
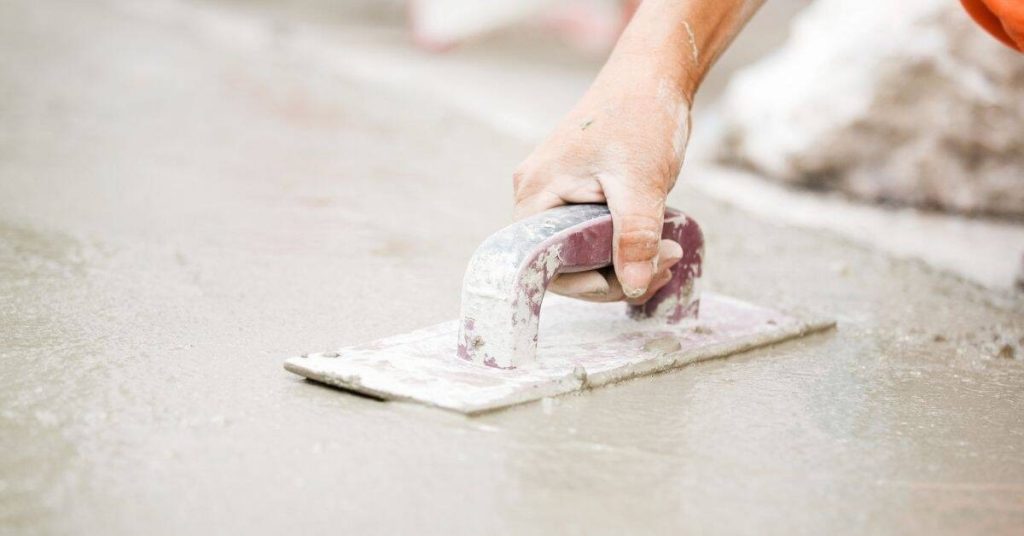
Introduction
Hand trowel sizing means choosing the blade width and handle style to match the task, material, and user comfort, so beginners know what to buy first and what to skip. Start with a basic mid-size trowel suitable for both concrete and plaster, and avoid buying rare or specialty shapes until you’ve used a standard tool enough to decide what you like. Check the manufacturer instructions or label for sizing guidance and test a couple of comfortable options before committing.
Keep blades clean, dry, and free of rust, and inspect for nicks or cracks before use to avoid transferring imperfections to the work surface. Learn basic handling techniques and switch to the appropriate material if frequent moisture or corrosion is a factor, while not overreaching into tools with unnecessary features. Regular maintenance and sensible use will help you get smoother surfaces and longer tool life without overbuying on day one.
Key takeaways
- Match trowel size to task: smaller for plaster, larger for concrete edgers.
- Choose steel or aluminum based on durability, weight, and corrosion resistance.
- Start with a basic curved and a wide margin trowel in kit.
- Protect hands and wrists with proper grip, avoid overloading for control.
- Read labels for size ranges and handle ergonomics before purchase.
- Maintain blades dry, clean, and lightly oiled to extend life.
Table of Contents
- Introduction
- Key takeaways
- Quick Primer on Hand Trowel Types and How Size Matters
- Matching Trowel Sizes to Specific Tasks (Concrete Vs. Plaster)
- What Beginners Should Buy First — a Practical Starter Kit
- Tools and Materials Checklist Before You Buy
- What to Skip (and Common Beginner Buying Mistakes)
- Materials, Build Quality, and Ergonomics — What to Look for
- How to Read Trowel Size Labels and Choose Safe Size Ranges
- Care, Maintenance, Troubleshooting, and When to Replace a Trowel
- Conclusion
- FAQ
Quick Primer on Hand Trowel Types and How Size Matters
Different hand trowels serve distinct tasks in concrete and plaster work. Finishing or float trowels smooth surfaces, margin trowels reach edges and corners, pointing trowels handle precise joints, and plaster or steel trowels suit feathering and fine detail. Blade shapes and stiffness guide how a tool behaves during work.
Blade size, shape, and core material influence finish quality, set time, and efficiency for concrete versus plaster. Smaller blades are handy for patches and detail work, while larger blades speed up flat work when space allows. Steel cores offer rigidity, while magnesium or aluminum cores reduce weight for longer sessions, but check manufacturer labels for specifics on each model.
Common Trowel Types and Their Uses
Hand trowels vary in size and design, each suited to specific tasks. Understanding these differences helps you choose the right tool for your project.
Small Trowels (6-12 inches): Ideal for detail work and small patches. Their smaller size allows for precise application and control. Steel cores provide stiffness, making them suitable for tougher substrates or when a firmer finish is required.
Medium Trowels (14-20 inches): Perfect for general finishing work on medium-sized areas. These trowels balance strength and weight, thanks to aluminum or magnesium cores. They’re versatile, handling both broad strokes and finer details.
On-site, ensure the trowel’s blade is flexible enough for the substrate but stiff enough to achieve the desired finish. An experienced installer typically checks blade size, material, and shape against the job’s requirements before starting work.
How Blade Size Influences Speed and Finish
The size of your trowel’s blade significantly impacts both the speed at which you work and the quality of your finish. Larger blades cover more area with each stroke, allowing for quicker application but potentially sacrificing control.
Smaller blades offer greater precision and control, enabling better edge definition and allowing you to work on details or small areas more effectively. However, they require more strokes to cover the same surface area, which can slow down your progress.
Before starting, ensure the chosen blade’s dimensions fit the area to be worked on without causing undue stress or leaving gaps. Consider the substrate type, desired finish, and edge requirements when selecting a trowel size for optimal results.
When stiffness and bevel matter
The stiffness of a hand trowel’s blade significantly impacts your work. For concrete, stiffer blades are ideal as they provide better support and prevent bending under pressure.
To check, simply try to flex the blade. If it feels rigid, it’s suitable for concrete. For plaster or fine details, a more flexible blade is needed to avoid damaging the surface. It should bend slightly when you apply pressure.
The bevel of the trowel edge also plays a crucial role. A square-edged trowel (no bevel) is best for spreading and leveling materials, while a beveled edge (angled) is better for smoothing and feathering.
Regular maintenance, including cleaning and occasional sharpening, ensures your trowel’s blade remains in optimal condition. Neglecting this can lead to reduced lifespan and performance.
Matching Trowel Sizes to Specific Tasks (Concrete Vs. Plaster)
Begin with a core set that covers common tasks: small finishing tools for plaster detail, medium finishing or smoothing tools for concrete, and longer screeding tools for slabs. Blade curvature and stiffness matter for how evenly you release material and control edges. Pairing the right size with the job helps reduce run marks and feathering errors.
Concrete needs stiffer blades and wider widths for flatter surfaces, while plaster benefits from softer blades and longer edges for feathering joints. Practical pairings to consider include a long straight-edge for initial screed work, a mid-sized finishing trowel for smoothing, and a small corner tool for edges and joints. Remember to assess project scale before buying to avoid oversized tools.
Concrete Tasks: Screeding, Floating, Finishing
For efficient concrete surface preparation and finishing, select trowel sizes and blade types that balance speed with a smooth finish. Blade width and stiffness are crucial for both slab and patch work.
Large area, flat surfaces, such as slabs, require long screeding trowels or straight-edge trowels (12–36 inches) for initial leveling. These tools help achieve a uniform surface quickly.
Medium-sized areas need 8–14 inch finishing/smoothing trowels to remove imperfections and ensure a smooth finish. These sizes offer better control and maneuverability than larger blades.
Avoid using oversized blades that are difficult to control or underpowered blades that can’t handle the task. Always verify blade size and rigidity match your specific requirements for optimal results.
Plaster and drywall applications (skim coats, bull floats)
Plaster work demands different blade widths and softer, finer finishes than concrete. To achieve smooth, fine finishes in plaster and drywall work, select trowels with dimensions and material suited to the task at hand.
Thin skim coats or floating require 6–12 inch plaster trowels with flexible blades and soft edges. These features enable smooth, fine finishes without damaging the surface.
Concrete finishing trowels should not be used for plaster work due to their stiffer blades and larger widths, which can lead to poor results and increased effort.
Always ensure blade dimensions and material suit your specific needs to maintain control and produce high-quality outcomes.
Detail Work: Edges and Tight Spots
For corners, joints, and hard-to-reach areas, narrow margin and pointing trowels are essential for efficient work. Assess the space requirements and choose a suitable blade size and shape to maintain control and precision.
Corners or tight spaces require narrow margin trowels (4–6 inches) or pointing trowels. These tools enable precise work in confined areas without damaging surrounding surfaces.
Avoid using oversized blades that cannot fit into the space or underpowered blades that lack control, as they can lead to poor results and increased effort.
Blade width, shape, and stiffness are crucial factors when working in tight spots. Always verify these aspects match your specific requirements for optimal performance.
What Beginners Should Buy First — a Practical Starter Kit
A practical starter kit aims to cover most common concrete and plaster tasks with a small investment. Start with one versatile all-purpose trowel as the anchor, then add one specialized option for edges or feathering. This approach minimizes decision fatigue and keeps costs reasonable.
Link each tool to typical beginner projects like patching, smoothing, floating, and edging. Decide whether a single versatile size suffices or if a second size or specialty tool enhances the kit’s usefulness. Focus on blade material, tang construction, handle comfort, and maintenance needs when selecting the first tool and any add-ons.
Core pick: a versatile finishing trowel
As a beginner, your first purchase should be a single, all-purpose trowel that covers most common tasks in both concrete and plaster work. This versatile tool will help you minimize cost and decision fatigue while still tackling a wide range of projects.
The ideal size for this all-rounder is between 8″ to 10″. This range offers a balance between speed, which larger trowels provide, and control, which smaller trowels offer. A smooth, beveled edge is also crucial for easy finish work on both concrete and plaster surfaces.
Starting with this versatile size first allows you to build your skills and toolkit gradually. It prevents you from buying tools that are too small (which can slow down your work) or too large (which can compromise control, especially in tight spaces).
Secondary picks: margin/pointing and a small float or plaster trowel
While a versatile finishing trowel is essential, some tasks require specialized tools to ensure precision and efficiency. For edges, repairs, and tight spaces, consider adding a margin trowel and a small float or plaster trowel to your kit.
A margin trowel, typically 3″ to 4″ in size with a pointed tip, is perfect for corner work, pointing, and small repairs. Its smaller size and pointed tip allow for better control and maneuverability in tight spaces.
A small float or plaster trowel, usually between 6″ to 8″ in size, is flexible and ideal for smoothing skim coats of plaster or joint compound. It’s also useful for applying these compounds in tight spots where a larger trowel might be unwieldy.
Optional but useful: larger float or screed tool for bigger concrete jobs
As your skills and project scope grow, you may find that a larger trowel is necessary to tackle bigger concrete tasks efficiently. Before purchasing, consider whether the tool will see frequent enough use to justify the investment.
- Large Float (12″-14″): Ideal for large-scale floating and finishing on concrete surfaces. Its size allows for faster coverage but requires more space to maneuver.
- Screed Tool (16″-18″): Essential for screeding large concrete slabs, ensuring a level surface. It’s heavier and stiffer than floats, providing the necessary weight and stability for this task.
- Power Trowel: For very large surfaces or high-quality finishes, consider renting a power trowel. These machines provide consistent, professional results but are expensive to purchase and maintain.
Tools and Materials Checklist Before You Buy
Start with core trowel types and understand when to use them: steel or magnesium straight trowels for finish, finishing trowels for smoothing, and margin trowels for corners. Blade width influences control on small patches versus larger areas.
Include complementary tools such as floats, a hawk, screed, and edging tools in sizes suited to typical small projects and larger pours. Also plan for PPE, ventilation considerations, and project-specific consumables to avoid gaps before starting work.
Essential Complementary Tools
In addition to trowels, several other tools are essential for a clean and efficient job. Here’s what beginners should consider:
- Float (Aluminum or Wood): Smooths and evens out surfaces. Aluminum is lighter and more durable; wood provides a softer touch for delicate finishes.
- Hawk: Holds and transports mortar or plaster, allowing easy application with trowels.
- Screed: Levels and smooths concrete surfaces. Choose one that matches your pour size to ensure even results.
- Edging Tool (Margin Trowel): Finishes edges and corners, providing a clean, professional look.
- Large Float or Screed (Optional/Rentable): For larger pours, these tools increase coverage and speed. Consider renting for occasional use to save on costs.
Personal Protective Equipment and Workspace Setup
Protect yourself and maintain a safe workspace with the following gear:
- Safety Glasses: Protect eyes from debris and splashes.
- Breathable Gloves: Shield hands while maintaining dexterity. Choose gloves that fit well to prevent slipping.
- Dust Mask or Respirator: Protect against harmful dust particles, especially when working with plaster or cement. A respirator offers better protection for prolonged exposure.
- Knee Pads: Provide comfort and protection during extended periods of kneeling.
- Closed-Toe Shoes: Protect feet from falling objects and provide traction on wet surfaces. Consider waterproof boots for added protection.
- Ventilation (Optional): Use a ventilation system or open windows to maintain a well-ventilated workspace, reducing the risk of dust-related health issues.
What to Check on Product Listings and Packaging
Before purchasing, review these factors to ensure you’re getting the right tools for your project:
- Blade Dimensions: Verify blade size matches your task – larger blades cover more area but may lack control in tight spots.
- Material (Trowels): Steel is durable and affordable; magnesium offers lighter weight and better balance. For floats, aluminum provides durability while wood offers a softer touch.
- Warranty: Check the warranty period to ensure you’re covered in case of defects or damage under normal use.
- Intended Use Notes: Ensure the tool is suitable for your specific task – concrete, plaster, or other materials.
- Blade Stiffness (Trowels): Stiffer blades provide better control but may require more skill. Softer blades are easier to handle but offer less precision.
- Bevel Angle (Trowels): Different bevel angles serve various purposes – check which one suits your needs best.
- Tool Weight: Consider the tool’s weight, especially for extended use. Lighter tools may reduce fatigue but could lack durability.
- User Reviews: Read user reviews to gauge product quality and performance in real-world scenarios.
Quick rule: Always review product specifications and user reviews before making a purchase to ensure you’re getting the right tools for your project.
What to Skip (and Common Beginner Buying Mistakes)
High-cost specialty trowels and premium accessories can be tempting but may not pay off for beginners. These options often come with a steeper learning curve or restricted use in small projects. Consider whether a simpler tool can perform the job with less effort and cost.
Impulse buys like designer handles or extra-large blades tend to add little value for most early projects. Evaluate cost-per-use and whether a multipurpose tool can cover multiple tasks. A clear decision framework helps prevent overbuying and guides practical upgrades later.
Overly specialized/large trowels for small projects
Beginners often feel pressured to buy large or highly specialized trowels, but these tools can be inefficient and unnecessary for small-to-medium projects. Very large trowels require more space and material, leading to waste and inefficiency.
For example, a 14-inch trowel might seem useful, but it’s overkill for applying plaster on a typical wall or finishing a small concrete slab. It’s like using a sledgehammer to drive a nail – it gets the job done, but with unnecessary effort and potential damage.
Instead of buying these tools outright, consider renting or borrowing them when you have a specific need. This way, you only pay for their use when required, saving space and money in the long run.
Trowel Quality: Budget vs Mid-Range
While budget trowels may seem appealing due to their low cost, they often lack durability and can warp or rust quickly, leading to frequent replacements. Inferior materials may also impact your work, resulting in uneven surfaces or poor finish.
For example, a $10 trowel might initially appear as a bargain, but if it needs replacing every few months, investing in a mid-range option could be more cost-effective in the long run.
Mid-range trowels typically offer superior materials and construction, providing better performance and longevity. They may have a higher upfront cost, but they often pay for themselves through reduced replacement costs over time. Always inspect the materials used, construction quality, and warranties before making a purchase.
Skipping ergonomics or wrong handle types
Some beginners prioritize price over comfort, leading to trowels with poor handles that cause discomfort and fatigue. Uncomfortable tools can also lead to reduced control and precision, affecting the quality of your work.
For example, a trowel with a handle that’s too long or short for your hand size can cause strain and reduce your ability to apply even pressure, resulting in an uneven finish.
Before purchasing, always test handles for comfort and grip. If a trowel feels uncomfortable, consider alternative handle types or sizes. Some trowels come with adjustable handles or offer different sizes to accommodate various hand sizes and preferences. Prioritizing ergonomics ensures better control, reduced fatigue, and ultimately, higher-quality work.
Materials, Build Quality, and Ergonomics — What to Look for
Key choices for a beginner are blade material, finish, and edge geometry, along with overall size, weight, and how the handle fits your hand. Stainless blades offer corrosion resistance, while carbon or tempered steel can hold an edge well but may require more maintenance; consider which medium you’ll work with most and check manufacturer specs and warranties.
Equally important are finish options, bevel, and how the blade attaches to the handle, since these affect concrete smear, cleaning, and durability under vibration. Look for a sturdy construction with a reliable tang, screws or rivets, and a solid ferrule or bolster, and test weight and grip with gloves to ensure comfort during long sessions.
Blade Material and Finish Explained
The blade’s material and finish significantly impact the trowel’s durability, performance, and maintenance needs. Here are key aspects to consider:
- Stainless Steel: Non-corrosive and easy to maintain, stainless steel is suitable for both concrete and plaster work. However, it may not hold an edge as well as carbon or tempered steel.
- Carbon/Tempered Steel: Durable and holds edges well, these steels are ideal for concrete work due to their edge retention. They require regular maintenance to prevent rusting.
- Blade Finish – Polished: Provides a smooth surface that reduces concrete smear but may show scratches over time.
- Blade Finish – Satin: Offers a balance between smoothness and durability, satin-finished blades are easy to clean and maintain.
- Blade Finish – Coated: A coated blade provides extra protection against corrosion but may affect edge retention. It’s beneficial for concrete work in harsh environments.
Handle Types and Grip Comfort
The handle’s material, shape, and texture greatly influence control, fatigue reduction, and long-term use. Here are common handle types:
Wooden Handles offer a traditional feel but can be slippery when wet. They are lightweight and comfortable for short sessions.
Plastic Handles are durable, lightweight, and affordable. However, they may lack grip and comfort for extended use.
Rubberized Handles provide excellent grip and comfort, making them ideal for long sessions. They can be slightly heavier than other materials.
Construction Quality Signals to Trust
A trowel’s construction quality is crucial for durability under vibration and impact. Here are visual checks to ensure a reliable product:
Welds: Inspect welds for cracks or unevenness. Even, smooth welds indicate high-quality construction.
Bladeset: Check the bladeset for flatness and warping. A flat bladeset ensures even contact with the surface.
Rivets/Screws & Ferrule/Bolster: Ensure rivets or screws are tight, with no wobble, and the ferrule/bolster is securely attached with no gaps. This prevents premature failure under use.
How to Read Trowel Size Labels and Choose Safe Size Ranges
Manufacturers label trowels by blade width, length, and overall size. Understanding what each dimension means helps you match tools to concrete versus plaster work. Verify these specs on the label or product data sheet before buying.
Note the difference between metric and imperial labeling and translate between systems if needed. Keep quick reference ranges in mind for small patches, medium finishing, and large slabs, and compare sizes across brands for reliable performance.
Trowel Size Selection Guide
This guide helps you understand trowel sizes and choose safely for your tasks.
- Wear appropriate personal protective equipment (PPE) and prepare your workspace before starting any task.
- Assess the type of work: small patches, medium finishing, or large slabs/veneer. This will help determine the suitable trowel width.
- Choose a trowel with an appropriate blade width:
- For small patches (4–6 inches), consider trowels around 4–6 inches wide.
- For medium finishing (8–10 inches), consider trowels around 8–10 inches wide.
- For large slabs or veneer work (12–14 inches), consider trowels around 12–14 inches wide.
- Verify the specific brand’s size and unit system on their website for accuracy.
- Confirm the listed size matches your selected range and is suitable for your task.
- Review manufacturer’s care and use instructions to maintain tool longevity and safety.
Understanding Blade Dimensions and Units
Manufacturers identify trowels using blade width, length, and overall size for accurate comparison.
Blade width influences the area covered in a single pass, crucial for task suitability. Wider blades excel on larger areas but may lack control in smaller spaces.
Blade length affects maneuverability and precision. Longer blades offer more control but can be challenging in tight spaces.
Overall size includes blade dimensions, handle length, and material, indicating tool weight and balance for user comfort.
Trowels are labeled using metric (mm) or imperial (inches) units. Use a conversion chart to quickly convert between units; 1 inch is approximately equal to 25.4 mm.
Recommended Trowel Sizes for Beginners
Starting with practical, conservative trowel sizes helps build skills and ensures safety. Here are recommended ranges for common tasks:
For those new to trowel work, begin with small trowels suitable for small patches or repairs. These typically have blade widths ranging from 4 to 6 inches (102 mm to 152 mm).
As your skills develop, progress to medium-sized trowels ideal for finishing work. Trowels in this range usually have blade widths between 8 and 10 inches (203 mm to 254 mm).
Once comfortable with basic techniques, gradually incorporate large trowels for tasks like laying large slabs or veneer. These typically have blade widths ranging from 12 to 14 inches (305 mm to 356 mm). Always check product pages for exact dimensions before purchasing.
When to size up or down for specific materials or accessibility
Material choices and workspace constraints can impact trowel selection. Consider the following factors:
- Mix consistency: Thinner mixes may require smaller, less aggressive tools to avoid overworking the material.
- Accessibility: Tight corners or narrow spaces call for smaller tools with better maneuverability to prevent damage and injury.
- Required finish: Some finishes demand more precision, which might necessitate a larger tool for better control.
- Workspace constraints: Larger workspaces may accommodate bigger tools, while smaller spaces require compact ones.
Always review manufacturer’s recommendations for specific materials or applications. Using the wrong size trowel can lead to cracking, staining, weak bonds, and other issues.
Care, Maintenance, Troubleshooting, and When to Replace a Trowel
Begin with a clear plan for care, maintenance, troubleshooting, and knowing when a trowel has reached its end of life. This helps beginners stay productive and safe. Simple routines extend tool life and performance.
Clean residue after each use and dry thoroughly to reduce rust. Store blades with edge protection and away from moisture. Learn basic sharpening or flattening methods and how to spot damage that signals replacement.
Daily cleaning and short-term care
After each use, clean your hand trowel thoroughly to prevent concrete residue buildup and corrosion. Here’s a simple process:
1. Remove any loose debris using a wire brush or scraper.
2. Rinse the trowel with clean water.
3. Dry it completely, ensuring no moisture remains that could cause rust.
4. Apply a light coat of oil or wax to protect the blade’s surface and inhibit corrosion. Repeat this process after every project for optimal care.
Long-term storage and minor repairs
Maintaining your hand trowel’s condition over time involves proper storage and addressing minor issues promptly. Here are some guidelines:
1. Store trowels in a cool, dry place away from extreme temperatures to prevent warping or damage.
2. Keep them off the ground and avoid stacking heavy objects on top to maintain their shape.
3. Periodically check for loose handles or screws. Tighten any that are insecure to prevent further damage.
4. If a blade becomes warped, straighten it gently using a flat surface and even pressure. Do not attempt to bend it back into shape forcefully.
Visual checkpoints and performance signs to replace
Regularly inspect your hand trowel for signs of wear or damage that may indicate it’s time for replacement. Use this checklist:
- Edge chips: Check the blade’s edge for any missing pieces, which can compromise its performance and safety.
- Warping: Inspect the blade for any bending or twisting out of shape, which can affect your work’s quality.
- Cracks: Look for hairline fractures on the blade, which could worsen over time and lead to breakage.
- Major pitting: Check for deep pits in the blade’s surface, usually caused by corrosion or improper cleaning.
- Persistent rust: Inspect for recurring rust spots, even after attempts at removal and prevention.
- Significant bending: Check if the blade has become noticeably bent or misshapen due to heavy use or misuse.
- Dull edge beyond restoration: Test the blade’s sharpness. If it cannot be sharpened effectively, consider replacement.
- Missing bevel: Ensure the blade’s beveled edge is intact and not chipped or missing.
Quick rule: If you notice any of these issues, compare new vs. used performance before purchasing a replacement to ensure you’re getting a quality tool.
Conclusion
Getting the right starter trowel setup is a practical investment in safety, durability, and a clean finish. Start with a comfortable handle, a blade labeled for the tasks you will tackle, and a small test area to confirm balance and control before you work on any larger project.
First, confirm your kit and the labels align with concrete or plaster work, check for a solid, well-balanced blade, and inspect for any nicks or loose parts. Then test in a small area to verify control, ease of cleaning, and how the edge behaves against your material. Ensure you have a basic maintenance plan: wipe clean, dry thoroughly, and store in a dry place, with a simple routine for checking the edge and screws or rivets before each use. Always follow the manufacturer instructions and local rules for tool use and safety.
Common mistakes to avoid include buying the wrong size or type for the job, skipping inspection of the blade and handle, and neglecting routine care that leads to rust or loose parts. Practice safe handling by wearing eye protection when mixing or applying material, keeping fingers clear of edges, and testing on a noncritical area first to prevent irreversible damage.
If a project requires unfamiliar materials, unusual access, or you notice persistent blade instability or cracking, it is reasonable to pause and seek professional guidance. With careful selection, a simple care routine, and small-scale testing, you can build confidence and achieve reliable results on your own. Stay steady, plan your steps, and progress one task at a time.
FAQ
How should hand trowel sizes be chosen for different concrete and plaster tasks?
Size should correspond to the work area and the control needed. Larger trowels cover more area on flat surfaces, while smaller trowels offer better precision in tight spots. Always check the manufacturer’s size ranges and your project type before buying.
What are the main types of hand trowel materials, and how do they affect performance?
Common options include steel and aluminum blades. Steel blades are tougher and hold edge longer; aluminum blades are lighter and easier to maneuver. Verify with the label or datasheet for intended use and durability guidance.
What maintenance steps help extend the life of a hand trowel?
Clean off concrete or plaster after use and dry fully to prevent rust. Lightly oil or wax moving parts if applicable and store in a dry place. Follow manufacturer instructions for any specific care recommendations.
What are best practices for using hand trowels in concrete work to avoid common issues?
Use the correct trowel size for the task and maintain a consistent angle to avoid gouging. Work in manageable passes and keep the blade clean to prevent bonding. For safety, handle the tool with care and inspect the blade and handle for damage before use.