
Introduction
Full-frame replacement means replacing the entire window and its frame, while an insert window is installed into the existing frame. For a DIY project, choose full-frame when the current frame is damaged or you want to redo the rough opening, and choose insert when the frame is solid and you want a quicker install. Think about room needs and how much work you’re willing to take on.
Energy efficiency and fit depend on proper installation and sealant details, so check product labels and manufacturer instructions. Cost effectiveness varies by opening size and existing condition, so consider labor time and material waste. Always verify local rules and property requirements before starting.
Key takeaways
- Insert replacements keep current trim and siding intact, simpler install in many rooms.
- Full-frame replacement removes old frame, reveals rough openings; requires more prep.
- Energy performance depends on retrofit fit; insert can retain existing glazing seals.
- Budgeting by room favors inserts for minor upgrades; full-frames for damaged openings.
- Safety: unplug power, protect framing, and use proper PPE during removal.
- Historic homes may require trim and exterior details preserved during replacements.
Table of Contents
- Introduction
- Key takeaways
- What Is Full‑frame Window Replacement?
- What Is Insert (Pocket) Window Replacement?
- Energy Efficiency and Performance Comparison
- Cost Comparison and Budgeting by Room/Project
- When to Choose Full‑frame Vs Insert — Decision Guide by Condition and Room
- Installation: DIY Vs Professional — Risks and Safety Considerations
- Impact on Exterior Trim, Interior Finish, and Historic Homes
- Long‑term Costs, Maintenance, and Warranty Considerations
- Conclusion
- FAQ
What Is Full‑frame Window Replacement?
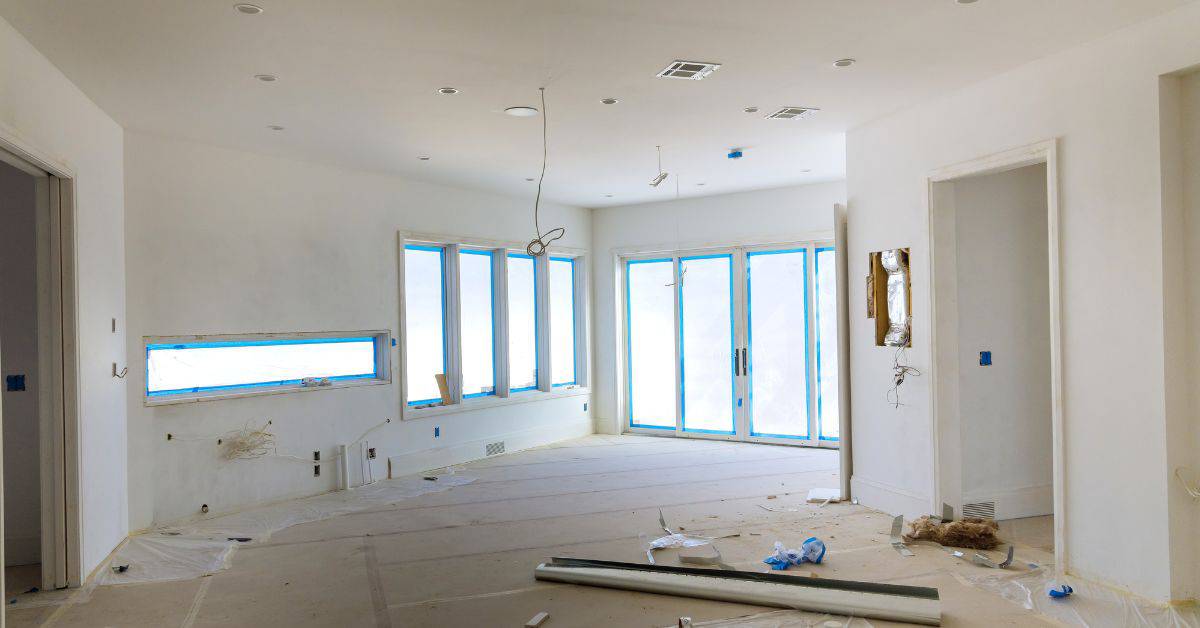
Full‑frame replacement means taking out the entire window unit, including the frame, sash, and typically exterior trim, down to the studs. This creates a new rough opening with fresh headers and jambs as needed. You’ll end up with a rebuilt opening that is ready for a new window unit and proper flashing.
The scope includes reinforcing the rough opening, replacing the sill and head jambs, and integrating with existing insulation and flashing details. This method changes the opening size and affects exterior trim, siding, and curb appeal. Use it when rot, structural concerns, or extensive trim damage justify rebuilding the opening instead of swapping only the sash.
How full-frame installation works step-by-step
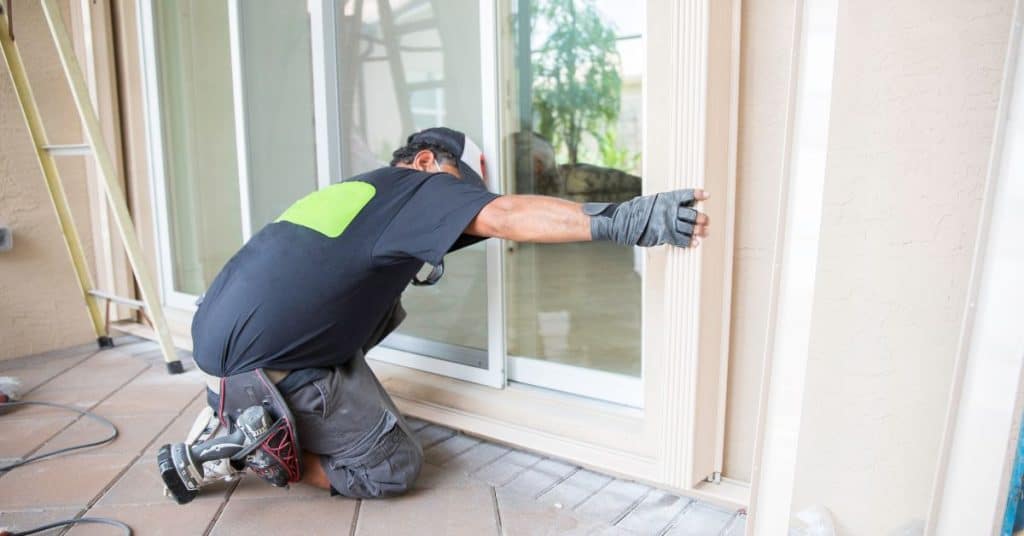
Full-frame window replacement starts by removing the old window, frame, and trim down to the studs. This creates a new rough opening.
Reinforce the rough opening with blocking or headers as needed. Replace any damaged or rotten sill and jambs.
Install the new full-frame unit, ensuring it’s level and plumb. Flashing goes on next to prevent water intrusion. Insulate around the window and use shims to ensure a tight fit. Exterior trim completes the job.
Pros and cons of full-frame replacements
Full-frame replacement offers several benefits but also comes with drawbacks.
Pros
- Better long-term performance due to replacing all components.
- Fixes extensive frame rot or structural issues.
- Allows for design flexibility in window style and size.
- Improves energy efficiency with new insulation and weatherstripping.
Cons
- Higher cost due to replacing more parts.
- More time-consuming process compared to insert replacement.
- Increased disruption during installation, especially if you’re living in the home.
- May require additional work on exterior trim, siding, or curb appeal.
Full-frame replacement makes sense when there’s significant damage, air leakage, or you want to change window size/style.
What Is Insert (Pocket) Window Replacement?
Insert (pocket) replacement leaves the existing frame in place and swaps only the sash units and hardware. The new sash fits inside the current jambs, preserving much of the surrounding wall structure. This method is commonly called insert, pocket, or retrofit replacement.
Consider how the new sash interacts with drywall, exterior trim, flashing, and exterior cladding. It’s important to verify compatibility with the existing frame and to understand how trim or brickmould may need adjustments. Use this option when the frame is sound and you want faster, lower‑cost installation.
How insert installation works step-by-step
Insert window replacement is a straightforward process that leaves your existing frame intact. Here’s how:
Step 1: Remove interior stops – these are the small pieces of wood or plastic that hold your old sash in place.
Step 2: Insert your new unit – slide it into the existing frame, ensuring it fits snugly and level. The new sash should rest on the bottom stop.
Step 3: Seal and trim reinstallation – apply caulk around the perimeter of the new sash, then reinstall any removed interior trim.
Pros and cons of insert replacements
Insert window replacement offers several benefits but also has its limitations. Consider these:
Pros
- Lower cost – you only replace the sash, not the entire frame.
- Quicker installation – no need to remove and dispose of old frames.
- Less exterior disruption – keeps existing trim, brickmould, and cladding intact.
- Preserves interior finishes – no drywall repair needed.
Cons
- Dependent on frame condition – if your existing frame is damaged or inefficient, insert replacement won’t address that.
- Potential efficiency loss – unless your new sash has better insulation values than the old one, you might not see energy savings.
- Limited design options – you’re restricted to sash styles and sizes that fit your existing frame.
- Not suitable for all frames – certain materials or conditions may require full-frame replacement.
Insert window replacement makes the most sense when your existing frame is in good condition, and you want a quick, cost-effective update with minimal disruption to your home’s exterior and interior finishes.
Energy Efficiency and Performance Comparison
Compare the basics of energy performance for full‑frame versus insert, focusing on how the frame itself affects seals, insulation, and overall comfort. Real‑world results depend on proper installation and air sealing practices. Check manufacturer data sheets for performance values before deciding.
Frame condition and sealing matter as much as the window type. Gaps around the frame and thermal bridging can change efficiency, so plan for thorough sealing and flashing regardless of method. Inspect how interior finishes and exterior siding will be affected by each option.
When inserts match or fall short of full-frame efficiency
Insert windows can perform as well as full-frame replacements under certain conditions. If your existing frames are in good shape, an insert window can provide similar energy efficiency with less hassle and cost.
However, inserts won’t improve upon a poor frame’s performance. Warped or rotten frames will still leak air and let heat escape, no matter how well you seal the insert. In these cases, full-frame replacement is your best bet for improved efficiency.
Upgraded glass in an insert window can also boost its energy efficiency, sometimes even surpassing a standard full-frame option. But remember, it’s the whole system – frame, glass, and installation – that determines real-world performance.
Long-term performance and maintenance considerations
Maintenance plays a big role in long-term energy efficiency. Both full-frame and insert windows need regular checks for air leaks, caulking, and weatherstripping.
Seals don’t last forever. Even the best-caulked inserts or full-frames can start leaking after 5-10 years. Regular maintenance keeps your investment in energy efficiency paying off.
Future replacement is another factor. If you think you might sell your home or need to replace windows again soon, consider the long-term costs and benefits of each option. A full-frame replacement might be a better choice if you plan to stay put for decades.
Cost Comparison and Budgeting by Room/Project
Understand the main cost drivers: labor time, material costs, and finishing trims. Each method brings different expectations for structural work, insulation, and weatherproofing. Do not rely on rough guesses; gather local quotes with itemized line items for clarity.
Account for additional components like insulation, flashing, and potential exterior trim work. Use budgeting steps such as collecting multiple quotes and staging the project if needed. Compare total installed price against per‑unit costs to plan realistically.
Comparing total project costs (single window vs whole-house)
When replacing a single window, expect to pay more per unit than if you’re doing a whole-house replacement. This is due to economies of scale – the installer’s time and materials are spread over fewer windows.
For instance, let’s say your local quote for full-frame replacement is $600 per window. If you’re replacing just one window, that’s what you’ll pay. But if you’re doing ten windows, the cost might drop to around $500 each.
Tip: Consider the age and condition of your windows. If they’re all nearing end-of-life, it might be more cost-effective to replace them all at once.
Value impact and ROI by room type
The best window replacement method varies depending on the room. For high-visibility areas like kitchens, living rooms, or historic facades, full-frame replacements often provide better value. They allow for updated aesthetics, improved energy efficiency, and increased home value.
For utility rooms (like laundry rooms or basements) or second-floor windows that aren’t easily seen from the street, insert replacements might be sufficient. They’re cheaper and faster but may not offer the same long-term benefits as full-frame replacements.
Bathrooms: Require moisture-resistant materials. Full-frame replacement allows for better insulation and vapor barriers, making it a good choice despite the higher cost.
When to Choose Full‑frame Vs Insert — Decision Guide by Condition and Room
Base the choice on frame condition and structural concerns. Rot, corrosion, or compromised hardware often push you toward full‑frame. If the existing frame is solid and the goal is to update without major opening changes, insert may fit well.
Consider room function and exterior needs, plus historic or preservation considerations. Use quick checks for each option to guide a fast, practical decision in minutes. Think about cost, time, and long‑term maintenance as part of the flow.
Choose full-frame if…
Full-frame window replacement is your best bet when the existing frame shows signs of damage. Here’s what to look for:
Rot or water damage: If you spot rot, warping, or soft spots on the frame, it’s time for a full-frame replacement.
Structural changes: Planning to change the size or shape of your window opening? Full-frame replacement allows for this.
Exterior trim update: Want new exterior trim or siding? Full-frame replacement lets you update that too.
Choose insert if…
Insert window replacement is a great option when your existing frame is in good condition. Here’s when to choose it:
Good frame condition: If your frame is solid, with no signs of rot or damage, an insert window can save you money.
Limited budget: Insert windows are generally less expensive than full-frame replacements.
Minimal exterior change: Want to keep your existing trim and siding? An insert window fits right into your current opening.
Fast project: Insert window replacement is quicker, with less disruption to your home’s interior.
Installation: DIY Vs Professional — Risks and Safety Considerations
Identify which method is more DIY‑friendly and where a professional is wise. In general, insert can be more DIY‑accessible, while full‑frame often requires pro handling due to framing changes. Use quick heuristics to decide when to call in help.
List the skills, tools, and permits needed for each path, and note safety risks. Understand common pitfalls and how to avoid them with proper flashing, sealing, and measurement discipline. Have a readiness checklist ready before you start.
Tools, materials, and prep checklist
Before you start your DIY window replacement project, use this checklist to ensure you have everything needed for a successful install.
- Tape measure: Accurate measurement is crucial. Check it against known dimensions before starting.
- Level: Ensures windows are square and plumb during installation.
- Claw hammer or pry bar: Carefully removes old nails and trim.
- Utility knife: Cuts through caulk, sealant, and old glazing.
- Safety glasses: Protects eyes from debris during removal and installation.
- Work gloves: Prevents cuts and scrapes when handling materials.
- Drywall saw or jigsaw: Cuts through drywall if needed for full-frame replacement.
- Caulk gun: Applies sealant around new windows.
- Shims: Ensures window is level and plumb before securing.
- Screwdriver or drill: Secures new window in place.
Quick rule: Always double-check your measurements. A small error can lead to a big problem during installation.
Common installation mistakes to avoid
Even with the best intentions, DIY window replacement can go wrong. Here are some common mistakes and how to avoid them.
- Improper flashing: Without proper flashing, water can leak behind the window, leading to rot and mold. Always install flashing before setting the window in place.
- Inadequate shimming: Not using enough shims can cause the window to be out of square, leading to drafts or water intrusion. Use shims liberally and check for level frequently.
- Wrong unit size: Measure twice, cut once. Ensure your new window is the exact same size as the old one to avoid costly mistakes.
- Improper glazing: Using the wrong type of glazing or not applying it correctly can lead to air and water leaks. Follow manufacturer’s instructions for best results.
By avoiding these common pitfalls, you’ll ensure a successful DIY window replacement project.
Impact on Exterior Trim, Interior Finish, and Historic Homes
Examine how each method interacts with exterior siding and trim, including sightlines and curb appeal. Full‑frame can alter exterior appearances more than insert, depending on the framing changes and trim revisions. Plan for how this affects the overall look.
Inside, consider casing, drywall, and finish continuity. Gaps or re‑trim may be necessary with either method. Historic or character homes may require preserving original trim or following preservation guidelines, which can influence the choice.
Visual and curb-appeal considerations
Full-frame replacement allows for updated trim detailing, matching new windows’ aesthetics. It can boost resale appeal by creating a cohesive look. However, it may disrupt original sightlines and curb appeal in historic homes.
Insert replacements maintain existing trim and sightlines but might show gaps or mismatches if not done right. They’re less intrusive visually but could appear outdated next to new windows.
Choose full-frame for a clean, updated look. Choose inserts to preserve original aesthetics and trim details.
Working with preservation guidelines and permits
Before deciding, check local historic district rules. Some areas require specific window types or preservation of original features.
Contact your city’s permit office. They can guide you through the process and ensure compliance with local codes and standards.
Historic homes often need preservation permits. These ensure changes align with historic district guidelines. Always consult these rules before starting any work.
Long‑term Costs, Maintenance, and Warranty Considerations
Outline maintenance tasks typical for each method, such as gasket checks, track lubrication, and flashing inspections. Maintenance needs can differ based on how the window is installed. Factor in ongoing upkeep when weighing options.
Compare warranty structures and transferability, including what is covered for frames, sashes, hardware, and labor. Understand how installation type affects warranty scope and what to ask the installer about exterior trim and energy performance for lasting protection.
Expected maintenance for full-frame vs insert
Maintenance tasks differ between full-frame and insert window replacements. Here’s what to expect:
Full-Frame Replacements: These need less frequent maintenance due to their robust construction. Check gaskets annually, lubricate sash and track every 2-3 years, repaint or inspect flashing every 5-7 years, and maintain exterior trim as needed.
Insert Window Replacements: These require more regular upkeep due to their smaller size. Check gaskets bi-annually, lubricate sash and track annually, repaint or inspect flashing every 3-5 years, and maintain exterior trim regularly.
Questions to ask manufacturers and contractors about warranties
Before signing any agreement, ask these questions to understand your warranty coverage:
What’s covered? Ask about frames, sashes, hardware, and labor. Some warranties cover everything, others only specific parts.
How long does the warranty last? Warranty durations vary by manufacturer and installation type. Longer isn’t always better; understand what’s covered in the final years.
What aren’t you covered for? What exclusions apply? Some warranties exclude certain parts, labor, or issues caused by specific events (like storm damage).
Is the warranty transferable? If so, how? Ask who initiates transfer, what documentation is required, and if there’s proration or exclusions after ownership changes.
Conclusion
Choose the right approach by room and condition, and keep safety at the top; the right choice protects value, performance, and appearance without wasting time or money. Build the plan around each opening’s needs, not the dream you had at the start.
First, check the opening and wall structure, verify which option fits the rough opening, measure accurately, compare energy performance, and map a room‑by‑room budget. Decide DIY or professional after you’ve mapped risk and scope, gather the right tools, and run a small test in a low‑risk area before you commit to full replacement.
Common mistakes to avoid are forcing a full‑frame install where the wall is sound, underestimating structural or moisture issues, and rushing trim, flashing, or finish work. Safety rules are simple: shut off power and water as needed, use proper fall protection on ladders, test fit and dry‑fit before cutting or removing material, and avoid irreversible moves that damage framing or exterior siding. If you see rot, high moisture, or hidden rot behind finish, stop and reassess.
If you’re dealing with historic homes, exterior trim, or complex flashing, or if the opening affects structural load or attic and basement components, call a professional instead of pushing ahead. For most DIYs, aim for a clean, safe, and reversible approach, and stay focused on the long‑term performance and warranty implications. You’ve got this—plan carefully, work methodically, and finish with confidence.
FAQ
What is involved in a full-frame replacement installation, and how does the process differ from other methods?
A full-frame replacement means removing the entire window and the surrounding frame, then installing a new frame with the sash. You’ll likely need to repair or replace the interior trim and exterior flashing. Expect more carpentry work and potentially longer job time than inserts.
What is involved in an insert (pocket) window replacement, and how does the process differ from full-frame?
An insert replacement leaves the existing frame and exterior trim in place. The new window slides into the old frame and is fastened from inside. This method is generally quicker and less invasive but relies on a sound, intact frame and sill.
How do energy efficiency outcomes compare between full-frame and insert replacements?
Full-frame can remove degraded sills and frames that leak air or moisture, potentially improving performance. Inserts keep the original frame, so any existing drafts come from that frame and the sill area. Check the window’s U-factor, SHGC, and the surrounding frame condition to gauge actual gains.
What are the main cost considerations and financial trade-offs I should know?
Full-frame usually costs more due to extra materials and labor. Inserts cost less but depend on a solid existing frame. Get quotes that itemize frame work, trim, flashing, and any reframing you might need.