
Introduction
Form ties are the hardware that holds concrete forms in place while the concrete cures. Snap ties, loop ties, and threaded rods are common types you’ll see on a DIY job site. Each type has its own way of behaving during and after the pour, so know what you’re using before you start.
Each type has its uses, pros, and cons, so choose based on the task, ease of removal, and the finish you want. As a hands‑on rule, follow the product label and manufacturer instructions, and check local rules for form work and safe work practices. Practice good installation, keep ties aligned, avoid over-tightening, and watch for shifting forms.
Key takeaways
- Snap ties simplify setup in fast projects but require precise alignment first.
- Loop ties offer adjustable spacing for pour walls and form overlaps during curing.
- Threaded rod provides rigid tie points for high-load sections and reusability.
- Safety warning: wear eye protection and gloves when removing or stressing ties.
- Check local codes and manufacturer guidance before choosing tie type for project.
- Costs and availability vary; evaluate reuse potential, material durability, and project scope.
Table of Contents
- Introduction
- Key takeaways
- Quick Definitions: Snap Ties, Loop Ties, and Threaded Rod
- Installation Methods, Tools and Visual Checkpoints
- Material Composition and Standards Explained
- Strength Comparison and Durability Factors
- DIY Use Cases and Project Examples (Small to Large)
- Cost, Availability and Cost-Benefit Analysis
- Safety Guidelines, Common Mistakes and Maintenance
- Environmental Impact, Recycling and Disposal Best Practices
- Conclusion
- FAQ
Quick Definitions: Snap Ties, Loop Ties, and Threaded Rod
Snap ties are simple plastic or nylon connectors that snap into the form face and hold forms apart while concrete cures. Their primary job is quick, disposable spacing and resisting outward pressure from the poured concrete. Typical components include the tie body, a knob or head, and a washer or clip that locks into place.
Loop ties use a continuous loop or hinged loop that anchors into the form and provides a flexible, reusable connection point. Their main function is to maintain spacing while allowing some reusability for lighter projects. Common hardware includes the loop assembly, reinforcing washers, and an optional nut or spacer for alignment.
Snap ties — what they are
Snap ties are temporary fasteners used in formwork to hold the forms together until concrete is poured. They’re called “snap” because they break off after use, making them easy to remove once the concrete has set.
You’ll find snap ties commonly used in vertical formwork like walls and columns. They come in various sizes, so check your project plans or the product label to ensure you’ve got the right ones for your job.
Never use them horizontally as they won’t hold up under pressure. For horizontal forms, use loop ties instead (see our section on those).
Loop ties — what they are
Loop ties are those flexible, wire-like things you see in concrete forms. Unlike snap ties, they don’t break off when the form’s removed.
Continuous-loop or reusable loop ties are just like regular loop ties, but with a twist. They’ve got a little hook at one end that lets you pull them out after the concrete’s set. No need to cut ’em out.
Here’s where they differ from snap ties:
Snap ties break off when you strip the form, leaving a bit of wire in the concrete. Loop ties? They stay put until you decide it’s time to remove them. And those reusable ones? You can pull ’em out and use ’em again.
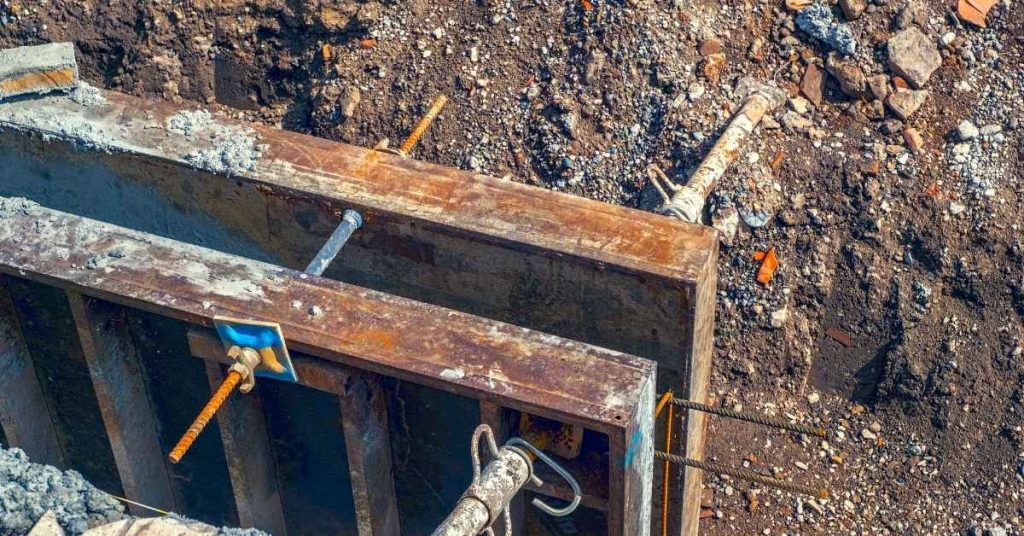
Threaded rod — what it is
Threaded rod is a heavy-duty alternative to snap ties and loop ties. It’s a steel bar with threads cut into its surface, allowing it to be connected with nuts and washers.
Unlike snap ties that just click together, threaded rods provide a more secure connection by letting you adjust the tension. This makes them ideal for reinforcing concrete forms where strength is crucial.
Check your form design and local building codes to ensure threaded rod is suitable for your project. You’ll need to decide on the size (usually 3/8″ to 1/2″) based on your form’s requirements.
Installation Methods, Tools and Visual Checkpoints
Start with a clean, aligned form face and plan your tie spacing before pouring. For snap ties, place each tie at the desired offset and ensure the knob seats firmly. Loop ties require securing the loop ends and checking that the loop remains centered as you go.
Tools you’ll likely use include measuring tape, a level, and a simple string line; keep spare ties handy for quick swaps. Visual checkpoints focus on consistent height, even embedment depth, and no visible gaps that could channel grout or cause leaks.
Installation steps for snap, loop, and threaded-rod ties
Use this checklist to ensure correct installation of each tie type before pouring concrete.
- Mark anchor points: Use form layout or string lines to mark where ties will go. Ensure they align with rebar placement.
- Snap ties: Insert through form boards, snap into place, and secure with a hammer if needed. Space them 16-24″ apart for wall forms, 12-18″ for slabs.
- Loop ties: Thread through form boards, twist to secure, and space similarly as snap ties. Ensure loops face outwards for easy removal.
- Threaded rod: Insert through form boards, secure with nuts on both sides, and tighten. Space 12-18″ apart for most pours.
- Check spacing: Use a measuring tape to ensure ties are evenly spaced along the form.
- Adjust tie height: Ensure ties are level with the top of the form and protrude enough (2-3″) to embed in concrete.
- Avoid excessive tension: Don’t over-tighten threaded rod or damage ties. Excessive tension can cause forms to bow or break.
- Remove damaged ties: Inspect all ties for damage before pouring. Replace any broken or bent ties.
- Cleanup: After pouring, remove ties as soon as concrete has set enough (usually 24-72 hours).
Quick rule: Always inspect all ties before pouring to ensure they’re secure and correctly placed.
Tools and materials checklist
Use this list to gather necessary tools and materials for installing concrete form ties.
- Hand tools: Hammer, adjustable wrench, tape measure, level, string line.
- Safety gear: Safety glasses, work gloves, ear protection (for power tools).
- Fasteners: Snap ties, loop ties, threaded rod, nuts, washers.
- Consumables: Concrete form release agent, tie removal lubricant.
- Power tools (optional): Impact wrench for tightening threaded rod, drill with screwdriver bit for adjusting snap ties.
- Specialty items: Tie spacers, form alignment guides, rebar chairs.
Quick rule: Always have extra fasteners on hand. It’s better to have too many than not enough.
Visual checkpoints and common QC failures
Use this checklist to inspect form ties before pouring concrete and identify potential issues.
- Alignment: Check that ties are straight and aligned with rebar. Misaligned ties can cause weak spots in the concrete.
- Protrusion: Ensure ties protrude enough (2-3″) to embed in concrete. Insufficient protrusion can lead to tie failure during removal.
- Nut tightness: Check that nuts on threaded rod are securely tightened. Loose nuts can cause forms to shift or collapse.
- Damaged coatings: Inspect ties for damaged protective coatings. Damaged coatings can lead to rusting and tie failure.
- Excessive gap: Check that there’s no excessive gap between form boards at tie locations. Large gaps can cause concrete to leak or forms to shift.
- Form rigidity: Gently push on the form at tie locations. If it feels weak, add more ties or support as needed.
- Clearance for rebar: Ensure ties are far enough from rebar to avoid interference during pouring and setting.
Quick rule: Regularly inspect form ties throughout the pour process. Concrete can set quickly, so it’s important to catch issues early.
Material Composition and Standards Explained
Snap ties and loop ties commonly use durable polymers like nylon or polypropylene, chosen for ease of removal and concrete compatibility. Threaded rods are typically metal, with coatings that resist corrosion and cement exposure. Material choice affects strength, creep, and how cleanly forms release after stripping.
Look for coatings or markings that indicate environment suitability and compliance signals from the supplier. When buying, confirm the tie type matches your form system and verify diameter and length suitability for your project context.
Common materials and coatings (steel grades, plastics, galvanizing)
Choosing the right material for your form ties is crucial. It affects strength, durability, and compatibility with concrete.
- Mild Steel: Cheap but prone to corrosion. Use in dry indoor conditions only. Look for ‘mild steel’ or ‘CS’ marking.
- Stainless Steel: More expensive, resistant to corrosion. Ideal for outdoor use and moist environments. Look for ‘SS304’ or ‘SS316’.
- Galvanized Steel: Mild steel with zinc coating for corrosion protection. Suitable for indoor/outdoor use. Check for ‘galv.’ or ‘G90/G120’ marking.
- Nylon 6/6: Strong, lightweight, resistant to chemicals and UV. Ideal for snap ties. Look for ‘NYLON 6/6’ or ‘PA66’.
- Polypropylene (PP): Lightweight, flexible, good chemical resistance. Suitable for loop ties. Check for ‘PP’ marking.
Material specs and standards to verify
Checking material specifications ensures you’re using safe, compatible form ties.
- Tensile Strength: Look for this rating (e.g., ‘min. 400 MPa’) to ensure tie can handle load.
- Corrosion Resistance: Check if it meets ASTM A696 or EN ISO 12944 standards for outdoor use.
- UV Stability: For plastic ties, check if they meet ASTM D4355 or EN ISO 4892 standards for UV resistance.
- Cement Compatibility: Ensure tie doesn’t react with cement, causing staining or weak bond. Check manufacturer’s data.
- Supplier Certifications: Look for ISO 9001 or other quality certifications to ensure consistent product.
Strength Comparison and Durability Factors
Basic mechanical properties such as tensile and shear resistance give you an idea of performance across tie types. Real-world failures often relate to improper embedment, misalignment, or corrosion and wear from repeated use. Installation habits and form stiffness play a big role in overall strength during the pour.
Durability considerations include resistance to moisture, chemical exposure, and how well the tie materials hold up under stripping. Use practical decision criteria to choose based on expected loads, reuse potential, and ease of installation.
Strength comparison overview
When it comes to strength, snap ties, loop ties, and threaded rods each have their own tendencies.
Snap ties excel in tensile strength, making them ideal for heavy loads and long spans. They can handle more pull before breaking compared to loops or threads.
Loop ties are good all-rounders. They’re not as strong as snaps under pure tension but perform well in shear resistance, which is crucial when forms are subjected to lateral forces.
Threaded rods, on the other hand, shine in high-shear applications like retaining walls or bridge decks. Their pull-out capacity is impressive, but they may not handle pure tension as well as snaps.
Durability, corrosion resistance and lifecycle factors
The lifespan of your form ties depends on their material, coating, environment, and exposure. Here’s what to consider:
Galvanized or epoxy-coated ties offer corrosion resistance, extending their service life in harsh environments. Stainless steel is another option but comes at a higher cost.
Exposure to chemicals, moisture, and repeated loads can wear down ties over time. In such cases, choose ties designed for heavy-duty or industrial use.
Maintenance and replacement are key factors too. If you’re planning to reuse your forms often, go for ties that hold up well under stripping – like snaps or high-quality loops. But if it’s a one-time project, cost-effective threads might be your best bet.
DIY Use Cases and Project Examples (Small to Large)
For small projects like planter boxes, snap ties are often convenient and quick to set. Loop ties can work well for lightweight garden walls where reusability matters. Threaded rod setups suit larger or more demanding forms where rigidity is critical.
Step-by-step examples help you compare options, with safety notes and tool lists to keep things straightforward. Quick visuals or diagrams can clarify how each tie type fits a single project scenario.
Small DIY projects (garden walls, footings, form repairs)
For quick and easy small pours, snap ties are your best bet. They’re cheap, simple to use, and perfect for light-duty tasks like garden walls or small footings.
Pro tip: Use them in pairs for added strength and stability.
Loop ties can also work here, but they might be overkill. Save them for when you need a bit more hold, like on form repairs.
Medium and large DIY projects (patio slabs, shed foundations, retaining walls)
When you’re pouring a patio slab or building a retaining wall, go for loop ties. They provide more tension resistance than snap ties and can be reused.
Pro tip: Use the right size and spacing to match your project’s load needs.
For heavy-duty jobs like shed foundations, consider threaded rod. It’s strong, versatile, and great for structural work.
Common industry applications to learn from
Professionals use snap ties in precast work, where easy removal is key. Loop ties are favored for commercial slabs due to their strength and reusability.
Pro tip: Learn from these applications to scale your DIY methods safely.
Threaded rod is a staple in residential foundations. It’s strong, adjustable, and can handle the heavy loads of a home’s weight.
Cost, Availability and Cost-Benefit Analysis
Costs vary by material and hardware complexity, along with any accessories needed for each tie type. Availability ranges from local suppliers to online options, and stock reliability can influence project timelines. Reusability affects the overall cost per use and long-term value.
Labor implications matter as well, since installation ease and required tools directly influence total expense. A practical framework helps you weigh project size, reuse potential, and risk tolerance to pick the best value option.
Cost differences and factors that influence price
The cost of form ties varies based on several factors. Let’s break it down.
Material: Stainless steel is pricier than galvanized steel due to its superior corrosion resistance. Plastic ties are the most affordable but have limited reusability.
Finish and Coating: Galvanizing adds cost, with hot-dip being cheaper than electroplating. Special coatings for harsh environments also increase price.
Reusability: Reusable ties like threaded rod or high-quality snap ties have a higher upfront cost but can be justified by their long lifespan and potential for reuse.
Cost-benefit by project size and reuse potential
The best value form tie depends on your project’s scale and how many times you’ll use them. Here’s a simple cost-benefit analysis:
Small projects (e.g., garden walls, footings): Go for affordable plastic ties if it’s a one-time job. For occasional reuse, consider budget-friendly galvanized steel snap ties.
Medium to large projects (e.g., patios, retaining walls): Invest in durable, reusable options like stainless steel or high-quality galvanized steel ties. They’ll save you money in the long run despite a higher upfront cost.
Reuse potential: If you plan to reuse ties for future projects, opt for more expensive but durable and reusable options. The initial investment will pay off over time.
Safety Guidelines, Common Mistakes and Maintenance
Always plan for proper PPE, site setup, and hazard awareness specific to form ties and concrete work. Follow safe workflows for placing, aligning, and tensioning to avoid distortion and pinch points. Removal should be timed with cure progress and performed with care to prevent form collapse.
Common DIY mistakes include misapplying tie types and skipping alignment checks. Maintain a simple inspection routine to catch corrosion or wear, and document replacements or upgrades after each project.
Safety guidelines and risk mitigation
Personal Protective Equipment (PPE): Always wear approved eye/face protection, gloves, hearing protection, and sturdy footwear when handling form ties. Steel-toed boots are a must.
Safe Handling: Be cautious with sharp edges on steel ties. Use appropriate tools to handle heavy pieces. Never carry or move ties under live power lines or near other hazards.
Load Limits and Engineering Consultation: Know the load limits of your chosen tie type. For complex structures, consult a structural engineer before installing formwork.
Common installation mistakes and how to avoid them
Here are some common DIY errors you should avoid when installing form ties:
- Incorrect Spacing: Not spacing ties properly can lead to weak points in your structure. Follow the manufacturer’s guidelines for optimal spacing.
- Improper Anchoring: Ensure ties are securely anchored at both ends. Loose anchors can cause formwork to shift or collapse during pouring.
- Damaged Ties: Check all ties before installation. Do not use damaged, bent, or rusted ties as they can fail under load.
- Mixing Tie Types: Using different tie types in the same formwork can lead to inconsistent strength and potential failure points.
- Skipping Alignment Checks: Ensure all ties are properly aligned before tensioning. Misaligned ties can cause form distortion or cracking.
Regularly inspect your work throughout the installation process to avoid these common mistakes.
Long-term maintenance and inspection checklist
Conduct this simple routine every six months or after major weather events to ensure your form ties remain in good condition:
- Corrosion Check: Inspect for signs of rust on steel ties. Galvanized ties should be checked for any damage to the zinc coating.
- Wear and Tear: Look for any wear, deformation, or damage on all tie components.
- Tension Check: Ensure all ties remain properly tensioned. Loose ties can lead to formwork failure.
- Support Structure Check: Inspect support structures (walers, shores) for any signs of distress or movement.
- Cleanliness Check: Remove any dirt, debris, or concrete residue that could accelerate corrosion or wear.
- Storage Check: When not in use, store ties in a dry place to prevent moisture-related damage.
- Record Keeping: Keep records of tie replacements and maintenance work done. This helps track performance and plan future upgrades.
Quick rule: If you find any damaged or worn components, replace them immediately to maintain the integrity of your formwork.
Environmental Impact, Recycling and Disposal Best Practices
Different tie materials carry varying environmental footprints and lifespans, which affects end-of-life decisions. Recycling options depend on material type and local facilities, so check what’s accepted in your area. Reuse strategies help stretch your supplies without compromising performance.
Dispose or segregate components responsibly, following local guidelines for concrete waste and metal or plastic streams. A practical disposal plan keeps the job site cleaner and supports sustainable home improvement practices.
Recyclability and environmental considerations by material
Material choices significantly impact your project’s environmental footprint. Here are key factors to consider:
- Plastic/Polymer Ties: Lightweight, low embodied energy. Check local recycling facilities for plastic acceptance.
- Metal Ties (Stainless Steel): Highly recyclable, long-lasting. Avoid galvanized ties due to hazardous coatings.
- Metal Ties (Galvanized): Recyclable, but coatings may pose disposal issues. Check local hazardous waste guidelines.
- Treated Components: May contain hazardous substances. Always check local regulations for safe disposal.
- Threaded Rod: Highly recyclable metal, but production has energy-intensive processes. Prefer recycled content if available.
Choosing lower-impact options and disposal best practices
Reduce waste by opting for reusable formwork systems. Buying recyclable materials also helps minimize environmental impact.
After project completion, follow these safe disposal steps:
1. Separate: Keep ties separate from concrete waste to facilitate recycling.
2. Clean: Remove any concrete residue before recycling or reusing.
3. Check local guidelines: Always follow your area’s specific recycling and hazardous waste disposal rules.
Conclusion
Pick the right tying method for the job, keep the load secure, and protect the project’s appearance by checking connections and finishes as you go. Your work should feel solid, predictable, and safe to everyone who uses the space.
Choose the method based on the expected load and project size, verify material standards and availability, gather the right tools, dry-fit or mock the setup, run a small test, then install with proper hardware and spacing, and finally inspect alignment and tightness with a clear visual checkpoint before calling it done.
Common mistakes to avoid are using the wrong tie for the load, skipping a test or small-area trial, and over-tightening or misaligning components. Always wear eye protection, secure the work area, and follow safety guidelines; never rush a critical connection or ignore damaged parts.
If the project involves uncertain loads, unusual materials, or signs of damage, it’s wise to call in a pro rather than push ahead. When you follow these steps, you’ll finish with a durable, safe result and the confidence to tackle the next DIY project. Stay careful, stay steady, and stay focused on the goal.
FAQ
What are snap ties, loop ties, and threaded rod, and how do they differ in DIY formwork?
Snap ties are quick-release ties that stay in the concrete when you remove the form. Loop ties are flexible ties that you loop through and then pull tight to hold forms. Threaded rod is a rigid rod used with nuts to clamp forms tightly. Each has a different ease of removal, strength, and how you control form alignment.
Which type of form tie should I use for small DIY projects vs. larger pours?
For small, simple forms, snap ties or loop ties are usually faster and easier. For larger, heavier forms where you need precise alignment and a stronger hold, threaded rod with nuts and washers is typically better. Check weight, form stiffness, and ease of removal before choosing.
What are the main advantages and disadvantages of each type?
Snap ties: fast, convenient, stay in place, but can show on the edge and may limit form removal options. Loop ties: flexible, forgiving, easy to adjust, but can loosen if not tightened correctly. Threaded rod: very strong and adjustable, but takes more time to install and remove, and you’ll need nuts, washers, and a proper plan for form removal.
What safety tips should I follow when installing or removing each type?
Wear eye protection and gloves. Keep forms square and level during tightening. Do not force removal or pry against rebar or edges. If in doubt, verify manufacturer instructions or local guidance for safe removal and disposal of form ties.