
Introduction
A patch that cures too fast is a concrete repair that dries or stiffens before you get a proper surface set, risking weak bonding. Keep the patch and surrounding surface moist with light, even misting and shade as long as the material remains workable. Don’t let it puddle or dry out too quickly, and always check the product label or instructions for re-wetting guidelines and timing.
If the patch has already cured too much, re-wetting alone may not save it—you may need to roughen the surface and re-apply fresh mix according to the product’s guidance. In moist or hot conditions, follow local rules and manufacturer instructions for curing and rework, and consider consulting the label before proceeding. When in doubt, inspect for surface bonding, consult guidelines, and plan a careful, hands-on redo rather than guessing.
Key takeaways
- Identify whether rapid curing affects surface integrity and bonding potential.
- Test moisture retention and hardness with gentle probing before re-wetting.
- Choose an approved re-wetting agent per label guidance and local rules.
- Do not re-wet if patch shows cracking, crumbling, or disintegration risk.
- Inspect for proper substrate adhesion and repair surface before applying any further mix.
- Document the failed patch and plan a longer cure strategy for future.
Table of Contents
- Introduction
- Key takeaways
- What “Cures Too Fast” Means and Why It Matters
- Common Causes of Overly Fast Cures
- Inspecting the Patch: Tests to See If It Can Be Saved
- Re-Wetting Rules: When to Attempt and How to Choose an Agent
- Signs the Patch Is Already Lost and Cannot Be Saved
- Prevention: How to Avoid Overly Rapid Cures in Future Repairs
- Tools, Materials Checklist and Material Specs Explained
- Visual Checkpoints and Troubleshooting Decision Flow
- Conclusion
- FAQ
What “Cures Too Fast” Means and Why It Matters
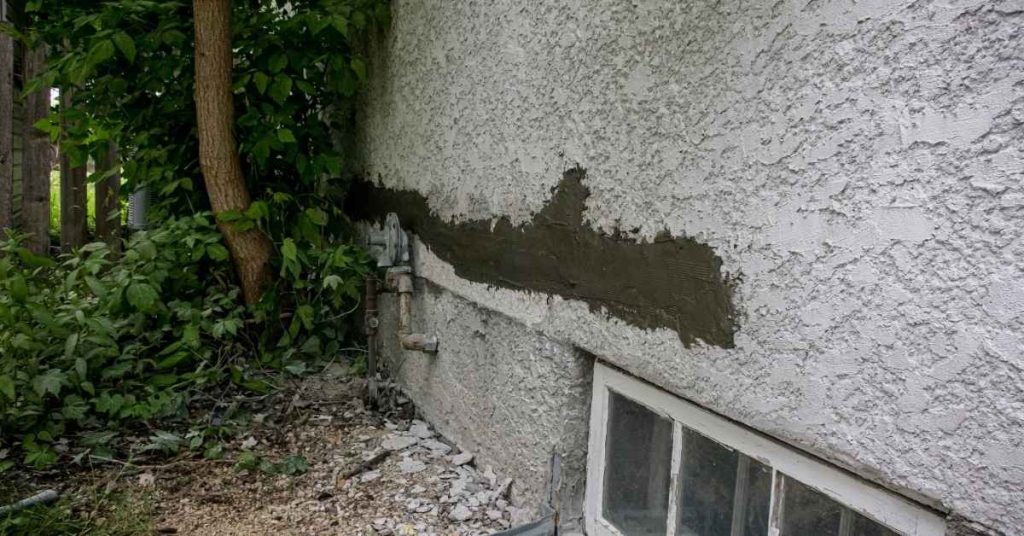
Accelerated curing shows up as a patch that hardens quicker than expected, often leading to a firm surface with little to no workable time. You might notice a rubbery skin, minute cracks, or a surface that sets while the interior remains soft.
The practical impact includes reduced bond strength, higher risk of surface defects, and possible gaps under load. Understanding this helps you decide if re-wetting or scrap is the safer route for the repair at hand, and it prompts you to check the product label or manufacturer instructions before taking action.
Chemical vs. Physical Curing Behavior
Curing too fast can happen due to two main reasons: chemical crosslinking and physical setting.
Chemical Crosslinking: This is when the patch compound reacts with moisture in the air or from mixing, forming strong bonds quickly. It’s hard to rework once it starts.
Physical Setting: This is when the patch compound solidifies due to temperature change or evaporation. It can often be reworked before it fully sets.
Practical Implications for Adhesion, Strength, and Appearance
When a patch cures too fast, you’ll see problems in these areas:
Adhesion: Fast curing can prevent the patch from bonding well with the existing surface. This means your repair could peel or flake off over time.
Strength: The patch might not reach its full strength potential if it cures too fast. This can lead to cracks or crumbling under stress.
Appearance: Fast curing can cause the patch to dry out quickly, leading to a rough, uneven finish. It may also shrink as it dries, causing cracks or gaps.
Common Causes of Overly Fast Cures
Material formulation and mix errors are frequent culprits, especially when a patch is mixed too rich or with incompatible components. Temperature and humidity can push a cure along faster than intended, even in small batches.
Airflow and surface contaminants also shorten workable time by drying the surface or introducing interference. When any of these conditions show up, inspect the batch label and material data sheets before adjusting your approach on the job.
Mix ratio, pot life, and batch handling
Incorrect mix ratios can speed up curing. Check your product labels for the right water-to-cement ratio – usually around 0.5 parts water to 1 part cement.
Large batches left open too long can also accelerate curing due to increased surface area exposure. Try to mix only what you need and keep it covered when not in use.
Pot life – how long a mixed batch stays usable – varies by product. Check the label for pot life guidelines. If it’s too short, you might be adding too much water or working in hot conditions.
Environmental factors: heat, humidity, and airflow
High temperatures speed up curing. If it’s too hot, consider working early or late in the day, or even waiting for cooler weather.
Humidity affects cure speed too. Low humidity can cause concrete to set too fast, while high humidity slows down setting time. Try to maintain a consistent humidity level on-site.
Strong airflow can also accelerate curing by drying out the surface too quickly. Keep your pours protected from strong winds until they’ve had a chance to set properly.
Inspecting the Patch: Tests to See If It Can Be Saved
Start with a visual check for surface gloss, hardness variations, or flaking edges that indicate premature setting. Gently press with a gloved finger to assess surface softness and tackiness.
Perform a light tap test to listen for a dull versus hollow sound, and try a small flexible pull to gauge cohesion. If the patch feels fully cured or cracks under light load, re-wetting is unlikely to restore performance; verify guidance on the product label or manufacturer instructions.
Visual and tactile checkpoints
Before diving into mechanical tests, use these quick visual and touch checks to gauge your patch’s cure stage.
- Tackiness: Press a clean trowel or gloved finger onto the surface. If it sticks, the patch is still workable.
- Gloss: Check for a matte finish. A glossy surface indicates fast curing and potential issues.
- Cracking: Fine cracks may appear if the patch cures too quickly. Inspect closely.
- Color change: Concrete darkens as it cures. Rapid darkening could signal a fast cure.
- Surface moisture: Feel for dampness. A dry surface means the patch has likely cured too much.
- Edges: Check edges for signs of rapid curing like discoloration or cracking.
- Texture: Run your hand over the surface. A rough, grainy feel might indicate fast curing.
- Temperature: Feel if the patch is warm to touch. Rapid curing can generate heat.
Quick rule: If you see or feel any of these signs, act fast. The patch may still be reworkable.
Simple adhesion and flexibility tests
These non-destructive tests help check your patch’s bond integrity and residual workability.
Light bending: Gently bend a small section of the patch. If it flexes without cracking, it might still be reworkable. Cracking indicates a fast cure.
Fingernail scrape: Try scraping the surface with your fingernail. If you can’t remove any material, the patch is likely too hard and has cured too much.
Tape pull: Apply and then quickly pull off a piece of duct tape. If some material comes off, the bond might still be weak enough to rework. If nothing sticks, it’s probably too late.
Re-Wetting Rules: When to Attempt and How to Choose an Agent
Re-wetting is more likely to work if the surface remains soft or tacky and there is still some plasticity in the patch. Do not attempt re-wetting if the material has already crosslinked or you feel granular rigidity beneath the surface.
Always check the manufacturer guidance, and read the product data sheet for compatible agents and procedures. If in doubt, test on a small area or seek advice from the product’s technical support by label or instruction manual.
Choosing compatible re-wetting agents
Only use manufacturer-recommended solvents or resin-compatible additives. These are designed to work with your specific concrete mix and won’t damage it.
Check the technical data sheets for compatibility. If it’s not clear, contact the manufacturer. They know their products best.
Avoid using harsh chemicals like paint thinners or strong acids. These can eat away at your concrete, causing more harm than good.
Step-by-step re-wetting and rework procedure
This sequence helps you safely rework the patch without damaging it further.
- Isolate the area to prevent contamination or interference.
- Test a small, hidden spot first. Apply a tiny amount of re-wet agent, wait 5 minutes, then try to rework it. If it’s too hard or too soft, adjust your approach.
- Clean the surface gently with a damp cloth. Remove any dirt, dust, or debris.
- Apply re-wet agent in small, controlled amounts. Start from one corner and work your way across.
- Rework the patch carefully. Use a trowel or float to redistribute the material evenly. Be gentle; you don’t want to tear the concrete apart.
- Reshape the patch if needed. Make sure it’s smooth, level, and matches the surrounding surface.
- Recure under recommended conditions. Follow the manufacturer’s guidelines for temperature, humidity, and airflow.
- Keep an eye on it. If it’s not responding as expected after 30 minutes, call a pro. It might be too far gone to save.
Signs the Patch Is Already Lost and Cannot Be Saved
Definitive indicators include a hard, brittle patch with no surface yield under moderate pressure and visible delamination or cracking that propagates with touch. When the patch refuses to re-wet or bead the surface with water, it is likely beyond salvage.
Avoid sanding or aggressive rework in these cases, as it can undermine substrate integrity. Rely on the product label or manufacturer instructions to confirm whether rework is permitted or scrap is necessary.
Indicators of complete cure and failed adhesion
The patch feels hard, almost like rock. It’s brittle – no give when you press it gently.
It looks fully cured too. You see a network of tiny cracks or ‘crosslink’ patterns on the surface. This means all the moisture has evaporated, and the concrete is completely hardened.
If you try to pick at it, it doesn’t flake off easily like uncured concrete. Instead, it breaks cleanly in chunks – that’s cohesive failure. It’s already one solid piece with your existing concrete.
There might be visible separation between the patch and the surrounding surface. This means adhesion has failed, and the patch isn’t sticking to the base anymore.
Removal, disposal, and re-application strategy
First, wear safety gear – gloves, goggles, and a dust mask. Use a chisel and hammer to break up the patch. Work from the edges towards the center.
Dispose of the waste according to local regulations. Don’t just throw it in your regular trash. Check with your local waste management department first.
Before you re-apply, clean the area thoroughly. Remove any loose debris or old material. You want a fresh, clean surface for the new patch to stick to.
When you’re ready to repair again, make sure you control the environment better this time. Keep it cool and moist – follow the rules we talked about earlier in the article.
Prevention: How to Avoid Overly Rapid Cures in Future Repairs
Control the environment where you mix and cure, using shade, airflow management, and dew point awareness to slow or steady the cure as needed. Prep the batch size to match the patch area so you don’t overwhelm the mix with too much material at once.
Plan timing and staging so patches cure at the intended rate, and keep tools clean and ready to reduce contamination. Always verify environmental and product guidance on the label or manufacturer instructions before starting.
Environmental controls and scheduling
Controlling the environment around your patch is key to avoiding rapid cures. Here’s how:
Temperature: Keep it within the range specified by your concrete mix. Too hot, too fast – that’s the rule.
Humidity: High humidity can speed up curing. If you can’t control it, time your work for cooler hours or days.
Airflow: Gentle airflow is good, but too much can dry out your patch too fast. Shield it if needed.
Mixing technique, batch size, and tooling choices
Small batches, accurate metering, gentle mixing – these are your friends in avoiding rapid cures.
- Batch size: Small is better. Only mix what you can use quickly.
- Metering: Use static mixers or calibrated dispensers for precise ingredient ratios.
- Mixing technique: Gentle, not aggressive. Overmixing heats up the batch.
- Application tools: Use appropriate tools – trowels, floats, edgers. They’re cheap to buy or rent.
- Tool tips: Keep your tools clean and sharp. Dull tools cause extra work and heat buildup.
Tools, Materials Checklist and Material Specs Explained
Have a measuring container, trowel, mixing paddle, and clean rags on hand. Include a moisture meter or simple surface test kit if available, to gauge readiness before re-wetting or rework.
Read the label, data sheet, and manufacturer instructions to identify compatible re-wet agents and any restrictions. If anything is unclear, verify with the supplier or product documentation before proceeding.
Essential tools and PPE
Before you start, make sure you have the right gear to keep your rework safe and efficient.
- Electric drill with paddle mixer: For mixing your patch material. Without it, you’ll end up with lumps that can weaken your patch.
- Notched trowel or squeegee: To apply the patch evenly. Skipping this can lead to an uneven surface.
- Measuring tape and container: For accurate material measurement. Inaccurate amounts can cause curing issues.
- Cleaning rags: To wipe off excess material and keep your workspace clean. Neglecting this can cause slips and falls.
- Disposable gloves: Protects hands from chemicals. Without them, you risk skin irritation or burns.
- Safety glasses: Shields eyes from debris. Skipping this can lead to eye injuries.
- Respirator: Guards against harmful fumes. Not using one can cause respiratory issues.
- Knee pads (optional): Provides comfort during long periods of kneeling. Without them, you might feel discomfort and reduce productivity.
Quick rule: Always check your gear before starting to avoid delays and safety hazards.
Recommended materials and compatible substitutes
Choose the right patching material for a successful rework. Here’s what to consider:
- Epoxy or polyurethane-based patch: These are common choices due to their strength and durability. Substituting with an incompatible product can lead to poor adhesion.
- Cement-based patch (for concrete): This is ideal for concrete surfaces. Using a different type can cause curing issues.
- Aggregates: These give your patch strength. Skipping them can result in a weak patch.
- Colorant (optional): Match the color of your existing surface to maintain aesthetics. Neglecting this can make the patched area stand out.
- Primer or bonding agent: Enhances adhesion. Without it, your patch may peel off.
- Avoid substituting with: Asphalt-based products (for concrete) as they don’t bond well; or dissimilar materials that aren’t designed for the same surface type.
Quick rule: Always verify compatibility before substituting materials to avoid failed patches.
Key material specs and label fields to check
Read these critical data points on your product labels to ensure you’re using the right patch for your job:
- Mix ratio (part A: part B): Follow this ratio exactly. Incorrect mixing can cause curing issues.
- Pot life: The time material remains usable after mixing. Exceeding this can lead to waste and poor results.
- Recommended cure temperature: Ensure your surface meets this requirement for optimal curing. Insufficient heat can slow down or prevent curing.
- Recoat window: The time you must wait before applying another layer. Rushing this can cause adhesion problems.
- Solvent compatibility: Check if your cleaner is compatible with the patch material to avoid damaging the patch.
- Storage conditions: Follow these guidelines to maintain product quality and prevent waste.
- Safety precautions: Always follow safety instructions to protect yourself from hazards.
Quick rule: Always read and understand material specifications before starting your rework to avoid common pitfalls.
Visual Checkpoints and Troubleshooting Decision Flow
Look for surface tackiness, gloss level, and edge integrity as quick cues. If the patch shows softness and cohesion within the upper layer, consider a controlled re-wet following guidance.
If stiffness, cracking, or delamination are evident, stop and consult the product label or instructions; proceed with caution or scrap as recommended. Use a simple on-site flow: assess visually, test tactically, then verify manufacturer guidance before acting.
Visual cues at each stage and what to do next
Use this checklist when you notice your concrete patch is curing too fast.
- Slightly tacky surface: Re-wetting is still an option. Act quickly before it hardens further.
- Dry but weak surface: Sand and recoat with a fresh layer. Remove any loose material first.
- Hard and brittle surface: The patch has likely failed. Remove and redo the repair.
- Cracks appearing: Indicates shrinkage. Re-wet and monitor closely.
- Blushing (white powdery residue): Surface is too wet or there’s excess lime. Let it dry, then brush off and recoat.
- Discoloration: Inconsistent curing rates can cause color variations. Re-wet and monitor.
- Edges lifting or delaminating: Poor adhesion. Remove and redo the repair.
- Uneven surface: Inconsistent application or rapid cure. Sand, re-wet, and recoat.
Quick rule: The earlier you catch it, the more options you have to save your patch.
Common failure modes and targeted fixes
Consult this checklist when troubleshooting a failed concrete repair.
- Surface blush: Too much water in the mix. Use less water in future repairs.
- Shrinkage cracks: Insufficient moisture retention. Use re-wetting agents and keep the patch moist longer.
- Delamination (lifting edges): Poor adhesion. Ensure proper surface preparation and use compatible materials.
- Inconsistent curing: Environmental factors or improper mixing. Control temperature and humidity, mix thoroughly.
- Weak spots or crumbling: Insufficient strength development. Increase cement content or use a faster-setting mix for future repairs.
- Excessive bleeding (water rising to the surface): Too much water in the mix. Reduce water content and ensure proper aggregate grading.
- Air pockets or voids: Inadequate consolidation. Use a vibrator or tamping tool for future repairs.
- Inconsistent color: Uneven curing rates. Monitor cure rate closely and adjust environmental controls as needed.
Quick rule: Understanding common failure modes helps prevent them in the future.
Conclusion
Fixing a patch that cures too fast requires careful checks, careful timing, and a plan you can back up with safe testing. Do not press ahead if the patch shows signs of failing or if the cure is setting before you can re-wet or rework it; missteps here can ruin the repair and cost more later.
First, run a quick mental checklist as you move from testing to action: confirm you understand why the cure behaved that way, verify with a small-area test that re-wetting is still possible, choose a compatible re-wetting agent, apply it in modest amounts and re-test, and then decide if the patch can be saved or must be cut out and redone. Start with the smallest area, document your results, and never mix products beyond what the guidance allows. If anything worsens, stop and reassess before you proceed.
Common mistakes to avoid are ignoring safety gear or ventilation, pushing a patch that shows lost bond or cracking, and applying extra material without letting it cure or re-wet properly. Always follow the recommended ratios and contact times, test on a concealed spot first, and keep work within your skill level. If you’re unsure after a couple of tests, or if you see persistent delamination, cracking, or hardening in ways that make restoration unlikely, call a professional instead of forcing the repair to fit. When in doubt, favor safety, document what you tried, and keep the project moving toward a solid, long-lasting finish with the right expert help when needed. You’ve got this—steady steps, safer outcomes, and a durable repair in sight.
FAQ
What should I check before attempting to re-wet a patch that cured too fast?
Look at the patch’s surface and edges. If it’s cracked, chalky, or has loose material, re-wetting may not help. Check manufacturer instructions or product labels for re-wet viability and safety warnings.
How do I choose a compatible re-wetting agent?
Use an agent recommended by the patch maker or jobsite guidelines. If you’re unsure, read the label or datasheet and confirm with the manufacturer. Local rules or your supplier can also advise on acceptable options.
What are the safe steps to re-wet a patch on a cured surface?
Apply the agent evenly in thin coats, allowing time for absorption between applications. Avoid soaking the patch or creating runoff. If the patch shows signs of failure after re-wetting, stop and reassess with the product’s instructions.
When is re-wetting no longer worth it or considered lost?
If the patch is severely cracked, delaminated, or shows significant loss of bond after attempts, stop. Document the condition and follow the manufacturer’s disposal or removal guidance and any local rules. If in doubt, consult the product label or manufacturer instructions.