
Introduction
Exposed aggregate repair patches involve matching the look of the existing surface by using stone-size blends and controlled washing timing.
This article gives a practical, hands-on view for DIYers on how to prep, bond, and patch exposed aggregate without a full resurfacer. We’ll cover how to choose the right aggregate size, how to wash or wet the surface before patching, and how to judge when patches will blend.
Start with surface prep like cleaning, profiling, and roughening the patch area to help adhesion.
Decide between mechanical or chemical bonding options and follow the product label for proper use. Choose aggregate size that matches the existing finish and check instructions for washing timing and wetting the surface before applying patch material.
Key takeaways
- Assess whether patch feasible or needs replacement based on depth and damage.
- Choose bonding method: mechanical vs chemical; apply according to surface condition and set.
- Select aggregate size and blend to match surrounding texture and exposure.
- Coordinate washing timing to achieve damp, not soaking, surface before patching.
- Thoroughly clean, abrade high spots, and remove contaminants prior to patch.
- Wear eye protection and masks; monitor curing conditions and avoid rapid drying.
Table of Contents
- Introduction
- Key takeaways
- Assessing the Existing Surface and Deciding Repair Vs Replacement
- Tools, Materials Checklist and Material Specs Explained
- Choosing the Right Bonding Method for Durable Patches
- Surface Preparation: Cleaning, Abrasion and Contamination Removal
- Matching Aggregate: Selecting Stone Size, Distribution, and Blend Recipes
- Washing Timing and Exposure Technique to Match Appearance
- Proper Hydration, Curing and Weather Considerations
- Quality Checks, Maintenance, Cost Planning and Project Closeout
- Conclusion
- FAQ
Assessing the Existing Surface and Deciding Repair Vs Replacement
Begin with a clear view of the surface condition to separate cosmetic issues from structural concerns. Look for signs of movement, widening cracks, deep spalls, or hollow spots that suggest subgrade or reinforcement problems. Document all findings with notes and photos so you can compare changes over time and justify a repair or replacement decision.
Use simple criteria to distinguish cosmetic from structural damage, focusing on crack width, displacement, voids, and delamination. Conduct practical checks like tapping test, probing for firmness, and observing moisture or efflorescence. When in doubt, consult product guidance, local codes, or a qualified professional, and plan your repair path with a documented budget, timeline, and safety steps.
Visual checkpoints for matching texture and color
Before you start mixing or ordering materials, use this checklist to ensure your repair or replacement will blend seamlessly with the existing surface.
- Check aggregate exposure: Look at the existing concrete’s surface. Is it smooth or does it have visible gravel or sand? This is your aggregate. Note its size and type.
- Measure aggregate distribution: Estimate how evenly the aggregate is spread across the surface. Is it uniform, or are there areas with more or less aggregate?
- Identify color tones: Look at the existing concrete under different lighting conditions to see its true color. Check if it has any unique tints or shades.
- Check for color consistency: Ensure the color is consistent throughout the surface. If not, note any variations.
- Examine texture: Feel the existing concrete’s surface to understand its texture. Is it rough, smooth, or somewhere in between?
- Check for signs of distress: Look for cracks, stains, or other defects that you’ll need to match or account for.
- Photograph the area: Take pictures from different angles and lighting conditions. These will help you make accurate matching decisions later.
- Measure the concrete’s thickness: This is crucial for ensuring your repair or replacement has the same strength and durability as the existing surface.
Quick rule: Always compare your notes, measurements, and photos with the existing surface under the same lighting conditions to ensure accurate matching.
Structural assessment and when to replace
Before you start patching cracks or applying new concrete, step back and look at the bigger picture. You’re checking for signs that a repair might be just a band-aid on a bigger problem.
Deep cracks, especially those wider than 1/4 inch (6 mm), could indicate serious issues beneath the surface. Check if they’re widening or moving over time. If so, you might be looking at foundation problems that need professional attention.
Also, keep an eye out for movement in the slab, like dips, waves, or sloping. This could mean the base isn’t solid anymore, maybe due to erosion or poor compaction. Check base compaction if you’re unsure. If it’s bad, replacement might be your only option.
Lastly, look for signs of undermining, where the soil beneath is washing away or settling. This can cause concrete to crack and shift. If you see these signs, it’s time to call in a pro. Don’t waste money on repairs that won’t last.
Common mistakes in identifying suitable patch areas
Before you grab your repair materials, take a step back and avoid these common pitfalls.
- Patching moving slabs – If your concrete is cracked due to movement (like from soil settlement), patching won’t fix the underlying issue. Check for signs of movement like diagonal cracks or gaps between slabs. Consider addressing the cause before patching.
- Ignoring subsurface contamination – Before you apply a patch, ensure there’s no trash, oil, or other contaminants under the surface. These can prevent proper adhesion and cause your repair to fail. Clean the area thoroughly before applying any material.
- Not matching texture and color – Even if structurally sound, a poorly matched patch will stand out like a sore thumb. Refer back to our earlier section on visual checkpoints for matching texture and color.
Double-check these points before you start any repair work. A few minutes of extra effort can save you from costly mistakes down the line.
Tools, Materials Checklist and Material Specs Explained
Assemble a contractor-grade set of tools and safety gear, plus a compact storage plan for dusty environments. Include hand tools for precise patch work, power tools for mixing and surface prep, and PPE such as gloves, goggles, an appropriate respirator, and a dust management kit. Have a portable light ready to illuminate work at all depths and corners.
Gather aggregates, repair mortars, bonding primers, cleaners, and curing compounds, and learn how to match size, texture, and color to the existing surface. Read product data sheets and SDS to verify strength, grading, water content, working time, and cure recommendations, then map a practical workflow with checks at key steps from cleaning to final finishing.
Tools and consumables you’ll need
Before you start, make sure you have all the necessary tools and consumables to get the job done right.
- Mixing: Heavy-duty mixing paddle for your drill or a portable cement mixer.
- Finishing: Trowels ( various sizes), putty knives, and a straight edge for screeding.
- Washing: Pressure washer with a suitable nozzle and detergent.
- Testing: Moisture meter to check surface dryness before patching.
- Optional (for exposed aggregate): Grinder with diamond blade for precise cutting, and a chipping hammer for removing damaged concrete.
Quick rule: Don’t skimp on tools. Good tools make the job easier and faster.
Aggregate types, stone size, and material specs explained
Understanding aggregates and their specs is crucial for matching your repair to the existing surface.
- Pebble vs. crushed: Pebbles have rounded edges, crushed stones have sharp edges; choose based on your existing aggregate type.
- Stone size: Match the size of your aggregates to the existing ones for a seamless look.
- Material specs: Check compressive strength (e.g., 2500 psi), water-cement ratio, and working time on product labels or datasheets.
- Safety data sheet (SDS): Always check for potential hazards and safety precautions before handling materials.
Quick rule: Matching stone size is key. If in doubt, take a sample of your existing aggregate to the store.
Safety gear, PPE and safe handling
Your safety is paramount. Here’s what you need before starting any work:
- PPE: Gloves, goggles or safety glasses, and a respirator (for dust protection).
- Clothing: Long sleeves, long pants, and sturdy boots.
- Pressure washer: Wear appropriate footwear to prevent slips, and keep your distance from the nozzle’s spray.
- Cementitious products: Avoid contact with skin and eyes; always wear gloves and goggles when handling.
Quick rule: Safety first. Always use PPE and follow safety guidelines to prevent injuries.
Choosing the Right Bonding Method for Durable Patches
Understand the main difference between mechanical bonding methods and chemical bonding approaches in the context of exposed aggregate patches. Mechanical options rely on physical anchors or textured interfaces, while chemical routes depend on adhesive bonds that cure and reach strength over time. Your choice should reflect the patch size, depth, and whether the substrate shows any signs of porosity or movement.
Assess substrate conditions such as cleanliness, moisture presence, and existing patch integrity to guide method selection. Outline preparation steps like cleaning, drying, and surface profiling, and consider how cure rates, environmental conditions, and the compatibility of patch materials influence long-term performance. Use this framework to decide and document the chosen approach before starting work.
Mechanical Bonding Techniques
For larger or deep exposed aggregate patches, mechanical bonding is your best bet. It’s all about creating a physical interlock with the substrate.
Start by profiling the surface. You want to remove any weak concrete and create a rough texture for better grip. Use a diamond blade or a chipping hammer, depending on the size of the patch.
Keying is crucial here. It’s like creating tiny hooks that the new concrete can grab onto. You can use a bush hammer or a needle gun to achieve this.
For deep repairs, consider using dowels or pins. They provide extra support and help distribute stress evenly across the patch. Just make sure they’re properly aligned and embedded in both the existing concrete and the new patch.
Chemical Bonding Options and Primers
Chemical bonding is great for smaller, surface repairs. It works by creating a strong chemical bond between the existing concrete and the new patch.
A bonding primer is often used here. It’s like a bridge that connects the two surfaces. Apply it to both the existing concrete and the new patch before mixing them together.
Polymer-modified mixes are another option. They contain polymers that enhance the bond between the old and new concrete. These are particularly useful when dealing with porous substrates or high moisture conditions.
Adhesion promoters work similarly, but they’re usually applied to the existing concrete only. They create a layer that improves adhesion without affecting the overall strength of the patch.
Decision Guide: When to Use Which Method
Choosing between mechanical and chemical bonding depends on several factors. Here’s a simple guide:
Substrate Condition: If the existing concrete is sound, clean, and dry, either method will work. But if it’s porous or wet, lean towards chemical bonding. If it’s weak or crumbly, go for mechanical.
Patch Depth: For surface repairs (up to 1 inch), chemical bonding is usually sufficient. But for deeper patches, you’ll need the extra support provided by mechanical bonding.
Exposure: If the patch is exposed to heavy traffic or loads, use a combination of both methods. This provides the strongest bond possible.
Surface Preparation: Cleaning, Abrasion and Contamination Removal
Define the scope of prep by removing loose material and identifying pits or cracks that could hinder patch adhesion. Establish cleanliness standards that support a solid bond and prevent future delamination. Plan for effective debris control and safe disposal as part of the prep workflow.
Address contamination types such as oils, grease, and efflorescence, and select appropriate cleaners with clear contact times and rinse/dry procedures. Choose abrasion tools that match the surface condition, progressing from brushing to mechanical scabbling when necessary, and verify readiness with simple moisture checks and surface feel tests before patching.
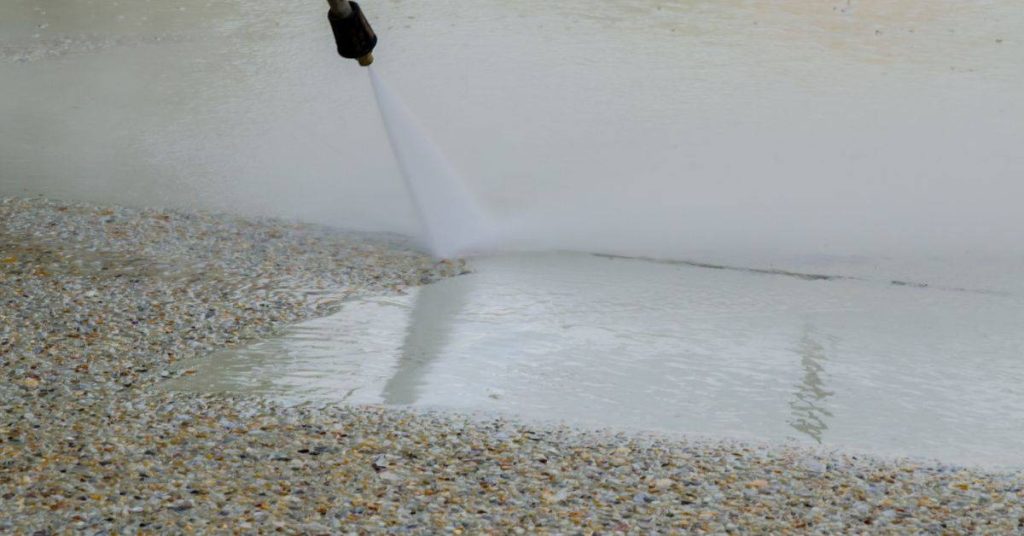
Pressure washing and timed surface drying
Start by using a pressure washer to clean the surface. Hold the wand at a 45-degree angle, about 6 inches from the surface. Work in small sections, overlapping each pass.
Important: Don’t use too high a pressure that could damage the substrate. A pressure of around 1200-1500 PSI should suffice.
After washing, assess residual moisture. The surface should be dry to touch. If it’s damp, allow it to air dry completely before proceeding. This usually takes a few hours to a full day, depending on weather conditions.
Why is drying time crucial? Patching over a wet or damp surface can lead to patch failure due to poor bonding and trapped moisture causing efflorescence.
Mechanical abrasion and edge profiling
After cleaning, use mechanical means to create a sound, keyed edge for your patch. This helps blend the new patch with the existing finish.
For small areas, a grinding tool or diamond-polish pad can be used. For larger areas, consider shot blasting or chipping hammers.
When using these tools, work in small sections, keeping the tool flat on the surface and moving it steadily. Be careful not to create deep gouges that could compromise the patch’s strength.
After mechanical abrasion, vacuum or brush off any dust or debris. The surface should now be ready for patching.
Dealing with stains, oils and organic residues
Oils, tree sap, and other organic residues can interfere with adhesion. Here’s how to deal with them:
For oil-based contaminants, use a degreaser specifically designed for concrete. Apply it according to the manufacturer’s instructions, usually leaving it on for 15-30 minutes before rinsing and drying.
For tree sap or other organic residues, try using a concrete cleaner with a mild acid base. Again, follow the manufacturer’s instructions for application and contact time. After cleaning, rinse thoroughly and allow to dry.
In some cases, it might be better to seal these contaminants rather than remove them, especially if they’re deeply embedded. Consult with a concrete specialist before proceeding.

Matching Aggregate: Selecting Stone Size, Distribution, and Blend Recipes
Begin by outlining the existing slab’s dominant stone sizes, colors, and distribution so the patch can visually blend with the surface texture. Note any staining or wear patterns that must be mirrored in the patch to maintain a unified look. Create a plan for one or two sizes that visually align with the surrounding aggregate and texture.
Develop small test blends to gauge color weight, hue, and speckle density, and document the results against a controlled target. Test patches on inconspicuous areas under different lighting to compare reflectivity and depth of exposure, then translate those findings into a practical field kit and repeatable steps with supplier notes for consistency.
How stone size and shape affect final texture
The size, shape, and color of your aggregate stones greatly influence the final look and feel of your patch. Here’s what to consider:
Size matters: Smaller stones create a smoother, more refined texture; larger ones give a rougher, more rustic appearance.
Shape impacts grip: Angular stones provide better traction than rounded ones, which can be slippery when wet. Consider the existing surface’s traction needs.
Color dictates warmth: Lighter colors reflect more light, making surfaces appear brighter and warmer; darker shades absorb light, creating a cooler, more subdued look.
Creating test panels and adjusting blends
Before committing to your final blend recipe, create small mockups to evaluate color and depth. Here’s how:
Mix up different aggregate sizes, colors, and ratios in small batches. Apply these mixes on sample panels or inconspicuous areas of the slab.
Expose the aggregates using your chosen method (pressure washing, blasting, etc.). Compare each patch under natural and artificial light to see how they match the existing surface.
Adjust your blend recipe based on these tests. Tweak aggregate sizes, colors, or ratios until you achieve a close match. Document your changes for repeatable results.
Visual checkpoints for an accurate match
Before applying your patch, use this checklist to ensure your mix matches the existing surface. Use it when judging a match and during testing.
- Exposure depth: Check how deeply aggregates are exposed in both the patch and the existing slab.
- Spacing: Ensure aggregates are evenly spaced in the patch, mimicking the existing surface’s spacing.
- Background matrix color: Match the gray cement paste color of your patch to the existing slab.
- Mortar-to-stone contrast: The ratio of mortar to aggregate should be similar in both the patch and the existing surface.
- Reflectivity: Compare how light reflects off the aggregates in both surfaces.
- Texture consistency: Ensure the patch’s texture is consistent with the surrounding slab.
- Wear patterns: If the existing slab has wear patterns, mimic them in your patch.
- Staining: If there are stains on the existing surface, try to replicate them in your patch.
Quick rule: The closer these factors match, the more seamless your patch will be.
Washing Timing and Exposure Technique to Match Appearance
Explain the link between wash timing and the final aggregate exposure, keeping a goal in mind for a natural, even look. Use practical cues such as color shift or cement paste visibility to determine when washing should begin, and perform quick go/no-go tests on scrap patches to confirm readiness. Control exposure with a measured wash sequence and stop when the target exposure is reached.
Consider environmental factors like temperature, humidity, and curing stage, which affect wash outcomes. Document the exposure reached on each patch and be mindful of common mistakes that lead to overexposure or underexposure, then apply corrective steps as needed while maintaining a consistent procedure across the project.
When to start washing: cues and test methods
The ideal time to start washing your patch is when the cement paste has set enough to hold the aggregate in place, but not so much that it’s hard to remove. Here are some practical cues:
Surface Cohesion: Gently press on the surface with your thumb or a knife. If the aggregate doesn’t move or dislodge easily, it’s ready for washing.
Bleed Behavior: Look for a consistent color and sheen across the entire patch. If some areas are darker or shinier than others, they might need more time to set.
Manufacturer Guidance: Always follow any specific timing recommendations provided by your concrete mix manufacturer.
Washing methods, tools and finishing technique
Proper washing techniques help reveal the aggregate and create a consistent texture. Here are some methods:
- Brush Washing: Use a stiff-bristled broom to scrub the surface in circular motions. This is labor-intensive but effective for small areas.
- Garden Hose Washing: Use a regular garden hose with a nozzle set to a strong, steady stream. Work from one side of the patch to the other, overlapping each pass.
- Pressure Washer Washing: Rent or borrow a pressure washer for larger patches. Use a 15°-25° nozzle and keep the wand about 6-8 inches from the surface. Start at one end and work your way across.
- Finishing Technique: Once you’ve revealed the aggregate, use a soft-bristled brush or a damp cloth to gently remove any remaining cement paste. Be careful not to dislodge the aggregate.
Fixes for over-washed or under-washed patches
Even with careful timing, mistakes can happen. Here’s how to fix common washing errors:
Over-washed Patches: If you’ve washed too much cement paste off, the patch may look dull and lack texture. The best fix is to re-surface the patch with a thin layer of fresh concrete mix, then wash it again more gently.
Under-washed Patches: If not enough cement paste has been removed, the aggregate may be partially covered or the surface may look dull. You can either flush and reseal the patch with water and a concrete sealer, or grind and recoat it to expose more aggregate.
Proper Hydration, Curing and Weather Considerations
Describe how moisture management interacts with bonding and edge stability, and how to verify suitable moisture levels for the patch bed. Discuss the role of curing compounds or sealers and how they may influence the appearance and performance of exposed aggregate. Keep notes on product compatibility to prevent unexpected reactions.
Address wash timing and method within the context of ambient conditions, and outline acceptable temperature and humidity ranges for curing. Consider wind, ventilation, and shade effects on cure rate and surface usability, and plan for weather-driven adjustments to avoid compromised patches or accelerated drying that harms appearance and strength.
Managing hydration during and after patching
Proper hydration is key to a strong, durable patch. During application, ensure the patch bed has moisture content between 12-15%. Too little will cause dry-out cracking, too much can lead to weak bonding.
Wet-curing helps maintain moisture during initial setting. Cover the patch with plastic sheeting immediately after washing and keep it moist for at least 7 days. Check for signs of under-hydration (dry, cracked surface) or over-hydration (soft, crumbly surface).
Use a moisture test kit to verify ideal moisture levels before applying the patch and during curing.
Weather windows and adapting to conditions
Temperature, humidity, wind, and rain all impact set time and wash timing. Aim for temperatures between 50-90°F (10-32°C) and relative humidity around 40-70%.
Wind can dry out the patch too quickly, so consider using windbreaks or scheduling work during calmer hours. Rain delays washing until the surface is dry to prevent dilution of the cement paste.
Plan your work around weather forecasts. If rain is expected, cover the patch with plastic sheeting and secure it well.
Adjusting materials and methods for extremes
Extreme temperatures and conditions require adjustments to materials and methods. Hot, dry conditions may necessitate slower-setting admixtures and shaded areas to prevent rapid drying.
- Hot, dry conditions: Use retarding admixtures (follow product guidance for mixing ratios) and provide shade or cover to slow down setting time and maintain moisture.
- Cold temperatures: Opt for cold weather concrete mixes with air-entraining agents. Consider using heated enclosures for curing.
- Frost risks: Use air-entrained concrete to resist frost damage and ensure proper drainage around the patch.
- Rain delays: Protect the patch with plastic sheeting until ready to wash. Ensure the surface is dry before washing.
- Fast-track or slow-curing mixes: Follow product guidance for mixing ratios and curing times. Avoid rushing the process as it can lead to weak bonding and cracking.
Quality Checks, Maintenance, Cost Planning and Project Closeout
Perform post-application checks that cover bond, surface evenness, and color matching, and document results with photos and a simple scoring rubric. Schedule short-term observations and longer-term monitoring to catch issues early and plan touch-ups or resealing as needed. Keep a concise punch list to finish with clear sign-off.
Outline a practical maintenance plan that includes routine cleaning, resealing after weather events, and reapplication windows for small repairs. Break down budgeting into materials, labor, equipment, and contingencies, and prepare to capture any changes or delays for the final report and client hand-off, including care instructions and warranty notes.
How to inspect and test a completed patch
First, let your patch cure for at least 24 hours before any testing. Then, follow this checklist:
Visual Inspection: Check for evenness, color match, and any voids or laitance.
Tactile Test: Gently probe the surface with a trowel or screwdriver to test adhesion. Be careful not to damage the patch.
If you find issues or need more certainty, consider laboratory testing or hiring a professional for evaluation.
Maintenance practices to ensure longevity
Regular inspections and cleaning are key to keeping your patch in top shape. Here’s a simple maintenance schedule:
Routine Inspections: Check for signs of cracking, fading, or other defects every 1-2 weeks.
Cleaning: Gently clean the surface with a mild detergent and water every 3-6 months to remove dirt and debris.
Resealing: After heavy rainfall or winter cycles, reapply sealant to maintain protection. Promptly repair any small defects to prevent larger failures.
Budgeting and common cost factors
When planning your budget, consider these cost drivers:
Materials: Patch mix, bonding agent, sealant, and aggregate can vary in price. Get quotes from multiple suppliers.
Labor: Skilled labor will increase costs. Consider doing some work yourself if you’re capable.
Equipment Rental: Renting tools like mixers or power washers adds to the budget. Plan for these expenses.
Contingency: Always include a 10-20% contingency in your budget for unexpected costs or weather delays.
Conclusion
From here, you can finish with patches that look right, hold up, and stay safe by sticking to tested steps and good judgment. The key is matching stone size and timing, and keeping the surface clean and hydrated for proper curing.
In practical terms, think of the job as a simple sequence: confirm the surface condition and repair method, gather the right bonding approach and patch materials, clean and abrade just enough to grab, choose stone size and blend, wash at the right moment, then hydrate and cure while watching weather and traffic. Check the substrate first in a small test area, verify that the patch material and aggregate match your blend recipe, verify exposure and washing timing with light, controlled applications, and perform a final cure check before opening the area to foot traffic. If any step feels off, pause and reassess before moving on.
Common mistakes to avoid are skipping surface cleaning or over-wetting before patching, using the wrong bonding method for the substrate, and rushing cure time or ignoring weather and hydration needs. Always work in small steps, wear eye and skin protection, and test a small patch first to confirm adhesion and appearance before committing to the full area. If the surface shows active movement, cracks beyond simple repair, or you’re unsure about aggregate choice, don’t push through—fix it right or call a professional.
If the patching environment or material mix feels beyond your comfort level, consider bringing in a pro before you risk costly mistakes. The right approach now is steady, controlled work, followed by careful inspection and a clear plan for maintenance. You can finish confident, with a surface that blends well, lasts longer, and looks good for years to come.
FAQ
How should I prep the surface before applying repair patches?
Clean the area well. Remove loose material, dirt, and oils. Lightly roughen the surface to give the patch something to grab onto. Don’t leave laitance or dust behind; wash and rinse until the surface is clean.
What are the differences between mechanical and chemical bonding methods for patches, and which should I use?
Mechanical bonds bite into the concrete with anchors, pins, or roughened edges. Chemical bonds rely on adhesives or bonding agents to grab the patch material. Choose based on patch size, exposure, and manufacturer guidance; if in doubt, check product instructions and local rules.
How do I choose the right aggregate size and blend for the repair patch?
Use aggregate that visually matches the surrounding exposed patch. Consider a mix that mirrors the distribution you see nearby, not just a single size. Always confirm with product labels or instructions for acceptable blends and any limits on size range.
When should I wash and wet the surface before patching, and how do I time it?
Rinse thoroughly to remove dust and debris, then let the surface dry to an appropriate level before applying patch material. Some products want a damp surface; others require a dry one. Check the patch material’s directions and follow the timing they specify for best adherence.
What quality checks should I perform after completing the repair?
Inspect for full coverage and proper height relative to the surrounding surface. Look for pinholes, hollow spots, or high spots and address them before finishing. If possible, test a small area for adhesion per the product instructions and repeat if necessary.