
Introduction
Edge spalling at joints is when the concrete at the joint edge chips or flakes away. It happens from weather, freeze-thaw cycles, or movement that stresses the edge near the joint. When this shows up, it can ruin the look and invite moisture.
To detail joints for durability, start by cleaning the joint and removing loose material. Back up the joint with the right backing and fill with a compatible filler, then smooth and let it cure per instructions. Always check the product label and local rules for movement, curing time, and sealing recommendations.
Key takeaways
- Edge spalling prevention starts at proper joint detailing and edge support during pours.
- Use continuous headers and chamfered or formed edges to reduce stress concentrations.
- Align joint spacing with anticipated shrinkage and curing to avoid cracking.
- Inspect after pour for hairline cracks; repair with compatible filler before set.
- Coordinate formwork nearing removal to prevent edge damage from early stripping.
- Safety: wear PPE near fresh concrete and guard edges to prevent spills.
Table of Contents
- Introduction
- Key takeaways
- What Is Edge Spalling and Why It Matters
- Mechanics and Root Causes of Edge Spalling
- Joint Types and Vulnerability at Edges
- Principles of Joint Detailing to Prevent Edge Spalling
- Detailing Recommendations for Common Assemblies
- Construction Best Practices and Sequencing
- Inspection, Monitoring and Visual Checkpoints
- Tools, Materials Checklist and Material Specs Explained
- Conclusion
- FAQ
What Is Edge Spalling and Why It Matters
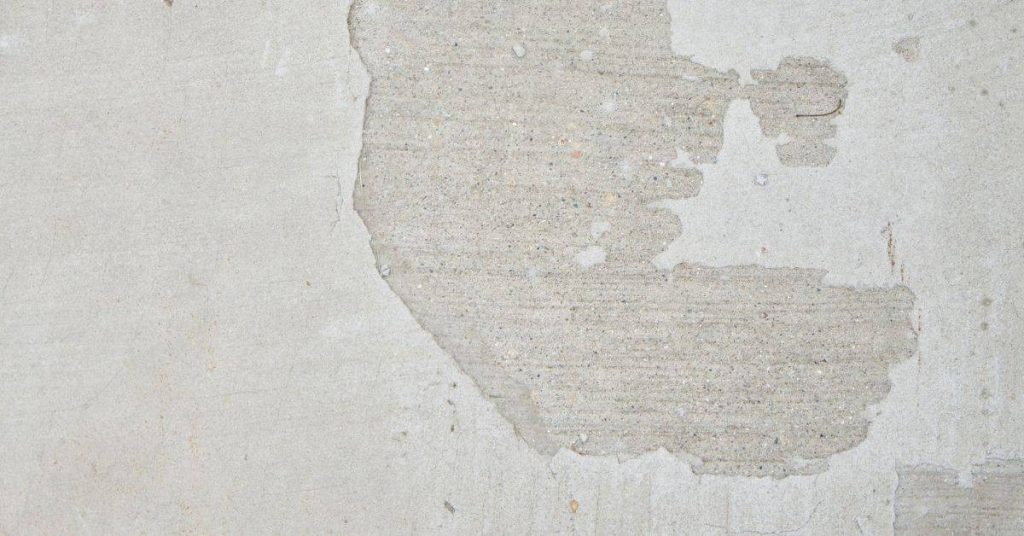
Edge spalling occurs when the concrete near joint edges starts to chip, flake, or break away. You’ll often notice small chips or hollow-sounding edges where the slab meets the joint sealant or backing material. This issue affects safety, durability, and asset life, especially in high-traffic areas.
This article covers both new construction and existing repairs, with an emphasis on detailing joints to prevent recurrence. Understanding the cost-saving value of proper detailing helps justify upfront efforts and materials. Verify project specs, manufacturer guidance, and local code requirements as you plan prevention measures.
Snapshot of common symptoms
Edge spalling around joints shows up as:
Flaking: Small pieces breaking off, like dandruff. It’s early stage.
Chipping: Larger chunks missing. It’s getting worse.
Joint edge breakup: Whole sections crumbling. It’s severe and needs immediate attention.
Consequences for structures and maintenance budgets
Spalling isn’t just unsightly, it’s trouble:
It accelerates deterioration. Water gets in, freezes, expands, and cracks deepen.
It increases maintenance frequency. You’ll be fixing joints more often.
It creates safety hazards. Loose pieces can fall, causing injury or damage.
Mechanics and Root Causes of Edge Spalling
Spalling at edges results from a mix of moisture movement, freeze-thaw cycles, and chemical or abrasive wear near joints. These forces concentrate at the joint edges where restraint and movement interact. No single cause acts alone; they compound when combined with poor consolidation or installer technique.
Moisture that migrates to the joint and then freezes can push on the edge, while salts or chemicals may weaken the surface. Abrasion from traffic or cleaning also wears away the edge, accelerating spalling. Check your project data sheets and local guidance to match materials to conditions.
Moisture, Freeze–Thaw Cycles and Salts
Water ingress is the root of many concrete problems. It seeps into joints, especially at edges where they’re weakest.
When temperatures drop, this water freezes, expanding by about 9%. This puts immense pressure on the surrounding concrete, causing micro-cracks and weakening the edge.
Deicing salts make things worse. They lower the freezing point of water, so it can seep deeper into cracks before freezing. Plus, they’re hygroscopic, drawing in more moisture. Each freeze-thaw cycle further damages the edge, leading to spalling.
Mechanical Loading and Traffic Abrasion
Wheel loads from vehicles concentrate stress at joints. This is especially true at edges where there’s no support on one side.
Impact loading, like from heavy trucks or dropped objects, can also cause edge spalling. Each impact sends shockwaves through the concrete, weakening it over time.
Repeated loading wears down the edge further. This is like a slow grindstone, gradually removing material until the edge fails and spalls off.
Poor Placement, Consolidation and Curing
Inadequate compaction leaves voids in the concrete. These weak spots are more susceptible to spalling.
Improper finishing can also leave a weak edge. If the surface isn’t properly screeded or floated, it won’t be strong enough to resist the forces that cause spalling.
Early exposure to elements before the concrete has cured properly can also lead to edge spalling. Concrete needs time to gain strength and develop its final properties. Rushing this process leaves a weak edge that’s prone to failure.
Joint Types and Vulnerability at Edges
Expansion joints accommodate wider movement and are often edge-prone because movement concentrates at the slab edge. Contraction joints aim to control crack width but leave vulnerable edge zones. Isolation joints separate concrete from adjacent structures, creating edge detail challenges and potential spall sites.
Their geometry, anticipated movement, and nearby loads determine where spalling is likely. Use this guide to tailor detailing choices to each joint type and the surrounding conditions. Always verify with project standards and supplier instructions for specifics.
Expansion and movement joints
Joints designed for large movements, like expansion and movement joints, need proper backup and confining details to protect edges. These joints allow concrete to expand and contract freely with temperature changes.
Proper detailing includes using steel reinforcement or fiber reinforcement along the joint to confine the concrete and prevent it from spalling at the edge. Wide joints filled with a flexible sealant can also help distribute movement evenly.
Without these details, edges are vulnerable to spalling as they try to accommodate movement. Always follow the engineer’s specifications for joint widths, spacings, and detailing.
Contraction joints and saw-cut joints
Contraction joints are cut into concrete to control where cracking will occur as the concrete shrinks during drying. Saw-cut joints are similar but made after the concrete has already started to set.
If these joints are too shallow or improperly located, they can create weak planes that propagate spalling at edges. Deep and well-spaced joints allow for better distribution of shrinkage stresses.
Proper timing of saw-cut joints is crucial. Cutting them too early can cause excessive water loss, while cutting them too late may not control cracking effectively. Always follow the recommended timing and spacing from the concrete mix design.
Isolation and construction joints
Isolation joints separate different sections of a structure, preventing them from affecting each other’s movement. Construction joints divide large pours into smaller, more manageable sections.
The quality of the interface and load transfer details at these joints greatly influence edge durability. Good contact between old and new concrete, along with proper reinforcement lapping, ensures even stress distribution and prevents edges from being overstressed.
Properly detailed isolation and construction joints use materials like bond breaker compounds to prevent adhesion between pours, allowing each section to move independently. Always follow the engineer’s recommendations for joint details and reinforcement lapping.
Principles of Joint Detailing to Prevent Edge Spalling
The core design goal is to allow measured movement while keeping water out of the joint and edge area. Detail the edge so there are no sharp corners or deep crevices that trap moisture or debris. Use appropriate edge confinement to maintain the integrity of the concrete near the joint.
Check project standards and manufacturer requirements for exact clearances, sealants, and consolidation methods. Prioritize durable edge geometry, proper backing materials, and compatible joint fillers to reduce stress concentrations. Always align detailing with local rules and product data sheets.
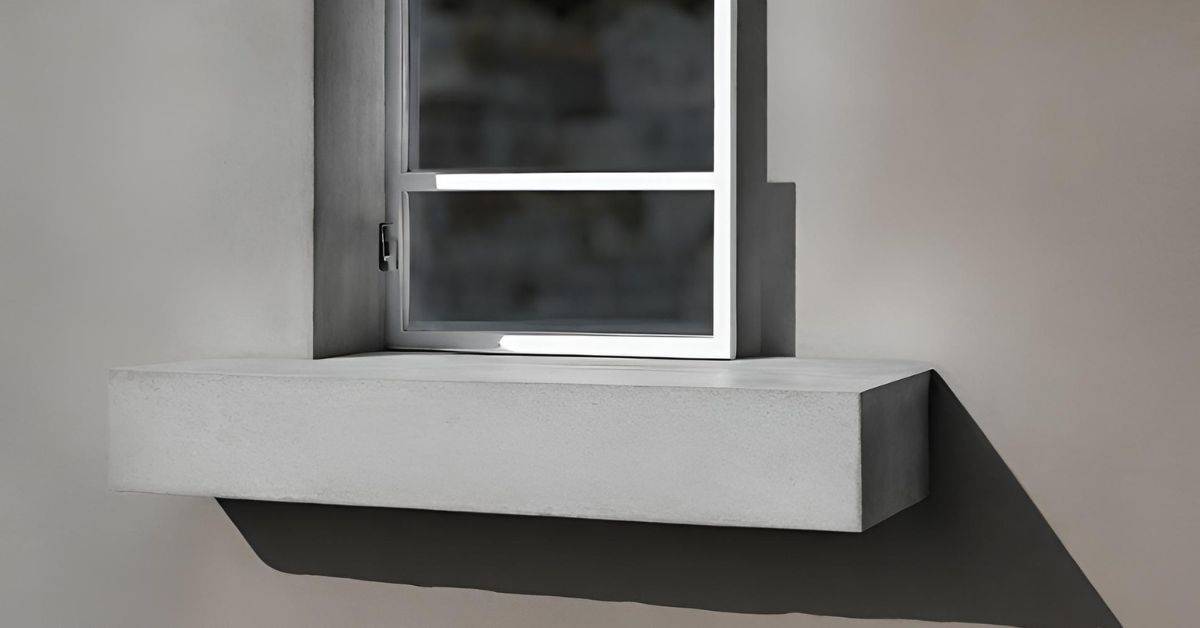
Edge geometry and chamfers vs square edges
Edge geometry plays a crucial role in preventing edge spalling. Square edges concentrate stress, making them vulnerable to cracking under pressure.
Chamfers or fillets reduce stress concentration by distributing forces more evenly. They also help shed water, reducing the risk of freeze-thaw damage.
Adequate bearing lengths are essential for proper load distribution and support at joints. Consult project standards to determine suitable dimensions.
Backer rods, bond-breakers and compressible fillers
Backing materials like backer rods, bond-breakers, and compressible fillers serve multiple purposes in joint detailing. They control sealant depth, preventing over- or under-filling.
These materials provide compressibility, allowing joints to accommodate movement without stressing the concrete. They also prevent three-sided adhesion, which could otherwise lead to cracking or delamination.
Choose backing materials based on joint size and expected movement. Always follow manufacturer guidelines for best results.
Sealant selection and adhesion strategies
Selecting the right sealant is vital to prevent edge spalling. Consider these key properties:
Movement capacity: Ensure the sealant can accommodate joint movement without failing.
Adhesion: The sealant must adhere well to both concrete and backing materials for a strong, durable bond.
UV/chemical resistance: Opt for sealants that can withstand exposure to sunlight and common chemicals in your environment.
Consult ASTM/EN standards and manufacturer data sheets to make informed decisions about sealant selection.
Detailing Recommendations for Common Assemblies
Sidewalks require edge detailing that handles pedestrian loading and freeze-thaw exposure, with a focus on clean joint edges and proper sealing. Slabs-on-grade should manage moisture migration and ensure a sound substrate preparation around joints. Pavements deal with heavier loads and must accommodate movement without edge loss.
Precast panels bring their own edge constraints and must be detailed to account for panel-to-panel movement. Tailor detailing to the assembly by comparing movement, loading, and exposure. Verify the specific assembly standards in your project documents.
Sidewalks and curb edges
Sidewalks take a beating from pedestrian traffic, weather, and drainage. To prevent edge spalling:
Detail expansion joints every 6-8 feet to control cracking. Use compressible backer rods and sealants that can handle freeze-thaw cycles.
For curb edges, use chamfers or radii to reduce stress concentration. Seal the joint with a flexible sealant to keep out water and debris.
Pavements and vehicular surfaces
Vehicular surfaces face heavy loads, impacts, and tire abrasion. To protect edges:
Use thicker edge slabs to distribute loads better. Detail load transfer platforms at joints to prevent progressive loss.
Apply edge confinement with steel reinforcement or fiber mesh to strengthen the edge and reduce spalling.
Precast panels and tilt-up connections
Thin precast edges are vulnerable. Protect them with these details:
At panel interfaces, use bearing strips to distribute loads evenly. Seal joints with compressible fillers and sealants that can accommodate movement.
For tilt-up connections, detail grooves or pockets for bearing strips. Use flexible sealants in joint gaps to prevent water intrusion and spalling.
Construction Best Practices and Sequencing
Prepare the substrate properly and keep joints clean during placement. Control the placement sequence to minimize disturbance near joints. Consolidate carefully near edges to avoid voids that can propagate spalling.
Plan the timing of saw cuts, curing, and protection of fresh edges. Use temporary edge protection as needed to prevent damage. Implement on-site quality-control checks to catch issues before they become repairs.
Substrate preparation and formwork details
The first step to preventing edge spalling is a clean, stable substrate. Remove all dirt, debris, and contaminants before pouring.
Ensure your forms are aligned properly and supported at the edges. This prevents any movement during placement that could cause stress on the joint.
Proper formwork also helps maintain the shape of the joint and reduces the risk of cracking.
Timing of saw cuts and finishing operations
Saw cuts should be made after the concrete has gained some strength, typically around 24-48 hours. This prevents unintended cracking.
Finishing operations like power troweling should also be done carefully near joints to avoid applying excessive stress.
The timing of these operations is crucial as it allows the concrete to gain enough strength before being subjected to further manipulation.
Curing, protection and traffic control
Proper curing keeps edges from early damage. Keep the surface moist for at least 7 days, using wet burlap or plastic sheets if necessary.
Use temporary edge protection to prevent damage from equipment or foot traffic. This could be in the form of barriers or warning signs.
Control traffic around the edges during the curing period. Limit access to only essential personnel and equipment.
Inspection, Monitoring and Visual Checkpoints
Develop a practical inspection routine for early signs of edge spalling, such as flaking, micro-cracks, or edge hollow sounds. Document any movement or moisture issues near joints. Prioritize areas with heavy traffic or exposure to freeze-thaw cycles.
Use simple visual checks and targeted tests to identify root causes. Schedule interventions based on observed progression and align with manufacturer instructions and local requirements. Keep a running log to guide maintenance decisions.
Visual checkpoints and what to document
Use this checklist during regular inspections or when you notice signs of edge spalling.
- Joint appearance: Check if joints are cracked, open, or filled with debris. Skipping this can lead to underestimating the problem’s extent.
- Crack patterns: Note linear cracks vs. random cracking. This helps identify causes like thermal movement or settlement.
- Edge loss extent: Measure and record how far edges are spalling. Tracking progress helps prioritize repairs.
- Drainage issues nearby: Check for standing water, ponding, or saturated areas. Poor drainage accelerates edge deterioration.
- Sealant condition: Inspect sealant for cracks, gaps, or discoloration. Failed sealants let in water and dirt, worsening spalling.
- Concrete surface: Look for scaling, pitting, or other signs of concrete degradation. These can indicate a more serious underlying issue.
- Expansion joint movement: Check if joints are moving freely. Restricted movement can cause excessive stress on edges.
- Photograph: Document your findings with clear, dated photos. These help track progress and make cases for repairs.
Quick rule: Always document your inspections. It’s the best way to track changes over time.
Diagnostic testing to confirm causes
Use these tests when visual checks aren’t enough or to confirm suspicions about causes.
- Sounding: Tap joints with a hammer. Listen for hollow spots indicating delamination. Skipping this can miss hidden damage.
- Core inspection: Drill cores to check concrete quality and reinforcement condition. This confirms if problems are due to poor concrete or other issues.
- Rebound hammer: Test concrete strength by measuring the rebound of a spring-loaded device. Low readings indicate weak concrete.
- Moisture testing: Use a moisture meter to check for excessive moisture in slabs. High moisture can cause edge spalling.
- Petrographic analysis: Send samples to a lab for detailed examination under a microscope. This identifies mineralogical causes of spalling.
- Half-cell potential testing: Check reinforcement corrosion risk by measuring electrical potential between steel and a reference electrode. Low readings indicate active corrosion, which can cause spalling.
- Chloride testing: Measure chloride content in concrete to assess the risk of corrosion. High chlorides accelerate corrosion and edge spalling.
- Consult standards: Refer to ASTM, ACI, or other relevant standards for specific test methods. This ensures you’re using accepted practices.
Quick rule: Don’t rely on a single test. Combine visual checks and various tests to get a full picture.
Tools, Materials Checklist and Material Specs Explained
Assemble a DIY-friendly list of essential tools: trowels, joint markers, moisture meters, and compatible sealants or fillers. Have protective edge products ready for after-work protection. Prepare backing rods and curing materials as needed for your joints.
Explain which material properties to verify on product data sheets, such as movement compatibility, adhesion, and durability. Always cross-check with manufacturer instructions, product labels, and local standards before purchasing or applying materials.
Essential Tools and Protection Items
Before you start forming or repairing joints, make sure you have these essential tools and protective gear on hand.
- Tape measure: To ensure accurate joint widths. Inaccurate measurements lead to weak joints.
- Level: For maintaining consistent joint depths. Irregular depths can cause water pooling and spalling.
- Shovel or edger: To form joint lines in fresh concrete. Improper forming results in poorly defined, weak joints.
- Jointing tool (groover): To create control joints after initial set. Skipping this step can cause random cracking.
- Chalk line: For marking joint locations before grooving. Inaccurate marking leads to misaligned joints.
- Joint sealer applicator: To apply sealant evenly and accurately. Poor application causes sealant failure.
- Safety glasses: To protect eyes from concrete dust and debris during forming and repair work.
- Gloves: For handling materials and protecting hands from cuts and irritants.
- Knee pads: For comfort while working on knees to form, groove, or seal joints.
Quick rule: Always double-check your tools before starting work. Missing a tool can lead to rework and increased labor costs.
Material Specs, Standards, and What to Check
When selecting materials for joint detailing and repair, verify these key properties and standards to ensure long-lasting results.
- Movement capability: Joint fillers must accommodate concrete’s natural movement. Incompatible materials can cause joint failure.
- Adhesion: Sealants should adhere well to both concrete surfaces and joint fillers. Poor adhesion leads to delamination and sealant loss.
- Compressibility: Joint fillers must compress slightly to accommodate traffic loads. Insufficient compressibility causes joint spalling.
- Durability: Materials should resist UV degradation, extreme temperatures, and chemical exposure. Poor durability leads to premature failure.
- ASTM C977/C977M: Standard for Sealants Used in Concrete Joints. Verify that sealant meets this standard.
- ASTM C1315/C1315M: Standard for Joint Fillers for Concrete. Ensure joint fillers comply with this standard.
- Manufacturer’s data sheets: Check for recommended application temperatures, substrate preparation requirements, and expected service life.
- Third-party certifications (e.g., NSF, UL): These provide additional assurance of product quality and performance.
Quick rule: Always verify material properties and standards before purchasing. Relying solely on marketing claims can lead to poor results and costly rework.
Conclusion
Edge spalling at joints is a failure mode you can prevent with solid detailing, careful sequencing, and strict adherence to safety pauses. When you get the joints right, you protect durability, appearance, and your own safety on the jobsite.
Start by checking the edge conditions and joint types in your project, confirm the correct detailing approach for each assembly, verify material specs and tool readiness, plan the work sequence and access, run a small test patch or mock-up in a hidden area, and then proceed with the full installation only after you’ve confirmed everything is behaving as expected. Keep moisture and movement in mind, and document checkpoints so you can inspect as you go and after completion.
Common mistakes to avoid include rushing detailing in the name of speed, using the wrong joint type for the edge, or skipping a proper cure, seal, or backing material. Always set up proper safety barriers, wear the right PPE, and test a small area before full scale work. Don’t force joints to fit or over-tighten, and never assume a bad edge will self-heal—address it now or call for help.
If the project involves complex joints, high movement, or uncertain materials, it makes sense to bring in a professional rather than risk costly damage. When in doubt, prioritize a solid plan, conservative practice, and a cautious pace, and you’ll finish with joints that hold up and look right for years to come.
FAQ
What are warning signs that your joint detailing is contributing to edge spalling?
Look for flaking concrete near joint edges, cracks forming along the edge, or moisture patterns that show the joint is not shedding water. If you see dusting or powdery surfaces at the edge, check if the detailing is allowing movement or cracking to propagate.
What are common mistakes in detailing joints at edges and how can you fix them?
Avoid tight or rigid joints that trap moisture. Use joints that allow a little movement and choose compatible materials for the concrete and the edge surfaces. Follow manufacturer instructions for joint products and avoid overfilling or underfilling the joints.
How should you select sealants and fillers for edge joints to prevent spalling?
Choose products labeled for concrete joints and compatible with edge conditions. Check the product label or datasheet for movement capability and curing requirements. If unsure, consult the manufacturer instructions or local guidelines before application.
What should you verify in materials and installation before pouring to prevent edge spalling?
Confirm that the edge forms and reinforcement placement match plan intent. Check that joints and sealants are suitable for the expected movement at edges. Always verify with labels, instructions, or local guidance before proceeding.