
Introduction
An epoxy patch is a DIY repair that fills a damaged garage floor and blends it into the surrounding concrete. You’ll feather the edges so the repair tapers into the floor, and aim for a consistent sheen to avoid a noticeable halo. Check manufacturer instructions for cure times, prep steps, and recommended products.
This job is about surface prep, patch material selection, and careful application to avoid ridges. Work in small sections, mix only what you can apply before it skins over, and wipe away excess before it cures. If unsure about gloss matching, test on a hidden area or a scrap piece and compare with the surrounding floor.
Key takeaways
- Assess patching vs resurfacing to avoid unnecessary work and halo risk
- Prepare edges by feathering and cleaning to prevent abrupt transitions
- Match gloss with multiple passes and test panels before full application
- Use compatible primers and sealers; read labels for compatibility issues
- Wear eye protection, gloves, and a respirator during mixing and curing
- Document surface condition and curing behavior to plan future repairs
Table of Contents
- Introduction
- Key takeaways
- When to Patch Vs. When to Resurface
- Tools, Materials, and Specs Explained
- Surface Preparation and Visual Checkpoints
- Mixing, Tinting, and Preventing Compatibility Issues
- Application Techniques to Feather Edges Seamlessly
- Achieving Consistent Gloss and Sheen Match
- Curing, Testing, and Troubleshooting Common Defects
- Final Finishing, Maintenance, and Future Repair Planning
- Conclusion
- FAQ
When to Patch Vs. When to Resurface
Assess the scope of the damage first. Localized gouges, thin showing, or small cracks often patch well without a full redo. If the damage covers a large area or undermines structural flatness, resurfacing is usually the smarter path.
Cost, downtime, and expected lifespan of the repair come into play. Review the manufacturer guidance and local rules to determine whether a patch will hold up under traffic. When in doubt, compare the patch’s longevity to a complete surface refresh as documented by the product label or data sheet.
Assessing the damage (cracks, spalls, delamination)
The first step is to inspect your garage floor for any cracks, spalls, or delaminated areas. These are signs of damage that may need repair.
Use a flashlight to check crack depths and widths. A crack wider than 1/8 inch or deeper than 1/4 inch usually needs attention. Spalls are broken-off pieces of concrete; if they’re larger than a quarter, consider patching.
Delamination is when the concrete surface peels away from the base. If it’s less than 1 square foot and not structurally compromised, you can likely patch it. But if it’s bigger or feels unstable, call a pro for structural evaluation.
Expected outcomes and limitations of patches
Epoxy patches are great for localized repairs but have their limits. They’re durable, but not as strong as the original concrete. Expect a lifespan of 5-10 years with proper maintenance.
Appearance-wise, a patch will never match the surrounding floor perfectly. Even with feathering edges and matching gloss, there may be slight differences in color or texture. Be prepared for this.
Patches won’t fix underlying issues like moisture problems or inadequate substrate. If these aren’t addressed, your patch may fail over time.
Safety and structural concerns that require pros
Some damage is beyond DIY repair. Large voids or honeycombing (missing chunks of concrete) need professional attention. These could indicate serious structural issues.
Exposed rebar is a red flag. It’s a sign of severe damage, and you should stop work immediately and call a pro. Rebar exposure can lead to further deterioration and even collapse.
Structural movement, like sloping floors or cracks that widen over time, also warrant professional evaluation. These could indicate settlement issues or other structural problems that need expert intervention.
Tools, Materials, and Specs Explained
Make a practical list of basics: patch material, a filler if needed, a squeegee or trowel, a mixing cup, and protective gear. Include scrapers, a grinder or drill with a pad, and clean rags. Have a planer or grinder for shaping edges if you need to feather edges.
Before buying, check the product data sheet for cure times, pot life, and substrate compatibility. Look at surface prep requirements, ventilation needs, and any minimum or maximum ambient conditions. If specs aren’t clear, verify with the supplier or manufacturer instructions before purchasing.
Essential tools and accessories
Having the right gear ensures a smooth, professional-looking patch.
- Mixing paddle: For blending epoxy components. Key spec: Compatible with your drill’s chuck size. Tip: Use a slow speed to avoid air bubbles.
- Notched trowel (1/8″ – 3/16″): For applying and feathering epoxy. Key spec: Width suitable for your patch size. Tip: Use the notched edge to control material flow.
- Flexible squeegee: For spreading epoxy evenly. Key spec: Width matching your trowel. Tip: Use a light touch to avoid overworking the epoxy.
- Grinder with diamond cup wheel (4″ – 5″): For preparing the substrate. Key spec: Compatible with your grinder’s output. Tip: Wear safety gear and keep the wheel wet to minimize dust.
- Safety glasses, gloves, respirator: Protect yourself from chemicals and debris. Key spec: EN166, ANSI Z87.1, NIOSH certified respectively. Tip: Always use when handling epoxy.
- Optional: Epoxy pump sprayer (for primers): For easy application of primers. Key spec: Compatible with your primer’s viscosity. Rental price: Around $25 – $40 per day.
Epoxy types, primers, and compatibility
Understanding epoxy products helps ensure a successful patch.
Epoxy patch compounds come in one- or two-part systems. One-part is easier to use but less durable than two-part.
Primers prepare the substrate, promoting adhesion and preventing delamination. They can be water-based or solvent-based; choose based on your substrate’s tolerance.
Topcoats protect the patch from UV damage and provide a final gloss level. Check compatibility with your chosen patch compound to avoid hazing or discoloration.
Material specs and standards to check
Checking product specifications ensures your epoxy patch lasts.
- Adhesion rating: Measures bond strength. Spec: ASTM D4541. Avoid: Products with low adhesion ratings on similar substrates.
- Recoat window: Time between coats for optimal results. Spec: Check manufacturer’s guidelines. Tip: Don’t rush; wait the recommended time to avoid weak layers.
- VOC content: Volatile organic compounds. Spec: Below 350 g/L for most regions. Avoid: High VOCs for better indoor air quality and compliance with regulations.
- Substrate tolerances: Surface conditions the product can handle. Spec: Check manufacturer’s guidelines. Avoid: Using products on substrates outside their tolerance range to prevent failure.
- Pot life: Time epoxy remains usable after mixing. Spec: Longer pot life is better for larger patches. Tip: Calculate your needs based on pot life and working time.
Surface Preparation and Visual Checkpoints
Start with a thorough cleaning to remove dirt, oil, and contaminants. Degrease stubborn slick spots and rinse until the surface is dry. Use mechanical profiling to create a slightly rough surface for bonding.
Check visuals and touch to confirm readiness: the floor should feel clean, dry, and dull in the patch area. No loose coating should smear under a fingertip. If any contamination remains, repeat cleaning and drying before patching.
Cleaning, degreasing, and contaminant removal
Before you start mixing concrete, use this checklist to ensure your surface is clean and free of contaminants. This step is crucial as residual contaminants can cause adhesion failures, leading to costly rework.
- Remove loose materials: Brush or sweep the surface to remove any loose debris, dirt, or dust. You should see no visible loose material when you’re done.
- Check for oil stains: Apply a small amount of dish soap and water solution onto suspected oily areas. If it becomes more sudsy than usual, oil is present. Use an appropriate degreaser to remove it.
- Test for grease: Sprinkle some talcum powder or cornstarch on the surface. If it turns into a paste, grease is present. Degrease using a suitable cleaner.
- Remove salt deposits: Inspect for white, crusty deposits (efflorescence). If found, use a muriatic acid solution to remove them, following manufacturer’s instructions.
- Check for mildew/mold: Look for dark spots or stains. If present, use a mold remover and follow up with a biocide to prevent regrowth.
- Remove any paint or sealers: Use a suitable stripper if necessary. The surface should be completely free of any previous coatings.
- Rinse thoroughly: After cleaning, rinse the surface with clean water to remove all traces of cleaner and contaminants. Allow it to dry completely.
- Inspect for moisture: Use a moisture meter to check for excessive moisture. Concrete should not exceed 4% moisture content before applying concrete.
Quick rule: Always remember, “Cleanliness is next to concreteness.” A clean surface ensures better adhesion and longevity of your concrete project.
Mechanical profiling and feathering the perimeter
Before you start grinding or shot-blasting, make sure the surface is clean and dry from the previous steps. This checklist will guide you through preparing the repair area and creating a smooth transition with the surrounding sound epoxy.
- Check repair area dimensions: Ensure you know the exact size of the repair area to order the right amount of material and plan your work.
- Inspect surface for contaminants: Quickly check if any dirt, grease, or other contaminants remain. If so, re-clean using the methods mentioned earlier.
- Set up grinding/shot-blasting equipment: Ensure your grinder or shot-blasting machine is in good working order and follows manufacturer safety guidelines.
- Mark out repair area: Use a marker or chalk to clearly define the edges of the repair area. This helps prevent over-grinding and ensures a neat boundary.
- Start grinding/shot-blasting: Begin at one corner, working diagonally across the repair area. Keep the grinder or shot-blasting nozzle moving to avoid creating divots or gouges.
- Check depth regularly: Use a straight edge and feeler gauge to ensure you’re grinding/shot-blasting to the correct depth (usually 1/8″ – 3mm). Inconsistent depth can lead to weak repairs.
- Feather the perimeter: Once the repair area is profiled, start feathering the edges. Work outward in small, overlapping strokes to create a smooth transition with the surrounding sound epoxy. This helps prevent delamination and stress points.
- Inspect for high spots or low spots: Use your straight edge to check for any remaining high or low spots. These can weaken the bond of the new epoxy and cause issues down the line.
Quick rule: Always overlap your feathering strokes by at least half to ensure a smooth, even transition between the repair area and the surrounding surface.
Visual checkpoints and measurement checks
Before you start mixing concrete, use this checklist to ensure your surface is ready. It’s quick and helps avoid costly mistakes.
- Check for dust: A thin layer of dust can compromise adhesion. Use a damp cloth to wipe the surface; if it comes off easily, you’re good to go.
- Inspect for contaminants: Oil, grease, or other substances can prevent concrete from bonding. Use a degreaser if necessary and recheck with a water break test (water should bead up on clean surfaces).
- Verify surface profile: The surface should have a minimum 1/8″ profile for proper adhesion. Check with a ruler or scraper; it’s like running your fingers through sand at the beach.
- Check perimeter feathering: Ensure edges are properly tapered to prevent stress points and cracking. Use a straight edge to confirm they’re within 1/4″ – 3/8″.
- Measure substrate thickness: Concrete should be at least 2″ thick for most applications. Check with a tape measure; if it’s too thin, consider adding reinforcement.
- Inspect for cracks or damage: Repair any cracks or holes before applying concrete. A quick visual check can save you from expensive rework later.
- Check moisture content: Excessive moisture can cause delamination. Use a moisture meter (available at hardware stores) to ensure readings are within safe limits (usually 15-20% for concrete).
- Verify surface temperature: Concrete should be between 50°F – 90°F for proper curing. Check with a thermometer; if it’s too cold or hot, consider adjusting the temperature.
Quick rule: If in doubt, double-check. A few extra minutes now can save you hours of rework later.
Mixing, Tinting, and Preventing Compatibility Issues
Measure and mix the patch material according to the label, keeping a clean workstation. Scrape the sides and fold until the color and consistency are uniform. Avoid rushing the mix to prevent uneven cures.
Tinting should be done with approved pigments or concentrates and mixed thoroughly. Check that the tinted batch matches the existing floor by testing a small area first. If you see mismatches, confirm with the manufacturer’s tinting guidance or step back to a neutral base.
Proper mixing technique and pot-life awareness
Mixing epoxy is a critical step. Follow the manufacturer’s mix ratio to avoid off-ratio errors.
Air entrapment can weaken your patch. Stir gently, scraping the sides and bottom of the container to incorporate all material.
Epoxy has a pot-life, or workable time, before it starts to cure. Work quickly but carefully within this window.
Tinting, color matching, and pigment loading
Matching the existing floor’s color is key to a seamless patch. Use the same pigment type and concentration as your original epoxy.
Test small samples on an inconspicuous area first. Compare dry color and sheen. Adjust tint until you match both.
Pigment loading affects gloss level. Too much can cause a dull finish, too little may not hide the old floor’s color.
Primer and adhesion promotion to avoid halo
Using a primer or seal coat can prevent a visible halo effect, where the patch looks different from the surrounding floor.
- New vs. old epoxy: If your original epoxy is old, use a primer to ensure good adhesion and minimize translucency differences.
- Different brands: Even if you’re using the same type of epoxy, different brands can look different. Prime to avoid a halo.
- Light reflection: A primer can help reduce glare from light reflecting off the patch.
- Moisture barrier: If your floor is prone to moisture, use a moisture-tolerant primer to prevent delamination.
Apply primer evenly, following manufacturer’s instructions. Let it dry according to its recommended time before applying your epoxy patch.
Application Techniques to Feather Edges Seamlessly
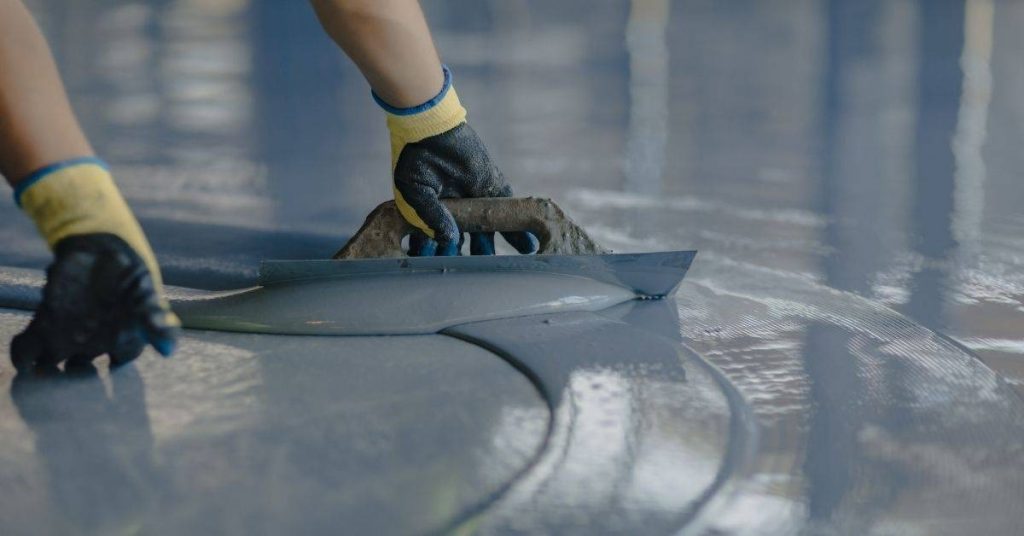
Apply the patch starting at the deepest spots and work toward the edges. Use a tool to spread and then feather the material beyond the repair line. Work in a consistent thickness to avoid ridges.
Sequence matters: establish a gradual transition from patch to existing epoxy. Keep a wet edge, avoid pooling, and rework any high spots before cure begins. Practice on a scrap area if you’re unsure of your feathering motion.
Tools and motions for feathering
The right tools make all the difference when it comes to feathering your epoxy patch. Here’s what you’ll need:
- Feathering trowel (4″ – 6″): This is your main workhorse. Use it to spread and smooth the epoxy, creating a gradual edge.
- Squeegee (12″ – 18″): For larger areas, use a squeegee to push the epoxy into the low spots and create an even surface.
- Spreader (3″ – 6″): This is useful for getting into tight corners and edges. It helps to create a smooth transition from the patch to the existing floor.
- Notched trowel (1/8″ – 1/4″): Use this to create grooves in the epoxy, helping it adhere better and creating a textured surface that blends with the existing floor.
- Optional: Power trowel: If you’re working on a large area, consider renting a power trowel. It can save you time and effort, but it’s an additional cost (around $50 – $100 per day).
Layering strategy and edge control
Building your patch in thin layers is key to creating a seamless transition. Here’s how:
Thin layers: Apply the epoxy in thin, even coats. This helps prevent ridges and ensures that the patch tapers smoothly into the existing floor.
Start at one edge of your patch and work your way across. Use your feathering trowel to spread the epoxy outwards, creating a gradual taper as you approach the edges.
Single fill: If your patch is small or shallow, you might be able to fill it in one pass. However, make sure to use your tools to create a smooth, tapered edge as you work.
Timing and working with pot life for clean edges
Pot life is the time during which your epoxy remains usable after mixing. Working within this window is crucial for creating smooth, seamless edges.
Work in small sections: Plan your work so that you’re only mixing enough epoxy to cover a small area at a time. This ensures that you can work with the material before it starts to cure.
Start at one edge of your patch and work your way across, using your tools to create a smooth taper as you go. Once you’ve reached the other side, move on to the next section, mixing only enough epoxy for that area.
Don’t overwork the material: Be mindful of how long you’re working with each batch of epoxy. If it starts to thicken or change color, it’s time to move on to a new section and mix up a fresh batch.
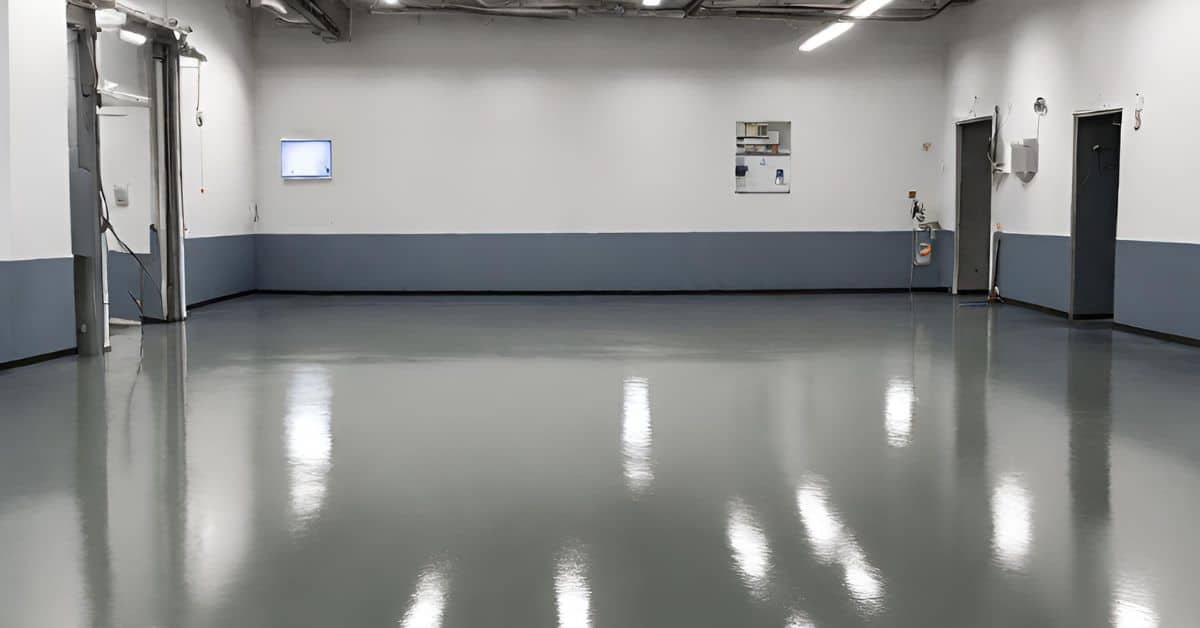
Achieving Consistent Gloss and Sheen Match
Old and new can look different due to surface condition and cure. Identify the gloss level you want by comparing under raking light. Note any dull or glossy patches that stand out.
Use compatible topcoats or sealers and follow cure times to blend the finish. Test a small area to verify the sheen match before proceeding with the entire patch. If you see a halo, plan a light rework to smooth the transition.
Identifying gloss differences and underlying causes
The first step to matching sheen is understanding why your old epoxy and new patches don’t match. Here are the main culprits:
Film Thickness: Too thick or too thin coats reflect light differently, affecting sheen.
Pigment: Different pigments absorb and reflect light at varying rates, altering gloss.
Surface Profile: The texture of the surface affects how light bounces off it. Mechanical profiling should be consistent across the entire floor to avoid this.
Using topcoats and recoat strategies for sheen match
A topcoat can help equalize gloss across the repaired area. Here’s how:
Apply a uniform coat of clear or tinted topcoat over both the repair and surrounding area after full cure.
Choose your sheen level wisely: Match the existing floor’s sheen as closely as possible. If you’re unsure, test in an inconspicuous spot first.
Remember, a topcoat also protects your epoxy from UV damage and wear, so it’s a good idea regardless of sheen matching.
Polishing, abrading, or burnishing to blend sheen
After your epoxy has fully cured (usually after 72 hours), you can fine-tune the sheen with some light mechanical finishing:
Light Sanding: Use a fine-grit sandpaper (around 400-600 grit) to lightly abrade the surface. Wipe off dust thoroughly.
Polishing or Burnishing: Use a buffer with a soft pad and polishing compound to smooth out any remaining texture and enhance sheen.
Test first: Always test these techniques in a small, hidden area before tackling the entire floor. You don’t want to end up with a floor that’s too shiny or has inconsistent sheen.
Curing, Testing, and Troubleshooting Common Defects
After application, allow the material to cure as directed by the label and conditions. Avoid traffic until the product is fully cured according to the instructions. Use simple checks like a firm feel and no tackiness to gauge readiness.
Address common issues by following manufacturer guidance: halos, blush, trapped air, or poor adhesion. Small halos may require blending or rework; adhesion problems often need re-prepping and reapplication. Verify steps with the product data sheet or manufacturer instructions before fixes.
How to test cure and readiness for traffic
Before you start walking on your epoxy patched floor, make sure it’s fully cured. Follow the manufacturer’s guidelines for cure time.
Tack Test: Press a piece of duct tape onto the surface. If it doesn’t stick or peels off easily, your patch is ready.
Edge Check: Inspect the edges of your patch. They should be fully cured and not feel tacky.
Diagnosing and correcting halo or sheen mismatch
A halo effect happens when the edge of your patch is lighter than the rest. Here’s how to fix it:
If you see a halo, it might be due to improper priming or not feathering edges properly during application.
To correct, lightly sand the area with 120-grit sandpaper, vacuum up the dust, and apply another thin coat of topcoat, extending it beyond the original patch edge.
Fixing bubbles, fish-eyes, or delamination
These issues can happen due to contamination, improper mixing, or moisture. Here’s how to fix them:
Bubbles: If you see bubbles, it might be due to trapped air during application. Let the patch sit for a while before sanding and vacuuming. Then apply another thin coat.
Fish-Eyes: These are small, raised areas that didn’t level out. Lightly sand, vacuum, and reapply a thin coat.
Delamination: If your patch is peeling off, it’s not adhering properly. Remove the loose area, clean the surface, prime again, and reapply.
Final Finishing, Maintenance, and Future Repair Planning
Finish with any recommended sealers or top coats to lock in color and gloss. Follow chosen product directions for curing and ventilation during sealing. Keep the surface clean and dry to preserve the repair’s invisibility.
Plan future small repairs by documenting wear patterns and patching strategies. Choose patch materials compatible with the existing coating and note the required prep steps. Refer to labels and data sheets when updating maintenance plans.
Final sealing and edge inspection
Before applying a full-area sealer, ensure your epoxy patch is fully cured and the edges are well-blended.
- Inspect for dust: Ensure no debris has settled on the surface. Wipe with a damp cloth if necessary.
- Check edge blending: Inspect feathered edges to ensure they’re seamless and blend seamlessly into the existing floor.
- Look for missed spots: Check for any areas that may have been missed during application. Fill in with a small amount of epoxy if necessary.
- Test gloss consistency: Compare the patched area to the surrounding floor using a gloss meter or by eye under natural light.
- Feel for tackiness: Ensure the surface is completely cured and not sticky before applying sealer.
- Check temperature: Apply sealer when the floor temperature is between 60-80°F (15-27°C) for best results.
- Humidity check: Ensure relative humidity is below 70% to prevent condensation from forming under the sealer.
- Apply sealer evenly: Use a lambswool applicator or short-nap roller, applying sealer in even strokes, following the direction of the floor’s texture.
Quick rule: Always perform these checks before applying a full-area sealer to ensure longevity and a uniform appearance.
Routine maintenance to preserve gloss match
Maintaining your epoxy floor’s gloss is crucial for preserving its appearance. Regular cleaning with the right products will help keep it looking new.
Use mild, pH-neutral cleaners: Avoid harsh chemicals that can dull or attack the epoxy finish. Stick to cleaners specifically designed for epoxy floors.
For spot scuffs, use a soft-bristled brush or a magic eraser. Gently rub in circular motions until the scuff is gone. Be careful not to scrub too hard and damage the surface.
Regular cleaning: Clean your floor regularly to prevent dirt buildup, which can dull the gloss over time. A weekly mopping with a mild cleaner should suffice.
Planning for future patches and documentation
Keeping records and samples of your epoxy patch will make future repairs easier and less noticeable.
Keep product labels: Store the labels from your epoxy kit in a safe place. These contain crucial information about the product, including its composition and recommended mixing ratios.
Make a small sample patch when you first apply the epoxy. This will serve as a reference for future repairs, helping you match the gloss and color exactly.
Document mixing records: Keep detailed notes on how you mixed your epoxy, including the temperature, humidity, and any additives used. This information will be invaluable when making future repairs.
Conclusion
Get this done right and you’ll have a seamless patch that lasts, looks clean, and won’t trap moisture or dust under a halo. The core idea is simple: choose the right repair path, prep well, and apply with controlled, feathered edges so the finish reads as one surface.
Proceed with a practical check as you go: confirm you’ve chosen patching or resurfacing based on crack width and substrate condition, verify you have the correct tools and materials, clean and roughen the area, mix and tint within the tested ranges, apply in thin passes to feather the edges, and cure with safe temps and ventilation. After curing, test for adhesion and gloss by comparing a small area first, then proceed methodically across the floor in the same order you prepared. If any step is uncertain, pause and recheck your prep and compatibility before moving on.
Common mistakes to avoid are rushing the prep, skipping surface cleaning, and trying to hide damage with a thick coat. Always wear proper safety gear, work in a well-ventilated area, and test a small patch first to confirm color, gloss, and adhesion. Don’t mix or tint beyond recommended ranges, and never apply in temperatures outside the advised range or over a damp floor.
If the substrate is severely cracked, already softened, or moisture is present, or if you’re unsure about compatibility or curing conditions, it makes sense to call a professional rather than push ahead. With careful prep and steady application, you can finish strong and protect the floor for years to come. Stay practical, stay deliberate, and keep the project moving forward with confidence.
FAQ
How do I feather the patch edges to avoid a halo when the epoxy skin is still setting?
Keep the patch slightly thinner at the edges and blend into the surrounding concrete with a trowel or a plastic spreader. Work quickly and lightly to smooth the edge so it tapers into the existing floor without a sharp line.
How can I test and match gloss after the epoxy cures?
Compare the patched spot to the adjacent floor in natural light. If it’s off, you may need another light mist or a light rework following the manufacturer’s guidance. Always check the product label for compatible topcoats and gloss options.
What should I do if I see defects like fish eyes, pinholes, or contamination after patching?
Identify the defect, then follow the manufacturer’s troubleshooting steps or re-clean and relayer as needed. If contamination caused the issue, remove, re-prep, and reapply per label directions.
Is it safe to patch a small area over a larger, already cured repair?
Yes, but prep the surface thoroughly and ensure the new patch bonds to clean, dry concrete and the old patch. Check product instructions for compatibility and cure guidance before proceeding. If in doubt, test a small area first.