

Introduction
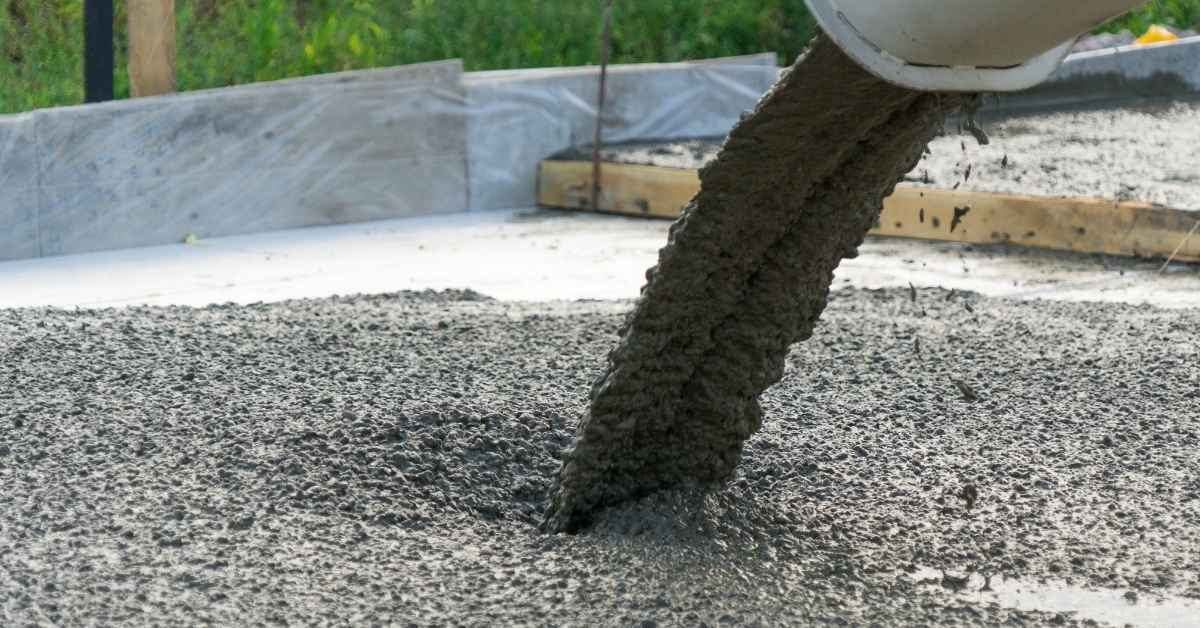
Slump control is the practical effort to keep concrete consistency by watching how much water is added and how the mix behaves as it sets. In DIY terms, it means measuring water carefully and watching the mix feel and settle so each batch pours the same way. This article stays focused on simple, hands‑on checks you can do at the job site.
Consistent water measurement helps prevent weak spots and unpredictable pours, so you don’t have to guess if a batch will set correctly. A basic slump test is a quick way to verify that the mixture looks and behaves like the previous batch, without needing special equipment. Be mindful of factors such as water added during transport, ambient temperature, and how the aggregate and cement proportions might vary between batches.
Key takeaways
- Understand slump as the fresh concrete’s workability and flow under load.
- Precise water measurement is essential for consistent slump between batches.
- Perform a slump test by filling, rodding, and measuring settlement per standard.
- Document batch water added and adjust subsequent batches to reduce variability.
- Inspect surface finish and color to align with batch-to-batch expectations.
- Safety: wear PPE, avoid exposure to wet concrete, and manage slip hazards.
Table of Contents
- Introduction
- Key takeaways
- Understanding Slump and Why Consistent Water Measurement Matters
- Tools and Materials Checklist for Accurate Water Measurement
- Step-by-Step DIY Methods to Measure and Control Water Per Batch
- Slump Testing and Fresh Concrete Tests for Batch-to-Batch Matching
- Techniques to Match Batch-to-Batch Color and Surface Consistency
- Common Mistakes, Troubleshooting, and Mitigation Strategies
- Planning and Quality Control for Multi-Day or Large Pours
- Safety, Environmental Factors, and Cost Implications of Inconsistent Slump
- Conclusion
- FAQ
Understanding Slump and Why Consistent Water Measurement Matters
Slump describes how fresh concrete flows and settles, revealing its workability and potential for hand-tamped placement and surface finish. It serves as a practical indicator of how the mix will perform during finishing and shaping. Small changes in slump can translate to noticeable differences at the surface.
Precise water measurement links directly to slump targets and the water-cement ratio, which in turn affects batch predictability. Tracking water input helps maintain consistent workability across pours and batches. Variations in water influence strength development, finish quality, and color uniformity, making careful control essential.
What slump tells you on site
Slump readings provide crucial insights into the workability, flow, and consistency of fresh concrete. This helps you make informed decisions about placement and finishing.
High slump indicates easier pouring and spreading, making it ideal for pumping or placing in complex forms. However, it may lead to segregation if not monitored.
Low slump, on the other hand, suggests concrete that’s harder to place and finish, but has better stability and reduced risk of segregation. Retest if initial readings are unexpected or vary significantly from target.
How water affects workability, strength, and color
Water content plays a significant role in concrete’s properties. Small changes can impact flow, set behavior, final strength, and appearance.
Low water content (low w/c ratio) results in stiffer, stronger concrete with better durability but reduced workability. It’s ideal for structural elements where strength is paramount.
High water content (high w/c ratio) improves workability and ease of placement but can compromise final strength and increase the risk of cracking. It’s typically used in non-structural or heavily reinforced elements.
Monitor weather conditions as they can affect water demand and concrete properties. Maintain a consistent water-cement ratio across batches to ensure predictable performance. If water content is too low (w/c < target), increase water within design limits or adjust cementitious materials. If it’s too high (w/c > target), reduce water or add cementitious materials to maintain strength and appearance.
Tools and Materials Checklist for Accurate Water Measurement
Essential measurement tools include calibrated containers, nested jugs, a digital scale or inline flow meter, and a thermometer for water temperature. Verify calibration regularly and keep units consistent (liters vs gallons) with quick pre-batch checks. Maintain clean tools to prevent measurement drift.
Document batch water precisely and avoid on-site adjustments that disrupt mix consistency. For small crews, consider portable measuring sets; for larger pours, use bulk water systems with clear accountability. Establish roles to measure, record, and adjust so workflow remains smooth.
Measuring devices and calibration
Before starting your concrete mix, ensure you have the right tools for accurate water measurement. Use this checklist to verify your equipment.
- Graduated buckets: Check markings are clear and consistent. Confirm against a known volume before use.
- Flow meters: Ensure consistent water pressure and temperature for accurate readings. Calibrate against a scale or known volume first.
- Water meters: Verify display accuracy and units (liters vs gallons). Calibrate if necessary.
- Hand-held probes: Test in water to ensure proper functioning before use.
- Thermometer: Check temperature range covers your needs. Calibrate against a known temperature source.
- Digital scale (optional): Verify display accuracy and units. Calibrate if necessary.
- Inline meters (for larger jobs): Ensure consistent water pressure and temperature. Calibrate before use.
- Collapsible containers: Check for leaks or cracks. Confirm volume markings are clear.
Quick rule: Always perform quick checks before each batch to ensure accuracy.
Batch recording, scales, and admixture dosing tools
Accurate batch records and precise admixture dosing are crucial for consistent mix quality. Here’s what you need:
- Batch tickets: Include fields for water volume, temperature, time of mixing, and admixture types/doses. Use a durable, weather-resistant material.
- Digital scales (for cement/aggregate): Verify display accuracy and units. Calibrate if necessary. Rent or borrow for larger jobs.
- Accurate dispensers (for liquid admixtures): Check nozzle size and flow rate. Clean after each use to prevent clogging.
- Portable printers (optional): Print batch tickets on-site for easy reference during pours.
- Temperature probes (optional): Monitor water temperature in real-time. Calibrate against a known temperature source.
Step-by-Step DIY Methods to Measure and Control Water Per Batch
Set up the batch with a clear target water-cement ratio or slump, and gather accurate tools and the mixing vessel. Confirm batch size and the approved mix design before starting. Establish a starting point for water based on the plan.
Add water in small, repeatable increments with thorough mixing between additions. Log each increment and note its impact on slump and consistency. After final mixing, perform a quick slump or flow check and record the result for batch tracking.
Step-by-Step Process
The following steps outline a practical workflow for measuring and controlling water per batch, ensuring consistent concrete workability and strength.
- Prepare your workspace: Follow safety guidelines, use calibrated tools, and maintain a clean workspace to ensure accurate measurements and safe handling of materials.
- Confirm target w/c ratio or slump: Review mix design or supplier guidance to determine the desired water-to-cement ratio or slump for your concrete batch.
- Gather accurate tools: Collect graduated containers, tared scale, mixing vessel, and other necessary tools to ensure precise measurements throughout the process.
- Verify batch size and mix design: Double-check the required batch size and mix design to avoid errors during the measurement and mixing stages.
- Measure water incrementally: Add water in small, repeatable increments with thorough mixing between additions. Log each increment and observe its impact on slump and consistency.
- Perform a quick slump test: After final mixing, conduct a slump or flow test to compare results with the target and record them for batch-to-batch tracking.
- Adjust as needed: If slump test results are outside the target range, adjust water addition, re-test, and document changes to maintain consistent concrete properties.
- Clean up and store tools: After completing the batching process, clean and store your tools properly to ensure their longevity and accuracy for future use.
Pre-batch setup and target water determination
Accurate initial setup is crucial for consistent results throughout the batching process. Begin by confirming your batch size and mix design.
Target Water Determination: Review your mix design or supplier guidance to determine the target water amount required for your specific concrete batch. This information will help you establish a baseline for water measurement using calibrated tools.
Gather graduated containers, tared scale, mixing vessel, and other necessary tools to ensure precise measurements during the batching process. Having the right equipment at hand helps maintain efficiency and accuracy throughout the workflow.
On-site batching protocol and verification
The sequence for adding measured water, recording volumes, using the slump test to confirm, and addressing deviations from the target ensures batch-to-batch consistency in concrete workability.
Consistent Water Addition: Use a consistent measurement method (volume-based or weight-based) for accurate water addition. Thoroughly mix the concrete between each water increment to ensure even distribution and proper hydration of cement particles.
Perform a quick slump test after final mixing to compare results with the target and record them for batch-to-batch tracking. This verification step helps maintain consistent concrete properties across different batches, ensuring optimal workability and strength.
If slump test results deviate from the target, adjust water addition, re-test, and document changes. Addressing these deviations promptly helps maintain the desired concrete consistency throughout your project.
Slump Testing and Fresh Concrete Tests for Batch-to-Batch Matching
Essential fresh concrete tests include slump, temperature, air content, unit weight, and workability indicators to monitor consistency. These tests help compare batches and identify deviations early. Use standardized methods where possible.
Test timing should align with the placement plan, including before, during, and after placement. Follow a routine for sampling size, location, and timing to ensure reproducibility and traceability. Record results and apply decision rules consistently.
Performing a representative slump test
The slump test is crucial for monitoring concrete workability across batches. Follow these steps to perform an accurate test:
1. Ensure the cone is clean, dry, and free of debris before each test. A dirty or wet cone can affect results.
2. Fill the slump cone (ASTM C143/C143M dimensions) in three equal layers, rodding each layer 25 times to consolidate the concrete.
3. Lift the cone vertically and measure the slump immediately. If the value is outside your target range, adjust water content or retest after adjustment.
Complementary fresh tests: temperature, unit weight, and air content
Regular checks of these properties help diagnose consistency or material changes affecting slump and finish. Here’s how to monitor them:
1. Temperature (ASTM C1732): Test promptly after sampling to avoid heat loss. Maintain temperature within set bands to ensure consistent concrete behavior.
2. Unit weight (ASTM C138): Measure the weight of a known volume of fresh concrete. Deviations may indicate material changes or segregation, requiring investigation and adjustment.
3. Air content (ASTM C231): Monitor air entrainment to maintain desired levels and prevent excessive bleeding or segregation. Trends in results may signal the need to update testing frequency or targets.
Techniques to Match Batch-to-Batch Color and Surface Consistency
Establish a repeatable water-management protocol by measuring every batch with the same method and documenting environmental factors. Keep rainfall, surface moisture, and adjustments in the records to minimize drift. Use consistent input to maintain color uniformity across pours.
Standardize pigment handling and batch integration with pre-weighed materials and dedicated mixing steps. Avoid on-site pigment adjustments to reduce color drift. Lock in a single mix design and track material lots to support uniform appearance across a project.
Controlling mix design, cement, and aggregate sources
Consistency in your concrete’s visual uniformity begins with maintaining the same mix design across batches. This includes keeping the same brand and type of cement, as well as using a single source for your aggregates.
Document any substitutions to ensure you can trace any variations back to their source.
If a substitution is necessary, perform trial mixes to confirm that workability, strength, and color remain consistent. Regularly review material certificates and compare them with previous batches before mixing to maintain batch-to-batch uniformity.
Finishing, curing, and timing that affect color
The methods used for finishing, curing, and the timing of these processes significantly impact your concrete’s surface appearance and texture. To maintain consistency across pours, ensure these steps are identical for each batch.
Inspect finished surfaces before curing begins to check for any visible inconsistencies. Implement a consistent cure approach, such as moisture retention or temperature control, to further minimize variation.
If mockups or test panels are available, use them to set expectations and validate your finishing methods and cure approaches. If color variation is observed, review and adjust these processes to maintain consistency.
Common Mistakes, Troubleshooting, and Mitigation Strategies
Identify frequent on-site mistakes that affect slump, such as adding water without updating the batch sheet or making mid-pour adjustments. Observe moisture variations in aggregates and ensure accurate slump readings. Document all readings and changes to prevent repeat issues.
Use a structured troubleshooting flow for drifting slump: verify samples, check logs, inspect equipment, and confirm measured water. Define corrective actions for existing batches and specify when re-mixing or discarding is necessary. Implement prevention through predefined procedures and clear roles.
Risks of adding water on-site and safe alternatives
Adding water without proper recording or control can lead to inconsistent slump, reduced concrete strength, and increased permeability. This compromises the quality and durability of your final product.
To mitigate these risks:
Ensure water is added only by authorized personnel following approved procedures. Pre-measure and calibrate water in labeled containers to maintain consistency. Use batch records to track additions, refusing any unrecorded on-site requests for water addition.
Instead of ad-hoc water additions, consider controlled alternatives such as measured top-up water or requesting a re-batched load to maintain slump consistency and quality.
Fixes for high/low slump, segregation, and streaking
High or low slump, segregation, and streaking can result in poor workability, reduced strength, and aesthetic issues. Here’s how to troubleshoot these common problems:
For high/low slump:
Inspect mixing equipment and tools for cleanliness and functionality. Check your mix design, cement, and aggregate sources. Verify admixture dosages and types. If necessary, adjust admixture or mix proportions to achieve the desired slump.
For segregation/streaking:
Remix the batch to redistribute aggregates and ensure homogeneity. Consider using corrective admixtures if segregation persists. Always check supplier guidance for limits on admixture use and document any changes made.
Planning and Quality Control for Multi-Day or Large Pours
Establish a master pour schedule and batch-log system to track each day’s mixes, batch IDs, slump targets, and visual outcomes to maintain consistency across pours. Define a stable mix design window for multi-day pours, with target slump, cement content guidance, moisture handling, and approved preventive adjustments to prevent drift. Create a pre-pour QC checklist and sampling plan that covers who tests, how often slump/flow tests are performed, equipment calibration, and documentation workflow.
On-site measurement and control protocols: pre-measure all water and admixtures, prohibit on-site water adjustments, and maintain a controlled environment (temperature, curing plan) to minimize slump variation. Contingency planning and documentation: weather and delay protocols, alternate batch plans, cross-day color/finish continuity steps, and client-facing sign-offs to manage expectations. Skipping pre-pour planning may result in inconsistent slump across pours, leading to visual discontinuity and potential issues.
Batch sequencing, mockups, and reserve batches
To minimize variation across multi-day or large pours, sequence your batches strategically. Maintain consistent mix proportions and slump targets by producing batches in a specific order.
Before starting main pours, produce mockup slabs to validate visual consistency. This quick check allows you to detect any variation early on and make necessary adjustments.
Keep reserve batches for touch-ups and comparisons throughout the project. If variation is detected in mockups, adjust your batch sequence or mix design accordingly.
Communication, acceptance criteria, and recordkeeping
Maintain daily logs of slump, water added, temperature, and any adjustments made to ensure all parties are aligned. This quick check helps track pours’ progress and maintain consistency.
Establish clear acceptance limits for slump, visual appearance, and other relevant properties. If slump or visual variation exceeds these limits, communicate with the batch plant to adjust the mix.
Implement regular communication checkpoints between the batch plant, foreman, finisher, and other stakeholders. This ensures everyone is on the same page and pours meet expectations throughout the project.
Safety, Environmental Factors, and Cost Implications of Inconsistent Slump
Follow safety protocols during mixing and slump testing, including PPE and proper handling of concrete. Use containment and appropriate tools to minimize exposure during tests. Have quick-response procedures for spills or exposure events.
Environmental factors such as temperature and humidity can alter water demand. Adjust targets or postpone pours if conditions warrant. Document water measurements, batch adjustments, and maintain clear client-facing records to reflect risk and planning decisions.
Health & Safety During Mixing and Testing
Wear appropriate personal protective equipment (PPE), including gloves, safety glasses, and a hard hat, when handling concrete. Ensure proper ventilation in the mixing area to minimize dust inhalation.
Never add water directly to the mix. Always maintain a safe distance from the mixer during operation. In case of spills or exposures, follow your site’s quick-response procedures.
When performing slump tests, use appropriate tools such as a slump cone and tamping rod. Ensure the test is conducted on a flat, stable surface to minimize exposure and maintain accuracy.
Weather, Substrate, and Sustainability Considerations
Temperature, humidity, wind, and sun exposure can affect concrete’s water demand. Hot temperatures increase evaporation, requiring more water to maintain slump. Conversely, cold temperatures slow hydration, reducing water demand.
High humidity may also increase water demand, while a dry or absorbent subgrade can absorb water from the concrete, leading to premature stiffening. Monitor these conditions and adjust your slump targets accordingly.
Minimize water usage for sustainability. Postpone pours if weather conditions are extreme to prevent excessive water adjustments. Always follow local regulations for environmental protection during construction.
Conclusion
Consistent water measurement and careful batch matching protect safety, durability, and the finished look of your concrete work. When you control slump reliably, you reduce cracks, uneven surfaces, and costly rework, even on multi-day pours or large slabs.
To proceed, verify your measurement setup and follow a simple flow: confirm the water source and measuring tools are clean and calibrated, mix a small trial batch to check slump and color, adjust water in measured increments and re-test, document the final batch data, and apply the same procedure to each subsequent batch with checks at key milestones and after any equipment changes. Always wear appropriate PPE and keep the work area organized to prevent errors and accidents.
Common mistakes include changing water without rechecking slump, skipping fresh-concrete tests when batching, and rushing pours or environmental changes that affect setting. Safety rules are essential: test in a small area first, document results before expanding the pour, and pause if weather, temperature, or mixing conditions depart from the plan. If conditions are beyond your control or results remain inconsistent after careful testing, consider bringing in a qualified professional to verify mix design, equipment, and batch procedures. With disciplined checks and clear records, you can achieve reliable slump, consistent color, and a durable, professional finish.
FAQ
What is slump in concrete?
Slump is a measure of the concrete’s workability and consistency. It reflects how far the concrete flows when placed in a cone or mold. Checking slump helps gauge whether your mix has the right water content for the batch.
Why is consistent water measurement important?
Consistent water measurement helps each batch behave the same way. It reduces the risk of unexpected changes in workability, strength, and surface finish. Rely on clear instructions from the mix supplier and follow a standardized procedure.
What are the steps for performing a slump test?
Prepare the testing setup as recommended by the supplier. Fill the slump cone in two or three layers, tamping each layer as instructed. Remove the cone and measure the subsidence of the concrete to determine the slump value.
What factors affect batch-to-batch consistency?
Variations in water content, aggregate moisture, mixing time, and ambient weather can all influence consistency. Check the materials’ moisture content, follow the same mixing procedure, and document any deviations for future reference.