
Introduction
This article helps you identify common concrete finishes and apply them confidently for durable, attractive results. You’ll learn practical steps, tips, and quick checks you can perform during preparation and finishing to ensure quality and consistency.
Key takeaways
- Assess concrete pH and moisture before finishing to prevent adhesion failures.
- Use a proper surface profile: etch or grind to open pores for better bonding.
- Plan curing regime early; keep damp or use curing compound as needed.
- Seal within spec window after final finish to minimize dusting.
- Use edging and masking to protect adjacent surfaces during finishing.
- Document your steps and timings for consistent DIY results next project.
Table of Contents
- Introduction
- Key takeaways
- Overview of Common Concrete Finishes
- Surface Preparation: The Foundation of a Good Finish
- Application Techniques for Each Finish Type
- Tools and Equipment: What DIYers Need vs. Pros
- Curing, Sealing, and Protective Coatings
- Visual Checkpoints and Quality Control for DIYers
- Troubleshooting Common Problems and Mistakes
- Cost, Time, and Project Planning for DIY Concrete Finishes
- Conclusion
- FAQ
Overview of Common Concrete Finishes
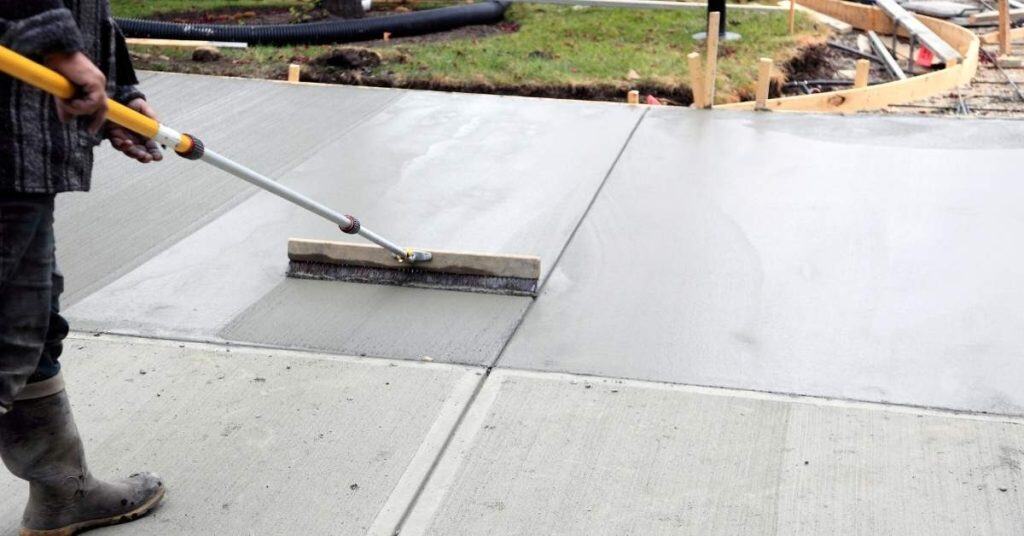
Concrete finishes come in several popular looks. A broom finish leaves texture for grip and is common for exterior slabs like sidewalks and driveways. For a smooth indoor surface, a trowel finish works best; other options include exposed aggregate, stamped, polished, and acid-etched, each with a distinct look.
Choose the finish based on foot traffic, maintenance, and how the surface will be used. For DIY projects, plan ahead about curing and simple tools, and be honest about your skill level to avoid bad results.
Quick comparison table
Broom finish offers a rough, textured surface that provides excellent slip resistance and is ideal for outdoor areas like driveways. It’s cost-effective but less aesthetically pleasing compared to other finishes.
Trowel finish gives concrete a smooth, polished look with minimal texture. This finish works well indoors where aesthetics are important, though it offers lower slip resistance than broom finish.
Exposed aggregate provides a unique, natural stone appearance by leaving small stones on the surface. It’s more expensive due to material costs and is best suited for outdoor areas that benefit from its aesthetic appeal and moderate slip resistance.
Stamped concrete mimics the look of brick, slate, or other materials through patterns and coloring techniques. This finish adds significant cost but offers a high-end appearance suitable for patios and walkways where visual interest is key.
When to choose which finish
The decision on concrete finish depends largely on the location of your project. For instance, broom finish is ideal for outdoor areas like driveways and sidewalks where slip resistance is crucial.
If you’re working indoors or in high-traffic areas that need a sleek look, go with trowel finish. This option provides a smooth surface but may not be as practical outdoors due to its lower slip resistance.
For outdoor spaces that require both aesthetics and functionality, consider exposed aggregate or stamped concrete. These finishes offer unique appearances and can enhance the curb appeal of your property, though they come with higher costs compared to simpler options like broom finish.

Surface Preparation: The Foundation of a Good Finish
Surface prep is the foundation of a good finish. You must inspect the slab, set up formwork, screed as needed, cure properly, and clean thoroughly. Address any cracks or uneven spots before you lay down finish.
Skimp on prep and you’ll pay later with cracks, pops, and a finish that doesn’t last. Doing the right prep stops problems before they start and saves you time and money in the long run. If you need specifics like cure times or mix instructions, check the label/datasheet for the product you’re using.
Substrate inspection checklist
Use this checklist before pouring new concrete to ensure the existing surface is ready.
- Inspect for cracks. Look for any visible cracks and confirm with a ruler; cracks can cause structural issues if ignored.
- Check moisture levels. Use a moisture meter or plastic sheet test; high moisture can lead to poor bonding.
- Look for contamination. Check for dirt, oil stains, or debris; these can affect the finish quality and adhesion.
- Assess surface level. Use a straightedge or laser level; uneven surfaces require leveling before pouring concrete.
- Test existing slab strength. Tap with a hammer to check for hollow sounds; weak spots need repair.
- Check for spalling. Look for chipped, flaked areas and confirm with a visual inspection; spalling can weaken the structure.
- Evaluate surface cleanliness. Wipe down test area with water; dirt or residue can prevent proper bonding.
- Look for previous repairs. Inspect old patches and confirm by probing; poor repair work needs redoing.
Quick rule: Always inspect the substrate thoroughly to avoid future problems.
Tools and materials checklist for prep
This list ensures you have everything needed before starting concrete work.
- Trowels of various sizes. Use for smoothing; ensure they are clean and sharp.
- Floating tools. For leveling and compacting; check their condition and replace worn ones.
- Brooms or brushes. For texturing; choose the right type based on desired finish.
- Cure products. Essential for protecting new concrete; apply immediately after finishing.
- Grinders and sanders. For surface preparation; ensure they are in good working order.
- Bonding agents. To improve adhesion between layers; check expiration dates.
- Screed boards. For leveling concrete; measure for straightness before use.
- Masonry saws. For cutting and shaping; ensure blades are sharp and secure.
Quick rule: Have all tools ready to avoid delays during prep work.
Application Techniques for Each Finish Type
Each finish type has its own best method, and you should follow the finish-specific steps for broom, trowel, exposed aggregate, stamped, polished, and acid-etched surfaces. Work in clean, manageable sections and use steady, even pressure with the right tool for the job. Always check the product label or datasheet for any specifics on prep, curing, or maintenance.
This matters because the right technique prevents streaks, gaps, and chipping that DIYers notice fast. Practice on a small area first and keep things consistent. If you’re unsure, follow the manufacturer guidance and avoid ad hoc tweaks that can ruin the finish.
Small-job tips (patios, walkways, small slabs)
For smaller concrete projects like patios and walkways, timing is everything. Start by laying out the area with stakes and string lines to ensure straight edges and proper alignment.
Once you have your formwork set up, mix your concrete in manageable batches. You want enough for a smooth pour but not so much that it sets before you can finish it. Aim for about 10-20 minutes of working time per batch depending on the weather conditions.
With small pours, one person can usually handle the job solo. But if you have helpers, assign them specific tasks like raking or troweling to keep things moving smoothly without overworking any part of the concrete surface.
Working with helpers and timing
When working on larger projects that require multiple people, coordination is key. Start by laying out your plan for each step: bleed water removal, strike-off, and finishing.
The first helper should focus on removing excess water from the surface as soon as it appears. This helps prevent a weak layer of concrete at the top. Once this is done, move to the next phase with another person raking or floating the surface smooth.
Timing is crucial here; you need to finish within the window when the concrete is still workable but not too wet. Use your experience and check for the right consistency by pressing a thumb into the mix—when it leaves an impression without sticking, it’s ready to be finished.
Tools and Equipment: What DIYers Need vs. Pros
For most home projects, you can get by with a solid basics kit. Some jobs, like finish work with power trowels, heavy grinders, or stamp gear, really need a pro or rental. Decide: if the tool will sit idle for most of the project, rent or hire instead of buying.
Know what you’ll save and what you’ll risk by skimping on the right tool. Renting gives you better capability without tying up cash, and it comes with support for setup and safety. Always check the label or datasheet for runtimes and maintenance to avoid surprises.
Rental vs. Buy Decision Guide
When deciding whether to rent or buy concrete finishing equipment, consider the frequency of use. For rare jobs like stamping a patio, renting is cost-effective and avoids storage hassles.
If you plan on doing more than one project in a year that requires specific tools such as power trowels or grinders, buying might be worth it. These tools can last years with proper care and maintenance.
For basic hand tools like floats and brushes, purchasing is usually the better choice since they are inexpensive and essential for most concrete work.
Safety Gear and Setup
Before starting any concrete finishing project, ensure you have the right safety equipment to protect yourself from dust, debris, and chemicals. Here’s what you need:
- Eyewear protection: Safety glasses or goggles prevent dust and splashes from damaging your eyes.
- Respirator mask: A respirator is crucial when working with concrete dust to avoid inhaling harmful particles.
- Knee pads: Protect your knees while kneeling on rough surfaces for extended periods. Look for padded knee pads that offer good support and comfort.
- Work gloves: Thick, durable gloves protect hands from cuts, scrapes, and chemical burns when handling concrete mix or acid etching solutions.
- Ventilation setup: Ensure proper ventilation when using power tools like grinders or polishers to avoid inhaling dust. Consider renting a portable air filtration unit if needed.

Curing, Sealing, and Protective Coatings
Curing, sealing, and protective coatings are all about how the surface ends up. Curing is how the material hardens and gains strength. Then you choose a sealer or coating to protect and finish the look—penetrating, film-forming, acrylic, epoxy, or urethane—and you follow the product label.
Understanding the options helps you avoid a failed DIY job. The right coating matters for the finish type you want, and inappropriate choices can peel or wear fast. Always read the label or datasheet for exact guidance and methods, and beware bad practices like skipping cure steps or using the wrong product for the surface.
Quick checks for proper curing
To ensure your concrete is ready for sealing, you need to perform a few simple tests. First up, the plastic sheet test: lay down a piece of clear plastic on the surface and leave it overnight. If there’s no visible moisture under the sheet when you lift it in the morning, your slab is likely cured enough.
Another quick check involves observing the color and strength of the concrete itself. Well-cured concrete should have a uniform grayish tone without any chalky patches or soft spots. It should also feel firm to the touch—no squishing under pressure means it’s ready for sealing.
If you’re still unsure, consider using a moisture meter designed specifically for concrete. This tool gives precise readings and takes out the guesswork. Remember, rushing into sealing can lead to poor adhesion and other issues down the line, so take your time with these checks.
Maintenance schedule and recoat guidance
Keeping an eye on your concrete’s condition is key. For most finishes, a good rule of thumb is to reseal or recoat every 2-5 years depending on exposure to elements like sun, rain, and traffic. Start by checking for signs of wear such as cracks, fading color, or loss of shine.
For penetrating sealers, look out for areas where water no longer beads up—this indicates the sealer is wearing off. Film-forming sealers will show signs of peeling or cracking if they need to be redone. Acrylic and epoxy coatings might start showing wear at high-traffic points like entryways.
When recoating, make sure to clean the surface thoroughly first. Use a degreaser for oil stains and a concrete cleaner for dirt and grime. Let it dry completely before applying new sealer or coating according to manufacturer instructions. Regular maintenance keeps your concrete looking great and protects against damage over time.
Visual Checkpoints and Quality Control for DIYers
Visual checkpoints mean you inspect room by room and surface by surface. Look for defects like trowel marks, scalping, popouts, and inconsistent aggregate exposure as you go. Trust your eyes and fix issues before grout or finish goes on.
This habit saves you rework and surprises later. If you’re unsure about a detail, check the label or datasheet for guidance.
Fast on-site fixes for common problems
Use this checklist when you spot minor issues during your daily walk-throughs.
- Minor cracks: Check if they are hairline and not structural. Fill with epoxy or concrete patch.
- Trowel marks: Look for visible tool lines. Smooth out with a float before the concrete sets.
- Inconsistent aggregate exposure: Ensure stones are evenly spread. Adjust by adding more sand and cement mix.
- Popping out: Check if small pieces of aggregate have come loose. Fill voids with patching compound.
- Efflorescence: Look for white powder on the surface. Clean with water and mild acid wash.
- Scalping: Inspect for thin spots where material is worn away. Add more concrete to build up low areas.
- Bubbles or honeycombs: Check if air pockets are present. Fill voids with grout or patching compound.
- Uneven surface: Ensure the slab is level. Use a straight edge and adjust with additional concrete as needed.
Quick rule: Address issues immediately to prevent bigger problems later on.
When to call a pro
Use this checklist when you notice signs of serious structural or material issues.
- Structural cracks: Check if they are wide and run through the slab. Call in an expert for assessment.
- Larger settlement: Look for uneven ground where concrete has shifted significantly. Professional help is needed to stabilize.
- Severe efflorescence: If white powder covers large areas, it may indicate moisture issues. A professional can diagnose and treat the root cause.
- Deep honeycombs or voids: Check if there are significant air pockets or missing concrete. Professionals have equipment to fill these properly.
- Inconsistent curing: If parts of the slab look different in color, texture, or hardness, it could be a sign of improper curing methods. Seek expert advice on how to proceed.
- Moisture issues: Look for dampness that doesn’t dry out quickly. Professionals can install vapor barriers and other moisture control measures.
- Uneven aggregate exposure: If the surface looks patchy with too much or too little stone, it might affect durability. A professional can provide a more uniform finish.
- Bubbles on large areas: If air pockets cover significant sections of concrete, they may weaken the structure. Professionals have techniques to address this effectively.
Quick rule: Don’t hesitate to call in experts for major issues that could compromise safety or structural integrity.
Troubleshooting Common Problems and Mistakes
This section helps you diagnose common problems like poor bonding, discoloration, pitting, and slippery surfaces. You’ll get practical, step-by-step fixes you can do yourself. We call out what to check first and how to avoid repeating mistakes.
Understanding the root causes saves time, money, and headaches, and keeps you safe on the job. Following the steps helps you choose the right approach, avoid rework, and finish with a solid, lasting bond.
Causes and cures for discoloration
Discoloration can be a real headache on your concrete project. Common culprits include water pooling, inconsistent mix ratios, or issues during the curing process.
To tackle this problem, start by cleaning the surface thoroughly to remove any dirt or stains. If that doesn’t work, you might need to grind down the affected areas and then reseal the entire slab for a uniform look. Remember, sealing is key—it helps prevent future discoloration from water and other elements.
Another tip is to check if your concrete mix had too much or too little of certain ingredients like cement or aggregates. Adjusting these ratios can help avoid similar issues in the future.
Dealing with surface texture issues
If your concrete finish is either too smooth or too rough, you’ll need to take action. A smooth surface might mean poor traction and durability, while a rough one could be uncomfortable underfoot.
To fix overly smooth surfaces, consider adding an aggregate topping mix or using a broom finish technique for better grip. For overly rough textures, sandblasting or grinding can help even out the surface without compromising strength.
Resurfacing is another option if you want to completely redo the texture. This involves applying a thin layer of new concrete over the existing slab and then texturing it as desired. It’s a bit more work but gives great results.
Cost, Time, and Project Planning for DIY Concrete Finishes
DIY concrete finishes come down to cost, time, and a solid plan. Costs vary with materials and the finish you want, and you can gauge what feels DIY-friendly without exact numbers. Labor time depends on surface prep, tools, and cure requirements—check the label or datasheet for guidance rather than guessing.
A clear plan keeps you from delays and rework. Rough timelines and contingency steps help you order material and fit the work into weekends or days off. This matters because skipping prep or underestimating weather can wreck a project.
Budget-saving tips without sacrificing quality
When it comes to DIY concrete projects, the key is finding ways to cut costs without compromising on durability or appearance. One effective strategy is renting tools and equipment. Instead of buying expensive items like a concrete mixer or vibrators, consider renting them for just the duration of your project.
Another cost-saving tip is batching small amounts of concrete at a time. This reduces waste and ensures you only mix what you need, which can save on material costs. Plus, it’s easier to manage smaller batches when pouring and finishing.
Lastly, choose sealers that offer good protection without breaking the bank. Look for products that provide budget-friendly coverage while still protecting your concrete from moisture and wear. Remember, a little extra upfront can save you big in maintenance costs down the line.
Quick permit and code considerations
Before starting any DIY concrete project, it’s crucial to check local building codes and obtain necessary permits. This ensures your work meets safety standards and won’t face issues later on.
A key aspect is drainage compliance. Make sure your pour will not impede water flow or cause flooding issues. Proper grading around the concrete area is essential to direct water away from structures.
Additionally, pay attention to slip-resistance requirements, especially for walkways and patios. Concrete can be slippery when wet, so adding aggregates like sand or gravel during finishing can enhance traction.
Finally, don’t forget about expansion joints. These are necessary to accommodate concrete’s natural expansion and contraction due to temperature changes. Proper placement of these joints will prevent cracking over time.
Conclusion
Getting a durable, good-looking concrete finish comes down to careful steps you can handle—focus on safety, proper prep, and follow-through. When you lock in clean surfaces, controlled application, and solid curing, you protect against costly damage and big surprises later.
Start with a clean, dry surface and verify level and crack-free conditions, then fix any defects, choose a finish type you can manage, apply per manufacturer guidance in small sections, keep the temperature and humidity in the required range, test a sample first, cure and seal as planned, protect the work from moisture during curing, and clean tools immediately after use.
Common mistakes to avoid are overworking the surface or applying finishes too thick, skipping curing time or sealing too early, and ignoring temperature or ventilation needs. A few simple rules: work in manageable sections, follow the product’s directions to the letter, and never rush curing or sealing. If you feel unsure about a large area, cracks that keep reappearing, or structural concerns, pause and recheck before continuing.
If the project involves major surface area, complex finishes, or existing damage you aren’t confident handling, consider bringing in a professional. For most DIY jobs, staying methodical, testing small areas first, and prioritizing safety will keep you moving with confidence and prevent costly mistakes—you’ve got this, stay steady and finish strong.
FAQ
What finish should I use for a DIY concrete floor?
Choose a finishing option that fits your use. Smooth and sealed works for garages; trowel-broom textures stay grippy in wet spots. Don’t mix finishes on the same slab unless you test first.
How soon can I walk on a newly finished concrete surface?
Wait at least 24 hours for light traffic if you used a thin sealant. For heavy use or overlays, follow the product directions; rushing it will leave marks or dull patches. When in doubt, give it 48 hours.
What mistakes ruin a concrete finish job?
Overwatering mixes, skipping the curing period, and rushing the trowel work ruin the look. Don’t skip surface prep or you’ll see pits and gray patches. Bad tools, bad technique, bad result.
Do I need a concrete sealer and how often should I reapply?
A sealer protects against stains and wear. Reapply according to the product and traffic level, usually every 1–3 years. If the surface looks dull or stains soak in, it’s time for a recoat.