
Introduction
Diagnosing soft stucco means using simple probing to tell if the issue is surface erosion or actual lath failure.
This hands-on approach helps you identify trouble without tearing the whole wall apart. You’ll base any next steps on what the probe reveals about attachment and depth.
Start with gentle, vertical and horizontal probing at a few suspect areas and note how much give you feel.
If the probe sinks easily or you hear a hollow sound, pause and recheck nearby areas and moisture conditions. Always verify with manufacturer instructions or local rules if a repair is indicated, and plan a cautious, staged approach.
Key takeaways
- Inspect for hollow sounding areas when gently tapped; surface erosion may mimic softness.
- Check for cracking patterns near seams indicating lath or plaster substrate failures.
- Probe with a blunt tool; avoid concrete damage, stop if metal underlying shows.
- Verify moisture sources from leaks, poor flashing, or inadequate drainage before probing.
- Document suspect areas with photos and notes for contractor or code checks.
- Follow local permits and safety guidelines; discontinue work if structural risk appears.
Table of Contents
- Introduction
- Key takeaways
- What “Soft” Stucco Means and Why It Matters
- Quick Visual Checkpoints Before You Probe
- Tools and Materials Checklist
- Step-by-Step Probing Tests You Can Do Safely
- Interpreting Probing Results and Decision Rules
- Material Specs, Installation Details, and Standards to Check
- Moisture and Hidden Causes to Investigate
- Safety, Permits, and When to Call a Pro
- Conclusion
- FAQ
What “Soft” Stucco Means and Why It Matters
Soft stucco can hide two very different problems. One is surface erosion that wears away the outer coat. The other is deeper substrate or lath failure beneath the skin.
Understanding which one you’re dealing with matters for aesthetics, moisture control, and safety. Look for clues that point to a superficial issue or something structural that needs attention documented by the manufacturer instructions or local rules when verifying specs.
Surface erosion vs. substrate/lath failure
When you’re dealing with ‘soft’ stucco, it’s crucial to understand what’s causing the problem. It could be surface erosion or deeper substrate and lath failure.
Surface erosion is when the outer coat of your stucco has degraded over time. It looks like a powdery, crumbly mess on the surface.
On the other hand, substrate/lath failure is when there’s an issue with the underlying support structure – either the substrate (the base material) or the lath (the metal mesh that holds everything together). This can cause more serious problems than just a cosmetic eyesore.
Risks and outcomes of misdiagnosis
Misdiagnosing the problem can lead to costly mistakes. If you treat surface erosion like it’s a substrate/lath failure, you might end up tearing out perfectly good material.
But if you do the opposite – treating a substrate/lath failure as if it’s just surface erosion – you’re in for bigger trouble. You’ll be applying new stucco over a weak foundation, which won’t solve the problem and could even make it worse.
Safety is also a concern here. If laths are failing, they can become sharp and dangerous. And if moisture is getting in because of the damage, it could lead to mold growth or structural issues down the line.
Plus, misdiagnosis can void warranties. Many manufacturers won’t cover their products if you’ve fixed the wrong problem. So, it’s important to get this right the first time.
Quick Visual Checkpoints Before You Probe
Scan for crack patterns, especially where lines form unfamiliar shapes or run along edges. Look for areas where the coating peels, delaminates, or lifts from the wall.
Note staining, efflorescence, bulges, and localized loss. These signs help you decide where to probe and whether the problem seems superficial or deep, without tearing into the wall yet.
Where to look first (patterns and locations)
Start your inspection at these common trouble spots. They often show signs of soft stucco first.
- Transitions: Where different materials meet, like walls and roof or walls and floors.
- Window/door openings: These areas are prone to cracking due to settling and expansion/contraction.
- Rooflines: Water can collect here and seep into the stucco.
- Lower courses: Gravity pulls water down, so problems often start at the bottom.
- Corners: Corners are stress points where cracking can initiate.
- Control joints: These intentional lines can crack if not properly installed or maintained.
- Expansion joints: Check these for proper functioning to prevent cracks from forming.
- Parapets and chimneys: These areas are susceptible to wind damage and temperature changes.
Quick rule: Always start at the bottom and work your way up, checking transitions and corners along the way.
Visual clues that suggest moisture or attachment issues
Look for these visual indicators of moisture problems or poor attachment. They point to deeper issues that need immediate attention.
- Stains: Discoloration, especially dark spots, can indicate water intrusion.
- Mold/mildew: Fuzzy growth on the surface signals moisture trapped within.
- Rust streaks: These often appear where metal lath is corroding due to moisture.
- Efflorescence: A white, chalky deposit on the surface indicates water has been present.
- Delamination: Peeling or flaking stucco suggests poor adhesion, possibly due to moisture.
- Bulges and localized loss: These can indicate hidden damage behind the surface.
- Crack patterns: Wide cracks or those with a ‘stair-step’ pattern often suggest structural issues.
- Warping or buckling: These signs point to serious problems with the substrate or lath.
Quick rule: If you see any of these signs, probe the area immediately to determine the extent of the damage.
Tools and Materials Checklist
Gather a small flat screwdriver, an awl, and a keyed probe if available. A rubber mallet and a moisture meter or basic camera can help document findings.
Don’t forget PPE and a notebook or digital recorder to log test results. Always check product labels and manufacturer instructions for any tool-specific cautions.
Probing and Tapping Tools
Before you start probing, make sure you’ve got the right tools. These help you check for soft stucco without causing more damage.
- Small flat screwdriver: Useful for gentle probing, it helps avoid puncturing laths.
- Awl or keyed probe: These pointed tools let you check deeper into the stucco without destroying it. Be careful not to push too hard and damage the laths.
- Rubber mallet: A light tap with this can reveal hollow spots, indicating potential issues. It’s gentler than a regular hammer.
- Moisture meter (optional): If available, use it to confirm moisture presence before and after probing.
- Camera (if available): Take pictures of areas you probe. It helps track changes over time and share findings with professionals.
Quick rule: Always start with the gentlest tool, then progress to more aggressive ones only if necessary.
Safety and Documentation Gear
Your safety and recording your findings are crucial. Here’s what you need:
- Work gloves: Protect your hands from cuts, scrapes, and debris.
- Eye protection: Safety glasses or goggles shield your eyes from dust and small particles.
- Notebook and pen: Record the location, date, and details of each probe. Note any unusual findings.
- Camera (if available): Take pictures of areas you probe. It helps track changes over time and share findings with professionals.
Quick rule: Always prioritize safety first. Wear appropriate PPE before starting any work.
Step-by-Step Probing Tests You Can Do Safely
Start with a gentle surface push or pull to feel for resistance. Move to an edge cut or feel along a suspected boundary to test adhesion.
Then tap or percussion-test a few targeted spots and, if needed, remove a pea-sized area to peek underneath. Keep each test small to avoid creating large damage and defer to manufacturer guidance on safe probing methods.
Step-by-Step Process
This sequence will guide you through safely performing probing tests on your concrete surface to assess its integrity and strength.
-
Preparation: Ensure the area is clear of debris. Use a broom or leaf blower to remove any loose materials.
Why it matters: A clean surface ensures accurate test results and prevents injuries from tripping hazards.
Check: Visually inspect the area for cleanliness before proceeding. -
Safety Check: Wear appropriate safety gear, including gloves, safety glasses, and a hard hat if there’s a risk of falling debris.
Why it matters: Safety is paramount when working with concrete. Always protect yourself from potential hazards.
Check: Ensure all safety gear is in place before starting any work. -
Mark Test Areas: Using a pencil or chalk, mark out the areas where you’ll be performing your tests. This helps maintain consistency and prevents confusion.
Why it matters: Marking test areas ensures you perform tests in the same spots each time, allowing for accurate comparisons over time.
Check: Visually confirm that all test areas are clearly marked. -
Perform Probing Tests: Using a concrete probe or a sledgehammer and chisel, carefully chip away at the marked areas. Be sure to wear safety gear as described in step 2.
Why it matters: Probing tests help identify any cracks, voids, or weak spots in your concrete that may not be visible from the surface.
Check: Inspect the chipped area for signs of damage or weakness. If you find extensive cracking or crumbling, stop and consult a professional immediately. -
Moisture Test (optional): Use a moisture meter to test the concrete’s moisture content before applying any sealers or coatings. This is crucial for ensuring proper adhesion and preventing delamination.
Why it matters: Concrete that is too wet can lead to poor adhesion of sealers and coatings, resulting in premature failure.
Check: Consult the manufacturer’s guidelines for acceptable moisture content levels before proceeding with any sealing or coating work. -
Clean Up: Remove all debris from the test areas using a broom or vacuum. Ensure the area is clean and safe for further work or use.
Why it matters: A clean surface prevents injuries, ensures accurate readings if further testing is required, and maintains a safe working environment.
Check: Visually inspect the area to ensure all debris has been removed.
Pro tip: Always consult local building codes and manufacturer guidelines before performing any tests or applying sealers and coatings. This ensures you’re working within safe parameters and adhering to legal requirements.
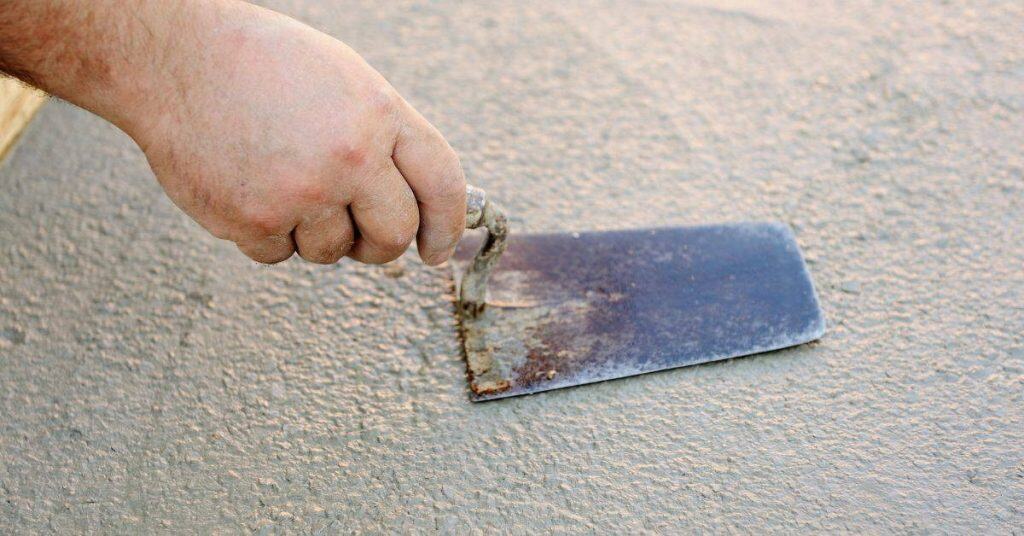
Surface push/pull and press test
Before you start probing, give your walls a good once-over with this simple test. It helps you feel for any loose plaster or weak spots.
Press and pull on the surface at both high and low points. Here’s what to look for:
Loose outer plaster: If it feels soft, crumbles, or moves under pressure, you’ve got a problem with your finish coat. Check base compaction and consider redoing that section.
Firm backing: If the surface feels solid and doesn’t give, that’s what you want. It means your backing is strong and should hold up well.
Tapping/percussion sound test
After checking your concrete’s surface with the push/pull and press test, it’s time to listen up. Grab a hammer or even a screwdriver handle for this one.
Here’s what you do: Tap on different parts of the concrete surface. Listen for the sound. It should be solid, like tapping on a wooden floor. If it sounds hollow, like tapping on an empty barrel, that means there might be separation or voids underneath.
Why it matters: Hollow sounds can indicate poor base compaction, lack of proper curing, or even hidden damage. Don’t ignore them. If you find any, check the area further with a core drill or a probing tool to see what’s going on beneath the surface.
Small-edge reveal or pinpoint cut
Alright, listen up. You wanna check your concrete’s layers without leaving a big ol’ scar? Here’s how:
First, grab a diamond blade or a masonry blade. Not a regular saw blade, that’ll just make a mess.
Now, mark out a small area, about 1″ x 2″. You’re not carving a turkey here, keep it small. Then, using your blade and a steady hand, cut down to the depth you wanna check.
Be careful around rebar. If you hit some, stop, mark it, and come back with a bigger blade or an angle grinder. Safety first, bud.
Interpreting Probing Results and Decision Rules
If the surface remains intact and adhesion is strong, you’re likely dealing with surface erosion. If you feel separation tethered to the substrate, delamination could be present.
Suspicious pins of rusted lath or fasteners and broader movement point toward lath failure or structural concerns. Use confidence levels to guide whether to continue DIY checks or seek a licensed pro after verifying with product data sheets or local codes.
Indicators of surface erosion only
The probe test reveals a thin, crumbly outer coat that flakes off easily. Yet, the backing feels firm and solid under pressure.
Surface erosion is often caused by weathering or improper mixing of the original stucco application.
Confidence level: High. You can proceed with surface repairs immediately.
Indicators of lath or attachment failure
The probe reveals wide hollows behind the stucco, indicating a loss of support from the backing or lath.
Delamination is also a clear sign – the stucco is peeling away from the substrate in large sheets.
Loose fasteners, like nails or screws, that wobble when tapped can indicate attachment failure.
Confidence level: High. Lath replacement or reattachment is necessary before any surface repairs.
Ambiguous results and conservative next steps
If your tests don’t provide clear answers, don’t guess. Targeted probing in specific areas can help clarify the issue.
Check for moisture – it could be causing hidden damage that’s not apparent from initial tests.
Consider hiring a professional stucco inspector if you’re still unsure. They have specialized tools and experience to make accurate diagnoses.
Confidence level: Low to Medium. Further investigation is needed before proceeding with repairs.
Material Specs, Installation Details, and Standards to Check
Identify the lath type, coating thickness, and fastener method where possible. Installation errors often show up as irregular or missing flashings, improper bedding, or inconsistent coating.
Always verify with the actual material specs, installation instructions, and local standards rather than relying on memory or assumptions. Check labels, data sheets, or code references before deciding on repairs.
What to check on product labels and job records
Before you start probing, gather info from your stucco’s labels and job records. This helps pinpoint issues and decide repairs.
- Product name: Look for manufacturer and product names. They’ll guide you to the right specs and repair methods.
- Installation date: Knowing when it was applied helps understand its expected service life.
- Warranty info: Check if there’s an active warranty that covers repairs or replacement.
- Layering details: If available, check how many coats were applied and their types (scratch, brown, finish).
- Lath type: Note the lath used – metal, wood, or synthetic. Each has different failure modes.
- Fastener method: Check if nails, screws, or other fasteners were used and their spacing.
- Weather barrier: Confirm a weather barrier was installed to prevent moisture intrusion.
- Previous repairs: Note any past repairs. They might indicate recurring issues.
Quick rule: Missing or incomplete records? Contact the installer or original homeowner for more info.
Common installation issues that mimic ‘soft’ stucco
Soft stucco can be caused by poor installation. Here are common mistakes to look out for:
Insufficient layering: Too few or thin coats of stucco can cause it to soften and crumble over time.
Wrong lath or fasteners: Incorrect lath type or improperly spaced fasteners can lead to delamination and a ‘soft’ feel.
Missing weather barrier: Without a proper barrier, moisture can get trapped behind the stucco, causing it to soften and fail.
Moisture and Hidden Causes to Investigate
Moisture often travels behind a soft layer and accelerates deterioration. Look for hidden leaks around windows, doors, and roof lines that align with softened areas.
Non-destructive moisture checks and visual patterns help you map affected zones. Use the results to decide whether to pursue remediation or more thorough evaluation with a pro.
Using Moisture Meters and Thermal Imaging
To get a handle on hidden moisture, grab a basic moisture meter or call in a pro with thermal imaging equipment. These tools can’t see through your stucco, but they can map out areas with elevated moisture.
Moisture meters work by sending an electrical current through the wall and measuring its resistance. Wet areas have lower resistance, so the meter beeps or displays a higher reading.
Thermal imaging cameras show temperature differences as colors on a screen. Since water holds heat differently than dry materials, they can highlight moisture patterns even if your stucco feels dry to the touch.
Don’t rely on single readings. Look for patterns – consistent high readings or hot spots that match up with other signs of trouble.
Common Moisture Sources to Inspect
When your stucco starts feeling soft, it’s time to play detective. Here are some common culprits that might be letting water in:
Improperly installed or damaged flashing around windows, doors, and roof intersections can let water seep behind your stucco. Check these areas first.
Faulty roofs or gutters can cause water to back up and find its way into your walls. Inspect your roof for missing shingles or leaks, and make sure your gutters are directing water away from the house.
Windows and doors that aren’t properly sealed can let water in around the penetrations. Check these areas closely, especially after heavy rain.
Lastly, grade and drainage issues can push water up against your foundation and into your walls. Make sure your yard slopes away from the house, and consider installing or repairing gutters if needed.
Safety, Permits, and When to Call a Pro
If you notice large delaminations, obvious structural movement, or widespread corrosion of lath and fasteners, stop DIY work and contact a licensed stucco contractor or structural engineer. These signs warrant professional assessment before further work.
Also check your local permit requirements for repairs and follow any jurisdictional rules. When in doubt, verify with the local building department or permit office and consult the manufacturer instructions before proceeding.
Red flags that need immediate professional attention
Safety should always be your top priority when dealing with stucco issues. There are certain signs that indicate a problem is too severe for DIY repair and requires the attention of a licensed stucco contractor or structural engineer.
Extensive delamination, where large sections of stucco are peeling away from the wall, signals significant damage to the lath or attachments. Sagging areas could indicate structural issues that need immediate attention.
Adjacent structural cracks or active water leaks are also red flags. These signs suggest that the problem may be more than just surface erosion and requires professional diagnosis and repair.
What to expect from a professional diagnostic
When you hire a professional, they will perform a thorough diagnostic of your stucco issue. This typically involves detailed probing and test cuts to assess the extent of damage.
A professional may also use moisture mapping techniques, such as moisture meters or thermal imaging, to locate any hidden water sources that could be causing the problem. They will provide a written report outlining their findings and recommendations for repair.
This process ensures that you have a clear understanding of the issue and can make informed decisions about how to proceed with repairs. It’s important to note that while professionals may charge for this service, it can save you significant time and money in the long run by preventing improper repairs.
Conclusion
Diagnosing soft stucco is about confirming whether you’re looking at surface erosion or actual lath failure, so you protect structure, appearance, and safety without guessing.
First, check in a small, discreet area for visual clues, moisture signs, and suspect edges, then perform the probing test in a logical order—start with a shallow gauge, listen for a hollow sound, compare results with material specs and installation details, and always respect permits and standards before you decide your next move.
Common mistakes to avoid are pushing beyond safe depths, using improper tools, or skipping a moisture check and a hidden-areas scan; keep your probe light at first, test in a noncritical spot, wear eye and skin protection, and shut off any nearby utilities if you interfere with the wall. These safety rules help prevent damage and costly missteps.
If the probing shows uncertain results, moisture concerns, or actual lath exposure, or if you’re unsure about permits or the standards to check, call a professional rather than pushing on; otherwise, use the tested steps as your guide and stay focused on solid, timely fixes—you’ll finish strong and keep the project durable and safe.
FAQ
What should I look for if probing reveals soft stucco around windows or doors?
Soft spots near openings can mean water was allowed behind the finish. Check the area for bubbling, staining, or crumbling concrete behind the plaster. If it feels hollow or pushes in easily, mark it and plan a careful cut to inspect the substrate.
Can probing cause more damage to the stucco or lath?
Use light pressure and a blunt probe to avoid gouging. If you hear a hollow sound or the surface breaks away easily, stop and reassess. Document affected areas and plan a controlled repair rather than digging blindly.
What should I do if the probe hits metal lath vs. solid backing?
Metal lath usually feels firmer but can still fail under corrosion or moisture. If you find detached lath or rusty edges, treat it as a structural concern and follow up with a deeper assessment or professional input. Do not assume all soft spots are the same cause.
How do I decide whether to DIY a repair or call a pro?
If multiple areas show soft stucco, or you uncover signs of extensive moisture, edge failures, or framing damage, plan professional help. For isolated, clearly surface erosion, you can target patching after proper surface prep and product instructions. When in doubt, check manufacturer guidance and local rules.