
Introduction
Rain mid-pour can ruin fresh concrete; cover, protect, and resume safely.
Protect exposed areas with appropriate coverings, don’t work on wet concrete, and check forms for any change.
After rain, inspect for surface defects, damp spots, or set delays before continuing.
Resume pouring only when conditions are right and you follow the coating and curing guidance from the product label and local rules.
Key takeaways
- Cover exposed concrete promptly to minimize surface damage and uneven curing.
- Pause work on unfinished pours during rain unless protection is secure and dry.
- Assess for honeycombing, cracking, or laitance after wet weather impacts.
- Identify salvageable sections quickly and mark areas needing redo before setting.
- Use plastic sheeting and drying blankets to protect newly poured surfaces.
- Always wear PPE and pause work if conditions jeopardize concrete integrity.
Table of Contents
- Introduction
- Key takeaways
- Immediate on-Site Assessment
- What to Keep Working and What to Pause
- Immediate Mitigation — Covering and Protecting Fresh Concrete
- Determining Salvageable Areas Vs Those Needing Redo
- Repair Techniques for Rain-Damaged Concrete
- Tools and Materials Checklist for Rain Emergencies
- Cost Considerations and the Go/no-Go Decision
- Cleanup, Drying, and Post-Event Preparation
- Conclusion
- FAQ
Immediate on-Site Assessment
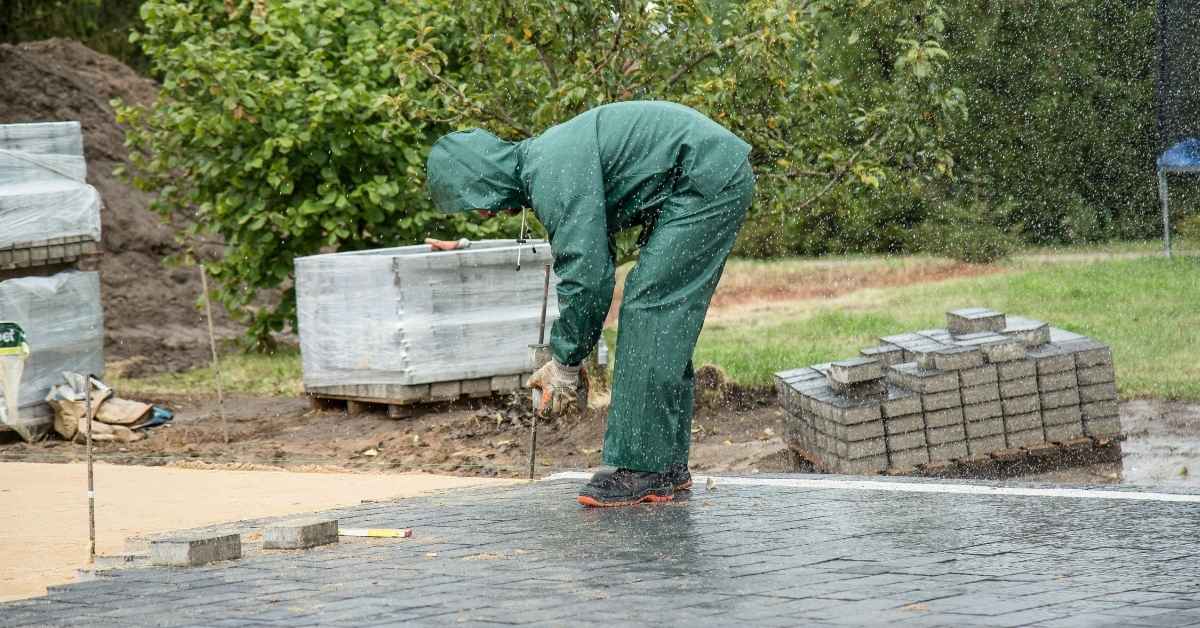
Start with safety first. Secure the site, shut off power tools, and scan for standing water or slip hazards. Put on the right PPE before you approach the pour area. Keep the crew clear of any exposed edges or rebar until the area is stable.
Do a quick weather and scene survey. Note current conditions, how long since the rain began, and any immediate risks like unplugged forms or compromised formwork. Look for surface issues such as washout, bleeding, cracks, or soft edges to identify affected zones. Document everything for decisions and claims by taking multiple angles with timestamped photos.
Safety and site control
First, prioritize safety. Shut off all power tools immediately to prevent accidents.
Wear appropriate PPE, including hard hats, gloves, and safety glasses. Check for standing water or slippery surfaces, and secure the area with cones or tape to keep crew away from compromised zones.
Inspect the pour site thoroughly. If you find exposed rebar, unplugged forms, or damaged formwork, tag off these areas immediately to prevent further damage and injury.
Visual inspection checklist
Use this checklist right after the rain stops. It helps you assess visible damage quickly.
- Standing water: Check for pooling water that could weaken the pour or cause further damage.
- Washout: Look for areas where the surface has been washed away, exposing aggregates or rebar.
- Surface texture changes: Inspect for rough patches, bubbles, or other unusual textures on the surface.
- Aggregate exposure: Check if any aggregates have risen to the surface, indicating possible issues with the mix design or placement.
- Edge erosion: Examine edges and corners for signs of crumbling or softening.
- Cracking: Inspect for hairline cracks or larger fissures that could indicate structural issues.
- Delamination: Look for areas where the concrete seems to be peeling away from itself or the formwork.
- Soft edges: Test edges and corners with a trowel or screed to check if they’re still solid or have softened due to water exposure.
Quick rule: Prioritize issues affecting structural integrity over surface finish problems. Address those first.
Documenting conditions for decisions and claims
Photograph the scene from multiple angles to capture the extent of damage. Include timestamps on your photos to prove when the rain occurred.
Take pictures of any tools, materials, or equipment affected by the rain. Also, photograph crew members present to document who was there during the incident.
Measure and log the dimensions of affected areas. Note down any actions taken immediately after the rain, like covering the pour or draining water.
Keep detailed notes about weather conditions, time since the rain started, and any immediate risks observed. This information will help in repair planning and discussions with insurance providers or clients.
What to Keep Working and What to Pause
Define what can safely continue on unaffected areas. Non-structural pours, finishing touches on cured sections, edging, and light troweling may proceed if conditions stay stable. Avoid work that could jeopardize bond, texture, or surface integrity in rain-exposed zones.
Establish immediate pause criteria. Stop when rain reaches fresh concrete, forms, or the curing environment changes noticeably. Set checks to perform before resuming, including surface moisture, temperature, wind, form condition, reinforcement alignment, and bleed water management. Plan temporary protections and a clear restart strategy for curing and potential rework.
Tasks generally safe to continue
When rain hits, don’t stop everything. Reduce waste and keep progress going by shifting tasks to unaffected areas.
Site cleanup can be done anywhere. Keep the site tidy to prevent slips and falls.
Prepare forms for upcoming pours in covered or sheltered zones. This way, you’re ready to go once the rain stops.
Stage materials in dry areas. Keep them organized and accessible for when work resumes.
If you have separate pouring sections, focus on those untouched by rain. But keep an eye on the weather and affected zones.
Tasks to pause immediately
Stop these tasks when rain hits fresh concrete or forms:
Finishing work like troweling, floating, or bullfloating. Rain can disrupt the surface and cause defects.
Hold off on joint cutting. Wet cuts are weak cuts. Wait for surfaces to dry before cutting joints.
Pause placement near washout zones. Rainwater running through these areas can contaminate or disrupt fresh concrete.
If you’re using formwork, don’t remove it until the rain stops and concrete has cured enough. Removing forms too early in wet conditions can cause issues.
Communication and crew reallocation
Rain delays don’t mean chaos. Keep your crew busy and informed:
Reassign workers to safe tasks. Move them to unaffected areas or have them prepare for upcoming work.
Communicate the plan to your crew and stakeholders. Let everyone know what’s happening, who’s doing what, and when work will resume.
Record who did what during the delay. This maintains accountability and helps with any follow-up needed after the rain stops.
Keep an eye on the weather. When it clears, be ready to resume work. Check conditions first, then get back on schedule.
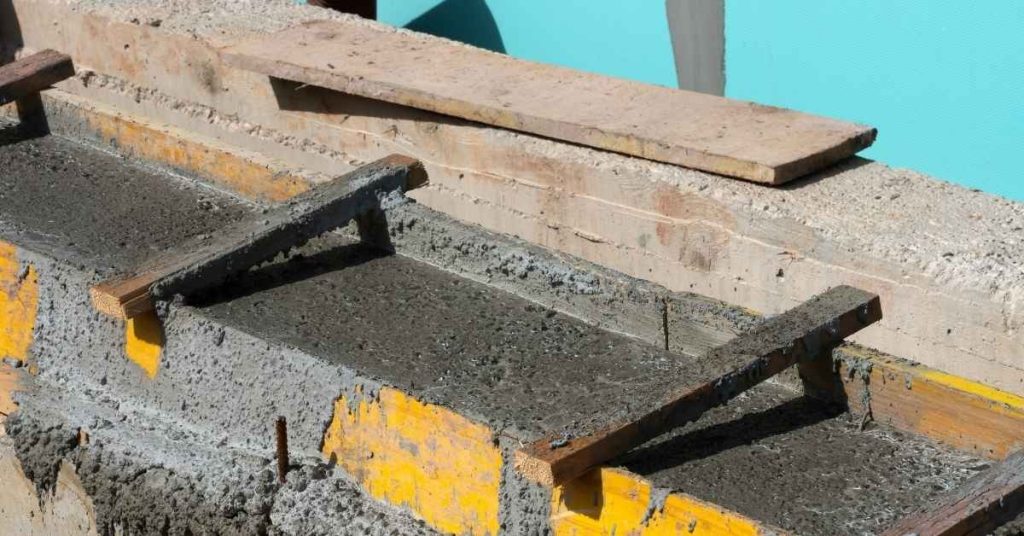
Immediate Mitigation — Covering and Protecting Fresh Concrete
Define the objective and scope: protect fresh concrete from ongoing rain without trapping moisture or causing surface damage, while keeping curing on track. Covering should occur promptly when rain threatens, but avoid overly plastic films that trap heat or stain the surface.
Covering options and trade-offs: compare permeable curing blankets, vented plastic, and sturdy tarps. Consider wind, rain intensity, and surface texture; secure edges, minimize folds, and prevent ponding. Prepare edges with extra material to keep moisture from seeping underneath.
Choosing covers: tarps vs plastic sheeting
When it comes to protecting your fresh concrete, you’ve got two main options: canvas tarps or plastic sheeting. Both have their pros and cons.
Tarps are great for light drizzle. They’re permeable, allowing moisture to escape while keeping rain out. But they can drag on the surface if not secured properly, potentially marring it. Use soft, non-abrasive layers underneath to protect the finish.
Plastic sheeting is ideal for heavy downpours. It’s waterproof and wind-resistant. However, it can trap heat and moisture, leading to surface damage if left on too long. Make sure your plastic has venting or use it in combination with a tarp for breathability.
Proper deployment and securing techniques
Laying covers right is crucial. Start by ensuring the surface is clean and minimally dry to prevent sags that can trap water.
Spread your cover generously, leaving extra material at the edges. This helps contain rainwater and prevents it from seeping underneath. Flatten any sags to avoid ponding.
Secure covers using weights, sandbags, or stakes along the perimeter. Avoid bearing down on the fresh surface. In windy conditions, use painter’s tape to secure the cover temporarily while you stake it down.
Safety while handling covers
Safety is key when deploying covers. Wet surfaces can be slippery, so watch your step and wear appropriate footwear.
Be careful not to step on the fresh concrete. If you must walk on it, use boards or distribute your weight evenly with a wide stance.
When pulling or setting coverings in windy conditions, protect the edges. Have helpers assist you, and work together to avoid damaging the surface or causing the covering to flap around.
Determining Salvageable Areas Vs Those Needing Redo
Create a salvageability rubric focused on load paths, reinforcement, and potential for durable bond with a new pour. Separate areas that can be repaired from zones needing full removal and re-pour by condition and exposure.
Assess structural indicators such as corrosion, major cracks, delamination, and depth loss. Use a grid or map to mark areas for epoxy or patching versus full redo. Document with non-destructive checks and photos to support your decisions and future references.
Visual and tactile signs of irreparable damage
When rain hits your concrete mid-pour, some areas might be beyond repair. Here’s what to look for:
Severe washout: If the surface looks like Swiss cheese with deep holes where the paste has washed away, it’s a sign of serious damage.
Exposed coarse aggregate with loss of paste: If you can see and feel the large stones that make up your concrete, and they’re not supposed to be there, it means the paste that binds them together is gone. This is a red flag for redoing the section.
Deep soft spots: If you press on an area and it feels spongy or gives way too easily, there’s likely significant depth loss or delamination beneath the surface.
Undermined edges: Check for any erosion or crumbling along the edges of your concrete. This could indicate that the base is compromised and needs to be redone.
Signs small-scale salvage is feasible
Not all rain damage means a full re-pour. Here are signs that you might be able to save the day with some localized repairs:
Surface defects: Minor cracks, chips, or other cosmetic issues can often be patched up without compromising the overall structural integrity.
Minor segregation: If there’s a bit of stone or sand separation, you might be able to remix and re-float the surface to even it out again.
Edge erosion: A little bit of edge crumbling can sometimes be trimmed back and patched. But remember, if it’s more than 1/4 inch deep, it’s likely a sign of deeper issues that need addressing.
When to consult structural or materials specialists
Sometimes, you might be unsure about what to do next. That’s when it’s time to bring in the pros:
- Exposed rebar corrosion: If you see rust on your reinforcement, don’t take chances. A structural engineer can assess if there’s still enough steel left for support.
- Significant depth loss or delamination: An inspector can use non-destructive testing to determine if the slab’s thickness is still within safe design parameters.
- Cracking patterns that don’t make sense: A materials specialist can help you understand what caused the cracking and how to fix it properly.
- Warranty implications: If your concrete has a warranty, you’ll want to check with the manufacturer or installer about any repair procedures that might void it.
- Specialty repairs: For things like epoxy injections or polymer modifications, it’s best to consult with someone who specializes in those materials and techniques.
Repair Techniques for Rain-Damaged Concrete
Assess the scope quickly but thoroughly to decide whether preservation is feasible. Map sound portions, surface erosion, laitance, and cracks, and note moisture and weather exposure before choosing a path.
Surface preparation matters: remove loose material, dry the surface, and create bonding profiles. Choose compatible patching materials and apply bonding agents only if recommended. Plan for proper finishing, curing, and protection to integrate repairs with the existing slab.
Cleaning and preparing the damaged area
Start by removing any loose material or contaminants from the affected area. Use a wire brush, chisel, or even a pressure washer to get rid of these. Be careful not to damage the sound concrete.
Drain standing water as much as possible. If it’s raining, use plastic sheeting or tarps to protect the area temporarily. You might need to dig out some water if it’s pooled in low spots.
Prepare edges by making them square and neat. Use a grinder or chisel to remove any rough edges or feathered transitions. This ensures your patch blends well with the existing slab.
Reworking fresh surfaces without undermining cure
If you’ve caught the damage early, you might be able to rework the surface. Use a magnesium float or a trowel to gently re-screed and re-float the concrete. Be careful not to overwork it though, as this can reduce its strength.
Feather edges of the repair into unaffected concrete. This helps to blend the repair with the existing slab and avoids visible ridges.
Remember, reworking is only an option if the concrete is still fresh enough to be manipulated. If it’s already cured, you’ll need to patch instead.
Bonding agents, overlays, and spec considerations
Before using any bonding agents or overlays, check the product instructions. Make sure they’re compatible with your existing concrete and that you’re using them correctly.
A thin overlay might be enough if the damage is superficial. But if there are deep cracks or large areas of erosion, you’ll need to remove and replace those sections entirely.
Epoxy overlays can be used for small repairs, but they’re not suitable for larger areas. For those, you’ll need a cementitious patching material that matches the existing concrete’s strength and durability.
Tools and Materials Checklist for Rain Emergencies
Prioritize items by must-have versus nice-to-have. Keep quick-access placement and a simple rationale for each tool or material. This helps you respond fast without digging through gear boxes.
On-site tools and materials: tarps, plastic, ground cloths, weights, utility knives, duct tape, markers, levels, and portable power. Stock or rent items like pumps, extra curing blankets, and rapid-set additives as needed for the pour size and forecast. Plan staging and safety for wet conditions.
Essential Physical Items to Have Ready
Before any pour, make sure these essentials are on-site. They’ll help protect your work and keep you safe during unexpected rain.
- Non-abrasive tarps/plastic sheeting: Protect formwork from rain. Check they’re large enough to cover the entire area.
- Weights/sandbags: Secure covers in place. Ensure you have enough to keep them from blowing away.
- Squeegees: Remove excess water from surfaces. Confirm they’re long enough for your forms.
- Pumps (sump or submersible): Drain standing water. Check their capacity and ensure you have backup power if needed.
- Soft brooms: Gently clean surfaces without damaging them. Make sure bristles are in good condition.
- Temporary barriers: Restrict access to wet areas. Ensure they’re visible and stable.
- Utility knives/scissors: Cut covers and barriers to size. Keep blades sharp for easy cutting.
- Duct tape: Seal edges of covers. Check roll condition and ensure it sticks well in wet conditions.
Quick rule: Always check your gear before rain hits. Better safe than sorry!
Backup Equipment and Rental Options
When heavy rain threatens, consider renting these items to keep your project on schedule.
- Pump rental: If you don’t have enough capacity, rent additional pumps. Check availability and delivery times.
- Generator (portable): Ensure backup power for tools and lights. Confirm fuel type and tank size.
- Temporary shelters: Protect workers and equipment from rain. Make sure they’re large enough and secure.
- Extra finishing tools: Rent additional tools to keep work moving. Check if they’re compatible with your existing equipment.
- Waterproof clothing/gear: Keep workers dry and safe. Ensure sizes fit your crew.
- Temporary heaters: If curing is affected, rent heaters to maintain temperature. Confirm safety features and fuel type.
Quick rule: Plan ahead for equipment rentals. Last-minute orders can cause delays!
Consumables and Repair Materials to Stock
Keep these materials on-site to quickly address rain damage and maintain project progress.
- Bonding agents: Compatible with your concrete mix. Check expiration dates and storage conditions.
- Patch mixes: Match your concrete color and strength. Ensure they’re properly stored and within shelf-life.
- Curing blankets: Maintain temperature and moisture. Confirm they’re in good condition and the right size.
- Curing compound spray: Protect surfaces from moisture loss. Check can condition and ensure it’s compatible with your concrete.
- Form-release agents: Prevent formwork from sticking. Ensure they’re suitable for your form material and climate.
- Rapid-set additives: Speed up curing process if needed. Confirm compatibility with your mix design.
- Cleaning supplies: Remove dirt, debris, and contaminants. Check solution strength and ensure they won’t damage surfaces.
Quick rule: Regularly check material shelf-life and storage conditions to avoid waste!
Cost Considerations and the Go/no-Go Decision
Identify core cost drivers such as materials, labor, equipment, and disposal. Include potential overtime or rush fees and any extra protective measures. Avoid fixed price assumptions; focus on what to verify and track.
Map schedule impact and long-term risk. Consider how surprise rain could shift curing windows and downstream work. Use a practical Go/No-Go checklist with pre-pour moisture tests, finish checks, and whether partial work can be protected or if a redo is needed.
Factors that drive repair vs redo costs
Labor: Repairing or redoing concrete involves man-hours. More damage means more work, driving up labor costs.
Materials: You’ll need new concrete mix for redos and possibly additional materials like bonding agents or overlays for repairs. These add to the cost.
Equipment Rental: If you need to rent equipment like pumps, mixers, or scaffolding, rental fees will increase your costs. More time using them means higher fees.
Lost Productivity & Traffic Control: Downtime due to rain and traffic control measures during repairs can slow progress, affecting overall project timelines and productivity. This can lead to additional labor costs or delays that impact other trades.
Long-term consequences of rushing repairs
Reduced Durability: Hasty fixes may not cure properly, leading to reduced strength and durability. This can result in cracking, spalling, or other signs of deterioration over time.
Premature Failure: Rushing repairs might lead to premature failure of the concrete, necessitating costly re-repairs or even full replacement down the line.
Higher Lifecycle Costs: While rushing repairs may save time and money in the short term, it can lead to higher lifecycle costs due to frequent repairs and reduced service life of the concrete.
Decision checklist for go/no-go
Use this checklist before deciding whether to repair or redo damaged concrete. It helps ensure you’ve considered all relevant factors.
- Structural Soundness: Assess if the substrate is still structurally sound. If not, consult a structural engineer.
- Finish Quality: Check if the original finish can be replicated or if a new one needs to be specified.
- Schedule Constraints: Consider project timelines and any downstream dependencies that could be affected by delays.
- Client Expectations: Understand what the client expects in terms of finish, timeline, and budget.
- Specialist Input: Consult with materials specialists or contractors if needed to ensure the best approach.
- Moisture Content: Check recent moisture tests. High moisture can compromise repairs or new pours.
- Aggregate Finish: Inspect the exposed aggregate finish. If damaged, consider redoing to maintain consistency.
- Temperature & Curing Windows: Ensure conditions are suitable for concrete work and that curing windows won’t be impacted.
- Partial Protection: Can partial work be safely protected until the rest is redone? If not, a full redo may be warranted.
Quick rule: If in doubt, consult with professionals to avoid costly mistakes.
Cleanup, Drying, and Post-Event Preparation
Outline a safe removal sequence: start with protectors and forms, then non-porous coverings, while protecting cured concrete and embedded components. Keep disruption to a minimum for final finishing or re-pour.
Drying strategy and cure preservation: monitor moisture, use fans and dehumidifiers, and aim for steady conditions to avoid crazing. Identify areas needing re-protection and document steps to resume finishing or rework once conditions improve.
Safe removal of covers and residue cleanup
Start by removing tarps, sheeting, or other protections carefully to avoid scouring the surface. Do this when the concrete is no longer wet but hasn’t fully cured yet.
Be gentle, lift rather than pull off. If you encounter resistance, wait a bit longer before trying again.
Clear away any remaining debris by hand or with a soft-bristled brush. Be mindful of any embedded rebar or fibers.
Manage runoff or contaminated water by containing it in designated areas and disposing of it according to local regulations. Don’t let it run off into drains or waterways.
Moisture checks and readiness for finishing or rework
Before applying finishes or overlays, check moisture levels. Use a non-contact moisture meter for surface readings and a probe-type meter for subsurface.
Follow product guidance for acceptable moisture content before application. Most finishes require surfaces to be below 4% MC.
If moisture is present, use fans, dehumidifiers, or gentle airflow to dry the area. Be patient; rapid drying can cause surface crazing or texture loss.
Once readings are within acceptable ranges, you’re ready for finishing or rework.
Waste handling and site recovery
Remove and dispose of spoiled concrete according to local waste management guidelines. If possible, recycle it if your area has a program for that.
Clean and dry used sheeting before storing or disposing of it. Contaminated washwater should be contained, treated if necessary, and then disposed of properly.
Restore the site by leveling any remaining aggregate, compacting the base, and ensuring all surfaces are clean and ready for future pours. This includes removing any temporary barriers or protections.
Before leaving, do a final walkthrough to ensure everything is in order and safe for the next phase of work.
Conclusion
In the end, quick and careful decisions save you time, money, and a lot of rework. Prioritize safety first, protect what you’ve just poured, and know what you can salvage without forcing a patch job that will fail later.
Move through a simple, practical check: confirm you’ve secured the site and avoided any hazards, inspect the fresh work for touch-up points or gaps, cover and shield zones that can keep moisture out while letting weather pass, mark salvageable areas and plan redo sections only where needed, then proceed with small, controlled repairs and allow for proper drying and cleanup before final finishing. If you’re unsure about a spot, test a small area first and proceed slowly, keeping your go/no-go decision in mind at every step.
Common mistakes to avoid are pushing work under rain when the surface is still gaining strength, underestimating the drying time, and skipping a clear plan for salvage versus redo. Safety rules are simple: never expose fresh concrete to rain without a protective cover, never mix or apply repairs on a surface that hasn’t cured enough to hold edit, and never skip the cleanup and drying step that locks in the finish. If you’re unsure about the integrity after assessment, it’s wiser to pause and call in a professional than to risk a costly failure.
If the situation feels beyond your scope—especially with large areas, structural concerns, or uncertain cures—don’t push ahead. A contractor or concrete pro can confirm whether a patch will bond properly or if sections must be redone. Stay proactive, stay safe, and you’ll finish strong with a durable result that looks right and lasts.
FAQ
Should I cover exposed concrete right away, and what’s the best way to do it?
Yes, cover exposed concrete as soon as possible. Use breathable sheeting or specialty curing blankets that won’t trap moisture. Check manufacturer instructions for coverage size, weights, and setups to avoid wind flaps or gaps.
How do I protect work in progress during a rain event?
Move loose tools and fresh edges away from the splash zone. Use temporary shelter or windbreaks if available, and cover with sheets rated for moisture. Inspect covers regularly and resecure any straps or edges that loosen in wind.
What should I look for when assessing damage after the rain?
Check for surface wash, color changes, or soft spots. Probe with a light touch to see if the surface remains firm. If you see deep cracking, layering delamination, or significant slump, plan for repairs or a redo per the manufacturer instructions and local guidance.
When and how can I resume pouring safely after rain?
Get a clear green light from the crew leader or the project spec. Ensure forms, rebar, and joints are dry, protected, and free of loose debris. Start with a small section, watch for set patterns, and follow any revised placement and finishing steps from your instructions or local guidance. If in doubt, pause and reassess before proceeding.