
Introduction
Damaged stucco control joints require resealing or replacement to restore movement control and weather sealing. Look for cracks, loose edges, out-of-plane movement, or water staining that indicate the joint has been compromised. Carefully tape off surrounding surfaces, inspect behind the joint, and note whether the substrate shows movement or spalling before choosing a repair path.
Resealing is often used for minor cracking and intact joints, while replacement is needed when the joint is failing or has significant movement. Use manufacturer instructions and local building rules to select the right sealant and joint accessory, and follow proper surface prep, backing, and curing guidance. Maintenance means periodic inspection, cleaning, and resealing when you notice new cracks or moisture intrusion, and never skip safety and weatherproofing steps.
Key takeaways
- Assess joint movement, cracks, staining, and water intrusion before deciding reseal or replace.
- Preserve flashing and substrate: reseal only if backing material remains stable.
- Deterioration signs: loose stucco, bulging joints, efflorescence, or hairline cracks.
- Safety: turn off power nearby, wear eye protection, and avoid working above head.
- DIY resealing limits: use rated sealants, follow substrate prep, and cure as directed.
- Professional replacement costs and contractor selection: require written scope and warranties.
Table of Contents
- Introduction
- Key takeaways
- Understanding Stucco Control Joints and Accessory Components
- Identifying Signs of Damage and Visual Checkpoints
- Common Causes of Control Joint Failure and Stucco Deterioration
- Reseal Vs. Replace — Decision Factors and Homeowner Checklist
- Safety, Structural, and Health Risks of Delayed Repairs
- DIY Resealing — Tools, Materials, Procedure Overview, and Limits
- Professional Replacement and Repair — Scope, Costs, and Choosing a Contractor
- Maintenance, Preventive Measures, Seasonal Timing, and Long-Term Impacts on Property Value
- Conclusion
- FAQ
Understanding Stucco Control Joints and Accessory Components
A control joint is a deliberate gap in the stucco cladding that allows for movement without spreading random cracks across the wall. Its purpose is to accommodate movement and preserve the overall integrity of the exterior finish. Common accessory parts and materials in modern systems include expansion joints, backer rods, sealants, flashing, lath, scratch coats, weep screeds, and mesh reinforcement.
Each accessory plays a role in moisture management and seal integrity, working together to form a durable joint. Backer rods and sealants create the proper geometry and seal performance to resist water intrusion. Installation essentials include proper joint preparation, clean substrates, correct sizing, and selecting compatible sealants. Regular inspection helps catch cracks, deterioration, or sealant failure before they spread. Look for indicators of joint and accessory failure such as cracks around joints or deteriorated sealant to guide reseal versus replacement decisions.
Purpose and function of control joints
Control joints in stucco systems serve a crucial purpose. They’re designed to accommodate natural movement and expansion of the wall assembly, preventing random cracking that could compromise the cladding’s integrity.
Where are they installed? You’ll find control joints at key locations on your walls: at facade plane changes, around openings like windows and doors, at corners, and where stucco transitions to other materials. This strategic placement helps manage stress points and keeps cracks from forming elsewhere.
Think of them as built-in ‘flex zones’ that allow your home’s structure to breathe and move without causing damage. Properly placed and maintained control joints are essential for preserving the lifespan and appearance of your stucco cladding.
Types of control joint profiles and materials
Choosing the right material for your control joints is vital. It affects how well they perform, their lifespan, and even the final look of your stucco.
- Metal Joints: Durable, long-lasting, but can rust if not properly protected. Look for galvanized or stainless steel. Avoid in areas with high salt content to prevent corrosion.
- PVC Joints: Inexpensive, easy to install, and resistant to corrosion. Not as durable as metal, so they may crack over time. Use in low-movement areas.
- Elastomeric Joints: Flexible, can accommodate more movement than other materials. They’re also paintable, making them a good choice for visible joints. Be sure to use a high-quality product with good UV resistance.
How control joints integrate with flashing and weep systems
Control joints work hand-in-hand with flashing, weather-resistive barriers (WRBs), and drainage planes to maintain a weatherproof envelope around your home. They allow moisture to escape while keeping water out.
Flashing: Flashing is installed at the base of walls and around openings to direct water away from the building. Control joints must be integrated with flashing to ensure proper drainage. This prevents water from getting trapped behind the stucco, which can lead to serious issues like mold growth or structural damage.
Similarly, control joints should align with weep screeds at the bottom of walls. Weep screeds allow any trapped moisture to drain out, preventing it from building up and causing problems. Regularly inspect these areas to ensure they’re functioning correctly.
Identifying Signs of Damage and Visual Checkpoints
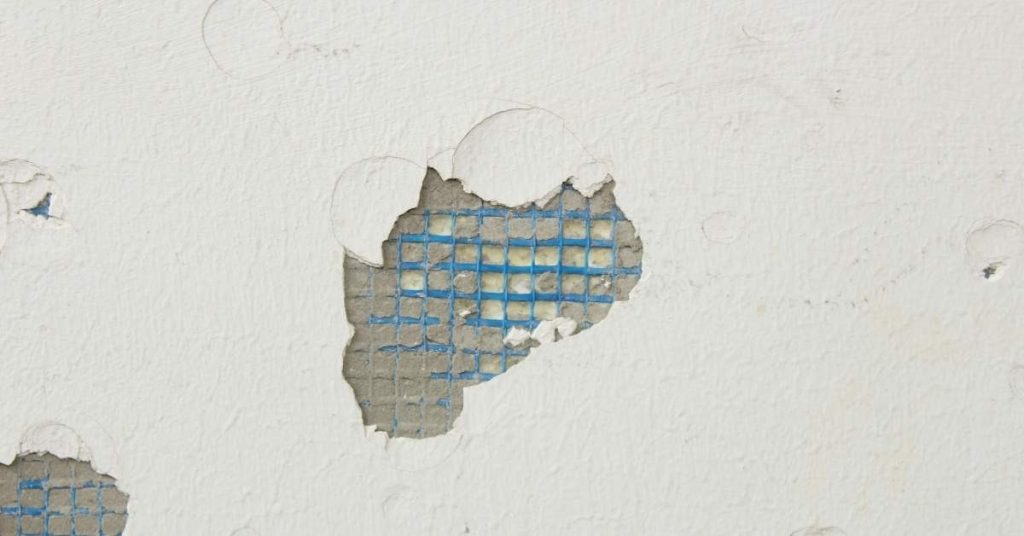
Visual indicators of joint and stucco failure include crack patterns such as hairline versus wider gaps, along with any displacement near joints or open seams. Gaps at the joint line are a clear clue that something is not performing as intended. Document these observations with clear notes and photos for accuracy.
Moisture cues include staining, efflorescence, mold growth, and rust on visible metal components near edges. Structural signs like sagging stucco or movement after wet periods point to moisture and structural interaction. Use documentation protocols that capture multiple angles and scales, noting locations precisely to aid diagnosis and planning.
Visual checkpoints to inspect and photograph
Before you grab your camera, walk around the stucco exterior with this checklist. It’ll help you spot issues and capture useful photos.
- Crack patterns: Hairline cracks are minor, but wide ones need attention. Skip checking, miss major problems.
- Joint displacement: Bulging or warped panels near joints signal trouble. Overlook this, risk bigger repairs.
- Gaps and open seams: Spaces around joint lines let in water. Ignore these, invite moisture damage.
- Stucco finish: Check for nail pops or fastener issues. Miss this, compromise structural integrity.
- Movement after weather events: Freeze-thaw cycles and heavy rain can expose hidden problems. Neglect this, face unexpected repairs.
Quick rule: Always photograph issues from multiple angles with a scale reference to aid diagnosis later.
Moisture and substrate indicators to watch for
Look out for these signs of moisture intrusion behind the stucco. Catching them early prevents costly damage.
- Efflorescence: White, powdery deposits on surfaces hint at moisture. Miss this, risk further deterioration.
- Mold/mildew growth: Dark spots or patches signal damp conditions. Ignore these, invite health hazards and structural decay.
- Dark or discolored patches: Water staining can hide beneath paint. Overlook this, miss underlying moisture issues.
- Rust on metal lath or fasteners: Rust indicates water exposure. Miss this, risk further corrosion and structural compromise.
Quick rule: If you spot any of these signs, investigate further to prevent moisture-related damage.
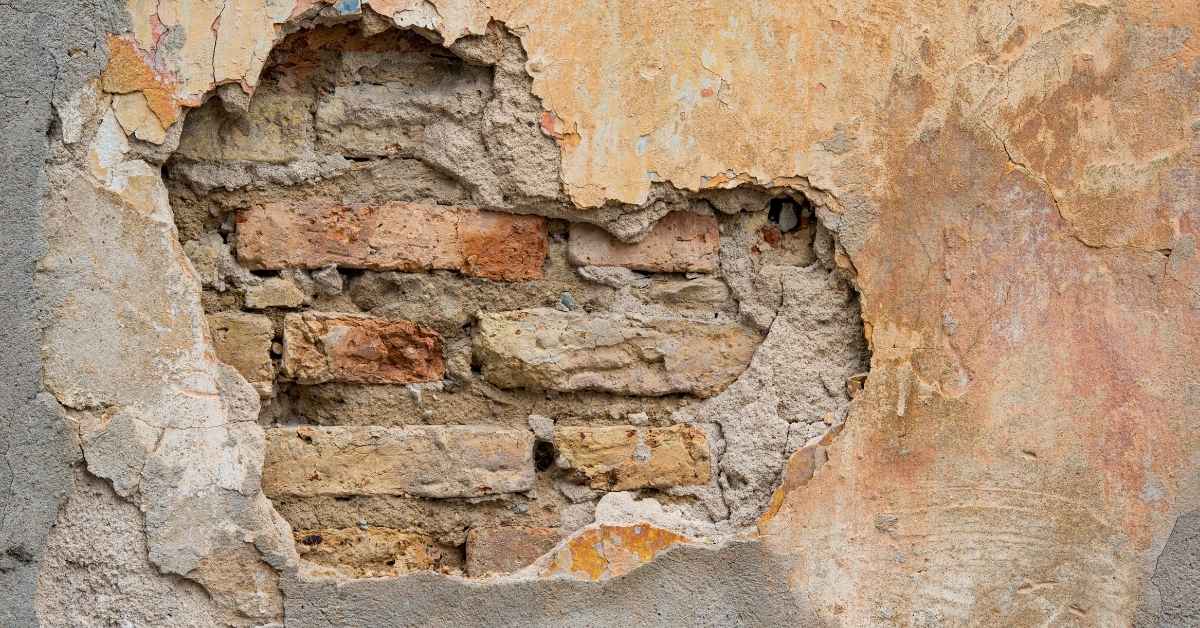
When visible damage likely means deeper problems
Certain signs suggest substrate or framing issues. Don’t stop at the surface; dig deeper.
- Sagging or loose stucco: This indicates a weak substrate. Miss this, face costly repairs and potential safety hazards.
- Cracking radiating from joints: These cracks suggest structural movement. Overlook this, risk further damage and expensive fixes.
- Water staining on interior faces: Interior stains hint at moisture intrusion behind the stucco. Ignore these, miss hidden damage.
Quick rule: If you notice any of these red flags, consider a more invasive inspection to address potential underlying issues.
Common Causes of Control Joint Failure and Stucco Deterioration
Substrate movement from settling or seasonal changes stresses joints and can lead to cracking or gaps. Movement is a primary driver behind joint misalignment and deterioration. Moisture intrusion through cracks or failed flashing accelerates behind-joint deterioration and weakens the system.
UV exposure, impact from nearby activity, and improper installation contribute to sealant failure and aging. Poor joint spacing, wrong backing materials, and inadequate surface prep reduce adhesion and performance. Indicators to assess include cracking, moisture streaks, rust, and visible UV chalking around joints.
Environmental and Movement-Related Causes
Control joints take a beating from Mother Nature. Here’s how:
Freeze/Thaw Cycling: Water expands when it freezes, putting pressure on joints. This cycle can cause cracking over time.
Thermal Movement: Stucco expands and contracts with temperature changes. If joints aren’t deep enough or spaced correctly, this movement can lead to gaps or cracks.
Settlement: Buildings settle over time. If the substrate moves, it puts stress on control joints, leading to damage.
Installation and Material-Related Causes
Proper installation and quality materials are key to joint longevity. Here’s what can go wrong:
- Incorrect Backer Rod: Too small, it won’t support the sealant properly. Too large, it won’t allow enough sealant for a strong bond.
- Incorrect Joint Depth/Placement: Shallow joints don’t allow for enough movement. Wide spacing leads to excessive stress on joints.
- Incompatible Sealants: Using the wrong type of sealant can lead to cracking, staining, or weak bonds. Always use a high-quality, compatible sealant.
- Low-Quality Accessories: Cheap backer rods, sealants, or lath can cause problems down the line. Invest in quality materials.
- Improper Flashing/Weep Systems: Without proper flashing and weeps, water can get trapped behind stucco, accelerating deterioration around joints.
Reseal Vs. Replace — Decision Factors and Homeowner Checklist
Start with clear decision criteria such as the severity of damage and whether the accessory substrate remains solid. Determine if resealing will stop moisture paths or if replacement is necessary due to delamination or extensive cracking. Gather clues from prior reseals to inform the plan.
Assess longevity and warranty expectations and how those influence the choice between reseal and replacement. Consider material compatibility and the implications for surface prep and backing materials. Use a homeowner checklist to document moisture signs, prior reseal history, and observed joint movement before consulting a pro.
Indicators that resealing is appropriate
Use this checklist when you suspect the sealant has failed but the accessory itself seems sound.
- Minor cracks: Hairline fractures are normal, but wider gaps need attention. Confirm with a flashlight and magnifying glass.
- No moisture intrusion: Check for dampness or mold behind the joint. Absence confirms resealing is enough.
- Staining only: Discoloration doesn’t necessarily mean leakage. Wipe test to confirm.
- Accessory solid: Gently push and pull on it. No movement means it’s still sound.
- No delamination: Check for peeling or lifting of the accessory from the substrate.
- Adhesion intact: Scrape gently with a utility knife to ensure sealant isn’t flaking off.
- No pest evidence: Look for signs of nesting or damage by insects or rodents.
- Recent reseal history: If it was done within the last 5 years, resealing might be sufficient.
Quick rule: Reseal when the accessory is sound and damage is minor, non-structural, and hasn’t caused recurring leaks or moisture intrusion.
Indicators that replacement is necessary
Use this checklist when you suspect the damage goes beyond a simple reseal.
- Extensive cracks: Multiple or wide cracks suggest structural issues. Confirm with a thorough visual inspection.
- Moisture intrusion: Check for dampness, mold, or mildew behind the joint. Presence confirms replacement is needed.
- Corroded accessory: Rust on metal accessories indicates they need replacing.
- Warped accessory: Bent or twisted accessories won’t seal properly and must be replaced.
- Delamination: Peeling or lifting of the accessory from the substrate signals a replacement is required.
- Loss of adhesion: Sealant flaking off means it’s not adhering anymore, necessitating replacement.
- Recurring leaks: Multiple instances of water intrusion indicate a deeper problem that resealing won’t fix.
- Compromised substrate: Check for softness or crumbling behind the joint. If found, replace both accessory and damaged area.
Quick rule: Replace when damage is extensive, recurring, or structural; when accessories are compromised; or when moisture intrusion has affected the substrate.
Homeowner decision checklist
Use this list to guide your choice between resealing and replacement. It covers condition, accessibility, history, and warranty status.
- Recent moisture signs: Check for dampness or mold within the last year. If yes, consider replacement.
- Prior reseal history: When was the last time it was resealed? Within 5 years? Consider resealing again.
- Visible joint movement: Any movement signals potential structural issues, favoring replacement.
- Pest evidence: Signs of nesting or damage may require replacement to prevent further damage.
- Accessibility: Can you safely reach the joint? If not, consider hiring a pro for safety reasons.
- Warranty status: Check if the warranty covers resealing or replacement. It might influence your decision.
- Labor/material costs: Estimate both. Resealing is cheaper but may lead to recurring issues down the line.
- Downtime: Consider how long each option will take and impact your daily life.
Quick rule: Use this checklist to weigh pros and cons, considering both short-term costs and long-term performance.
Safety, Structural, and Health Risks of Delayed Repairs
Loose or bulging stucco, exposed nails, or sharp edges create immediate safety concerns that require barriers and careful inspection before work resumes. Do not disturb compromised areas without a professional assessment. Prioritize securing the area to prevent accidental injury.
Moisture intrusion can lead to wood rot, rusted lath, and framing weakening, increasing the risk of larger structural problems. Indoor air concerns emerge from mold, mildew, and musty odors if water enters interior spaces. Understand that delays can escalate repair scope and cost as damage progresses.
Moisture entry, mold, and indoor air quality concerns
Control joint failures can let moisture sneak into your walls, unseen. This moisture creates a perfect breeding ground for mold and mildew.
Mold can cause respiratory issues, allergies, and other health problems. It also stinks – that musty odor is a sign of trouble.
Moisture in walls can mess with your indoor air quality too. It might not be obvious, but it’s happening behind the scenes.
So, keep an eye out for water stains, peeling paint, or that telltale musty smell. If you see any of these signs, act fast to prevent bigger issues.
Structural and finish deterioration risks
Prolonged moisture and movement damage can wreak havoc on your walls. It’s not just about the stucco – it goes deeper.
Wood rot can set in, weakening your framing. Metal lath can rust or fail, leaving your wall system unsupported.
Exterior finishes like paint or siding might start to peel or crack. And don’t forget about insulation – moisture can ruin that too, leading to energy loss and higher bills.
The longer you wait to fix damaged control joints, the more damage spreads. What starts as a small repair job can turn into a major renovation if left untreated.
DIY Resealing — Tools, Materials, Procedure Overview, and Limits
Begin by identifying damaged joints and confirming the absence of active leaks before starting a reseal. Establish a weather window that allows proper cure and performance. A moisture check helps determine readiness for sealant application.
Choose a sealant type appropriate for stucco joints and plan for compatible backing materials. The high-level workflow includes removing damaged sealant, placing backer rod if needed, surface abrasion, and applying new sealant with proper tooling. A quick post-seal inspection verifies adhesion and integrity before finishing touches.
Tools and materials checklist
Before you start, make sure you have the right tools and materials. Here’s a quick checklist to ensure you’re prepared.
- Sealant: Choose between silicone or polyurethane acrylic based on your joint profile and climate. Check compatibility with stucco.
- Primer: Some sealants require a primer for better adhesion. Check your sealant’s specs.
- Scraper: To remove old, damaged sealant.
- Wire brush: For surface cleaning and etching.
- Backer rod: For wide joints that need support before resealing.
- Caulking gun: To apply the new sealant.
- Gloves: Protect your hands from chemicals.
- Safety glasses: Essential for eye protection during the entire process.
- Dust mask: Wear when sanding or cleaning to avoid inhaling particles.
Quick rule: Always check material specs and compatibility before starting any resealing project.
Basic step-by-step resealing overview
Follow this sequence to effectively reseal your stucco control joints.
- Clean the joint: Remove any dirt, debris, or old sealant using a wire brush and scraper. Ensure the surface is dry.
- Remove failed sealant: Scrape off all damaged sealant from the joint.
- Prepare substrate: Lightly sand the joint to create a rough surface for better adhesion. Wipe clean with a damp cloth, then let it dry.
- Apply primer (if needed): If your sealant requires a primer, apply it now and let it dry according to the manufacturer’s instructions.
- Insert backer rod (if needed): For wide joints, insert a backer rod before applying the new sealant for better support.
- Apply new sealant: Using a caulking gun, apply the new sealant along the joint. Tool it with a damp finger or tool to create a smooth bead.
- Cure properly: Allow the sealant to cure according to the manufacturer’s instructions before exposing it to water or heavy traffic.
DIY limits and common mistakes to avoid
While resealing can be a DIY job, there are some limits and common mistakes to steer clear of.
- Active leaks: If you find active water entry, stop. This indicates a deeper problem that needs professional attention.
- Persistent cracking: Cracks that keep reappearing after resealing suggest underlying structural movement or decay.
- Improper sealant choice: Using the wrong type of sealant for your joint profile and climate can lead to premature failure. Always check compatibility with stucco too.
- Wet substrate: Resealing over a wet surface can trap moisture, leading to mold growth and sealant failure.
If you encounter any of these issues or feel unsure about any part of the process, it’s best to call a professional. DIY resealing is only suitable for minor repairs on sound substrates.
Professional Replacement and Repair — Scope, Costs, and Choosing a Contractor
Define when reseal is insufficient and replacement is warranted by damage severity and moisture intrusion. Identify affected areas and how widening joints or water paths may influence the scope. Assess system age to determine the appropriate repair strategy.
Contractor selection should focus on qualifications, licenses, insurance, and relevant certifications. Expect a clear bid with a defined work scope, timeline, and warranty terms. Use diagnostic reports and testing results to compare proposals and ensure code compliance in the final plan.
What to expect during a professional assessment and repair
A pro will start by inspecting your stucco, checking for damage, moisture intrusion, and signs of aging. They might use invasive testing like core drilling or moisture meters.
Once they’ve assessed the damage, they’ll repair any substrate issues, replace damaged accessories, and prep the surface for finishing. Expect them to apply new sealant, mesh, and stucco as needed.
Note: If there’s extensive damage or structural concerns, they might need to remove and replace entire sections of your stucco system.
Cost factors and how to get accurate estimates
The cost depends on the extent of damage, access (like needing a scaffold), material choice (EIFS vs. traditional stucco), and permit fees. Expect labor hours to vary too.
Tip: Get multiple written quotes from different contractors. This helps you compare prices and services accurately.
Ask for a detailed breakdown of costs, including materials, labor, removal/disposal, and any temporary weather protection needed during repairs.
Selecting a contractor and verifying qualifications
First, check if they’re licensed and insured. Ask about certifications too, like stucco remediation or EIFS expertise.
Ask for references and photos of past work. A good contractor will have no problem providing these.
Important: Verify their warranty terms. You want a solid guarantee on their workmanship.
Maintenance, Preventive Measures, Seasonal Timing, and Long-Term Impacts on Property Value
Establish an ongoing maintenance routine with regular inspections and a resealing cadence appropriate for your climate. Clean and inspect joints, addressing gaps or deteriorated materials promptly. Keep guidance labeled on product data sheets or manufacturer instructions for reference.
Develop a seasonal plan that aligns with weather windows and freeze–thaw cycles. Use preventive upgrades like better sealants, corrosion-resistant fasteners, and proper backing to protect the system and preserve curb appeal. Document upkeep to support resale value and insurance considerations.
Routine maintenance and seasonal timing tips
Inspect your stucco control joints every six months. Spring and fall are ideal for resealing, as temperatures should be between 50°F to 90°F for proper adhesion and curing.
Spring: Check for winter damage. Reseal any compromised joints before summer heat expands them further.
Fall: Inspect again after summer’s expansion. Reseal if needed, ensuring it’s done at least a month before freezing temperatures to allow proper curing.
Preventive upgrades to improve longevity
Upgrade your sealants to high-performance, flexible options that can withstand temperature changes and prevent water intrusion.
Use corrosion-resistant fasteners and flashing to minimize rust stains and deterioration around windows, doors, and corners.
Install proper joint backing materials and moisture barriers behind the stucco to reduce future deterioration and improve longevity.
Long-term impact on property value and disclosure
Maintaining your control joints preserves structural integrity, reduces repair costs, and enhances curb appeal. Proactive care can add to your home’s resale value.
Document all repairs and maintenance with dates, materials used, and photos. This shows buyers and inspectors that you’ve taken good care of the property, boosting its perceived value.
Disclose any past or present issues with control joints to potential buyers. Honesty builds trust and helps avoid future disputes or legal issues.
Conclusion
Safety and long-term durability come first. Make the call to reseal or replace based on clear, visible damage and the likelihood of moisture intrusion, then move quickly to concrete steps you can trust.
Now, walk this through in order: inspect the joints and accessory components for cracks, gaps, or swelling; note any moisture signs on the stucco surface or behind the joint; confirm the weather window for resealing or replacement; verify you have the right sealant or replacement parts; test a small patch before a full job; follow the product guidelines and surface prep steps; use the right tools, clean work areas, and avoid pressure washing or harsh chemicals near joints; and finish with a thorough curing or cure-time check before exposing the work to rain or sun.
Common mistakes to avoid are over-stretching a sealant where movement is needed, using an improper or incompatible sealant for stucco, and skipping hidden damage checks — always test, verify substrate condition, and keep safety gear within reach. Do not work from ladders on wet or windy days, never skimp on fall protection, and never seal if you suspect structural movement or cracking that goes behind the surface.
If you see signs of structural movement, widespread cracking, interior moisture, or your area requires flashings and more complex assembly, call a qualified professional instead of pushing ahead. A clear plan, proper materials, and a cautious pace will protect your investment and keep the job from turning into a bigger expense — you can stay ahead and finish with solid, durable joints.
FAQ
How do I assess damage to stucco control joints?
Look for cracks that run along or across the joint, gaps where the sealant has pulled away, and loose or hollow-sounding stucco near the joint. Push gently around the joint edges to feel for movement or detachment. If you see moisture staining, mold, or soft spots, note them as additional red flags.
When should I reseal a control joint vs replace the accessory?
If the joint is structurally sound and the sealant is the main failure, resealing is often enough. If the joint or accessory shows cracking, deformation, or metal corrosion, replacement is usually the safer long-term fix. Check the manufacturer instructions for the accessory and consult a pro if you’re unsure.
What are the clear signs of damaged control joints I should not ignore?
Visible gaps in the sealant, cracking that extends into the stucco face, and water staining or softness around the joint are serious signs. Peeling or bulging stucco near the joint also indicates failure. Don’t assume a small crack willStay cosmetic—it can gain moisture behind the layer fast.
What safety concerns should I consider during DIY repairs?
Work from ground level only when possible; use a stable ladder and a helper for balance. Wear eye protection and gloves, and avoid working in wet conditions or on fragile surfaces. If you see structural movement, exposed rebar, or extensive moisture, stop and call a pro.