
Introduction
Concrete washout containment is a simple setup that captures concrete slurry so it doesn’t run onto soil or into drains. This article focuses on a practical, hands-on approach you can use at home to protect your lawn and the stormwater system. It also points you toward quick links that help you navigate related notes and tips.
Stormwater protection starts with a contained area and a plan for how to manage cleanup and disposal. Check the product label and local rules for disposal and never pour washout anywhere you don’t intend to contaminate. Look for guidance on common pollutants and the safe handling of hazardous waste so you avoid illicit discharges into storm drains and waterways.
Key takeaways
- Contain washout runoff with a secured tarp or basin to protect lawns.
- Schedule washouts during dry weather to minimize rainwater mixing and overflows.
- Identify pollutants from cement, metals, and paints; avoid dirty water entering drains.
- Follow local rules, permits, and report spills promptly to authorities.
- Use purpose-built washout containers and absorbents; never dispose of liquid down drains.
- Secure cleanup tools and perform a visual check for leaks before leaving.
Table of Contents
- Introduction
- Key takeaways
- Why Concrete Washout Matters for Lawns, Drains, and Stormwater
- Common Pollutants from Concrete and Related Construction Activities
- Local Rules, Permits, and How to Report Spills
- Containment Methods for Home Concrete Washout
- Step-by-Step Safe Concrete Washout Procedure
- Disposal and Post-Washout Handling
- Tools, Materials Checklist and Visual Checkpoints
- Common Mistakes, Cost Implications, and Planning Tips
- Conclusion
- FAQ
Why Concrete Washout Matters for Lawns, Drains, and Stormwater
Concrete washout left on the landscape can stain lawns and shift soil pH, which weakens turf and harms plant health. It can also clog drains and back up sewer lines, creating immediate maintenance headaches. Downstream, settled solids and alkalinity threaten stormwater quality and aquatic life.
Homeowners should keep washout contained on site and dispose of washwater properly. Use dedicated washout containers and schedule pours away from vegetation and storm drains. A simple, practical routine can protect property value and reduce regulatory exposure; always verify local rules, spill reporting requirements, and buffer zones before starting.
How concrete washout pollutes
Concrete washout becomes a pollutant when it leaves your project site, carrying with it sediment and alkaline slurry. This mixture can stick to everything it touches, staining surfaces and altering soil pH.
The sediment in washout is like tiny grains of sand that can clog up drains and pipes. Alkaline slurry, on the other hand, is caustic and can burn plants and harm aquatic life if it finds its way into waterways.
Think of it this way: concrete washout is like a sticky, caustic mud that’s bad news for your lawn, drains, and local ecosystems.
Environmental, health, and legal risks
Long-term exposure to concrete washout can kill vegetation, clog storm drains, and even cause sewer backups. This can lead to costly maintenance and repairs for you.
Worse still, washout can harm aquatic life downstream. Alkaline slurry raises water pH, making it hard for fish and other creatures to survive. Local authorities may fine you or restrict your work if they catch you letting washout escape.
Check local enforcement policies before starting any concrete work. Some areas have strict rules about washout disposal and containment. Ignoring these can lead to fines or even jail time.
Common Pollutants from Concrete and Related Construction Activities
Core pollutants include wet concrete slurry, hardened solids, and alkaline residues. Secondary pollutants such as silica dust, curing compounds, paints or solvents, fuels, and cleaners often travel with concrete work.
Each contaminant harms lawns and drainage by altering pH, increasing solids that clog irrigation and storm drains, and affecting microbial activity in soil. Plan containment and disposal to minimize these pathways and comply with local guidelines when in doubt.
Concrete-specific contaminants
When you’re working with concrete, the main pollutants to watch out for are:
Wet Concrete Slurry: This is a mix of water and cement that hasn’t set yet. It’s high in alkalinity, which can imbalance your soil and harm plants.
Hardened Solids: These are the solid particles left behind after the water evaporates. They’re too big to be absorbed by the soil and can clog up your irrigation and storm drains.
Alkaline Residues: Concrete is alkaline, with a pH around 12-13. These residues can leach into the soil profile and groundwater, causing long-term damage.
Associated construction pollutants to watch for
Concrete work often brings other pollutants onto your site. Here are a few:
Silica Dust: This fine dust is created when concrete is cut or drilled. It can injure turf and coat drainage lines, causing blockages.
Curing Compounds: These chemicals help concrete set properly but can be harmful to plants if not used correctly.
Paints/Solvents, Fuels, Cleaners: These are common on construction sites and can all pose risks. Paints and solvents can contaminate soil and water, while fuels and cleaners can cause odors or nuisance conditions if spilled.
Local Rules, Permits, and How to Report Spills
Check with your municipal stormwater program, public works, or building department to know what rules apply to your project. They can tell you when permits or notifications are required for washout activities. Trigger points often include creating pits, storing or disposing washout water, and discharges near drains or during rain events.
Learn the exact steps for reporting spills or illegal discharges: who to call, what information to have ready, and the immediate actions to take. Staying compliant means pre-planning, proper containment, and documenting communications with authorities as you work.
What to check with your municipality
Before starting any concrete project, it’s crucial to understand local regulations to avoid potential fines and environmental damage.
- Stormwater ordinances: Check if you need a permit for creating washout pits or disposing of washout water. Skipping this can lead to hefty fines.
- Allowable discharge rules: Know what materials are allowed to enter storm drains and when. Discharging prohibited substances can result in penalties.
- Construction permits: Check if you need a permit for your project from the building department.
- Waste management rules: Understand how to dispose of concrete waste and washout water properly.
- Rain event timing: Know when to pause work due to rain or risk fines for improper discharges.
- Large-volume activities: Check if large-scale washout activities need special permits or notifications.
- Local codes or ordinances: Familiarize yourself with any specific local rules that may apply.
- Contact information: Keep handy the contact details for your municipal stormwater program, public works, and building department.
Quick rule: Always check these points before starting work to stay compliant and avoid issues.
How and when to report a spill or illicit discharge
If you notice discolored runoff, unusual odors, or hardened material in drains after concrete work, it may indicate a spill or illicit discharge. Act promptly to minimize environmental impact.
Signs of a spill: Look for visible signs such as discoloration, odors, or solidified materials in drains. If you suspect a spill, don’t wait – report it immediately.
Contact your local environmental agency or public works hotline. Have the following information ready: location, volume of material spilled, type of material (concrete washout), time of incident, and weather conditions. They will guide you through the next steps, which may include containment, cleanup, and follow-up reporting.
Preventing spills: Use proper containment strategies, schedule work around rain forecasts, and always have a plan for managing washout water to minimize risks.
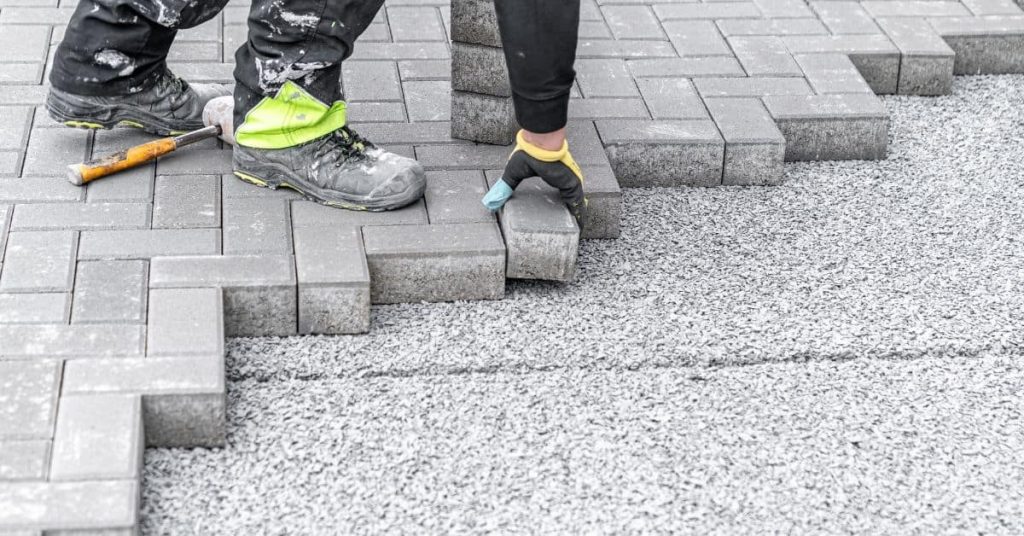
Containment Methods for Home Concrete Washout
For DIYers, prioritize portable and reusable options like lined containers or washout troughs, with temporary barriers such as plastic sheeting, berms, or silt fences. Compare pros, cons, and approximate costs to choose what fits your site constraints. Use containment to prevent washout from reaching lawns and drains.
Assess your site with a simple checklist: distance from grass, slope, soil permeability, and known drainage paths. Plan for easy disposal and cleaning and ensure containment remains secure during the pour.
DIY Washout Pits and Lined Containment
For small jobs, consider building a lined pit or bermed area to collect wash water. This is cheap but requires some effort.
Placement: Keep it away from lawns, drains, and utilities. Downhill from the pour site helps gravity do its job.
Avoid infiltration: Line the pit with a heavy-duty plastic sheet or use a rubber membrane. Anchor the edges to prevent washout from seeping into the ground.
Portable Containers and Commercial Products
For convenience, consider using portable containers like buckets, tubs, or fabric-lined bins. These are easy to move around but may not hold as much.
Renting professional units: For larger jobs, rent a professional washout trough or containment unit. They’re more expensive but can handle bigger volumes and come with lids for safety.
Pros and cons: Portable containers are cheaper upfront but may require frequent emptying. Professional units cost more to rent but save time and labor.

Step-by-Step Safe Concrete Washout Procedure
Before mixing, mark drainage paths and place barriers to keep washout away from lawn areas and storm drains. Set up a designated washout zone with sleeves for easy disposal. Have absorbents and a sealable container ready.
During mixing, use a contained setup and minimize water use to reduce splatter. Transfer rinse water or slurry promptly to an approved container and avoid discharging to driveways or gutters. After cleanup, document disposal methods and restore any disturbed lawn areas.
Step-by-Step Process
Follow this clear sequence to safely manage concrete washout at home, minimizing contamination and protecting your lawns and drains.
- Assess drainage paths and mark them. Place physical barriers like tarps or berms to prevent washout from reaching soil or pavement.
- Set up a designated washout zone away from lawns and storm drains. Use a contained wheelbarrow, portable tub, or sealable container for mixing and pouring.
- Minimize water use during mixing and pouring. Keep a 5-gallon bucket or drum nearby to capture rinse water or slurry.
- Promptly transfer any washout into the approved containment or washout container. Never discharge into driveways, gutters, or drainage roads.
- Allow solids to cure/dry before disposal as solid waste per local rules. Rinse containers and tools with minimal water, capturing runoff.
- Inspect for trace leaks or residue after the job. Remove barriers and restore lawn if impacted.
- Document disposal method and any spills for future reference and compliance.
Preparations before mixing or pouring
Before you start, assess your site to minimize washout risk. Protect storm drains and position tools and vehicles carefully.
Site selection: Choose a flat area away from lawns, gardens, and storm drains for mixing and pouring. If possible, use an existing hard surface like a driveway or patio.
Protecting storm drains: Cover nearby storm drains with a sturdy, weighted tarp to prevent washout from entering the system. Secure the tarp edges with sandbags or rocks if needed.
Laying liners and positioning tools: Place a heavy-duty plastic liner in your designated washout zone to contain any spills. Position tools and vehicles so they don’t track concrete onto lawns or pavement.
Cleaning tools and vehicles without contaminating drains
Properly cleaning your tools and vehicles after a concrete job prevents washout from entering drains. Follow these best practices.
- Rinse tools into containment: Use a portable washout tub or bucket to rinse tools. Scrape off excess concrete before rinsing to minimize waste.
- Capture wash water: Place a fine mesh screen over your washout container to capture small particles and prevent them from clogging drains. Empty the screen regularly into a designated disposal area.
- Leave solids for proper removal: Allow concrete residue on tools and vehicles to dry and harden before scraping it off. Dispose of dried solids as solid waste per local rules.
- Optional: pressure washer with vacuum: Rent or purchase a pressure washer with an integrated vacuum system for efficient cleaning. This tool captures wash water and solids, making cleanup easier and more environmentally friendly.
- Realistic price cue: Expect to pay around $50-$100 per day for renting a pressure washer with a vacuum. Consider sharing the cost with neighbors or friends if you plan on doing multiple concrete projects.
Disposal and Post-Washout Handling
Recognize that slurry, gray wash water, and hardened residues may have different disposal paths under local rules. Identify which streams are considered hazardous or non-hazardous in your area. Plan solidification and containment accordingly.
Solidify and remove solids, then manage liquids per local disposal options—on-site containment, licensed disposal sites, or household hazardous waste programs if required. Always verify local wastewater and stormwater ordinances before disposing washout materials.
Turning slurry into disposable solids
The first step in handling concrete washout is to let the slurry settle and harden within your containment. This turns the liquid waste into solid material that’s easier and safer to dispose of.
After washing, allow the slurry to sit undisturbed for at least 24 hours. This gives it time to separate into solids and water. The solids will start to harden due to the remaining cement in the mix.
Once solidified, you can remove the cured material from your containment using a shovel or small excavator. Break up any large chunks if necessary. Remember to wear gloves, goggles, and sturdy boots for protection.
Pro tip: If you’re using a lined pit or portable container, make sure it’s on a stable, level surface to minimize settling time.
Hazardous waste drop-off and municipal options
Concrete washout can contain hazardous materials like heavy metals or other contaminants. Always check with your local waste management facility before disposing of it.
Contact your local household hazardous waste program to find out if they accept concrete washout. They may have specific days, times, and procedures for drop-off. Some facilities might require you to pre-treat the waste on-site before bringing it in.
Alternatively, look into licensed construction/demolition disposal sites in your area. These sites are equipped to handle concrete waste safely and responsibly. Again, call ahead to confirm they accept washout and follow their guidelines for drop-off.
Remember: Never dump concrete washout on the ground or into drains. This can cause serious environmental damage and may result in fines.
Tools, Materials Checklist and Visual Checkpoints
Compile a homeowner-friendly list of containment options (berms, plastic sheeting, ground cloth, spill berms, sandbags, absorbent pads, portable basins) plus essential PPE (gloves, goggles, long sleeves, boots). Include optional handy items like a utility knife, tape, and a push broom. Check local recommendations before purchase.
Use a clear staging plan and containment footprint, with edges sealed or weighted. Verify distances from lawns and drains and ensure barrier integrity. Keep a simple product spec and local guidance in hand during the project.
Recommended tools and materials
Before you start your concrete project, make sure you have the right tools and materials to contain washout effectively. Here’s a checklist to help you prepare.
- Heavy-duty liners: Check manufacturer specs for capacity and compatibility with concrete washout.
- Buckets or washout boxes: Ensure they’re large enough to hold washout from your project.
- Absorbent materials: Consider using absorbents like socks, pads, or kitty litter to solidify slurry for easy disposal.
- Shovels and rakes: Essential for moving concrete and maintaining containment.
- Protective gloves: Thick, durable gloves to protect hands from concrete and chemicals.
- Splash goggles: Eye protection from splashes and debris.
- Long sleeves/pants and boots: Full coverage to prevent skin contact with concrete and chemicals.
- Portable containment basins (optional): Ideal for larger projects or when a dedicated washout area isn’t available.
- Utility knife, tape, and push broom (optional helpers):
Quick rule: Always check manufacturer specs to ensure your tools and materials can handle your project’s demands.
Visual checkpoints and what to inspect
Regular visual checks help ensure your containment is working as intended. Here are key points to inspect before, during, and after your concrete project.
- Containment perimeter: Check for tears, gaps, or signs of leakage. Seal any issues immediately.
- Slope direction: Verify washout is directed into the containment area, not towards lawns or drains.
- Washout level: Monitor washout levels to prevent overflow and ensure containment capacity.
- Absorbents: Check absorbents for saturation. Replace as needed to maintain effectiveness.
- Lawn and drain distance: Confirm no washout has flowed onto lawns or into storm drains.
- Washout box/bucket: Inspect for cracks, leaks, or overflow. Empty and clean as needed.
- Seals and weights: Ensure all edges are sealed or weighted to prevent washout escape.
- Containment footprint: Verify containment is positioned correctly, with no obstructions or blockages.
Quick rule: Regular visual checks help catch potential issues early, preventing costly mistakes and environmental damage.
Common Mistakes, Cost Implications, and Planning Tips
Common mistakes include inadequate containment, discharging washout directly to lawns or drains, mixing washout with soil, leaving caked residue, and incomplete spill cleanup. Each misstep drives higher cleanup costs or potential fines.
Plan ahead with site selection away from water features, choose or fabricate a containment method, and schedule around weather. Consider reuse of washout water, minimizing volume, and establishing a dedicated washing area to cut cleanup costs and reduce risk.
Top mistakes to avoid
Knowing what not to do is half the battle. Here are common pitfalls to steer clear of.
- Washing into gutters: This can clog drains and cause flooding. Keep washout away from all drainage systems.
- Using inadequate liners: Thin plastic sheets won’t hold up. Use heavy-duty polyethylene or rubber liners designed for concrete washout.
- Poor siting: Don’t place your containment near lawns, gardens, or water sources. Find a flat, dry area away from these.
- Ignoring local rules: Failing to follow regulations can lead to fines. Check with your city or county for specific guidelines.
Each mistake adds to cleanup costs and potential penalties. Stay aware and plan ahead.
Planning to minimize waste and cost
Before you start, consider these steps to reduce waste volume and keep costs down.
Estimate your needs: Calculate how much concrete you’ll use. This helps determine washout volume and containment size.
Plan your cleanup: Schedule a time for washing out when it won’t disrupt other work or create rush jobs that lead to mistakes.
Consider contractors: If the job’s big enough, hire professionals. They have experience managing waste and can help keep costs under control.
Conclusion
Paragraph 1: Concrete washout at home is about keeping runoff out of your yard and drainage system, protecting the lawn, drains, and stormwater from harm while keeping the job durable and clean. Stay focused on safety, containment, and clear, repeatable steps so mistakes don’t snowball into costly repairs.
Paragraph 2: To move forward, act like a foreman: survey the site and note any local rules or permit needs, set up a containment area with sturdy barriers, keep spill kits and absorbents handy, use only approved washout methods, avoid flushing liquids into storm drains, test samples if you’re unsure, follow a simple step-by-step washout procedure, dispose of liquid waste according to guidelines, and check frequently for leaks or overflow. Do these in order, stay within marked boundaries, and document where you put washout water so you can trace it if issues arise.
Paragraph 3: Common mistakes bite hard: skipping containment or trying to improvise with loose barriers, pouring wastewater down the drain or onto the ground, and ignoring local rules or spill reporting. Safety rules are simple: wear eye protection and gloves, work on dry, firm ground, never mix cleaners with concrete washout, and halt work if wind shifts or rain threatens runoff. Keep your work area mirrors clean—one mistake can ruin the lawn or clog a drain and cost more to fix.
Paragraph 4: If the site is large, near sensitive drainage, or you’re unsure about permits or spill response, call a professional rather than pushing forward. When in doubt, pause and verify the rules, then proceed with a clear plan. Stay focused, stay safe, and you’ll protect the yard, the drains, and the project’s overall look and cost. You’ve got this.
FAQ
What are practical stormwater protection measures I can implement on a DIY site?
Set up a clean, defined wash area away from grass and storm drains. Use a lined pit or portable containment to hold washwater until you can treat or dispose of it properly. Keep the area organized and limit runoff by plugging gaps where water could escape.
What common pollutants from concrete washout should I watch for?
Keep out concrete slurry, detergents, and spills that can wash into drains. Cementious waste can harden quickly and block paths or drains. If you see oily slicks or unusual residue, stop work and address it before it spreads.
How do I properly dispose of hazardous washout material?
Treat or containerize washwater per manufacturer instructions and local guidance. Do not pour slurry or dirty water down the drain, curb, or onto the ground. Check what your local rules say about disposal or take your waste to a designated facility or collection point.
What should I do about suspicious spills or illicit discharges?
If you suspect a spill, stop work and contain it to the smallest area possible. Notify the right authority or site supervisor as soon as you can. Document what happened, when, and where it went, and follow up with proper cleanup steps.