
Introduction
Darkening after sealing happens when moisture or solvent residues interact with the sealer on the surface. This can make the concrete look blotchy or deeper in color as it dries. If this happens, check moisture levels of the slab and review the sealer’s instructions.
Try simple fixes first by letting the surface breathe, cleaning any tacky residues, and using a compatible sealer. If the color stays dark, test in a small area and compare with the rest before sealing again, and follow manufacturer instructions. Always check product labels and local rules for cure times and application methods.
Key takeaways
- Inspect sealer and concrete for uneven absorption and moisture before sealing again.
- Test moisture levels with a simple plastic sheet method after removing seal.
- If darkening persists, strip sealer and air-dry before reapplying.
- Use solvent-compatible sealers and follow manufacturer instructions exactly on application.
- Protect new pours from moisture exposure with cover and ventilation.
- Safety: wear respirator, gloves, and eye protection during sealing and stripping.
Table of Contents
- Introduction
- Key takeaways
- Why Concrete Darkens After Sealing
- Diagnosing the Cause: Systematic Tests
- Immediate Remedial Steps After Sealing Darkening Appears
- Permanent Fixes: Stripping, Drying, and Re-Sealing
- Preventing Moisture and Solvent Trap in New Projects
- Tools, Materials Checklist, and Safety
- Case Studies and Visual Checkpoints
- Conclusion
- FAQ
Why Concrete Darkens After Sealing
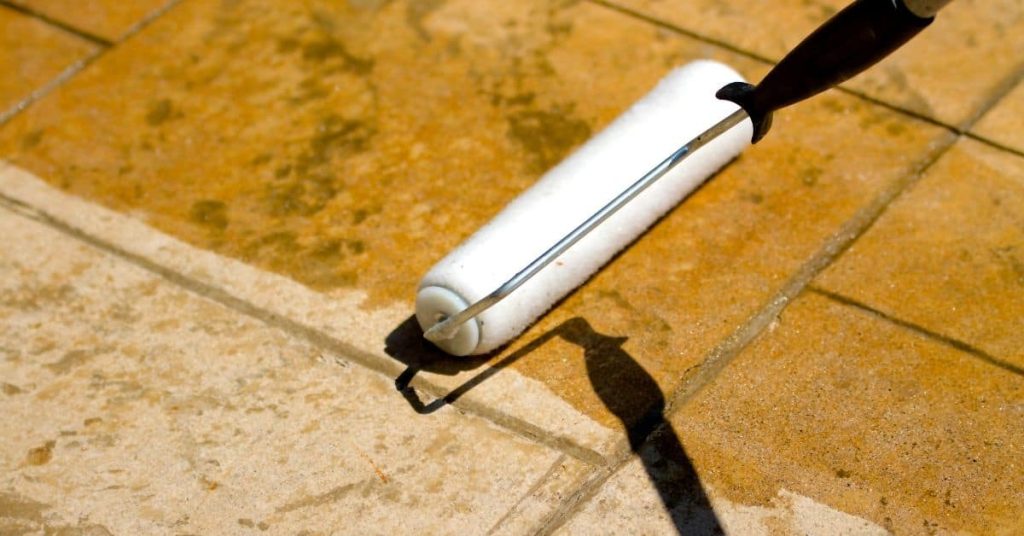
Sealing can make concrete look darker by changing how light reflects off the surface. Trapped moisture, solvent movement, and the chemistry of the sealer all play roles. You’ll also see a deeper, wet-look effect when the surface is freshly sealed and hasn’t cured fully.
Each mechanism affects appearance differently. Moisture beneath the surface can be visible as a uniform darkening. Solvent entrapment can cause a temporary glossy pool that fades as the solvent evaporates. Surface chemistry and the sealer’s sheen work together to alter color perception over time. Always check product labels and manufacturer instructions to understand how these factors interact on your slab.
Moisture-related darkening
When liquid water or vapor is trapped within your concrete slab, it can cause darkening after sealing. This happens because moisture increases the contrast of the concrete’s color.
Think of it like looking at a dark object through a wet window. The reflection of light off the water makes the object appear darker.
Similarly, when moisture is trapped under your sealer, it reflects light differently, making your concrete look darker.
Solvent-trap and surface reaction
Some sealers contain fast-evaporating solvents. If these solvents evaporate too quickly, they can trap moisture beneath the sealer, leading to darkening.
Additionally, non-breathable films in some sealers can react with the concrete’s surface, altering its color and causing it to appear darker.
This is why it’s crucial to use the right sealer for your specific job. Always follow the manufacturer’s instructions and allow adequate drying time before application.
Sealer type and wet-look vs natural finish
The type of sealer you use can significantly impact the appearance of your concrete, including its color and sheen.
Topical sealers sit on top of the surface, providing a glossy, ‘wet’ look that can darken the concrete. On the other hand, penetrating sealers soak into the concrete, preserving its natural finish but may still cause slight darkening due to trapped moisture.
Film-forming sealers create a protective layer over the surface, which can also lead to a darker appearance if not allowed to cure properly. Always test your sealer on a small, hidden area first to see how it affects the color and sheen of your concrete.
Diagnosing the Cause: Systematic Tests
Start with a simple moisture check: feel the surface and nearby slabs for dampness and look for condensation in the early morning. Then review the sealer’s data and any older underside coatings that might trap solvents. If you suspect the substrate, consider checking for porosity changes or moisture emissions with basic testing methods.
Move through a logical sequence: test moisture separately, evaluate the sealer choice for your stone or concrete type, and inspect cure history. When in doubt, compare results from a small test area with a different sealer or a compatible primer. Always verify instructions from the product label, data sheet, or manufacturer guidance before proceeding.
Simple moisture tests (plastic sheet method)
The easiest way to check for moisture is using a plastic sheet. Here’s how:
1. Tape a clear plastic sheet (like polyethylene) over the affected area.
2. Leave it untaped at the edges, allowing air circulation but keeping rain out.
3. Check back after 24-48 hours. If water droplets form on the underside, you’ve got moisture vapor transmission.
Advanced moisture measurement (RH probe, calcium chloride)
For more precise readings, consider these methods. They’re best left to pros but can be done DIY with the right gear.
In-situ RH probes: These measure relative humidity within the concrete. Insert them deep enough to avoid surface effects.
Calcium chloride test: This measures moisture content by weight gain. Apply a sealed dish of calcium chloride on the surface, weigh it after 24 hours, and calculate the moisture content.
For accurate readings, consider hiring a pro with specialized equipment like nuclear moisture meters.
Visual and tactile inspection
Before you start poking around, remember: darkening can happen due to moisture, sealer choice, or substrate issues. This checklist helps pinpoint the problem.
- Blooming: A white, powdery residue on the surface might indicate excess water in the concrete mix.
- Blisters: Puffy areas could signal trapped moisture under the sealer.
- Sheen changes: A glossy or waxy look might suggest a solvent trap from the sealer.
- Dark patches: Uneven darkening could point to moisture migration or substrate problems.
- Cracking: Hairline cracks can indicate too-rapid drying due to lack of moisture retention, or they might be a sign of underlying structural issues.
- Delamination: Peeling sealer suggests poor adhesion, possibly due to trapped moisture or contaminants.
- Cold joints: Dark lines at the edges of poured concrete sections could indicate excess water or improper curing.
- Efflorescence: A white, chalky deposit on the surface might signal rising moisture and salt deposits.
Quick rule: If you spot multiple issues, it’s likely a combination of problems. Start with addressing moisture, then re-evaluate.
Immediate Remedial Steps After Sealing Darkening Appears
Limit foot traffic and avoid additional wetting on the surface while you assess. Take notes on how long the darkening lasts and any changes after ventilation or heat is introduced. Gather samples or photos of the affected area to help decide the next move.
Before committing to a permanent fix, document the sealant used, the curing environment, and your moisture observations. If possible, run a quick test in a small, inconspicuous spot with a different sealer or a temporary masking. Check labels and local rules to ensure any actions follow manufacturer recommendations.
Ventilate and allow curing
First things first, improve airflow around the affected area. Open windows, use fans, or set up portable heaters to increase ventilation. This helps the concrete’s surface dry evenly and encourages proper curing.
The sealer needs time to bond with the concrete. Follow the product’s recommended cure time. Rushing this process can lead to more damage. Be patient; let nature take its course before deciding on stripping or further intervention.
Remember, darkening might not be permanent. It could just be a temporary phase in the curing process. Give it some time before you panic and start stripping off sealers.
Reduce active moisture sources
Moisture is your enemy here. To limit damage, stop any leaks immediately. Check for and fix any water ingress points – cracks in walls, faulty plumbing, etc.
Redirect water away from the concrete surface if necessary. Ensure gutters are clean and directing water away from the area. Consider installing a French drain or other drainage solutions to keep moisture at bay.
Also, eliminate surface wetting. Keep the area dry while the sealer cures. Avoid hosing down or washing the concrete until it’s fully cured.
By reducing active moisture sources, you’re giving your concrete a fighting chance to cure properly and preventing further darkening.
Temporary aesthetic measures
While waiting for the concrete to cure, you can’t just stare at the dark patch all day. Here are some temporary masking options:
1. Use area rugs or mats to cover the affected area. This won’t fix the problem but it’ll hide it until you’ve decided on a permanent solution.
2. Consider applying a benign, temporary coating like a clear acrylic sealer. This might help blend the dark patch with the rest of the floor while allowing the concrete to breathe and cure.
Caution: Don’t rush into permanent fixes just yet. You need to diagnose the cause first. Temporary measures can help you live with the issue until then, but they’re not solutions in themselves.
Permanent Fixes: Stripping, Drying, and Re-Sealing
Plan a safe removal of the current sealer according to the product label and manufacturer instructions, using the appropriate stripping method for your surface. After removal, ensure the slab dries thoroughly with airflow and appropriate ambient conditions. Do not rush to reseal until the surface is adequately dry to avoid trapping moisture again.
When resealing, choose a product compatible with your concrete and substrate, and follow the manufacturer’s application guidelines. Consider a test area first and monitor for changes in appearance as the sealer cures. Keep notes on curing times and environmental conditions as a reference for future projects.
When and how to strip the sealer
If your concrete has darkened after sealing, it’s time to remove that sealer. But when do you know stripping is necessary?
Signs that require stripping: Darkened appearance, sticky or tacky surface, or a strong solvent smell.
Use stripper products specifically designed for the sealer type. Always test on a small area first to ensure compatibility.
Drying the slab (passive and active methods)
After stripping, let your concrete dry out. Passive drying involves opening windows and doors for ventilation.
Active methods: Use dehumidifiers or heated air blowers to speed up the process. But remember, never apply heat directly onto the slab.
Before resealing, verify moisture levels are below 75% RH using a probe or calcium chloride test.
Choosing a breathable sealer and re-application tips
Opt for breathable/penetrating sealers. They let moisture escape, preventing darkening.
Compatibility checks: Ensure the new sealer is compatible with your concrete type and previous treatments.
Apply in thin, even coats. Let each coat dry according to manufacturer’s instructions before applying the next one. This helps prevent vapor trapping.
Preventing Moisture and Solvent Trap in New Projects
From the start, plan with proper curing methods and moisture management, including barrier considerations if needed. Match the sealer to the concrete type and expected use, and confirm surface prep requirements before applying any coating. Use labeled testing or moisture checks to verify conditions before sealing.
Set up a workflow that allows slow, even curing and avoids rapid evaporation or solvent buildup. Review the product data sheet, label instructions, and local building guidelines for your project. Keep preparation and sequencing documented so you can protect the finish long term.
Proper substrate preparation and cure time
Adequate slab cure, surface cleanliness, and moisture control are crucial before sealing. Here’s why:
Cure Time: Concrete needs time to develop its full strength and hardness. Rushing this process by sealing too early can trap moisture and lead to darkening.
Surface Cleanliness: Dirt, grease, or other contaminants on the surface can prevent proper sealer adhesion and absorption, leading to issues later on.
Moisture Control: Excessive moisture in the slab can cause darkening. Use moisture tests (like the plastic sheet method) to ensure your slab is dry enough before sealing.
Sealer selection criteria
Choosing the right sealer is vital to prevent darkening. Consider these factors:
Breathability: A breathable sealer allows moisture vapor to escape, preventing trapped moisture from causing issues.
VOCs: Low or zero VOC sealers are better for indoor projects and the environment. They also reduce the risk of solvent traps.
Penetration Depth: Deep-penetrating sealers offer better protection but may take longer to cure. Topical sealers are quicker but offer less protection.
Substrate Compatibility: Ensure the sealer is compatible with your concrete type and any existing treatments or stains.
Application environment controls
Controlling the application environment helps ensure a successful seal job. Here’s how:
Humidity Control: Maintain relative humidity between 40-70% during and after application to prevent moisture issues.
Airflow: Good airflow promotes quick curing and prevents solvent traps. Open windows or use fans, but avoid drafts that could disrupt the sealant.
Surface Dryness: Ensure the surface is completely dry before applying the sealer. Follow manufacturer guidelines for specific drying times.
Manufacturer Guidelines: Always follow the manufacturer’s instructions for application, curing, and clean-up to ensure the best results.
Tools, Materials Checklist, and Safety
Prepare a practical DIY checklist with diagnostic tools, stripper options, drying aids, and resealing supplies. Include safety gear such as gloves, eye protection, and ventilation considerations. Have disposal bags or containers ready for used stripping materials and wipes nearby.
Organize test kits or methods to evaluate moisture and compatibility. Document where each item is stored and the steps for use. Always verify labels and instructions for any chemical you plan to handle on site and follow local safety rules.
Tools and materials for diagnosis and testing
Before you start, gather these tools to diagnose the problem accurately.
- Plastic Sheeting: To create a moisture trap for testing.
- Duct Tape: To seal the plastic sheeting around edges.
- Moisture Meter: To measure slab’s moisture content. Look for one with a range of 0-100% and accuracy within 1%.
- Probes: For deeper moisture readings, use probes designed to penetrate the concrete.
- Label Reader: To understand test results, ensure you can read labels in different languages.
- Hygrometer: To measure relative humidity levels around the slab.
- Thermometer: To check ambient and slab temperatures. Concrete darkens faster in hotter conditions.
- Flashlight: To inspect hard-to-see areas for moisture sources or cracks.
Quick rule: Always test on a small, hidden area first to avoid damaging visible parts of the slab.
Tools and consumables for stripping and re-sealing
When it’s time to strip and reseal, use these tools and consumables.
- Chemical Stripper: Choose one suitable for your sealer type. Test on a small area first.
- Graters or Scrapers: To remove old sealer once softened by the stripper.
- Stiff-bristled Brushes: For scrubbing and removing residue.
- Primer: A breathable, concrete-specific primer to prepare the slab for resealing.
- Sealer: Choose a breathable sealer suitable for your climate and slab type. Test on a small area first.
- Paint Sprayer or Roller: For applying sealer evenly. A sprayer may be faster but requires more skill to control.
- Drop Cloths or Plastic Sheeting: To protect surrounding areas from sealant drips.
- Safety Glasses and Gloves: For protecting yourself during the stripping and sealing process.
Quick rule: Always follow manufacturer’s instructions for application, drying times, and safety precautions.
Personal protective equipment (PPE) and ventilation
Safety first! Use these PPE and ventilation measures when working with strippers or solvent-based sealers.
- Respirator: Wear a respirator rated for organic vapors to protect against harmful fumes.
- Gloves: Use chemical-resistant gloves to protect your hands from strippers and sealants.
- Eye Protection: Wear safety glasses or goggles to shield your eyes from splashes and debris.
- Ventilation Fan: Set up a fan to blow fumes away from you and any nearby openings, like windows or doors.
- Natural Ventilation: Open windows and doors if possible to create cross-ventilation.
- Wet/Dry Vacuum: Use one to clean up spills quickly and safely.
- Disposable Coveralls: Wear coveralls to protect your clothing from chemicals and easy cleanup.
Quick rule: Never work in an enclosed space without proper ventilation. Your health is more important than a quick job.
Case Studies and Visual Checkpoints
Review real-world scenarios and compare the symptoms to your own slab, noting color changes, gloss level, and texture. Use clear visual checkpoints to distinguish moisture-related darkening from sealer-induced effects. Look for patterns like uniform darkening versus localized patches.
Match your observations to likely causes and recommended fixes, then plan a measured response. Keep a log with dates, conditions, and results of any tests or small trials. Always cross-check conclusions with product guidance and local code requirements.
Example: darkening from hydrostatic or ground moisture
Use this checklist when your sealed concrete turns dark, indicating possible moisture from below.
- Check for: Dark patches or overall discoloration on the slab.
- Confirm by: Dabbing with a paper towel – if it comes away damp, you’ve got moisture.
- Check for: Cracking or lifting at edges of dark patches.
- Confirm by: Inspecting closely; cracks may be small but present.
- Check for: Musty odor.
- Confirm by: Smelling the affected area.
- Check for: Soft or spongy feel underfoot.
- Confirm by: Pressing firmly with your foot; if it feels soft, moisture is present.
Quick rule: If you find any of these signs, strip the sealer, let the slab dry (see earlier section), and re-seal using a breathable sealer.
Example: solvent-trap after fast-curing sealer
Use this checklist when your freshly sealed concrete turns dark immediately after application, indicating a solvent trap.
- Check for: Darkening within minutes to hours of sealing.
- Confirm by: Comparing to unaffected areas; they should be lighter in color.
- Check for: Strong solvent smell.
- Confirm by: Smelling the affected area.
- Check for: Soft or sticky feel underfoot.
- Confirm by: Pressing firmly with your foot; if it feels soft, solvents are trapped.
- Check for: Bubbles or blisters in the sealer film.
- Confirm by: Inspecting closely; these indicate trapped solvents pushing up from below.
Quick rule: If you find these signs, strip the sealer immediately (see tools and methods earlier), let it dry, and re-seal using a slower-curing product in cooler temperatures.
Visual checklist before and after fixes
Use this checklist to document your concrete’s condition before starting work and confirm success afterward.
- Before: Take photos of affected areas from multiple angles.
- After: Compare these with post-fix photos to see improvements.
- Before: Measure the moisture content using a moisture meter (see tools earlier).
- After: Re-measure; readings should be lower after fixes.
- Before: Check for and note any cracks or other defects.
- After: Inspect again; fixes should have improved these issues.
- Before: Document the sealer type and application date.
- After: Note the new sealer type and re-application date.
Quick rule: Regularly review these records to ensure your fixes are working and to plan future maintenance.
Conclusion
Safety first and durability go hand in hand. If you’ve seen darkening after sealing, you can fix it with control, method, and careful testing. The goal is a solid seal, a dry surface, and a finished look that lasts without revisiting the problem every season.
Now, act in order: confirm the cause with the system tests you’ve learned, strip only if needed, dry the slab completely, and re-seal in small stages. Start in a low-risk area, follow the diagnostic steps, apply the chosen fix, and then cure and re-test before expanding. Take it one area at a time, and document what you see and what works.
Common mistakes to avoid include rushing the drying stage, skipping small-area tests, and choosing a stripping method that’s too aggressive for your surface. Use proper ventilation, eye and skin protection, and work within the product guidelines. Do not over-wet or over-clean, and never seal over a damp surface. These simple rules keep you out of costly damage.
If moisture or solvent issues persist after the basic steps, or if the surface is large, irregular, or structurally questionable, call a professional sooner rather than later. When in doubt, get a quick expert assessment and a fresh plan. Stay focused, follow the tested sequence, and you’ll move from concern to confidence. You’ve got this.
FAQ
What causes some finishes to darken after sealing, and how can I tell if it’s moisture or solvent?
The most common cause is moisture trapped under the seal or a solvent residue lingering from the sealer. Look for a uniform darkening with a damp look rather than a glossy finish. Check the product label and manufacturer instructions for drying times and any moisture warnings.
If my concrete darkens right after sealing, what quick checks can I do to decide on a fix?
Ventilate the area and give it time to air out. If the darkening fades as it dries, it’s likely moisture related; if it stays or worsens, solvent or sealer issues may be involved. Always verify with the product’s label and local guidelines before taking action.
What immediate steps should I take if sealing darkens the floor during or right after application?
Stop applying more sealer and open nearby doors or windows for airflow. If possible, remove excess product with a clean method specified by the sealer’s instructions and allow extra drying time in a warm, dry environment. Follow the label for any re-entry or rework cautions.
How can I reduce the risk of darkening in future sealing projects?
Choose a sealer compatible with your concrete and test a small area first. Ensure the slab is fully dry, use proper ventilation, and follow manufacturer guidelines strictly. If in doubt, check the label, datasheet, or local rules before proceeding.