
Introduction
Concrete spall repair with rebar exposure means removing loose concrete, cleaning and protecting any exposed steel, and rebuilding the patch so the surface is sound and bonded. In DIY terms that means chipping out unsound material, getting the rebar clean and passivated, and building the repair in layers so it cures properly. Check product labels and manufacturer instructions for compatible patch materials and steel treatments before you start.
Most spalling starts from corrosion of embedded steel or from impact and freeze–thaw cycles, and you can usually see cracking, flaking, or rust staining where rebar is near the surface. A practical jobsite approach is to expose sound concrete, remove rust and loose scale from the rebar, apply a corrosion-control treatment recommended for your patch system, and then apply bond coat and patch material in manageable lifts. If you’re unsure about structural elements, consult an engineer or local building authority.
Key takeaways
- Identify common causes: moisture intrusion, freeze-thaw cycles, and rebar corrosion indicators.
- Check for exposed rebar by probing with a dull tool and clean visuals.
- Clean spalled areas with mechanical brushing, wire wheels; wear eye protection.
- Apply passivation per manufacturer guidance to exposed rebars before patching.
- Select repair mortars with compatibility to substrate and expected load.
- Mix and apply patch build-up in thin, successive layers per instructions.
- Protect with curing, sealing, and waterproofing measures after completion.
Table of Contents
- Introduction
- Key takeaways
- What Is Spalling and Why Rebar Gets Exposed
- Safety, Site Control, and Initial Structural Assessment
- Tools, Materials Checklist, and Standards
- Cleaning and Preparation of Exposed Rebar and Substrate
- Rebar Passivation and Protection Techniques
- Patch Build-Up: Selecting and Applying Repair Mortars
- Finishing, Curing, Protective Topcoats, and Waterproofing
- Project Planning, Costs, Timelines, Mistakes to Avoid, and Maintenance
- Conclusion
- FAQ
What Is Spalling and Why Rebar Gets Exposed
Spalling is the breaking, flaking, or delamination of concrete cover that ranges from shallow surface peeling to deeper sections where aggregate and paste separate. Repairs are usually warranted when the damage compromises cover, bond, or structural capacity rather than just cosmetic crazing.
Spalling often progresses to rebar exposure when moisture and aggressive agents reach the steel, initiating corrosion that expands and fractures surrounding concrete. Check product data sheets and local guidance for tests to confirm mechanisms; on site use visual inspection, sounding/probing, cover-depth checks, and note rust staining or pitting as signs of active corrosion.
Common causes of concrete spalling
Concrete spalling is a result of several root causes that accelerate cover loss. Understanding these helps in preventing and repairing the damage.
Corrosion of reinforcement: Moisture and oxygen combine with steel to form rust, which expands and pushes against the concrete, causing it to crack and spall.
Chloride ingress: Chlorides from de-icing salts or seawater accelerate corrosion. They can penetrate deep into concrete, reaching the rebar and initiating corrosion.
Carbonation: Carbon dioxide in the air reacts with concrete’s alkaline environment to form carbonic acid, which neutralizes the protective layer around steel, leading to corrosion.
Identification, visual checkpoints, and severity grading
Before starting repairs, inspect the damage thoroughly. Here’s a checklist to help you categorize the extent, depth, and rebar exposure.
- Cracking: Check for hairline cracks or wider ones. Ignoring these can lead to further deterioration.
- Delamination: Tap the surface with a hammer. A dull sound indicates delaminated concrete that could spall off.
- Spalling: Look for pieces of concrete breaking away, exposing underlying layers or rebar.
- Rebar exposure: Check if any rebar is visible. Even partial exposure can lead to rapid corrosion.
- Rust staining: Brownish stains indicate active corrosion, which can cause further spalling.
- Pitting: Small, crater-like holes on the surface or rebar indicate localized corrosion.
- Moisture presence: Check for dampness or efflorescence. Moisture accelerates corrosion and spalling.
- Aggregate pull-out: Try to remove a small piece of aggregate with a pick. If it comes out easily, the concrete is weak and may spall further.
Quick rule: Always prioritize repairs based on severity and extent of damage to prevent further deterioration and maintain structural integrity.
Safety, Site Control, and Initial Structural Assessment
Start with a site safety plan that lists required PPE, exclusion zones, access controls, and fall-protection methods tailored to the work elevation and environment. Use clear signage and temporary barriers to keep the public and untrained personnel out of the hazard area.
Decide early whether a qualified person or structural engineer must assess the condition by looking for wide cracks, movement, loss of reinforcement, or load-path changes that indicate escalation. Verify permit and utility isolation procedures with facility management and keep a daily log of toolbox talks, inspections, and any stop-work triggers.
Safety precautions and PPE
Before you start any concrete spall repair, safety is your top priority. Here’s what you need:
Personal Protective Equipment (PPE): Hard hats, safety glasses or goggles, work gloves, and high-visibility clothing are must-haves.
Dust control is crucial too. Use wet cutting methods where possible, and keep the area damp to minimize dust. Isolate the work area with barriers to prevent unauthorized entry.
Structural assessment and when to consult an engineer
Concrete spalling can hide serious structural issues. Here’s when you need a professional eye:
Check for large areas of spalling. If more than 10% of the surface is affected, it might be time to call in an engineer.
Look out for loss of cover. If rebar is exposed over a significant area or you can see bent or broken bars, stop work and consult a structural engineer immediately. They’ll assess load-bearing changes and any movement.
Document your findings and keep records. If you’re unsure about anything, it’s always better to err on the side of caution and get professional advice.
Tools, Materials Checklist, and Standards
Create a practical kit: hand chisels, cold chisels, grinders with dust shrouds, wire brushes, vacuum, scrapers, levels, tape, and power tools, plus PPE and respirators for dust control. Include consumables such as cleaners, rust removers, primers, curing materials, rags, brushes, and spray bottles.
For repair materials list cementitious and polymer-modified mortars, epoxy or polyurethane resins, bonding agents, rebar coatings, and corrosion inhibitors; always read the product data sheet for performance metrics, cure conditions, and compatibility notes. Cross-reference manufacturer instructions with applicable standards (ICRI/ASTM/ACI) and maintain a versioned checklist and one-page job aid for field use.
Tools and equipment checklist
Use this checklist before starting your repair to ensure you have all the necessary tools for a safe, professional job.
- Safety gear: Goggles, gloves, respirator, and dust control measures.
- Hand tools: Chisels, scrapers, trowels, brushes, and tape measure.
- Power tools: Grinders with diamond blades, angle grinders for wire brushing.
- Cleaning equipment: Vacuum, pressure washer (optional).
- Mixing tools: Drill with paddle mixer attachment, mixing tubs.
- Application tools: Trowels, squeegees, and brushes for applying mortars and coatings.
- Inspection aids: Level, straight edge, and flashlight to check rebar exposure and surface preparation.
- PPE storage: Secure place to store PPE between uses.
Quick rule: Always double-check your tools before starting. Missing a tool can delay the job and lead to mistakes.
Materials and consumables (repair mortars, passivators, coatings)
Use this checklist to select the right materials for your repair job.
- Repair mortars: Cementitious or polymer-modified mortars with suitable compressive strength and bond strength to rebar.
- Bond coats: Epoxy or latex primers to improve adhesion of repair materials.
- Rust removers: Chemical cleaners to remove rust before applying passivators.
- Passivating treatments: Rust inhibitors and corrosion inhibitors compatible with your patch system.
- Protective coatings: Epoxy, polyurethane, or acrylic sealers to protect the repaired area from future damage.
- Curing blankets: To maintain humidity and temperature during curing for optimal strength development.
- Cloth rags and brushes: For applying materials and cleaning up.
- Spray bottles: For applying cleaners, degreasers, and rust inhibitors.
Quick rule: Always choose polymer-modified mortars for better durability and flexibility over cementitious ones when possible.
Material specs, standards, and product data to check
Use this checklist to ensure you’re using the right materials that meet required standards and performance metrics.
- Compressive strength: Check it matches or exceeds your existing concrete’s strength.
- Bond strength to rebar: Ensure it meets or exceeds 300 psi for structural repairs.
- Freeze-thaw resistance: Confirm it’s suitable for your climate.
- Cure time: Check it aligns with your project timeline and conditions.
- Chloride limits: Ensure they meet ASTM C 1251 standards to prevent corrosion.
- Setting/curing requirements: Follow manufacturer’s instructions for optimal performance.
- Safety data: Review Material Safety Data Sheets (MSDS) before use.
- Certifications: Check materials comply with ASTM, ACI, or ICRI standards.
Quick rule: Always follow manufacturer’s instructions and recognized standards for best results and compliance.
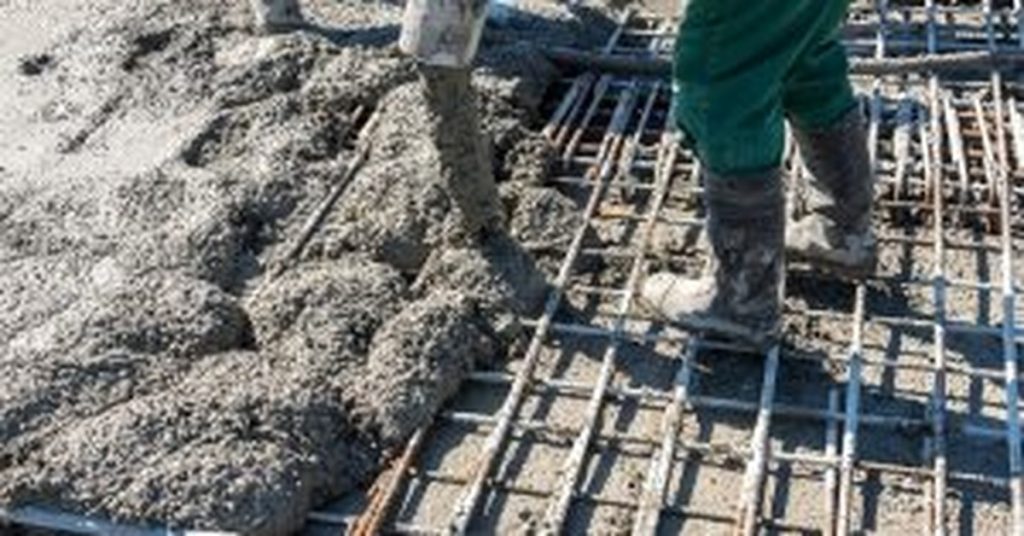
Cleaning and Preparation of Exposed Rebar and Substrate
Remove all loose and unsound concrete to reach a solid anchor zone, opening the perimeter until you have a uniform, sound substrate free of weak material. Use mechanical removal methods appropriate to the extent of damage and the surrounding structure to avoid creating new fractures.
Eliminate corrosion products from the steel by wire brushing, power tool cleaning, or approved chemical methods and then verify cleanliness by visual inspection and touch; document profile depth and remaining cover. Control dust and moisture during prep, photograph conditions, and confirm substrate readiness before applying passivation or patch materials.
Mechanical cleaning methods and acceptance criteria
Start by removing loose concrete around the exposed rebar using a chisel, hammer, or power tool. The goal is to expose solid, sound concrete for better bonding.
For rebar cleaning, use wire brushes or needle scalers for manual cleaning. For larger areas, consider abrasive blasting or power tools like angle grinders with wire cup wheels. Always wear appropriate PPE when using these tools.
Acceptance criteria: Rebar and surrounding substrate should be clean, free of loose material, and have a uniform, roughened surface. No visible rust or corrosion products should remain. Inspect visually to ensure a sound substrate for patching.
Chemical cleaning, rust removal, and rinsing protocols
Use chelating agents or acid etches to remove tough corrosion products. Follow manufacturer’s instructions for application and safety precautions. Commonly used chemicals include phosphoric acid or citric acid-based solutions.
After applying the chemical cleaner, scrub the area with a stiff brush to loosen rust. Rinse thoroughly with clean water to remove all traces of the cleaning agent and loosened corrosion products. Ensure no residue remains that could interfere with patch adhesion.
Neutralize any remaining acid using a base (like sodium bicarbonate) if necessary, then rinse again. Allow the substrate to dry before proceeding with passivation or patching. Always wear appropriate PPE when handling chemicals and follow safety guidelines for proper disposal.
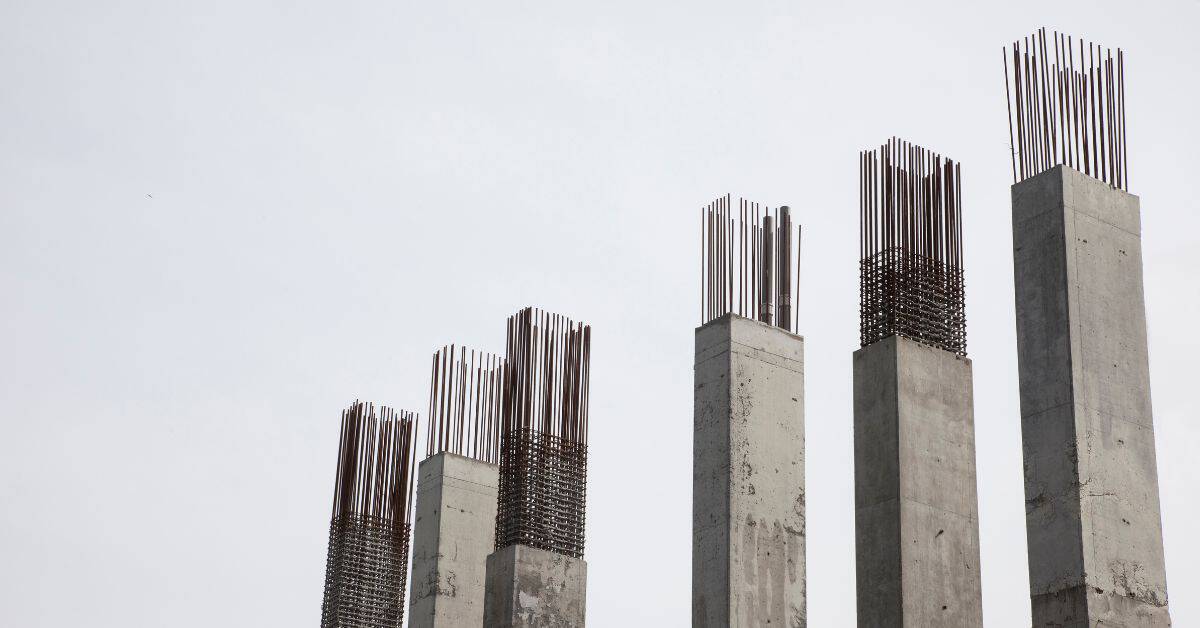
Rebar Passivation and Protection Techniques
Assess whether the embedded steel can be salvaged: severe section loss or fractured bars may need replacement, while surface corrosion can often be treated. Choose a passivation or protection method based on the corrosion mechanism and compatibility with the chosen patch system.
Apply rust converters, chemical passivators, migratory corrosion inhibitors, or barrier coatings in the sequence recommended by product instructions and allow required dwell or cure times per the manufacturer. Record test verifications such as coating adhesion, surface appearance, or electrical checks and keep those results with the repair documentation.
Passive passivation treatments and corrosion inhibitors
Rebar corrosion starts when oxygen and moisture reach the steel. Passivators and migrating corrosion inhibitors (MCIs) create a protective layer to stop this process.
Passivators, like phosphates or chromates, work by forming an insoluble layer on the rebar surface. They’re best for light contamination and short exposure times. Apply them after cleaning and before patching.
MCIs, like calcium nitrite or sodium metaborate, migrate through the concrete to reach active corrosion sites. They’re ideal for severe cases with long-term exposure. Apply MCIs directly onto the rebar before patching.
Rebar coatings and active protection options
Coatings provide a physical barrier against moisture and oxygen, preventing corrosion. Here are common types:
Epoxy coatings offer excellent adhesion and resistance to chemicals. They’re suitable for most patch repairs but may not tolerate movement well.
Zinc-rich primers provide galvanic protection, sacrificing themselves to protect the rebar. They’re great for new steel or severe corrosion cases but can’t be used with cementitious patches due to curing interference.
Cementitious primers are compatible with concrete and patch materials. They form a protective layer that tolerates movement and is suitable for most repair scenarios.
For severe cases, consider cathodic protection, which uses an external current to protect the rebar. High-performance specialty systems, like fusion-bonded epoxy or heat-cured epoxies, offer superior protection but require professional application.
Patch Build-Up: Selecting and Applying Repair Mortars
Select repair mortars that match structural needs and environmental exposure—cementitious or polymer-modified mixes with appropriate strength, shrinkage control, and workability. Confirm compatibility with any rebar coatings and refer to product literature for mix guidance and recommended application limits.
Use bond coats and proper surface prep, place patch material in planned lifts for deep fills, and consolidate each layer to avoid voids or cold joints. Follow curing guidance from the supplier, verify cover with measurements after final set, and document layer thicknesses and application conditions for quality control.
Material selection and compatibility checks
Choosing the right repair mortar is crucial for a lasting fix. The wrong material can cause cracking, staining, or weak bonds.
- Cementitious vs Polymer-modified Mortars: Cement mortars are cheaper but shrink more. Polymers reduce shrinkage and improve bond strength. Use polymer-modified mixes for larger repairs or where movement is expected.
- Compressive Strength: Match the existing concrete’s strength (2000-4000 psi). Lower strength patches can cause stress points.
- Shrinkage: Low shrinkage mortars prevent cracking due to drying. Use shrinkage-compensating additives (SLU) for large repairs.
- Workability: Easy-to-apply mortars ensure good consolidation and void-free patches. Avoid stiff mixes that can lead to honeycombing.
- Compatibility with Existing Concrete/Rebar: Check manufacturer’s data for compatibility with your substrate and passivators used on rebar. Incompatibility can cause discoloration, delamination, or corrosion.
- Thermal and Modulus Compatibility: Match the existing concrete’s thermal expansion and elastic modulus to prevent stress buildup due to temperature changes or loading.
Application technique, layering, and quality control
Proper application ensures a strong, durable patch. Follow these steps for deep repairs:
Bond Coat Application: Apply a thin, even coat of primer or bond coat to clean, moist surfaces. This improves adhesion between old substrate and new patch.
Layering Technique: Build up the repair in successive lifts (max 2-3 inches thick) to avoid excessive shrinkage and cracking. Allow each lift to cure slightly before applying the next.
Finishing Methods: Use a trowel or float to strike off and finish the surface, ensuring it’s even with the existing concrete. For deep repairs, use a vibrating poker to consolidate the mix and remove air voids.
Quality Control Checks: Inspect each lift for voids, honeycombing, or poor adhesion. Tap the patch gently – a hollow sound indicates voids. If found, remove and reapply that section.
Finishing, Curing, Protective Topcoats, and Waterproofing
Match the finish and texture to the surrounding concrete and feather patch edges to prevent abrupt transitions; choose the finishing method that suits the repair location and use conditions. Plan curing that aligns with the patch material and site conditions—select an appropriate membrane, water curing, or blankets per manufacturer recommendations.
Evaluate protective topcoats and waterproofing systems for compatibility with the patch and exposure environment; verify adhesion on a test area and check moisture content before application. Sequence operations so the patch is fully cured to the required degree before final coatings, and keep records of cure method, ambient conditions, and test results.
Curing best practices and monitoring
Curing is crucial for new concrete patches to reach their full strength. Here’s how:
Moisture retention: Keep the patch damp, but not wet, during curing. This helps maintain a consistent temperature and prevents rapid drying.
Coverings: Use curing blankets or membranes for small patches. For larger areas, misting can be effective. Follow manufacturer guidelines for specific products.
Duration: Curing times vary by patch material and conditions. Generally, expect 3 to 7 days for full strength development. Monitor the patch daily, checking for signs of excessive drying or cracking.
Protective coatings, sealers, and waterproofing strategies
After curing, apply protective topcoats to extend your patch’s service life. Here are some options:
Topical sealers: Penetrating sealers like silane or siloxane can be applied after the patch has cured. They protect against moisture and de-icing salts.
Breathable coatings: Epoxy, polyurethane, or polyaspartic coatings provide a barrier against chemicals and abrasion. Ensure they’re compatible with your patch material and allow for some moisture vapor transmission.
Waterproofing systems: For areas prone to standing water or heavy traffic, consider additional waterproofing. Surface-applied membranes or integral waterproofers can be used, depending on your specific needs.
Project Planning, Costs, Timelines, Mistakes to Avoid, and Maintenance
Prepare a phased plan listing crew roles, task durations, and material needs for each step—cleaning, passivation, patch build-up, and finishing—so you can sequence work and limit downtime. Factor supplier lead times, weather windows, and staging for lifts and curing into the schedule.
Identify common mistakes to avoid, such as inadequate rebar cleaning, skipping passivation, poor surface profile, and premature loading of the repair. Create a maintenance and inspection schedule for the repaired area and document thresholds for repeat actions, keeping all records to inform future work.
Cost estimation and scheduling tips
The cost of concrete spall repair varies greatly depending on the extent of damage. Here’s a breakdown to help you estimate:
Labor: Estimate around $50-$100 per square foot for labor, including crew size (2-4 people), shift length (8 hours), and sequencing to minimize downtime.
Materials: Plan for about $30-$60 per square foot in materials like patch mortars, corrosion inhibitors, rebar couplers, protective coatings, formwork, grinders, and PPE. Include a 15-20% waste factor and add supplier lead times.
Access and equipment: If scaffolding or specialized equipment (like grinders) is needed, budget for rentals at around $100-$300 per day.
Common mistakes and long-term maintenance strategy
To ensure a successful repair that lasts, avoid these common pitfalls:
- Inadequate cleaning: Thoroughly clean exposed steel to remove all rust and contaminants. Incomplete cleaning can lead to continued corrosion.
- Improper material choice: Use compatible materials for patching and protection. Incompatible materials can cause debonding or premature failure.
- Poor curing: Follow recommended cure times and conditions (temperature, humidity) to ensure proper patch development.
- Neglected moisture control: Address any underlying water issues that caused the spalling in the first place. Otherwise, repairs may fail again.
- Skipping passivation: Always apply a corrosion inhibitor or protective coating after cleaning rebar to prevent flash rusting and further corrosion.
For long-term maintenance, reinspect every 6-12 months for signs of ongoing corrosion or debonding. If necessary, repeat repair steps or upgrade protective coatings.
Conclusion
Fixing spall where rebar shows up is about control, durability, and staying safe while you improve the look and strength of the structure. When you do it right, the repair lasts and the risk of further damage drops fast.
Start by confirming safety—power and moisture controls in place, PPE on, and fall protection ready if you’re working at height. Inspect the area for hidden damage, gather the tools and materials, clean the exposed rebar and substrate, apply passivation, and then build up the patch in thin, workable layers, curing and sealing as you go. Work in small sections, test each coat, and follow the specified mix ratios and curing times from the materials you chose.
Common mistakes to avoid: skip or rush passivation and protection steps, overbuild too thick in one go, or skip testing in a hidden corner and commit to a finish you can’t guarantee. Safety rules to follow are simple: stay within your skill and tool limits, ventilate and protect yourself from dust and fumes, and never proceed when moisture, heat, or bond failures compromise the patch. If something feels uncertain or the damage is widespread, back off and recheck or call in backup.
If the crack pattern is extensive, the corrosion looks advanced, or the area is critical to structural support, consider bringing in a professional rather than pushing on alone. With careful planning and disciplined execution, you can restore integrity and curb costly failures—stay methodical, stay safe, and you’ll get solid, lasting results.
FAQ
What causes concrete spalling and why does rebar get exposed?
Spalling happens when moisture and chemicals get behind the surface and the steel rebar starts to corrode. Freeze-thaw cycles, improper curing, and salt or chloride exposure speed up the process. Look for rust stains, flaky concrete, and loosened edges as clues.
How do I identify rebar exposure in damaged concrete?
Check for rust on the surface and hollow or hollow-sounding spots when you tap. If you can see metal or the rebars are clearly exposed, stop and plan a repair. Map out where the damage is so you know what you’re cleaning and patching.
What cleaning methods should I use for spalled areas?
Remove loose and damaged concrete from around the exposed rebar. Use a wire brush or chisel to clean the rust; don’t gouge the steel. Rinse the area well and let it dry before patching.
How should I perform patch build-up and what materials work best?
Choose a patch material that bonds well with the existing concrete and is compatible with the substrate. Apply in thin lifts, roughen between lifts, and follow the product instructions for setting and curing. If in doubt, check the label or manufacturer guidance for rebar-adjacent repairs and local conditions.
What about protective coatings and final protection?
Apply a coating or sealant only after the patch has cured to the manufacturer’s specs. Use a coating that’s compatible with concrete and any patch material you used. If you’re unsure, read the product label and consider local weather and exposure conditions.