
Introduction
Concrete retaining walls are structures that hold back soil and must stay dry and stable. To do that, waterproofing and proper drainage are essential, along with backfill and proper reinforcement. Without addressing hydrostatic pressure, the wall can leak, bow, or fail over time.
There are several waterproofing options worth considering, and you should follow the product label and manufacturer guidance. Drainage rock behind the wall helps move water away from the concrete, reducing pressure and helping backfill settle properly. For backfill, follow practical steps such as placing clean material, compacting as directed, and using a flowable fill option where allowed; check local rules and specifications.
Key takeaways
- Choose waterproofing membranes or coatings compatible with concrete and soil conditions.
- Incorporate drainage rock behind walls to reduce hydrostatic pressure and fines migration.
- Backfill with approved materials and compact in lifts to minimize settlement.
- Install subsurface drains and cleanouts per manufacturer and local code guidance.
- Integrate waterproofing during construction sequence to prevent moisture intrusion.
- Safety: wear PPE, keep hands clear of equipment, and secure trench edges.
Table of Contents
- Introduction
- Key takeaways
- Why Waterproofing and Drainage Matter for Concrete Retaining Walls
- Waterproofing Methods for Concrete Retaining Walls
- Using Drainage Rock and Backfill Correctly
- Designing Subsurface Drainage to Prevent Blowouts
- Step-by-Step Construction Sequence with Waterproofing Integrated
- Materials, Specs, and Tools Checklist
- Inspection, Maintenance, and Repair Strategies
- Costs, Safety, Environmental Impact, and Common Mistakes
- Conclusion
- FAQ
Why Waterproofing and Drainage Matter for Concrete Retaining Walls
Water pressure behind a wall is not just a nuisance; it can drive cracks, bowing, and leakage along joints. When hydrostatic pressure builds, the wall responds in ways that are often visible as efflorescence, damp patches, or spalling on exposed faces. Integrated waterproofing and drainage reduce these risks by giving water a controlled path to daylight or a storm system, rather than pushing against the structure. Understanding the failure modes helps you design for longevity and safety from the start.
Different approaches exist, and the right choice depends on the wall and site. Waterproofing coatings, damp-proofing, and drainage boards each play a role in the assembly. Practical options include surface membranes or bituminous coatings, integral sealants, and drainage layers that connect to a proper discharge path. Plan drainage with a gravel core, perforated pipe, filter fabric, backfill grading, and a daylight or sump outlet, and coordinate these with the waterproofing so there are no voids or punctures in membranes. Regular inspections after heavy rain catch issues early and guide repairs before they worsen.
What is hydrostatic pressure and how it causes blowouts
Hydrostatic pressure is the force exerted by water at rest. Behind a retaining wall, this pressure builds up as water saturates the soil. It’s like having a giant, invisible hand pushing against your wall.
This pressure can cause several failure modes:
- Cracking: The wall cracks under the constant pressure, allowing more water in and exacerbating the problem.
- Bowing or Overturning: The wall leans or tips over due to the sheer force of the water.
- Joint Leakage: Water seeps through the joints between blocks or panels, weakening the structure.
- Spalling: The concrete surface flakes off, exposing the aggregate and compromising the wall’s integrity.
Types of concrete retaining walls and risk differences
Concrete retaining walls come in various types, each with its own vulnerability to water-related issues:
Gravity Walls: These thick, heavy walls rely on their mass for stability. While they can withstand some hydrostatic pressure, excessive water behind the wall can still cause cracking and bowing.
Cantilever Walls: These walls have a thick base that extends out in front of the wall face. They’re more susceptible to water issues as the soil behind them becomes saturated, putting immense pressure on the wall’s anchor bolts.
Anchored Walls: Anchors help reinforce these walls against hydrostatic pressure. However, if anchors corrode or fail due to water exposure, the entire wall is at risk.
Segmental Walls: These systems use interlocking blocks that can shift under high water pressure, leading to leakage and structural failure.
Waterproofing Methods for Concrete Retaining Walls
Major approaches include surface-applied liquid membranes, sheet membranes, and integral water repellents. Each has clear strengths and limitations for retaining walls, depending on exposure and installation conditions. A surface coating is easy to inspect but may require reapplication over time, while sheet membranes can offer continuous protection with careful detailing. Integral repellents reduce moisture ingress but may not stop bulk water on their own. Evaluate which combination best suits your wall and climate to minimize long-term failures.
Compatibility with concrete is essential. Adhesion, cure impact, and potential effects on cracking and vapor transmission must be considered, along with how the system handles movement at joints. Site conditions such as soil moisture, hydrostatic pressure, freeze-thaw cycles, and groundwater chemistry guide method selection. A practical framework helps decide when to use coatings, drainage-plane systems, or integral waterproofing, with clear criteria for each scenario. Installation steps require suitable substrates, primers, joint detailing, backer rods, flashing, and tests for watertightness and bond. Avoid common pitfalls by planning for crack control, drainage integration, and timely inspections after heavy rain.
Membrane systems (sheet-applied and fluid-applied)
Sheet membranes and fluid-applied coatings are popular choices for waterproofing concrete retaining walls. Here’s how they stack up:
Sheet Membranes: Pros include easy installation, durability, and resistance to punctures. They’re great for high-exposure areas with heavy traffic or equipment. Cons? They can be pricey and may require additional primers or adhesives for proper adhesion.
Fluid-Applied Coatings: These are cheaper, easier to apply, and can conform to wall surfaces better than sheets. But they’re more susceptible to damage from heavy equipment and may require multiple coats for adequate protection.
Cementitious coatings and crystalline admixtures
Cementitious coatings and crystalline waterproofing are concrete-friendly options that work well in various site conditions:
Cementitious Coatings: These are thick, trowel-applied pastes that create a physical barrier against water. They’re great for vertical surfaces but can be labor-intensive and may require additional reinforcement due to their thickness.
Crystalline Admixtures: These waterproofing agents are added to the concrete mix during batching. They form crystals within the concrete matrix, blocking water penetration. They’re ideal for new construction but aren’t suitable for existing walls as they can’t penetrate deep into the concrete.
Integrating waterproofing with drainage layers
Waterproofing layers must work hand-in-hand with drainage systems to prevent hydrostatic pressure buildup:
Use drainage boards behind the waterproofing membrane to channel water away from the wall. Ensure they’re properly sloped and connected to a daylight or blind drain.
Protect the waterproofing with protection boards. They shield membranes from damage during backfilling, preserving their integrity and preventing future leaks.
Backfill with clean, well-draining material. Avoid using clay or other heavy soils that can retain moisture and exert hydrostatic pressure on the wall.
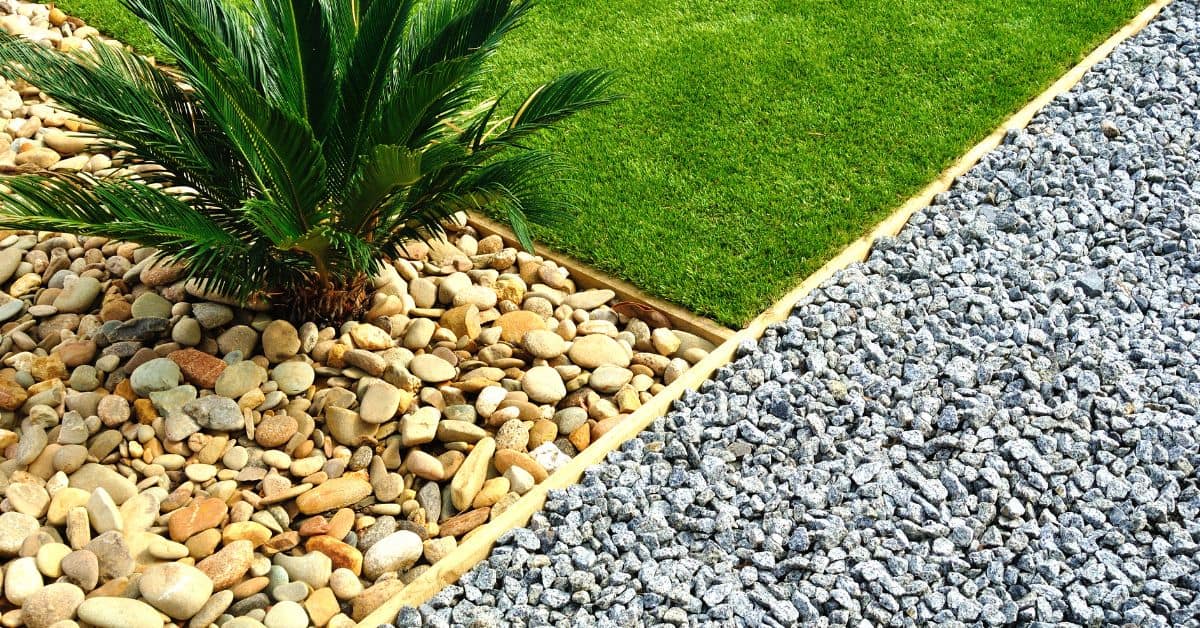
Using Drainage Rock and Backfill Correctly
The purpose of drainage rock behind a concrete retaining wall is to provide free drainage to a dedicated outlet or daylight. It prevents pressure buildup by keeping pore water from pushing against the wall face. Behind the rock, a proper backfill sequence helps maintain void-free, continuous drainage and reduces the chance of sediment migrating into the wall joints. When done right, you’ll see fewer damp patches and more predictable backfill performance over time.
Backfill sequencing matters: compact in layers, starting with coarse drainage rock, followed by usable backfill that suits the site. Keep rocks clean and free of fines. Use a clean under-wall fabric, perforated or slotted drainage pipe, and ensure the system slopes away from the wall. Wrapping fabric correctly and placing the pipe at the correct elevation minimizes clogging. Regular checks should catch sediment buildup and verify outlet clearance, with periodic backfill refresh if settlement slows drainage.
Selecting drainage rock and gradation principles
Choosing the right drainage rock is crucial for your retaining wall’s longevity. It should be clean, free of fines, organic matter, and clay.
Permeability is key – go for single-size or graded angular rock in the 0.5 to 2-inch range. Rounded rocks can roll together, creating voids that clog easily.
Stable gradation reduces settlement and clogging risk. Check local supplier gradation specs to ensure they meet your needs. Too much ‘fines’ can cause clogging, while too many large rocks may lead to instability.
Filter fabric and geotextile placement
Geotextiles prevent fines from backfill migrating into the drainage layer, keeping your system clear. Choose a non-woven filter fabric with an appropriate opening size (0.1 to 0.2 mm) for your backfill.
Place geotextile along the wall face first, overlapping seams by at least 18 inches. Extend it beyond the toe of the wall and up the wall face as needed.
Test compatibility with chosen backfill to ensure no chemical reactions occur that could degrade the fabric over time. Follow manufacturer guidelines for installation and maintenance.
Layering, compaction, and spacing from wall face
Start with a layer of drainage rock at the base, sloping it away from the wall. This creates a continuous drainage zone.
Add backfill in layers no more than 6 inches thick, compacting each lift to avoid voids. Use a vibrating plate compactor for best results. Maintain a minimum spacing of 2 inches from the wall face to prevent excessive pressure on the wall during compaction.
Moisten backfill slightly before compaction, but avoid adding too much water as it can reduce permeability and cause settlement. Regularly check compaction targets to ensure proper density and drainage performance.
Designing Subsurface Drainage to Prevent Blowouts
Hydrostatic pressure behind a wall is mitigated by a well-designed subsurface drainage system. It relieves pressure that can compromise waterproofing, widen cracks, and increase blowout risk. Subsurface drainage focuses on keeping water away from the wall surface and directing it to a daylight outlet or sump. This approach is distinct from surface drainage, which handles water at or near grade instead of behind the wall.
The layout can include interior or exterior drains, perforated sleeves, French drains, and continuous runs along the wall and footing. Plan trench widths, pipe spacing, and positive grading toward an outlet, while coordinating with footer details to avoid hidden voids. Materials should be clean, well-graded drainage rock with a geotextile filter and a rigid pipe to resist crushing. Install cleanouts and access points at regular intervals to simplify maintenance and inspection.
Perforated drainpipes and filter drains
Perforated pipes are essential for subsurface drainage. They should be placed along the base of your retaining wall, with a positive grade towards the outlet or sump.
Proper bedding is crucial to prevent pipe crush and maintain flow. Use clean, well-graded drainage rock around the pipe, extending 2-3 inches above it.
Wrap the pipe in filter fabric before bedding. This prevents clogging from fine particles in the backfill. Connect perforated pipes to gravity outlets or sump systems using solid pipe sections to maintain flow and prevent blockages.
Weep holes, relief drains, and overflow provisions
Weep holes and relief drains are small openings that allow water to escape from the wall face. Size them around 1/2″ to 3/4″. Space weep holes every 6-8 feet along the wall, and place relief drains at low points or where water tends to collect.
Redundancy is key in drainage systems. Over-provision of outlets reduces blowout risk by ensuring water has multiple escape routes if one becomes blocked.
Make sure weep holes and relief drains lead to daylight outlets or sumps. Keep these accessible for periodic checks and maintenance. Never let them bypass waterproofing membranes, as this can compromise the wall’s integrity.
Inspectable and maintainable drainage features
Including cleanouts, inspection points, and access ports in your drainage system allows you to verify performance and address any issues that arise over time.
Install accessible cleanouts every 6-8 meters. These should be large enough for a person to enter if necessary. Place them at low points or where water tends to collect.
If your system requires pumping, include sump or pump pits as needed. Regularly check these features for clogging, settlement, or shifting backfill that could impede flow. Maintain a record of inspection dates and findings for future reference.
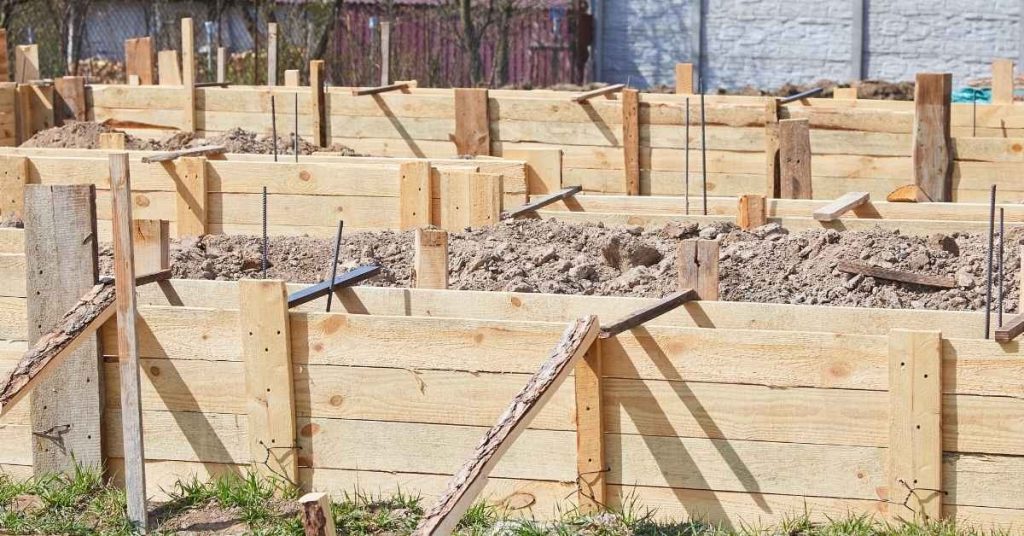
Step-by-Step Construction Sequence with Waterproofing Integrated
Pre-pour integration sets the stage: select a membrane type or liquid coating, prepare the surface, and ensure slope toward the drain. Detail overlaps and terminations so they tie into future drainage components, minimizing rework. Coordinate these details with footing preparation to prevent leaks where the wall meets the base. Plan for protection during backfill to avoid punctures or movement of the membrane.
During foundation and wall work, trench design and compaction, formwork alignment, and early routing for drainage matter. Ensure waterproofing terminates under the footing where needed. For wall drainage, install geotextile and cleanouts, lay the perforated core pipe, and place backfill drainage rock behind and adjacent to the wall face. Keep a continuous drainage path to daylight or a sump and verify clean, secure terminations before moving on.
Step-by-Step Process
This section guides you through the practical steps to construct a concrete retaining wall with integrated waterproofing, from preparation to final checks.
- Preparation and safety: Clear the site, mark out your wall’s footprint, ensure proper PPE, and call utility lines if needed.
- Excavation: Dig the trench, control groundwater using sump pumps or well points, and compact the subgrade.
- Formwork and rebar: Set up forms, align them properly, lay out rebar, and route drainage pipes early.
- Concrete pouring: Pour concrete, vibrate to remove air pockets, and finish the surface. Let it cure according to manufacturer’s guidelines.
- Waterproofing application: Apply membrane or coating at appropriate faces, ensure seamless overlaps, seal joints, and protect against backfill damage.
- Drainage installation: Install geotextile and cleanouts, lay perforated core pipe with a continuous drainage path, incorporate backfill drainage rock behind and at the wall face.
- Form removal and backfilling: Carefully remove forms, verify seals and penetrations, backfill in lifts with drainage rock and filter fabric, use protective measures to avoid membrane puncture.
- Final checks and commissioning: Perform a functional hydrostatic check if feasible, verify uninterrupted drainage flow, inspect flashings and joints, document maintenance points for long-term performance.
Site preparation, excavation, and foundation considerations
Preparing the site properly ensures a solid foundation for your retaining wall. Here’s how:
Subgrade Preparation: Remove all vegetation, loosen the soil, and compact it using a plate compactor.
Groundwater Control: During excavation, use sump pumps or well points to control groundwater. This prevents hydrostatic pressure from pushing water into your trench.
Key Checks Before Placing Concrete or Backfill: Ensure the subgrade is stable and level, check that your forms are properly aligned, and verify that drainage pipes are routed correctly.
Wall construction, joints, and waterproofing application timing
Timing is crucial when applying waterproofing to your retaining wall. Here’s how to do it:
Waterproofing Application Timing: Apply membrane or coating after the concrete has cured according to manufacturer’s guidelines. This ensures a strong bond between the concrete and the waterproofing layer.
Joint Treatment Techniques: Treat joints using expansion joint material or by saw-cutting and filling with a flexible sealant. This prevents cracking due to wall movement.
Protecting Membranes During Backfill: Use protective board or foam to prevent backfill from damaging the waterproofing membrane during backfilling.
Backfilling, drainage installation, and final grading
Proper backfilling and drainage installation are crucial for maintaining wall stability and preventing hydrostatic blowouts:
Drainage Rock Installation: Install drainage rock behind and at the wall face. This helps to channel water away from the wall and prevents hydrostatic pressure buildup.
Perforated Core Pipe Installation: Lay perforated core pipe with a continuous drainage path. Ensure it’s daylighted or connected to a sump to discharge water effectively.
Geotextile and Filter Fabric Placement: Place geotextile and filter fabric behind the drainage rock to prevent soil from clogging the drains. Backfill in lifts, compacting each lift to maintain drainage continuity and wall stability.
Materials, Specs, and Tools Checklist
Core materials include concrete, waterproofing membranes or coatings, drainage rock, geotextile filter fabric, perforated drainage pipe, end caps, risers, backfill, sealants, and any required reinforcement. Verify compatibility between waterproofing and drainage components and confirm substrate readiness. Gather data sheets and installation guides for each product and cross-check with local codes and inspector requirements before ordering. Documentation upfront saves delays later on.
Perfomance checks should cover compressive strength, water permeability, hydrostatic pressure ratings, freeze-thaw durability, chemical resistance, cure time, and surface drying. Always require manufacturer datasheets and installation instructions, plus warranty terms. Tools and equipment include measurement gear, trowels, mixer or ready-mix, vibrator, membrane roller, trenching tools, cleanouts, PPE, and a mock-up panel for adhesion tests. Plan inspection milestones and non-destructive testing where applicable.
Material selection considerations and standards to verify
Before you start, use this checklist to ensure your materials meet the job’s demands.
- Waterproofing membranes/coatings: Check permeability (gallons/m2/day), hydrostatic pressure ratings, and compatibility with drainage components. Skip this, risk water intrusion.
- Concrete mix: Verify acceptable compressive strength for your wall type. Too low, wall may crack or collapse.
- Drainage rock (size and gradation): Ensure proper size and gradation for efficient drainage. Wrong size, clogging occurs.
- Geotextile filter fabric: Check permeability and durability. Poor quality, soil may clog drains.
- Perforated drainage pipe: Verify flow rate and compatibility with end caps and risers. Incompatible parts, leaks occur.
- Backfill material: Ensure compaction and stability. Poor backfill, wall may lean or settle.
- Sealants/crack injection materials: Check compatibility with concrete and waterproofing. Wrong choice, ineffective sealing.
- Reinforcement (rebar/fiber): Verify design requirements are met. Insufficient reinforcement, wall may fail under load.
Quick rule: Always consult manufacturer datasheets and local building codes to ensure material compliance.
Tools and equipment checklist for DIY and contractors
Gather these tools before starting your project to ensure smooth execution.
- Measurement/marking tools: Tape measure, level, chalk line. Inaccurate marking, improper construction.
- Trowels/hawks: For membrane application and finishing concrete. No trowel, poor finish.
- Concrete mixer/ready-mix delivery: For mixing or delivering concrete. No concrete, no wall.
- Vibrator/combination screed: To consolidate concrete and strike off excess. No vibrator, weak concrete with voids.
- Membrane roller/broom: For applying membranes smoothly. Poor application, ineffective waterproofing.
- Trenching/saw-cut tools: For excavating and cutting drainage trenches. No trench, no drainage.
- Sump pump/pump-off system: To remove water from excavation. No pump, waterlogged site.
- PPE (Personal Protective Equipment): Safety glasses, gloves, hard hat, etc. No PPE, safety hazards.
- Mock-up/test panel: For adhesion checks and quality control. No test, unexpected failures.
Quick rule: Always prioritize safety gear and ensure tools are in good working condition before starting.
Inspection, Maintenance, and Repair Strategies
Set a schedule for inspections: a yearly visual survey and after major weather events. Check for cracks, spalling, efflorescence, movement, joint integrity, backfill settlement, and drainage outlets. Document findings to prioritize repairs and track progress over time. Be proactive with small issues before they become big problems.
Drainage requires regular verification: ensure unobstructed weep holes and perforated lines, test drainage rock porosity, and confirm proper grading away from the wall. Inspect waterproofing layers for delamination or cracking, and note any membrane damage. Schedule preventive maintenance like debris removal, rock re-bed, crack resealing, and resealing coatings per product guidance, plus a clear plan for medium- and long-term repairs.
Routine Inspection Checklist and Early Warning Signs
Inspect your retaining wall annually or after major weather events to catch issues early.
- Saturated Backfill: Check for wet soil behind the wall. If present, it could indicate a drainage issue.
- Bulging: Look for any convex curves in the wall face. This can signal hydrostatic pressure buildup.
- Efflorescence: White powdery deposits on the wall may hint at moisture ingress.
- Seepage: Check for water trickling down the wall face or through joints.
- Cracks: Inspect for hairline cracks, which can widen over time.
- Spalling: Look for flaking or chipping concrete, indicating potential structural issues.
- Movement: Gently push the wall; any give could signal instability.
- Joint Integrity: Ensure joints remain tight and free of debris.
- Backfill Settlement: Check for sunken or settled backfill, which can put pressure on the wall.
- Drainage Outlets/Cleanouts: Inspect these areas to ensure they’re clear and functioning properly.
Quick rule: Regular inspections help prevent small problems from becoming big, expensive ones.
Repair Options for Leaks, Blocked Drains, and Hydrostatic Damage
Address these issues promptly to prevent further wall deterioration.
- Localized Patching: For small cracks or holes, use a concrete patching compound. Seal afterwards.
- Drain Flushing: Clear blocked drains with water or an air compressor. Regular maintenance prevents blockages.
- Membrane Repair: If the waterproofing membrane is damaged, patch it using a flexible sealant.
- Partial Regrading: If necessary, regrade the area around the wall to improve drainage.
- Hydrostatic Pressure Relief: Install relief drains or weep holes if none exist. Consult an engineer for major changes.
- Professional Remediation: For extensive damage, consider hiring a professional. They have specialized equipment and expertise.
Quick rule: The sooner you address these issues, the less costly repairs will be in the long run.
Costs, Safety, Environmental Impact, and Common Mistakes
Budget awareness comes from understanding major cost drivers: concrete, reinforcement, waterproofing, drainage rock, fabrics, backfill, formwork, excavation, equipment, permits, and labor. Plan for long-term maintenance and potential price swings. Factor in contingencies for unexpected site conditions and weather. Keep a log of vendor quotes to compare scope and value.
Safety and environmental stewardship matter on every job. Consider trench depth and stability, shoring needs, fall protection, PPE, and proper access control. Minimize soil disruption and manage runoff with drainage rock and silt fencing. Avoid common mistakes like improper membrane detailing, missing joints, or inadequate backfill grading, which can undermine the system. Ensure permits, milestone planning, and waste handling are in place, and document warranties and product guarantees for future reference.
Cost factors and budget planning tips
Building a concrete retaining wall involves several cost elements. Prioritize spending to minimize long-term risks.
Materials like concrete, rebar, waterproofing membranes, and drainage rock are the backbone of your costs. Get quotes from multiple suppliers to find the best prices.
Excavation, formwork, and backfill also add significantly to your budget. Consider renting equipment to save on labor costs, but ensure you’re comfortable operating it safely.
Don’t forget about permit fees, labor rates, and a contingency for unexpected expenses. Plan for long-term maintenance and potential price fluctuations in materials.
Safety precautions and best practices on site
Safety is paramount when building retaining walls. Here are some key precautions:
Excavation safety is crucial. Assess trench depth and stability, use shoring or bracing where needed, and maintain clearances for equipment.
Wear appropriate PPE, including hard hats, gloves, and steel-toed boots. Use fall protection when working at heights. Ensure membranes and chemicals are handled safely according to manufacturers’ guidelines.
Obtain necessary permits and engage qualified supervision for complex jobs. Establish clear emergency procedures and site access controls to minimize risks.
Common mistakes, sustainability practices, and long-term durability
Avoid these common pitfalls for a durable, sustainable retaining wall:
- Poor filter detail: Ensure proper drainage behind the wall to prevent hydrostatic pressure buildup.
- Inadequate drainage: Install a drainage layer or tiles at the base of the wall to direct water away.
- Improper membrane protection: Protect membranes from damage during backfilling and construction.
- Ignoring grading: Ensure the ground behind the wall slopes away to prevent water accumulation.
- Not considering sustainability: Use recycled aggregate in concrete, choose low-VOC products for waterproofing, and implement dust control measures.
Long-term durability depends on proper installation, regular maintenance, and addressing any issues promptly. Regular inspections can help catch problems early.
Conclusion
Waterproofing and proper drainage are the core guardrails for a durable, safe concrete wall that won’t leak, crumble, or fail under pressure. When you lock these in early and test as you go, your wall stays straight, looks solid, and resists hydrostatic blowouts.
Check your plan like a foreman would: verify drainage paths and backfill are in place, confirm a waterproofing layer or coating is applied correctly, inspect seals and joints, run a simple water test behind the wall, ensure grading slopes away from the wall, and have the right drainage rock, filter fabric, materials, and tools ready before you pour or backfill.
Common mistakes to avoid include skipping the subsurface drainage or using improper backfill; cutting corners on waterproofing details; and rushing the backfill around the wall. Safety first means double-checking forms, wearing eye and hand protection, and never burying utilities or leaving loose rock that can clog drains. If you’re unsure about the drainage design, edge conditions, or the waterproofing method, stop and get an expert opinion before moving ahead.
If the project involves complex drainage design, uncertain soil conditions, or patching an old wall, don’t push on alone—call in a pro. When you know your plan is solid, you can move forward with confidence and finish a wall that stands up to weather, time, and use, with clean lines and minimal maintenance.
FAQ
What are the main types of waterproofing materials I can use on a retaining wall?
Look at the product label and manufacturer instructions to choose between options like membranes, liquid coatings, or self-adhesive sheets. Each type has different installation steps and compatibility with concrete. Always verify suitability for underground use and exposure to soil moisture with the label or datasheet.
Why is drainage rock important in retaining wall construction, and how should I use it?
Drainage rock relieves hydrostatic pressure behind the wall. It should be placed where water can flow toward the outlet, not compacted tightly where water can’t escape. Check local guidance and product specs for minimum size ranges and drainage criteria.
What are safe steps for backfill material, including flowable fill, to prevent blowouts?
Backfill should be clean, well-draining, and installed in layers that you can compact without overloading the wall. If you’re using flowable fill, follow the manufacturer instructions and local guidance for placement and curing. Always confirm with the label or instructions before mixing or pouring.
What common installation mistakes should I avoid to keep the wall from failing?
Avoid skipping proper drainage, failing to install a waterproofing barrier, or over-tamping backfill. Do not compact soil directly against the wall where it can trap moisture. When in doubt, review product labels and construction guidelines for the specific materials you’re using.