
Introduction
A concrete project roadmap is a step-by-step plan from initial sketch to a finished slab that you can build yourself.
Key takeaways
- Assess slab condition and moisture before adding framing or deck over concrete.
- Verify load paths and local code requirements for new structures atop slabs.
- Plan proper joint layout and control cut spacing to prevent cracking.
- Evaluate whether repairs or removal of damaged concrete is needed.
- Use sleepers or elevated framing to create dry, level deck over slab.
- Wear PPE and follow moisture testing guidelines before any new pour.
Table of Contents
- Introduction
- Key takeaways
- Can You Build a New Slab or Structure over Existing Concrete?
- Planning, Permits, and Structural Requirements
- Site Preparation and Subgrade Work
- Formwork, Reinforcement, and Joint Planning
- Concrete Mix Selection, Pouring, and Consolidation
- Finishing, Curing, and Surface Treatments
- Framing and Decking Options over Concrete
- Ventilation, Drainage, Moisture Management, and Long-Term Performance
- Conclusion
- FAQ
Can You Build a New Slab or Structure over Existing Concrete?
Assess the overall slab condition by looking for cracks, spalling, flatness, moisture signs, and prior repairs. Identify if cracking is active or cosmetic and whether settlement or heaving has occurred. Use simple checks to guide reuse versus removal.
Evaluate structural readiness by verifying thickness, reinforcement presence, and compatibility with the planned load. Determine if the existing slab can bear additional loads or if a new base is required. Consider moisture and bonding factors to decide if a vapor barrier or coating is needed between old and new construction.
Assessing the Existing Slab Condition
The first step in determining if you can build over an existing concrete slab is to assess its condition. This involves a visual inspection, probing for hollow spots, and checking for levelness.
Look for cracks, flaking (spalling), signs of settlement or heaving, and any prior repairs. Use a measuring tape to determine the width of cracks – extensive cracking over 1/4 inch may indicate significant issues.
If you find minor cracks less than 1/8 inch wide, no signs of movement, and the slab is level, repair and reuse might be feasible. However, if there are extensive cracks, significant spalling, or poor elevation/levelness, consider removal or partial replacement.
Repair vs Removal: Decision Checklist
Use this checklist to help decide whether to repair, partially replace, or fully remove the existing slab. It’s crucial to choose the most cost-effective and long-lasting solution.
- Crack width: Measure crack widths. If over 1/4 inch, full removal may be necessary.
- Movement signs: Check for differential movement or heaving. Any signs warrant further investigation.
- Spalling: Inspect for flaking concrete. Significant spalling may require removal.
- Levelness: Use a level to check the slab’s elevation. Poor levelness may necessitate replacement.
- Moisture presence: Check for signs of moisture or dampness. Moisture can compromise concrete and should be addressed.
- Reinforcement presence: Verify if there are reinforcing bars in the slab. They’re crucial for bearing additional loads.
- Thickness: Measure the slab’s thickness. It must meet local building codes and support new loads.
- Compatibility with new load: Ensure the existing slab can bear additional loads safely.
Quick rule: If in doubt, consult a professional to avoid costly mistakes.
Special Cases: Slabs Under Decks or Additions
When planning to build decks or structures on top of existing slabs, consider the slab’s condition, levelness, and its ability to bear additional loads.
If the slab is in good condition, level, and can safely support new loads, building over it may be feasible. However, if there are moderate damages or it cannot bear additional loads, consider partial replacement, reinforcement, or building a new base.
Always ensure that the existing slab is structurally sound and capable of supporting the new structure’s weight to prevent safety hazards and structural failures.
Planning, Permits, and Structural Requirements
Plan for loads and serviceability, assess the existing slab and site layout, and identify permit requirements early. Assess dead and live loads, environmental factors, soil bearing, and how the planned slab fits with the structure; note when a licensed PE is needed for complex designs. Prepare buildable drawings and a clear permitting scope, including site plans, framing/layout diagrams, and proposed concrete specifications.
Understanding these steps helps avoid surprises during inspection and approval. Quick check: inspect the existing slab for cracks or moisture, verify thickness, and review drainage as you plan reinforcement and formwork for permitting. Stake: skipping load calculations may result in slab failure under heavy loads; pro check: an experienced installer verifies loads and coordinates stamped drawings with the permit package; if heavy loads, irregular geometry, or additions to load path are involved, hire a licensed structural engineer for stamped calculations and coordinate them with the permit package to avoid common mistakes.
From Sketch to Plan: Dimensions, Loads, and Layout
Begin by translating your sketch into a practical layout. Accurate planning ensures structural integrity and functionality.
Key steps:
- Check for proper alignment with existing structures and drainage slope.
- Verify dimensions match the sketch.
- Consider load-bearing capacity, including dead loads (weight of slab itself), live loads (expected traffic), environmental factors like snow and wind, soil bearing, and potential uplift or seismic considerations.
Pro tip: If your project involves heavy loads or complex geometry, consult a structural engineer to ensure safety and longevity.
Permits, Inspections, and When to Hire an Engineer
Use this checklist to navigate the permit process and inspections. Compliance ensures safety and avoids project delays.
- Check local codes: Ensure your project complies with frost, expansion, and drainage requirements.
- Identify permit triggers: Determine if a permit is needed for your project.
- Know required authorities: Identify which agencies oversee the permitting process.
- Prepare submission requirements: Gather site plans, framing/layout diagrams, and proposed concrete specs as needed.
- Plan temporary works: Consider any temporary structures or backfill plans required during construction.
- Schedule inspections: Coordinate with inspectors for plan review, foundation inspection, and final inspection.
- Hire a structural engineer: Consult one if your project involves heavy loads, irregular geometry, additions to load path, or complex designs.
- Coordinate stamped drawings: Work with the engineer to include their calculations and drawings in your permit package.
Quick rule: Always engage professionals when needed to ensure a smooth permitting process.
Timeline and Budget Planning
Create a realistic schedule and budget for your project. Realistic planning minimizes delays and cost overruns.
Key considerations:
- Break down tasks into manageable phases, such as site preparation, formwork, concrete pouring, curing, and finishing.
- Account for material procurement, labor, and weather contingencies to avoid unexpected delays or additional costs.
- Allocate time for inspections and any necessary revisions.
Pro tip: If you encounter unforeseen site issues, adjust your timeline and budget as needed.
Site Preparation and Subgrade Work
Assess soil conditions and drainage, identifying soil type, bearing capacity, and frost risk. Decide if soil tests or a geotechnical consult are needed before proceeding. Prioritize a stable base for long-term performance.
Execute site clearing and grading with vegetation removal, debris clearance, and proper elevation control. Establish slopes that promote drainage away from the future slab. Coordinate utility locating and permitting as part of early planning.
Clearing, Excavation, and Utility Considerations
The first step in site preparation is to clear the area where your slab will be poured. Remove all vegetation, debris, and any existing structures that may interfere with the construction process.
Safety is paramount during this stage. Always call local utility locating services before you begin excavation to map out any buried lines. This quick check can save you from costly damages and potential hazards.
Once the site is clear, establish a clean work area and set your elevation references. Ensure that all necessary permits are obtained before starting any work. If buried utilities are present, coordinate with utility providers and follow their guidelines for working near or around their lines.
Subgrade Evaluation and Compaction
Before proceeding with any work, it’s crucial to evaluate the subgrade’s suitability. Inspect the area for any soft spots or inconsistencies. If poor soil conditions are present, consider engineered fill or consult a geotechnical engineer.
Compaction is key for long-term performance of your slab foundation. Achieve target compaction levels to provide a stable base for your concrete. Perform proof-rolling to detect any soft spots that may need additional compaction.
Soil tests can help assess bearing capacity and compaction needs. If compaction is insufficient, re-compact the subgrade to meet target specifications. This professional check ensures your slab has a solid foundation.
Managing Drainage and Slope Away from Structures
Proper drainage is essential to protect your foundations from water damage. Ensure the site slopes at least 1 inch per foot away from the structure to prevent water pooling.
Plan edge drains or drainage outlets to direct water away from the slab. If your site is in a frost heave zone, consider additional measures such as insulation or heating to prevent frost heaving.
Regularly inspect and maintain your drainage system to prevent any blockages or issues that could lead to water damage. If water pooling occurs, re-evaluate and adjust your drainage plan accordingly.
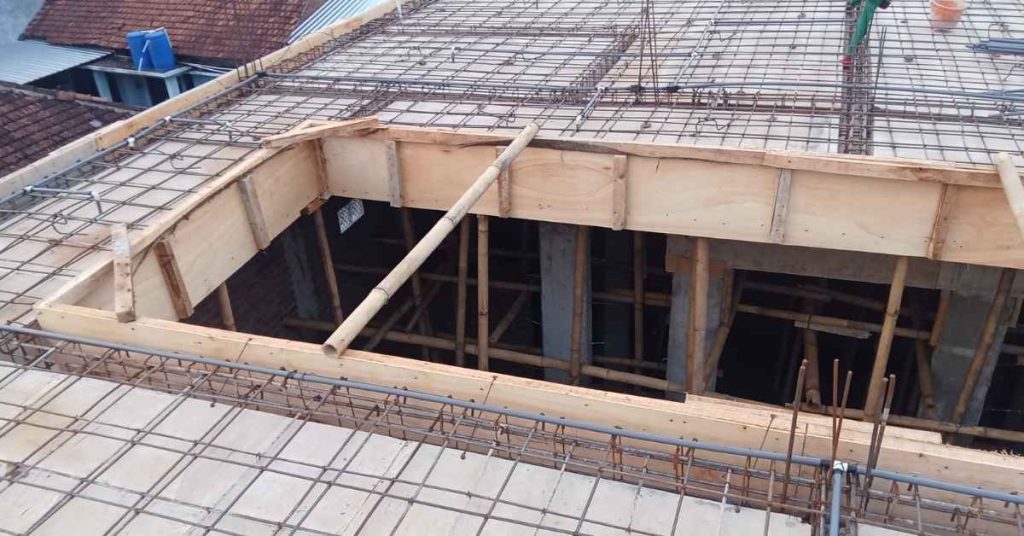
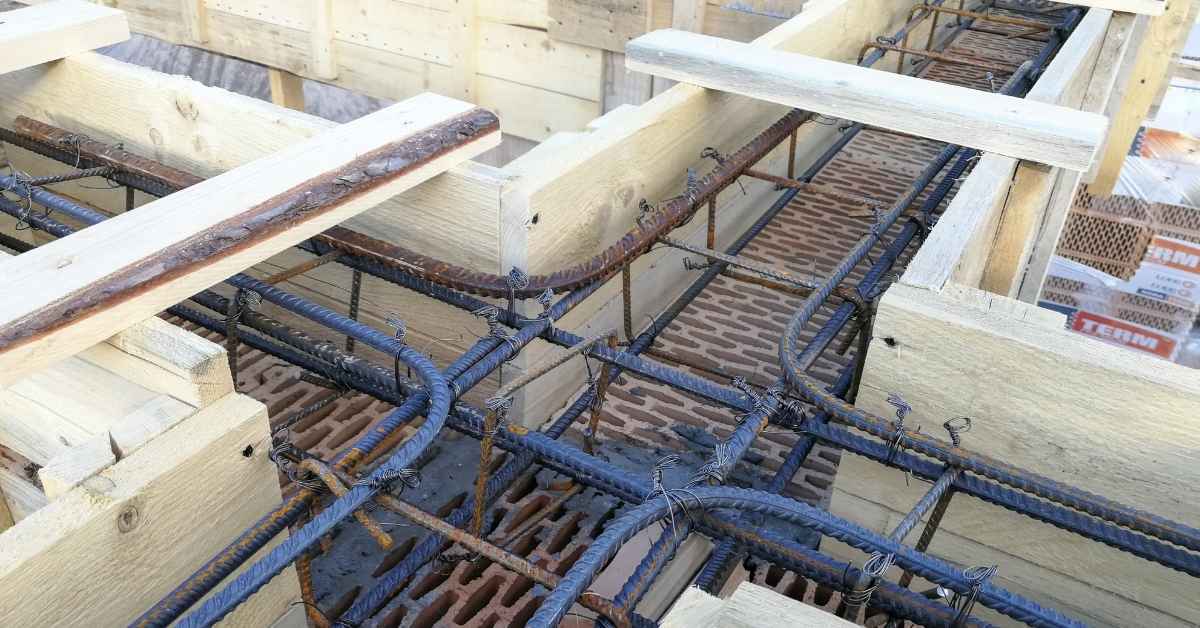
Formwork, Reinforcement, and Joint Planning
Describe how to assess the existing slab and determine formwork needs, considering thickness, edge conditions, slope, and any cracks or spalling that affect load transfer. Use this to inform form layout and material choices. Ensure plans support accurate placement of later work.
Detail form layout and sizing, including joint placement, bracing patterns, and edge truth. Explain proper bracing practices and sequence to maintain alignment during pour and cure. Cover reinforcement options and placement to control cracking and bond with the base.
Choosing Reinforcement: Rebar, Wire Mesh, or Fibers
Selecting the appropriate reinforcement method is crucial for your concrete slab’s strength and longevity. Here are three common methods:
Rebar is ideal for high loads and heavy traffic due to its strength and flexibility. It can be placed in various patterns, allowing for customization based on load requirements.
Welded wire mesh is suitable for lighter loads and easy access installations. It provides a consistent reinforcement layer but may not offer the same flexibility as rebar under heavy loads.
Polypropylene fibers are micro reinforcements that can be added to concrete mixes. They improve strength, reduce cracking, and are easier to install than traditional methods. However, they may not provide the same level of reinforcement for high load applications.
Formwork Best Practices and Bracing
Proper form construction ensures accurate slab dimensions and prevents concrete from bulging. Here are some best practices:
Ensure forms are level, square, and true to achieve the desired slab finish. Inspect forms for damage before use and verify they can withstand pour pressure.
For large pours or high concrete pressure, use bracing at regular intervals to maintain form alignment. This prevents bulging and ensures a smooth, even surface.
For complex slab shapes or edges, consider using straight edges and aluminum forms for precise dimensions. These materials can help achieve intricate designs while maintaining structural integrity.
Control and Expansion Joints
Proper joint placement controls cracking and accommodates slab movement. Here’s how to plan for them:
Verify joint spacing aligns with local building codes and your slab dimensions. Assess existing slabs for any cracks or spalling that may affect joint placement.
For widely spaced supports or large slab areas, increase control joint frequency to manage shrinkage cracks. These joints allow the concrete to contract freely as it cures, preventing random cracking.
If your slab is subject to temperature changes or movement, include expansion joints to accommodate thermal expansion and contraction. These joints should be filled with a flexible material to prevent water intrusion while allowing for movement.
Concrete Mix Selection, Pouring, and Consolidation
Select a concrete mix that matches slab needs, balancing target workability, slump, and compatibility with reinforcement and joints. Check options for bagged premix or ready-mix, and verify supplier batch consistency and admixture compatibility. Consider environmental and curing implications, including temperature, bleed, and shrinkage, and note how air entraining agents, plasticizers, and set accelerators or retarders may fit your plan.
Plan the pouring and consolidation workflow with proper surface prep, vapor barrier, and formwork, and sequence pours to avoid cold joints. Use effective consolidation methods to minimize voids and segregation, and perform real-time checks such as slump tests where feasible. For on-site logistics, coordinate delivery windows, staging, weather considerations, curing coverage, and contingency for partial holds or re-tempering; on cold days, consider set accelerators or heating as needed. Common mistakes include surface drying or cracking, which should be corrected by re-wetting and covering promptly; a pro-check with an experienced installer helps verify batch consistency and admixture compatibility with chosen aggregates.
Selecting a Concrete Mix and Admixtures
The concrete mix you choose significantly impacts your slab’s strength and durability. Consider the following factors when selecting:
- Compressive Strength (PSI): Aim for the required PSI for your specific project, typically within the range of 2500 to 4000 PSI for residential slabs.
- Water-to-Cement Ratio: Target a ratio between 0.4 and 0.6 to balance workability and strength. Verify supplier options and batch consistency to ensure this is met.
- Admixtures: Consider adding air entraining agents, plasticizers, set accelerators/retarders based on your project’s needs. Consult suppliers for site-specific recommendations. Ensure compatibility with any rebar/mesh reinforcement or joint layout in your mix selection.
Pouring Technique and Vibration/Consolidation
Proper placement of concrete minimizes voids and ensures uniform strength. Follow these techniques:
Placement Methods: Use a buggy or pump to place concrete at the highest point, allowing it to flow downwards.
Sequencing: Pour in sections, starting from one corner and working towards the opposite side to prevent cold joints. Consider using multiple pours for large or thick slabs with proper timing.
Consolidation: Use vibrators, poker vibes, or tamping to eliminate honeycombing and ensure uniform compaction across corners and edges. Monitor slump test during the pour to maintain workability.
Safety and Logistics for a Pour Day
A well-coordinated, safe pour minimizes delays and ensures quality. Plan for:
Site Access: Ensure clear access to the site for delivery trucks and equipment.
Crew Coordination: Brief your crew on tasks, timings, and emergency contact information. Provide proper personal protective equipment (PPE).
Protective Gear: Use safety glasses, hard hats, steel-toed boots, and gloves to protect workers from hazards.
Contingency Plans: Prepare for weather delays or delivery issues by having a backup plan in place. If adverse weather conditions arise, implement contingency plans such as delaying the pour or protecting materials.
Finishing, Curing, and Surface Treatments
Screeding, floating, and troweling create a flat, true slab, with texture options ranging from broom finishes to stampable patterns and exposed aggregate. Safety-focused finishes, non-slip textures, and post-pour treatments can improve grip and durability, while curing methods like moisture retention help strength gain and long-term performance. Check tool access and suitability for DIY application, and avoid over-troweling by stopping before the surface locks up too hard.
Why it matters: proper curing and moisture control directly influence final strength, durability, and finish quality, so plan for coverage, duration, and temperature considerations. Skipping proper curing can lead to weak, brittle concrete susceptible to cracking and reduced lifespan, while verifying initial set and slab level helps prevent texture or edge issues later. A practical approach combines surface safety, decorative choice, and maintenance that extends durability without requiring specialized equipment.
Finishing Methods for Different Uses
When it comes to concrete finishing, the method you choose depends on your intended use. For safety, aesthetics, and durability, select a finish that suits your needs.
Smooth Finish: Ideal for garage floors, this finish provides a clean, easy-to-clean surface. It’s achieved by troweling the concrete until it’s smooth and glossy.
Broom Finish: Popular for walkways and driveways, this textured finish offers better traction. Use a broom to sweep the surface while the concrete is still wet.
Textured Finish: For outdoor surfaces prone to moisture or slippery conditions, consider a non-slip texture. Stamped patterns, exposed aggregate, or other textured finishes can enhance safety and aesthetics.
Curing Strategies and Moisture Protection
Proper curing is crucial for concrete strength gain and longevity. During the critical curing period, retain moisture to allow hydration to complete.
Plastic Sheeting: Cover the slab with plastic sheeting to trap moisture. Ensure a tight seal around the edges to prevent evaporation.
Curing Compounds: Apply these liquid or paste compounds immediately after finishing. They form a protective barrier, preventing moisture loss and allowing hydration to continue.
Wet Curing: For large slabs or when time allows, wet curing can be effective. Lightly mist the surface with water and cover with plastic sheeting. In cold weather, use insulated covers or heaters to maintain temperature.
Sealing, Staining, and Surface Repairs
After curing, protect your concrete slab with sealers or stains. These enhance appearance and prevent moisture damage. Inspect the surface for defects before application.
Sealers: Choose between penetrating (longer drying time but better breathability) and film-forming (quick-drying, protective barrier) sealers based on your needs. Apply according to manufacturer’s guidelines.
Stains: Available in various colors and types (acid-based, water-based), stains can enhance the natural beauty of concrete. Test stain samples before committing to a color.
Surface Repairs: For minor defects like cracks or chips, use concrete repair kits. Follow manufacturer’s instructions for best results. For major repairs, consult a professional.
Framing and Decking Options over Concrete
Three decking-on-concrete options are: fully supported sleepers placed directly on the slab, elevated sleepers with shims or blocks to create a vented air gap, and independent free-standing frames that don’t touch the slab. Each method has distinct pros, cons, and fit depending on slab condition, finished height, and access to utilities. The existing slab height and its condition strongly influence which approach works best.
For a DIYer, the choice affects installation effort, cost, and maintenance, so map out slab cracks, moisture, and slope before starting. Check grade, clean and level the surface, and plan fastening methods, drainage, and edge flashing to prevent water intrusion. If the slab is cracked or damp, or height differences are substantial, consider repairs first or elevated sleepers to match surroundings, then verify railing, stairs, and accessibility as part of the system.
Fully Supported Sleepers: Pros and Installation Tips
For stable, level, and dry concrete slabs, fully supported sleepers offer a cost-effective solution. These sleepers sit directly on the slab, providing a solid base for your decking or lightweight structure.
Pro tip: Ensure the slab is clean and level before installing sleepers to prevent water intrusion and maintain structural integrity.
Use appropriate fasteners such as concrete screws to secure the sleepers to the slab. Align them evenly to provide a consistent base for your decking or structure.
Common mistake: Avoid installing sleepers on slabs with moisture issues, cracks, or spalling. Repair or treat these problems before proceeding to prevent further damage.
Elevated Sleepers and Ventilated Systems
For moist, uneven, or sloping concrete slabs, consider elevated sleepers with a ventilated system for airflow and drainage. This method creates an air gap between the slab and your structure to prevent moisture-related issues.
Tip: Use shims or blocks of appropriate size (typically 1-2 inches) to create this vented air gap. Ensure even placement to maintain levelness.
This method is suitable for slabs with height variations, allowing you to adjust the sleepers’ height accordingly. However, always check the slab’s condition and moisture content before proceeding.
Caution: Avoid creating a continuous path for water towards the structure, which could lead to pooling and potential damage. Ensure proper shim/block placement to maintain levelness and facilitate drainage.
Independent Structural Framing Over a Slab
When the concrete slab is damaged, weak, or has height limitations, consider building an independent structural frame. This method provides additional support and ensures proper load distribution.
Pro tip: Consult with a structural engineer to design footings that distribute loads appropriately using pedestals or piers. This step is crucial for maintaining the structure’s stability and safety.
This approach allows you to build a traditional framed structure independent of the slab, making it suitable for various climates and usage scenarios, including heavy foot traffic, outdoor kitchens, and hot tub proximity.
Common mistake: Avoid relying on an unsound or unstable slab as a bearing surface. Always assess the slab’s condition and consult local building codes to ensure compliance with safety standards.
Ventilation, Drainage, Moisture Management, and Long-Term Performance
Assess slab condition and site geometry, looking for cracks, spalling, and proper drainage away from the structure. Identify signs that moisture could undermine long-term performance. Plan for adequate ventilation in under-deck or under-slab spaces.
Design drainage and moisture routing with perimeter drains, flashing details, and, when needed, sub-slab provisions. Specify moisture control measures for both new and existing slabs, including vapor barriers and appropriate curing. Outline a maintenance plan with regular inspections to preserve long-term integrity.
Vapor Barriers, Insulation, and Moisture Barriers
Proper use of vapor barriers, insulation, and moisture barriers is crucial for extending the life of your concrete slab and preventing mold or mildew growth in floor assemblies. These materials control the movement of moisture through your concrete slab, helping to maintain a dry, stable environment.
When and where to use: In cold climates or over unheated slabs, use a vapor barrier that is permeable upwards (Class I) to prevent condensation. In warm, humid conditions or with heated slabs below, use a vapor-permeable barrier downwards (Class II) to allow moisture escape.
Installation tips: Inspect barrier integrity during installation and before finishing. Ensure all penetrations and overlaps are sealed. Replace damaged sections promptly. Always verify material compatibility with concrete and other components per manufacturer’s guidelines.
Ensuring Adequate Airflow and Water Drainage
Proper ventilation and drainage are crucial for preventing rot, mold, and slab deterioration beneath decks or finished floors. They maintain a dry, healthy environment for framing and finishes.
Ventilation: Plan for sufficient air exchange in under-deck/under-slab spaces. A common guideline is 1 square foot of vent per 300 square feet of area. Ensure unobstructed clearances for proper airflow.
Drainage: Ensure positive drainage away from the slab. Incorporate perimeter drainage, flashing details, and consider French drains or under-slab sump/weep provisions as needed. Test drainage paths before finishing to confirm functionality.
Long-Term Maintenance and Monitoring
Regular checks and maintenance tasks help catch settling, drainage issues, or moisture problems early. Early detection prevents costly repairs and maintains the performance of your concrete slab.
Annual checks: Inspect for mold, mildew, efflorescence, cracks, or deck attachment looseness annually. If a crack is detected, assess its severity and cause. Repair if necessary and monitor further cracking.
Moisture testing and drainage updates: If moisture or drainage issues are suspected, test moisture using relative humidity (RH), calcium chloride, or modern alternatives. Update ventilation or drainage systems as needed to maintain a dry environment.
Conclusion
Finishing a concrete project with care now protects safety, durability, and appearance for years to come. Prioritize solid subgrade preparation, correct form and reinforcement, proper curing, and moisture management to avoid costly setbacks or irreversible damage.
Before you proceed, confirm the local permits and structural requirements, verify your plan for site preparation, formwork, reinforcement, and jointing, choose a compatible mix and placement method, and set a realistic curing and protection schedule. Check weather and scheduling, complete a small test area if you’re unsure, and document the steps you take so future work or repairs can follow the same logic. Keep the work area organized, follow manufacturer or code guidance, and use appropriate PPE at all times.
Common mistakes include skipping subgrade preparation or compaction, under- or over-finishing the surface, and neglecting joints and curing. Protect the slab during curing, control moisture, and avoid early loading or vibration that can cause cracks. Stay mindful of ventilation and drainage needs and always follow safety rules when handling forms, rebar, or any lifting or placement tasks.
If the project involves complex framing over concrete, unusual loads, significant moisture considerations, or where local rules require professional inspection, consider bringing in a pro. When in doubt, pause and consult the relevant manufacturer instructions, building codes, or a licensed contractor. With careful planning and deliberate steps, you can finish a slab that performs well and looks right.
FAQ
Can you build a deck on a concrete slab?
Yes, a deck can be built over a concrete slab, but you must assess the slab’s condition and levelness first. Consider framing options such as sleepers or elevated supports and ensure proper fasteners and drainage. Check manufacturer guidance and local rules for any restrictions.
How should I evaluate an existing concrete slab before adding a deck?
Look for cracks, signs of movement, and moisture issues. Check the overall level and any slope that could affect drainage. Inspect joint placement and edge conditions. If in doubt, consult the slab’s documentation or a professional for guidance.
Repairing versus removing an old concrete slab before deck framing
Repair if cracks are minor and the slab remains stable and dry. Consider removal or replacement if there are large cracks, settlement, spalling, or persistent moisture problems. When in doubt, compare repair options with the cost and impact of removal and follow manufacturer and local guidance.
What framing options work best for decks over concrete
Sleeper framing is a common approach, placing horizontal supports on top of the slab to create a level deck frame. Elevated sleepers can provide a flush appearance and assist drainage, while still allowing air and moisture to escape. Always verify compatibility with the chosen decking material and follow installation instructions.