

Introduction
A concrete porch drip edge is a saw-cut groove that directs water away from the porch surface. It helps reduce streaks and puddling by guiding runoff toward the edge, and it should sit where rainwater tends to flow. Plan with the porch as built and avoid cutting through any critical structural lines.
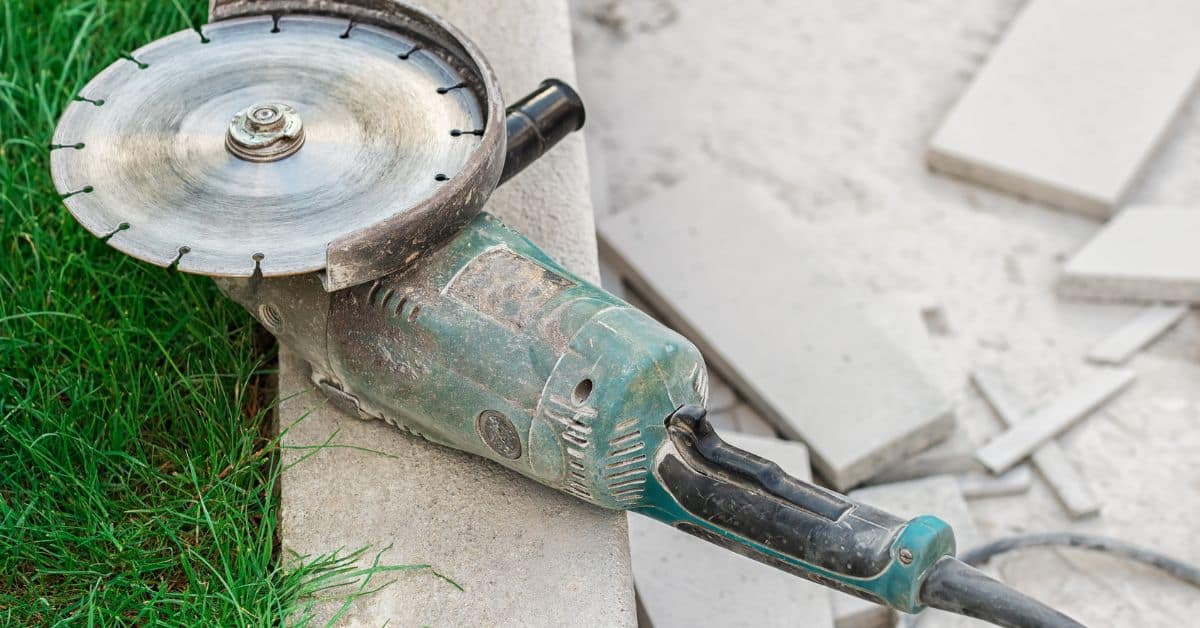
Tools you’ll commonly use include a circular saw with a masonry blade, a hammer and chisel, a straightedge, and a broom for cleanup. Step by step, mark the groove, cut a shallow groove first, then deepen in gentle passes until you reach the desired depth, and clean the slot between cuts. Always check the blade manufacturer and local rules for safe depth and placement; if you’re unsure, start with a lighter cut and verify it won’t weaken edges.
Key takeaways
- Drip edges guide water off the porch surface to reduce staining.
- Saw-cut grooves must be planned with proper spacing and orientation per edge.
- Prepare surface by cleaning, drying, and removing adhesion inhibitors before cutting.
- Use a stable saw with a suitable blade and PPE for personal safety.
- After cutting, seal and finish to prevent water infiltration and rough edges.
- Cleanup and cure upkeep prevents slurry buildup, tool wear, and future maintenance surprises.
Table of Contents
- Introduction
- Key takeaways
- Why Saw-Cut Drip Grooves Work and When to Use Them
- Tools, Materials, and PPE Checklist
- Preparing the Concrete Surface for Cutting
- Saw-Cutting the Drip Grooves — Step-by-Step Procedure
- Sealing, Caulking, and Finishing the Drip Edge
- Clean-Up, Slurry Management, and Tool Care
- Maintenance, Troubleshooting, and Common Mistakes to Avoid
- Cost Estimating, Planning for Different Porch Sizes, and Alternative Methods
- Conclusion
- FAQ
Why Saw-Cut Drip Grooves Work and When to Use Them
Drip grooves break surface tension at the porch edge, guiding water to drop away from the face. That water shedding helps prevent staining, efflorescence, and moisture intrusion along the edge. Compared with untreated edges, grooves add a visual finish and a clearer channel for runoff.
Use drip grooves on new pours or retrofits where edge protection is needed. Plan for overhangs, high foot traffic, heavy rainfall, or climates with freeze–thaw cycles. Coordinate groove placement with existing slope, flashing, and waterproofing to avoid conflicts with trim and coatings.
How drip grooves control water and staining
Concrete porches are prone to water trails. Here’s why:
Water clings to surfaces due to surface tension. On a smooth edge, it travels down, leaving behind stains and encouraging efflorescence – that ugly white powder.
Saw-cut grooves interrupt this journey. They break the surface tension, causing water to drop away instead of trailing down. This reduces staining, erosion, and moisture infiltration at the edge.
When saw-cutting is the right solution
Saw-cut drip grooves are versatile. Here’s when they’re your best bet:
Existing concrete: Can’t change the slope? Cut grooves to redirect water.
Aesthetics: Grooves add a clean, professional look. They also match many decorative edge profiles.
Minimal structural changes: Want to avoid major alterations? Saw-cutting is non-invasive and preserves your porch’s integrity.
Tools, Materials, and PPE Checklist
Essential tools and blades include a masonry saw with a diamond-continuous rim blade and an angle grinder for edge cleanup. Add dust collection and a compatible vacuum system for dry or wet cutting. Have a sharp backer rod, sealants, primers, and curing compounds on hand for after-cut work.
PPE and site safety items are non-negotiable: eye/face protection, respirator or P100 mask, hearing protection, gloves, knee pads, and non-slip footwear. Consider fall protection or scaffolding for elevated porches. Plan groove dimensions and check for any embedded items before cutting.
Power tools and blade selection
Before you start cutting concrete or masonry, make sure to go through this checklist. It’ll help you avoid common mistakes and ensure your tools are up for the task.
- Masonry Saw: Check if it’s a wet saw (water-cooled blade) as it’s safer and reduces dust. Confirm it has enough power (at least 120V, 3500-4000W).
- Blade Type: Ensure the blade is diamond-tipped for concrete/masonry cutting. Check if it’s a segmented or turbo rim blade; both work well but have slight differences in performance.
- Blade Size: Measure your saw’s maximum blade size (usually 12″ to 14″). Make sure your blades fit and are the right size for your cuts.
- Tooth Count: Check if the blade has enough teeth (at least 30) for smooth, clean cuts. Too few teeth can cause rough edges.
- Blade Condition: Inspect blades for cracks or missing teeth. If found, replace them to prevent blade failure mid-cut.
- Saw Alignment: Ensure the saw’s blade is properly aligned with the cutting surface. A misaligned blade can cause crooked cuts and blade damage.
- Water Supply (for wet saws): Confirm there’s a steady water supply to keep the blade cool and reduce dust. Low water pressure or no water can overheat the blade, causing it to fail.
- Safety Guards: Check if the saw has safety guards in place (lower guard, upper guard). Ensure they’re functioning properly and are not damaged.
Quick rule: Always use diamond-tipped blades designed for concrete/masonry cutting. Regular wood or metal blades won’t last long and can cause damage to your saw.
Materials, sealants, and consumables
Use this checklist before you start grooving to ensure you have everything needed to finish the job properly.
- Expansion Joint Sealant: Check label for compatibility with your concrete mix. Confirm it’s a high-quality, flexible sealant designed for expansion joints.
- Backer Rod: Ensure it matches the width of your groove (usually 1/2″ or 3/4″). Check its compressibility to ensure it fits snugly in the groove.
- Sealant Applicator Gun: Confirm it’s clean and in good working condition. Check if you need any replacement parts like O-rings.
- Surface Primer: Verify it’s suitable for concrete surfaces and compatible with your chosen sealant. Check expiration date.
- Groove Cleaning Solution: Ensure it’s designed to remove laitance (surface dirt) from concrete. Check if you need any safety gear like gloves or goggles.
- Concrete Grooving Blade: Re-check blade condition. Ensure it’s sharp and undamaged for clean, precise cuts.
- Safety Glasses: Inspect for cracks or damage. Ensure they provide adequate protection from debris during grooving.
- Disposable Gloves: Check if you have enough pairs to last the job. Confirm they’re suitable for handling chemicals in your cleaning solution and sealant.
Quick rule: Always use high-quality, compatible materials to prevent premature failure of your expansion joint seal, which can lead to costly rework and damage to surrounding concrete.
Safety gear and site equipment
Before you start any concrete work, ensure you have the right safety gear and site setup. Use this checklist to double-check everything is in place.
- Hard Hat: Check it’s in good condition with no cracks or dents. Ensure it fits snugly but comfortably on your head.
- Safety Glasses: Inspect for any scratches or damage. Make sure they provide adequate eye protection.
- Ear Protection: Check if earplugs are clean and undamaged. Ensure they fit well, reducing noise levels to a safe decibel range (below 85 dB).
- Work Gloves: Inspect for any tears or worn-out spots. They should provide a good grip and protect your hands from cuts and burns.
- Steel-Toed Boots: Ensure they’re in good condition, providing protection against falling objects and puncture wounds.
- High-Visibility Vest: Check it’s clean and visible. It should meet local safety standards for high-visibility clothing.
- Water Supply: Verify there’s a reliable water source nearby to control dust and prevent heat stress.
- Barriers: Inspect that safety barriers are in place, preventing unauthorized access to the work area. They should meet local regulations (e.g., OSHA standards).
- First-Aid Kit: Check it’s well-stocked and easily accessible. Ensure you know how to use its contents.
Quick rule: Always prioritize safety over speed. Skipping safety checks can lead to serious injuries, rework, or even project delays.
Preparing the Concrete Surface for Cutting
Begin with a thorough surface inspection for cracks, spalling, pitting, or loose concrete. Note any repairs needed and assess footing stability before cutting. Check for moisture intrusion that could affect adhesion or curing.
Verify flatness and cleanliness by testing with a straightedge and removing oils, sealers, paint, and curing compounds. Ensure the surface is dust-free and dry to improve saw-cut accuracy. Mark the cut path to align with joints and edges before proceeding.
Inspecting and marking the layout
Before you start cutting, take a close look at your porch surface. You’re looking for any damage that needs fixing before you make those grooves.
Once you’ve checked for repairs, it’s time to plan your drip groove layout. Grooves should be spaced every 3-4 feet, aligned with existing joints or edges to control cracking. Mark them out using chalk lines or a template for consistent, straight cuts.
Consider the slope and porosity of your porch when deciding on groove depth. Deeper grooves can handle more water but may require additional support if too deep.
Cleaning, drying, and temporary repairs
Start by removing any dirt, efflorescence, or loose material from the surface. Use a stiff brush, wire brush, or even a pressure washer if needed.
If you find minor spalls or cracks, don’t ignore them. Temporary repair these before cutting. Use a concrete patching compound, fill any holes, and let it cure according to the manufacturer’s instructions.
Ensure your surface is dry before cutting. If there are damp patches or trapped water, address them first. You might need to wait for a weather window or use fans to speed up drying.
Saw-Cutting the Drip Grooves — Step-by-Step Procedure
Define groove depth, width, and spacing, and decide whether to run continuous or segmented grooves to match slope and water flow. Plan the pattern to align with the porch edge and any adjacent trim. Confirm groove locations before making the first cut.
Use a masonry saw with a diamond blade, with water containment and proper guard setup. Maintain a stable substrate and perform checks on tooling and depth before each cut. Use gradual passes to avoid chipping.
Step-by-Step Process
Follow these practical steps to saw-cut drip grooves into your concrete porch edge. This sequence ensures safety, accuracy, and a professional finish.
- Inspect the surface: Check for cracks or weak spots before starting. Make temporary repairs if needed.
- Mark out groove pattern: Using a straight edge and pencil, mark where you want each groove. Ensure they follow the slope to guide water off the porch.
- Set up your saw: Attach a diamond blade suitable for concrete. Check the blade’s tension and ensure it’s secure. Set the depth gauge to match your desired groove depth.
- Wear appropriate PPE: Put on safety glasses, gloves, and ear protection. If dry cutting, wear a dust mask or respirator.
- Make initial score lines: Using a slow feed rate, make shallow passes along your marked lines to create starter grooves for the blade to follow.
- Cut the grooves: Follow your scored lines, making multiple shallow passes if needed. Keep the blade at a consistent depth and maintain a steady speed.
- Clean up: Remove cut debris with a brush or shop vacuum. Inspect each groove for cleanliness and any ragged edges.
- Seal or paint: Apply a protective sealant or water-shedding finish to prevent micro-cracking. Allow it to dry before using the porch.
Setting depth, width, and angle
Determine your groove dimensions based on water flow and staining prevention. Set your saw or guide for consistent results.
Groove depth should be around 1/4″ to 3/8″. Deeper grooves can weaken the concrete edge, while shallower ones may not control water effectively.
Width depends on your porch’s thickness. Aim for a width that’s about half the porch’s thickness. This provides enough space for water to flow off without compromising structural integrity.
Angle should follow the slope of your porch. Most porches have a slight angle, around 1-2 degrees. If unsure, use a small level or laser level to determine the correct angle.
Cutting technique and best practices
Use the right cutting speed and feed rate for clean, accurate grooves. Multiple shallow passes help maintain control and prevent blade binding.
Saw speed should be around 80-120 RPM with a diamond blade. Too slow can cause blade glazing, while too fast may overheat the blade or cause it to break.
Feed rate is crucial. Go slow and steady – about 3-5 inches per minute. This allows the blade to cut cleanly without overheating or binding.
To keep lines straight, use a guide if your saw has one. If not, use a straight edge clamped to the porch as a reference. Make sure it’s secure before starting the cut.
Safety precautions while cutting concrete
Follow these safety measures to protect yourself and your workspace during concrete cutting.
Dust control: Always use water when cutting concrete. This reduces dust and keeps the blade cool. Wear a respirator or dust mask if dry cutting is unavoidable.
Use blade guards. Ensure the guard covers the entire blade, protecting you from flying debris and preventing accidental contact with the blade.
Maintain secure footing. Wear sturdy shoes with good grip. Keep your workspace clean to prevent slips or trips.
Avoid vibration-related mistakes by taking regular breaks. Vibrations can cause fatigue, affecting your accuracy and safety.
Sealing, Caulking, and Finishing the Drip Edge
Identify vulnerable cut edges exposed to moisture and freeze-thaw cycles. Select sealants compatible with concrete and any adjacent wood framing or coatings. Note any requirements from paint or sealer manufacturers before sealing.
Backer rod selection should align with groove depth, with suitable foam or polymer options. Prepare the surface by cleaning and drying, then install backer rod and apply sealant in a continuous bead. Plan curing and environmental conditions to ensure proper adhesion.
Applying Silicone Caulk and Backer Rod
Use backer rod when your drip groove is too wide for a single bead of caulk. It fills the gap, providing support for the caulk and creating a smooth, weatherproof seal.
Installing backer rod: Choose foam or polymer based on your groove depth. Insert it into the groove using a caulk gun or fingers, ensuring it’s flush with the surface. Use a utility knife to trim any excess.
Applying silicone caulk: Squeeze out a smooth bead along the top of the backer rod (if used) or directly onto the concrete edge. Use your finger or a damp sponge to tool the caulk into the groove, ensuring it’s fully seated and creating a neat, even surface.
Concrete Sealers and Edge Protection
Seal your drip grooves to prevent water penetration and reduce freeze-thaw damage. Choose a sealer compatible with any existing porch paint or sealant.
Pre-seal primer: Apply a pre-seal primer before the sealer to enhance adhesion and improve the final finish. Follow the manufacturer’s instructions for application, drying times, and environmental conditions.
Edge-fill products: For wider grooves, consider using edge-fill products designed for concrete. These fillers provide additional protection against water intrusion and abrasion while creating a neat, finished look.
Visual and Tactile Finish Checks
After applying sealant and caulk, perform visual and tactile checks to ensure your drip edge is properly sealed and finished.
Groove depth: Check that the groove is consistently deep along its entire length. Use a straight edge or level to ensure it’s even.
Uniformity: Inspect the caulk bead for any gaps, air bubbles, or inconsistencies in thickness. Run your finger along the sealant to feel for any unevenness or voids.
Transition to porch surface: Ensure the drip edge transitions smoothly and evenly to the main porch surface. Check for any raised edges, gaps, or rough spots that could trap water or debris.
Clean-Up, Slurry Management, and Tool Care
Contain slurry and wash-water using tarps or pans, and manage filtration or settling per local rules. Do not dispose of slurry in typical drainage unless allowed. Follow local disposal regulations for slurry and debris.
Control dust with wet cutting or dust suppression, and wear appropriate PPE. Clean and dry tools after use, inspect blades for wear, and store equipment properly to extend life. Have a spill response plan for any unexpected runoff on site.
Containing and disposing of slurry and wastewater
Slurry and wash-water are byproducts you can’t avoid. Here’s how to handle them safely and responsibly.
Containment: Use tarps or pans under your work area to catch runoff. For larger jobs, consider using a secondary containment system like an inflatable dam or a portable tank.
Disposal: Never let slurry or wastewater enter storm drains or waterways. Allow it to settle in the containment, then dispose of it according to local regulations. Some areas may require filtration before disposal. Check with your local environmental agency for specific rules.
Cleaning and storing blades and equipment
Maintaining your tools ensures they last longer and work safer.
- Flush after use: Rinse blades, trowels, and other tools with clean water immediately after use to remove concrete residue. This prevents rust and makes future cleaning easier.
- Dry thoroughly: After flushing, dry your tools completely before storing. A quick wipe-down with a clean cloth should do the trick.
- Check for wear: Inspect blades regularly for nicks or dullness. Sharpen or replace as needed to maintain cutting efficiency and safety.
- Lubricate moving parts: Apply a light coat of oil to pivot points, gears, and other moving parts on your saw before storage. This prevents rust and keeps mechanisms running smoothly.
- Store properly: Keep tools in a dry place, off the ground, and away from extreme temperatures. A toolbox or dedicated shelf works well. Consider renting a tool-specific case for added protection if you don’t use it often.
Maintenance, Troubleshooting, and Common Mistakes to Avoid
Set a practical maintenance schedule with seasonal inspections and routine groove cleaning to prevent sediment buildup. Keep grooves clear to maintain water shedding. Document any changes for future work.
Watch for hairline cracks, spalling, or sealant degradation that can disrupt flow. If performance drops, reseal, re-cut grooves, or address cracks with patching materials as needed. Plan preventive measures to reduce chipping and deterioration over time.
Routine Inspection and Upkeep
Inspect your concrete porch drip edges regularly to keep them in top shape. Here’s a simple checklist:
- Check for cracks or spalling: Look along the groove edges for any hairline cracks or signs of spalling (flaking). If found, note and address.
- Inspect for debris: Check if dirt, debris, or vegetation has clogged the grooves. Remove any blockages to maintain proper water flow.
- Look for algae or mineral deposits: Inspect for greenish or whitish buildup that can hinder water runoff. Clean if necessary.
- Examine sealant condition: Check if the sealant is still intact and not degraded. Reapply if needed.
- Test slope and depth: Ensure the groove’s angle and depth are still adequate for effective water diversion. Adjust if required.
- Inspect caulking: Check if the silicone caulk and backer rod are intact and performing well. Reapply or replace if necessary.
- Check edge protection: Ensure any edge protection measures (like chamfers or rounded shoulders) are still in good condition.
- Document findings: Keep a simple log of your inspections, repairs, and maintenance actions for future reference.
Quick rule: Inspect seasonally and after heavy rains to catch any issues early.
Troubleshooting Water Trails and Blockages
Persistent staining or clogging can indicate problems with your drip edges. Here’s how to diagnose and fix these issues:
First, perform a water runoff test. Pour water into the grooves and observe if it flows correctly. If not, use a dye tracing method to pinpoint blockages or leaks.
To troubleshoot, gather some tools: a flashlight, mirror, small brushes, and a flexible scraper. Inspect the grooves for any visible debris, cracks, or sealant degradation. Use your tools to clear any blockages and reapply sealant if necessary.
If water is still not running off properly after clearing blockages, you may need to re-cut or widen the grooves. Refer back to the saw-cutting procedure in our earlier section for guidance on this. Always ensure your tools are clean and sharp before re-cutting.
Typical Installation Mistakes and How to Avoid Them
Here are some common errors in installing concrete porch drip edges and tips on how to avoid them:
- Incorrect depth: Shallow grooves won’t divert water effectively. Ensure your grooves are deep enough (at least 1/4 inch) for proper runoff.
- Poor alignment: Misaligned grooves can cause water to pool or flow incorrectly. Mark and measure carefully before cutting.
- Inadequate dust control: Cutting concrete without proper dust control can lead to poor groove quality. Use appropriate safety gear and tools to manage dust effectively.
- Neglecting edge protection: Without chamfers or rounded shoulders, grooves are more prone to chipping. Include edge protection in your design.
- Skipping sealant application: Unsealed concrete can absorb water, leading to cracks and spalling over time. Always apply a compatible sealant after cutting.
By avoiding these common mistakes, you’ll ensure your drip edges perform as expected for years to come.
Cost Estimating, Planning for Different Porch Sizes, and Alternative Methods
Identify all cost components, including materials, tools, and potential labor. Include contingency for hidden fixes and long-term maintenance. Budget for ownership costs and future repairs as part of the plan.
Develop a porch-size planning matrix to scale groove length, depth, and lines with geometry. Compare DIY versus pro work based on skill, access to equipment, and curing windows. Use a simple, region-adjusted budgeting tool to guide decisions.
How to estimate costs and what to check locally
Before you start your project, follow this checklist to accurately estimate material, rental, and labor costs.
- Concrete mix: Check local prices per cubic yard. Inaccurate measurements lead to waste or extra trips.
- Water barrier: Verify unit cost and coverage area. Skipping this can cause water damage.
- Form lumber: Confirm availability and price per board foot. Missing materials delay work.
- Sealant: Find out how much you need and its cost. Inadequate sealing causes leaks.
- Masonry saw rental: Check daily or weekly rates. Buying might be cheaper for frequent use.
- Trowels, floats, curing blankets: Confirm availability and prices. Lack of tools slows progress.
- Labor (if not DIY): Get quotes from pros. Not comparing rates can lead to overpaying.
- Contingency (10–15%): Budget for hidden fixes or adjustments. Ignoring this can bust your budget.
- Long-term costs: Consider maintenance and potential repairs. Neglecting these can lead to expensive surprises.
Quick rule: Always round up material quantities to account for waste.
Planning for small vs large porches and tricky layouts
Porch size and layout impact your drip edge project. Here’s how to plan accordingly.
For small porches, keep it simple: one or two straight grooves should suffice. Measure carefully to avoid crooked lines.
On large porches, break the job into sections for manageable work. Plan groove spacing and depth consistently across sections.
Tricky layouts, like L-shapes or wraparound porches, require careful measurement. Plan grooves around corners and steps to maintain water flow.
Alternative methods and when to choose them
Besides saw-cut drip grooves, consider these alternatives:
Formed drip edges are great for new construction. They provide a clean edge but require additional formwork.
Applied edge products, like liquid applied flashing, work well on existing porches. They’re easy to apply but may not last as long as other methods.
Slope correction involves leveling the porch. This is labor-intensive but ensures water runs off naturally.
Metal drip flashing provides a durable edge but can be visible, which might not suit your porch’s aesthetics.
Conclusion
These drip grooves are a practical, durable fix when done right, protecting the porch from ugly water trails and extending the surface life without breaking the bank. Proceed with care, respect for the concrete, and a steady pace to keep the edge clean and neat.
Start by confirming you have the right tools, materials, and PPE, then prep the surface, mark and cut accurately, rinse and seal, and finish with proper caulking and cleanup. Work in a single, logical sequence: surface prep, groove cutting, edge finishing, then drying and sealing, testing water runoff after each step to catch problems early.
Avoid common traps: rushing the cut or skipping a test patch, using the wrong blade or too-deep a groove, and neglecting proper slurry management or tool maintenance. Wear eye protection and gloves, keep feet away from the cutting line, and never cut into damp or frozen concrete. If something feels off, stop and reassess rather than forcing the work.
If the porch is large, irregular, or the substrate shows cracks or settlement, or you’re unsure about sealing compatibility, consider bringing in a pro for the cut quality or edge finishing. Stay deliberate, document your plan, and you can finish with a clean, professional look and dependable performance. You’ve got this—let the first groove set the pace for a solid, low- maintenance porch edge.
FAQ
What is the purpose of a drip edge on a concrete porch, and why does it matter?
The drip edge guides water off the surface and away from the foundation. It helps reduce staining and reduces how long water trails stay visible. A proper groove system also helps prevent pooling near door thresholds.
What tools are required for saw-cutting drip grooves?
You’ll need a concrete cutting tool such as a saw or grinder with a suitable diamond blade, a straightedge or guide, and a vacuum for cleanup. Have a chisel or stiff brush for cleanup between cuts, plus personal protective gear. Always check manufacturer instructions for tool compatibility and safety tips.
What are the basic steps to create the grooves, from layout to finish?
Mark the groove paths with a straightedge and clear guide marks. Cut the grooves to the recommended depth and width per instructions, then remove slurry and clean the grooves. Inspect the cuts for uniformity and free edges before sealing or finishing.
What maintenance tips help prevent water trails and keep the porch looking good?
Regularly wash the surface to remove dirt that can highlight grooves. Re-check and touch up any worn or shallow areas as needed, following product instructions. If water trails appear, verify groove condition and reseal or re-cut as required.