
Introduction
Concrete pads provide a solid, level base for mini-split condensers while helping dampen vibration and manage drainage. In practice, you’ll pick a pad size and placement that suits your unit and how you route condensate away from the slab. Always verify load limits, mounting hardware recommendations, and local rules before pouring.
Anti-vibration features and pad options vary, so check what your kit recommends and read the product label for guidance. Weight capacity depends on your condenser and mount type, so confirm with the unit’s documentation and installation instructions. Compare wall-mount versus ground-mount options based on drainage slope, service access, and how you’ll anchor the pad to the surrounding surface.
Key takeaways
- Ensure pad sits level and fully supported to prevent condenser tilt and leaks.
- Use anti-vibration interface and pads rated for expected load and local conditions.
- Ground pads require proper drainage slope away from building to avoid pooling.
- Wall mounts demand structural assessment, correct fasteners, and vibration isolation between unit and wall.
- Verify weight capacity and compatibility of mounts; follow local codes and safety.
- Routine checks for condensate drainage, pad integrity, and mounting security after storms.
Table of Contents
- Introduction
- Key takeaways
- Why Concrete Pads Matter for Mini-Split Condensers
- Anti-Vibration Technologies and Pad Interface Components
- Concrete Pad Design, Dimensions, and Load Considerations
- Mounting Options: Ground Pads, Stands, and Wall Brackets
- Drainage Strategies and Condensate Management
- Tools, Materials Checklist and Site Preparation
- Safety, Codes, Warranty and Professional Considerations
- Cost Trade-Offs, Common Mistakes, Troubleshooting and Maintenance
- Conclusion
- FAQ
Why Concrete Pads Matter for Mini-Split Condensers
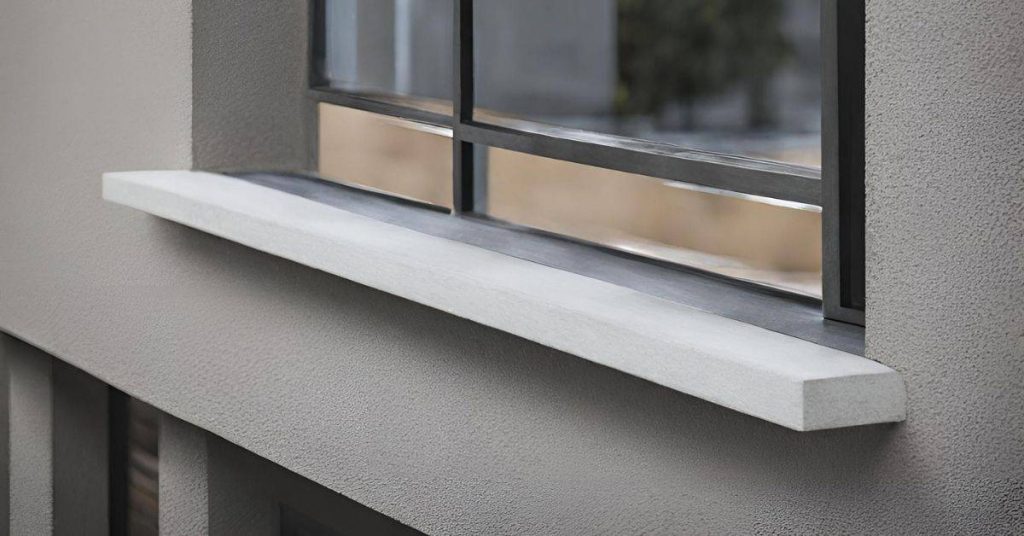
A concrete pad does more than give a level resting place. It helps stabilize the unit and supports proper drainage away from the base. The pad also improves vibration isolation to protect the condenser and nearby structures.
Think of the pad as a dual-purpose foundation. A level surface minimizes settling, while dedicated pads and surface finishes reduce noise, wall movement, and mounting fatigue. Consider how pad materials and thickness influence isolation and water management on site.
Vibration isolation vs support stability
The pad’s primary role is to provide a stable, level base for your mini-split condenser. But it also plays a crucial part in reducing vibration and noise.
A solid concrete pad supports the unit’s weight evenly, preventing settling or shifting that could damage components over time. It’s like having a steady foundation under your feet – you wouldn’t want to stand on wobbly ground, would you?
Now, let’s talk about vibration isolation. Your condenser has moving parts, and they can cause vibrations. A well-designed pad works with isolation components (like rubber pads or springs) to absorb these vibrations before they reach the structure above.
Imagine it like a trampoline: when you jump on it, the bounce stays on the trampoline itself; it doesn’t shake the entire house. That’s what a good pad does – it keeps the vibration party contained within the condenser area.
Drainage, moisture control, and durability
A concrete pad isn’t just about keeping things level and quiet. It’s also about keeping water away from your condenser and its surroundings.
Proper placement and elevation are key here. You want to make sure the pad slopes slightly away from the unit so condensate can drain off easily. No one likes a puddle of water sitting around, right? That could lead to all sorts of problems like rust or even undermining your footing.
Moisture control isn’t just about preventing pools of water; it’s also about protecting against soil erosion and corrosion. A durable concrete pad helps keep these issues at bay, extending the life of your equipment.
Think of it like a roof: it keeps the rain out, but it also protects the walls from getting damaged by the elements. That’s what a good pad does – it shields your condenser and its surroundings from moisture-related woes.
Anti-Vibration Technologies and Pad Interface Components
Explore the isolation options that pair with concrete pads, including rubber or neoprene pads, anti-vibration mounts, and composite isolators. Each option has different isolation performance and load ratings, so check compatibility with the concrete pad you choose. Material choice affects both effectiveness and service life.
Define how the pad interfaces with the condenser. Look at load distribution, seating surface, and how fasteners or adhesive interact with concrete to prevent damage or slipping. Align these details with the unit’s mounting pattern and airflow needs.
Common isolator types and materials
Material choice for your isolators is crucial as it affects the performance of your mini-split condenser’s vibration isolation. Here are some common options:
- Rubber/Neoprene Pads: Inexpensive, easy to install, but can degrade over time with UV exposure and high temperatures.
- Cork Isolators: Natural, eco-friendly, good isolation performance, but may not be as durable as synthetic options.
- Elastomeric Isolators: Synthetic rubber compounds that offer excellent vibration isolation, resistant to UV and temperature extremes. Look for those with high durometer ratings (40-60 Shore A) for better load-bearing.
- Composite/Elastomer Blends: Combine the benefits of different materials, offering good isolation, durability, and resistance to various environmental factors.
How isolators attach to concrete pads and condensers
Isolators need secure attachment to both the concrete pad and condenser for optimal performance. Here’s how:
Adhesive Bonding: Use a suitable construction adhesive, like polyurethane or epoxy, for a strong bond between isolator and pad/condenser. Ensure surfaces are clean, dry, and primed before application.
Mechanical Fasteners: Bolts, screws, or other fasteners can secure isolators to pads and condensers. Use appropriate hardware based on isolator material and manufacturer’s recommendations. Tighten to specified torque values to prevent slippage.
Bracket Interfaces: Some isolators come with brackets that attach to the condenser, providing a secure interface while allowing for some movement. Ensure brackets are properly aligned and secured according to the manufacturer’s guidelines.
Concrete Pad Design, Dimensions, and Load Considerations
Start with a baseline for the unit’s weight and how that translates to pad dimensions and thickness. Heavier condensers generally require larger contact areas for stability on typical soils. Use simple load-spread concepts to plan the footprint.
Discuss thickness, reinforcement options, and concrete strength needs. Soil bearing capacity and potential frost effects matter, as do surface drainage and edge details. Include a quick sizing checklist and note when to seek a professional for difficult soils or high-load scenarios.
Sizing guidelines and weight capacity checks
First, check your mini-split condenser’s weight. Most range from 100 to 500 lbs.
Match this with a pad that can handle at least 1.5 times the load. So, for a 200 lb unit, you’d need a pad rated for 300 lbs or more.
Always confirm manufacturer specs and local building codes.
Thickness, reinforcement, and elevation recommendations
Pad thickness depends on load. For typical mini-splits, 4 to 6 inches is sufficient.
Use rebar for heavier units (over 500 lbs) or when frost heave is a concern. Welded wire mesh works fine otherwise.
Elevate the pad above grade to prevent water pooling and protect against frost heave. Aim for at least 2 inches of clearance.
Mounting Options: Ground Pads, Stands, and Wall Brackets
Ground pads, metal stands, and wall brackets each offer different vibration isolation and load handling capabilities. Consider local climate and material durability when choosing among them. Understand how each option handles drainage and moisture movement.
Outline installation prerequisites such as site prep, pad dimensions, reinforcement, and fasteners for various substrates. Review compatibility with common condensers and any warranty considerations. Plan for maintenance and potential retrofits if equipment weight changes.
When to use a concrete pad vs metal stand
Concrete pads and metal stands both have their places. It’s all about your site conditions.
Use a concrete pad: when you’ve got unstable soil, slopes, or vibration concerns. Pads spread the weight, isolate vibrations, and integrate with anti-vibration mounts.
Opt for a metal stand: if you need portability, quick install, or levelness isn’t critical. They’re easy to move around but may not be as stable on uneven ground.
Wall-mounted brackets: advantages and limitations
Wall mounting can be a smart choice, especially in certain situations.
Advantages: No frost heave issues. Easier access for maintenance. Keeps the ground clear.
Limitations: You need solid walls to support the weight. Clearance around the condenser is crucial for airflow. Check your wall structure can handle it before you start drilling.
Drainage Strategies and Condensate Management
Describe how pad slope and surrounding grading direct condensate and rainwater away from the unit. A steady away-from-structure gradient helps prevent pooling around the base. Ensure the path is clear of obstructions that could trap moisture.
Discuss condensate discharge options and routing considerations. Include gravity drain paths, traps, or pump methods as needed, and plan for seasonal changes that affect flow. Regularly inspect drainage paths for debris or blockages.
Pad placement, slope, and runoff control
When placing your concrete pad, consider the natural flow of water away from your home’s foundation. A good rule of thumb is to position the pad at least 18 inches away from any walls or doors to prevent splashback and ice buildup.
Ensure your pad has a consistent slope of at least 1/4 inch per foot (2% grade) away from the condenser unit. This encourages water runoff and prevents pooling around the base. Use a level or a string line to check and maintain this slope during construction.
To control runoff, consider using gravel around the pad’s perimeter or creating shallow swales to direct water away from walkways and other areas prone to ice formation. This helps prevent slip hazards and reduces maintenance needs.
Condensate routing, traps, and freeze protection
Route condensate discharge through a dedicated hose or drain line that slopes gently downwards towards an appropriate disposal point. This could be a storm sewer, a dry well, or a designated area on your property.
If the disposal point is uphill or inaccessible, consider using a mechanical pump to move condensate. Ensure the pump is sized appropriately for your mini-split system and that it has a float switch to prevent over-pumping.
Install a condensate trap at the lowest point of your drain line to prevent sewer gases from entering your home. Make sure the trap is easily accessible for maintenance and cleaning.
To protect against freeze-related blockages, insulate exposed drain lines using heat tape or foam pipe insulation. Additionally, consider insulating the pad’s perimeter with rigid foam board to maintain a consistent temperature around the unit and its drainage system.
Tools, Materials Checklist and Site Preparation
Describe how pad size, thickness, and mounting location relate to condenser specs and drainage needs. Have a clear plan for grading and isolation before starting work. Confirm that the site supports a level, stable foundation with proper drainage.
List the essential tools and materials for the job, plus key site prep steps. Focus on measuring, leveling, forming, and placing the base cleanly, with attention to safety and access for service.
Tools and fasteners to have on hand
Before you start, ensure you’ve got the right tools and fasteners for a smooth installation.
- Leveling: Tape measure, 2-foot level, string line – To get your pad level and square.
- Anchoring: Anchors matching pad and bracket types – Secure the condenser safely.
- Cutting: Circular saw, chisel, hammer – For cutting forms and adjusting anchors.
- Sealing: Silicone sealant, paintbrush – To waterproof and protect your pad.
- Mixing: Concrete mixer or mixing tub, shovel – For preparing the concrete mix.
- Compacting: Tamper, plate compactor (optional) – To ensure a solid base.
- Safety: PPE (gloves, safety glasses, ear protection) – Protect yourself from harm.
- Marking: Spray paint, marking crayon – To mark out dimensions and anchor points.
Quick rule: Match anchors to pad and bracket types to ensure a secure fit.
Site prep: soil compaction, leveling, and visual checkpoints
Before pouring your pad, ensure the site is well-prepared for a solid foundation.
- Soil compaction: Rent or borrow a plate compactor – Pack down the soil to prevent settling.
- Leveling: 2-foot level, string line – Ensure your pad will be level and square.
- Visual checkpoints: Check for rocks, debris – Remove any obstacles that could cause issues.
- Drainage: Slope the site away from structure – Prevent water pooling under the pad.
- Clearance: Verify clearances for service lines – Ensure there’s enough room for maintenance access.
- Subgrade stability: Check for soft spots, instability – A stable base is crucial for your pad’s longevity.
- Forms placement: Set forms to exact dimensions – Ensure a precise pad size and shape.
Quick rule: Compacting the soil and checking for level ensures a solid, even pad.
Safety, Codes, Warranty and Professional Considerations
Cover the safety practices required during pad installation, including PPE and safe lifting. Ensure electrical clearances and stable footing to protect workers and equipment. Emphasize keeping the work area organized to avoid hazards.
Explain when permits or AHJ reviews are needed and how to document compliance. Clarify how installation choices impact warranties and serviceability, and when to consult licensed installers or engineers for complex sites.
Safety best practices during installation
Always prioritize safety when installing your mini-split condenser pad. Here’s what you need to know:
Personal Protective Equipment (PPE): Wear gloves, eye protection, and hearing protection if using power tools. If lifting heavy materials, consider a harness or ask for help.
Lockout/Tagout: Ensure all electrical connections are secure and locked out before starting work to prevent accidental energization.
Electrical Clearance & Fall Hazards: Maintain clearances from power lines, and be aware of fall hazards when setting up, lifting, or placing the condenser pad. A stable, level footing is crucial to prevent injuries or equipment damage.
Warranty implications and when to hire a pro
Proper installation can protect your warranty. Here’s how:
Check Manufacturer Warranty Conditions: Some manufacturers require professional installation or specific mounting methods to keep the warranty valid. Always check before proceeding.
If you’re unsure about any aspect of the installation, it’s best to hire a licensed installer or engineer. They can ensure your pad is installed correctly and won’t void your warranty.
Service Clearances & Access: Consider future service needs. Ensure there’s enough clearance around the unit for maintenance and that technicians have easy access when needed.
Cost Trade-Offs, Common Mistakes, Troubleshooting and Maintenance
Compare typical DIY versus professional costs and time, noting potential hidden expenses. Consider the long-term value of different pad types and mounting methods. Balance upfront effort against future maintenance needs.
List common mistakes to avoid, such as improper leveling or insufficient drainage. Provide a troubleshooting guide for settling, drainage issues, or unusual vibration, and outline a maintenance plan to extend pad life.
Common installation errors and how to avoid them
Here are some common mistakes homeowners make when installing concrete pads for mini-split condensers, along with ways to prevent them.
- Incorrect leveling: Uneven pads cause vibration and noise. Use a laser level or long straight edge to ensure your pad is perfectly flat.
- Insufficient slope for drainage: Water pooling can damage the condenser. Ensure your pad has at least 1/4 inch per foot fall towards the drain.
- Undersized pads/anchors: Inadequate size leads to instability and vibration transfer. Follow manufacturer guidelines for pad size and use appropriate anchors.
- Incorrect isolator selection: Wrong isolators can’t dampen vibration effectively. Choose the right ones based on your condenser’s weight and vibration frequency.
Prevent these errors by careful planning, measuring, and following manufacturer guidelines.
Troubleshooting symptoms and inspection checklist
Regularly inspect your mini-split condenser pad to catch any issues early. Use this checklist when diagnosing problems or scheduling annual maintenance.
- Vibration: Check isolators for damage or wear. Replace if necessary.
- Noise: Inspect for loose hardware or improper leveling. Tighten and re-level as needed.
- Tilting: Check soil compaction beneath the pad. Re-compact if settling occurs.
- Water pooling: Ensure proper drainage slope. Clean drain lines if clogged.
- Refrigerant line issues: Inspect lines for kinks, damage, or movement. Secure and repair as needed.
- Cracking: Inspect pad for cracks. Seal with appropriate concrete crack filler.
- Weatherproofing: Check sealants around pad edges. Renew if degraded.
- Debris: Remove any debris from the pad surface and drain lines.
Quick rule: Inspect annually to catch minor issues before they become major problems.
Conclusion
Get this right and your condenser sits solid, quiet, and leak-free, with a clean look that lasts. The goal is a stable base that protects the unit, drains condensate properly, and avoids unwanted vibration or movement that could shorten the life of the system.
Check in plain language: confirm the pad size and foundation matches the load and mounting option, verify a clear, sloped drainage path away from the pad, inspect the interface components for proper isolation and a clean seal, sight-and-measure the whole setup for level, safety clearances, and proper future access. Do the work in the rough order of site prep, pad design, mounting, drainage, and final inspection, and document any deviations from plan.
Common mistakes to avoid are skimping on pad thickness or support, skipping a proper drainage slope, and mounting without confirming level or vibration isolation. Always hot-check for electrical clearance, keep condensate away from any standing water or foundations, and never pour concrete or modify pads without confirming the load and code requirements. When in doubt, slow down, double-check the plan, and use the tested safety steps: wear eye protection, keep the work area dry, and verify all connections before energizing the unit.
If the project hits uncertain loads, unusual mounting positions, or complex drainage, call a pro before you push on. A quick professional check now can prevent costly mistakes later and keeps your warranty intact. You’ve got this—finish with confidence and a solid, safe install that stays put and works cleanly for years.
FAQ
How do I properly mount a mini-split condenser on a ground pad vs. a wall bracket?
Ground pads should sit on a solid, level base with a stable, flat surface. Use brackets or frames rated for the condenser’s weight and follow the manufacturer’s spacing and clearance guidance. For wall mounts, ensure the wall structure can support the unit and use mounting hardware specified for outdoor condensers.
What is the typical weight capacity to look for in different mounts, and how do I verify it?
Check the mount’s label or datasheet for its rated load. Compare that rating to the condenser’s dry weight plus a safe margin for vibration and ice/frost conditions, then confirm it with the manufacturer’s installation instructions. If in doubt, don’t guess—consult the product instructions or a pro.
What anti-vibration technology and materials should I expect, and how should I install them?
Look for rubber isolation pads, interleaved springs, or compliant mounting cushions between the unit and its pad or frame. Install them per the manufacturer’s layout, ensuring even contact and no compression beyond what the kit specifies. Avoid hard, direct contact with concrete or metal where it isn’t designed for isolation.
What hardware is required for installation, and what practices prove professional-grade work?
Use the hardware listed by the condenser maker—bolts, washers, clamps, and anchors appropriate for your mounting surface. Pre-loosen fasteners, level the unit carefully, and torque fasteners to the spec in the instructions. For wall installs, verify studs, wall material, and weatherproofing; for ground installs, check pad drainage and frost protection. If you’re unsure, hire a pro to confirm mounting integrity and venting clearances.