
Introduction
A durable nosing for concrete steps is the reinforced edge that resists chips and cracks.
In plain DIY terms, it’s the part you notice first when you step on the edge and it should stay intact after the concrete cures. To get it right, form the edge with proper size and support, and finish the edge before the concrete sets. Follow the manufacturer instructions for any edging forms or reinforcement, and check local rules if required. If you’re unsure about specs, rely on product labels and safe ranges and adjust based on the space you have.
Key takeaways
- Choose a durable nosing profile and water‑resistant forms to resist chips.
- Lock the formwork securely; check alignment and edge supports before pouring; wear PPE.
- Use proper consolidation near edges to avoid air voids and weak corners.
- Careful curing and protection prevent early drying cracks and surface chipping.
- Inspect nosing after form removal; patch minor issues with compatible mortar.
- Follow local guidelines for curing intervals and edge detailing to stay compliant.
Table of Contents
- Introduction
- Key takeaways
- Why a Durable Nosing Matters and How It Fails
- Nosing Profiles and Design Choices That Resist Chipping
- Material Selection and Mix Strategies for Tough Edges
- Tools and Materials Checklist for Forming a Nosing
- Formwork Setup and Layout Best Practices
- Placing, Consolidating, and Finishing a Nosing Without Weakening It
- Curing, Protection, and Surface Treatments to Prevent Chipping
- Inspection, Common Mistakes, and Repair Strategies
- Conclusion
- FAQ
Why a Durable Nosing Matters and How It Fails
The nosing on interior and exterior steps serves as the primary edge that users step on and strike with grip. It helps define footing and guides water and debris away from the tread. Proper shape and support prevent trip hazards and reduce surface wear over time.
Common deterioration shows up as chipping, spalling, and edge abrasion when the edge is struck, exposed to freeze‑thaw cycles, or exposed to heavy use. Look for signs of loose or rounded edges and wear patterns near corners and transitions. When in doubt, check product labels, manufacturer notes, or local code guidance for edge requirements and durability expectations.
Functional stresses on a step nosing
A step’s nosing takes the brunt of wear and tear. Here’s why:
Load: Every time someone steps onto or off a stair, weight bears down hardest at the nosing.
Impact: Dropped objects, moving furniture, even kids’ toys can jar the nosing.
Freeze/Thaw & Abrasion: Weather and foot traffic erode the nosing over time. These stresses influence design (like adding rebar) and material choices (using air-entrained concrete).
Typical failure patterns and root causes
Chipping nosings often point to construction or material issues:
Poor Consolidation: Inadequate vibrating can leave voids that weaken the nosing.
Weak Surface Paste: Too little cement in the mix or improper finishing can cause surface flaking.
Insufficient Curing: Skimping on curing lets moisture escape, drying out the concrete too fast and causing micro-cracks to form.
Sharp Edges: Corners that aren’t properly rounded or beveled can chip off under stress.
Nosing Profiles and Design Choices That Resist Chipping
Profile geometry matters because it concentrates or disperses stress along the edge. A rounded or serviced profile can reduce sharp stress risers compared to a square, sharp edge. The chosen shape influences how the edge wears under foot traffic and impacts ease of finishing.
Compare common profiles by how they distribute load and resist edge damage. Consider guidance from product data sheets or supplier instructions to match profile to traffic and exposure. If you’re unsure, verify with a manufacturer or a qualified contractor about profile suitability for your steps.
Rounded, beveled, and square profiles—pros and cons
The shape of your step nosing can make a big difference in how it handles stress. Here’s what you need to know:
Pros
- Rounded: Distributes impact forces evenly, reducing stress concentration points.
- Beveled: Provides a larger surface area for foot placement, improving slip resistance.
- Square: Simple to form and finish. Can provide a clean, modern look.
Cons
- Rounded: May not provide as much grip underfoot compared to beveled or square profiles.
- Beveled: Can be more susceptible to chipping at the edges if not properly reinforced.
- Square: Sharp corners can concentrate stress, leading to chips and cracks over time.
Choose based on your needs. Rounded for even force distribution, beveled for better grip, square for simplicity.
Capped and metal nosing options
For added protection and durability, consider these nosing options:
Metal or composite caps: These can be attached to the top of your concrete nosing. They protect against abrasion and impact, extending the life of your steps.
They’re great for high-traffic areas or where you need extra durability. But they might not fit with all design aesthetics.
Ensure compatibility with your chosen finish and that they’re properly installed to avoid moisture buildup behind them, which can cause damage over time.
Material Selection and Mix Strategies for Tough Edges
Edge toughness starts with the cement, aggregate, and any additives chosen for the mix. A well‑graded aggregate can improve impact resistance and reduce surface wear. Consider surface-strengthening approaches that align with your project goals while following label directions.
Admixtures and cement types can influence early strength and long‑term durability of the edge. Review manufacturer instructions or product data sheets to confirm compatibility with your formwork and finishing method. If details aren’t clear, check local guidelines or consult the supplier for safe recommendations.
Aggregate, cement, and admixture considerations
The key to a tough nosing starts with the right mix. Here’s what you need to know:
Aggregate: Harder aggregates like granite or basalt make for stronger edges. Go for a well-graded mix – it packs better, reducing voids where concrete can chip.
Cement: Type II cement is standard for most steps. For tougher edges, consider Type III, which sets faster and develops strength quicker.
Admixtures: Air-entraining agents make concrete more durable in freeze-thaw cycles. Plasticizers improve workability without adding water. Bonding agents help aggregate stick to the cement paste. Always check product data for specific recommendations.
Reinforcement and fiber options
Reinforcing your concrete steps can significantly improve edge toughness:
Mechanical reinforcement: Steel or fiberglass rebar, placed along the nosing, helps prevent cracking. Make sure to anchor it properly.
Chamfer reinforcement: Reinforce the edge with a metal strip or angle iron. This protects the edge from impact and reduces chipping.
Fibers: Synthetic or steel fibers mixed into the concrete can reduce cracking and improve edge performance. Always follow manufacturer guidance on dosage rates.
Tools and Materials Checklist for Forming a Nosing
Gather a practical set of forms, sealants, and fasteners that fit your nosing profile. Include hand tools for shaping, screeding, and finishing the edge. Have a plan for protecting forms and controlling moisture during the pour.
Stock durable edging material, release agents, and curing blankets or covers as part of your on‑site kit. Double‑check quantities and compatibility with your chosen mix and form system by reading the product instructions and label warnings. If a detail isn’t clear, verify with the supplier before pouring.
Essential tools for forming and finishing
Before you start, make sure you have all the right tools to form and finish your concrete step nosing. Here’s a quick checklist.
- Formwork: Check for straight edges, no warping or cracks.
- Bracing: Ensure it’s sturdy enough to support the concrete weight.
- Vibrator: Test it to ensure it’s working properly. It helps remove air bubbles from the concrete.
- Trowel: Check for straight edges and no rust. A 1/2″ or 3/4″ trowel is usually suitable.
- Edger: Ensure it’s in good condition to create a clean, sharp edge on the nosing.
- Level: Check if it’s accurate and long enough for your step width.
- Tape measure: Confirm it’s calibrated correctly for accurate measurements.
- Gloves: Protect your hands from concrete dust and chemicals.
Quick rule: Always check tools before starting to avoid delays or poor results.
Recommended form materials and temporary hardware
Using the right form materials ensures a strong, durable nosing. Here’s what you need to check.
- Formboard: Use 1/2″ or 3/4″ thick plywood for most steps. For wider steps, consider using 1″ or thicker.
- Release agent: Apply a form release agent to prevent the concrete from sticking to the forms.
- Bracing: Use strong, sturdy supports to keep the forms square and stable.
- Screws or nails: Ensure they’re long enough to secure the formboard properly. Galvanized screws are best for outdoor use.
- Form ties: Use them to connect the forms together securely. They come in various sizes, so choose ones that fit your step width.
- Plastic sheeting (optional): If you’re pouring in cold weather, use this to insulate the forms and prevent freezing.
- Alternative materials: For tight budgets or limited access, consider using OSB board instead of plywood. It’s cheaper but less durable.
Quick rule: Always use sturdy, well-secured forms to prevent concrete from leaking and nosing from chipping.
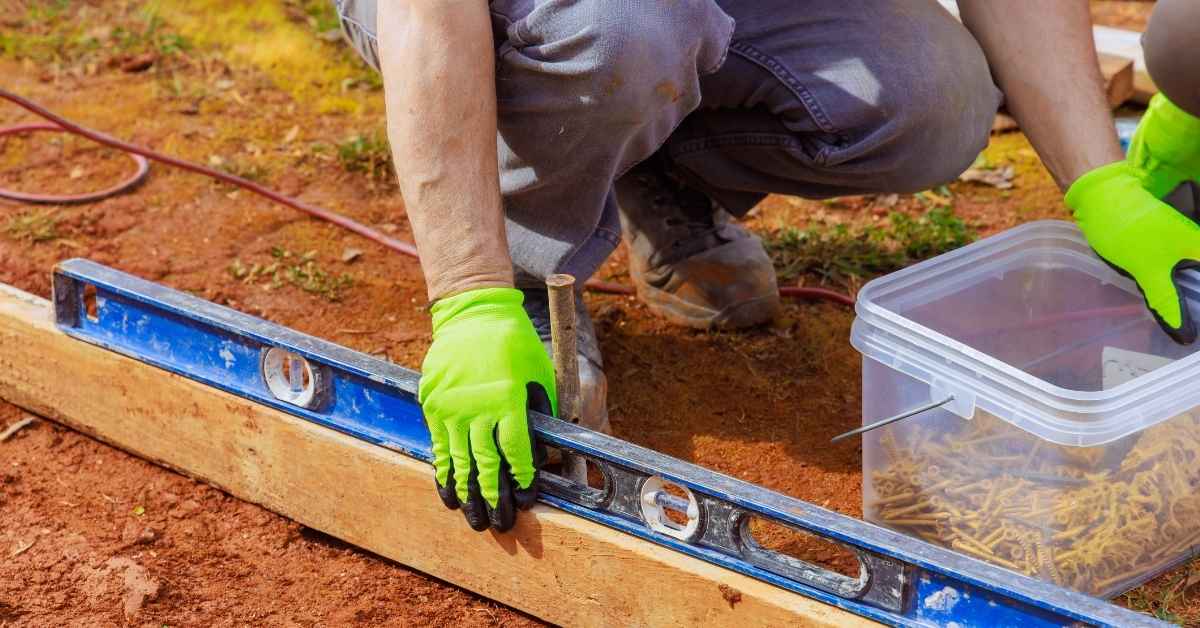
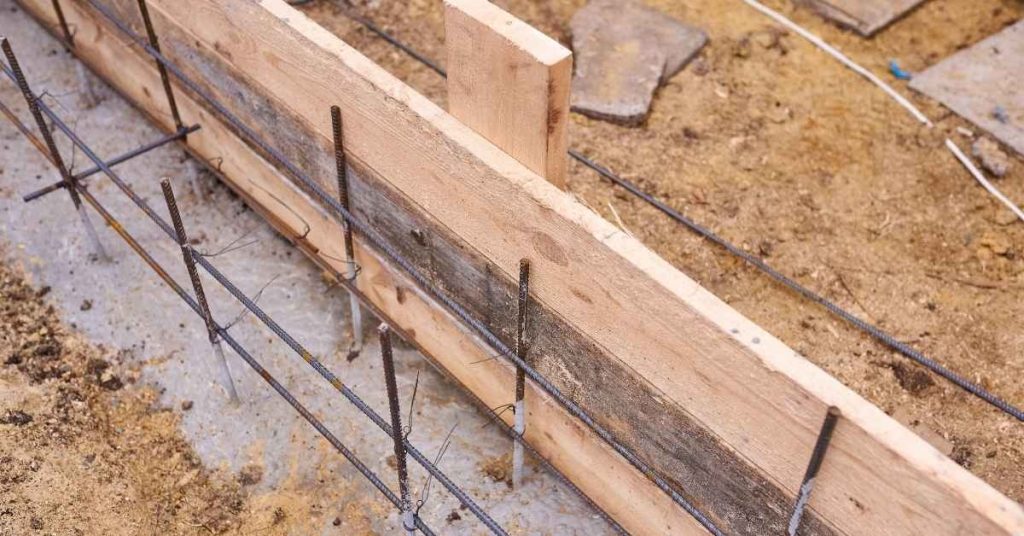
Formwork Setup and Layout Best Practices
Set forms to the intended nosing profile and ensure alignment along the tread edge. Use straight edges or guides to keep the profile true as you install the form material. Secure bracing so the form won’t shift under concrete pressure.
Check the spacing and support at corners, transitions, and corners where the nosing ends. Verify that the form system allows for proper consolidation and finishing access. If you’re unsure about bracing stiffness, consult the form manufacturer or a seasoned mason for safe guidance.
Accurate layout and form alignment
Start by laying out your forms on a flat, level surface. Use a straight edge to ensure the nosing is uniform across all steps.
Align the nosing profile with the treads. A simple way to check this is to place a level on top of the form and make sure it’s even with the bottom of the tread above it.
Use temporary hardware like clamps or screws to hold the forms in place. Double-check your alignment before pouring.
Preventing form leakage and blowouts
Seal any gaps between the nosing form and the tread form with tape or caulk to prevent grout loss.
Brace your forms well. Use 2x4s or other sturdy material to support the forms from behind, especially at the nosing where vibration can cause blowouts.
Remember: The nosing is the most vulnerable part of the step. Extra bracing here can prevent costly mistakes.
Placing, Consolidating, and Finishing a Nosing Without Weakening It
Place concrete to the nose edge in a controlled, steady manner and avoid over‑vibration that can cause segregation near the edge. Use appropriate consolidation techniques to minimize voids along the profile. Maintain a clean edge and steady surface to prevent ripples or pitting.
Finish the edge to a uniform texture without forcing excess paste into the face. Watch for brush or trowel marks that could become wear points and adjust your technique accordingly. If you’re unsure about finishing method, consult the mixing instructions and finishing guide from the supplier.
Placement and consolidation sequence
Start by placing concrete at the bottom of your form, near the nosing. This helps prevent segregation, keeping your aggregate evenly distributed.
Use a shovel or a small concrete rake to push the mix towards the nosing profile. Be gentle; you don’t want to break it.
For consolidation, use hand tamping or low-intensity vibration. Focus on the nosing area. You want to remove air pockets without damaging the profile.
Pro tip: Don’t over-consolidate. Too much vibration can cause segregation and weaken your nosing.
Finishing techniques for durable edges
After initial set, use a straight edge trowel to strike off the excess concrete from the nosing. Be careful not to disturb the profile.
For a smooth finish, use a magnesium float or a darby. Work perpendicular to the nosing. Again, be gentle; you don’t want to scrape away your aggregate.
To blend the nosing into the tread, use a broom finish or stamp the edges. This helps hide any slight differences in texture between the two areas.
Timing is key: Finish too early and you’ll have a weak surface; too late and you might damage your aggregate.
Curing, Protection, and Surface Treatments to Prevent Chipping
Implement curing practices that keep the surface moist or protected during the initial hardening period. A proper cure helps the edge gain strength and resist early cracking. Follow recommended timing and methods from the product data sheet or label for best results.
Protect the new nosing from traffic and weather for the required duration, and consider surface treatments that are compatible with the concrete mix. Check whether a sealer or coating is appropriate for your climate and exposure by reading the manufacturer instructions. If in doubt, verify with a local pros or code authority before applying anything new.
Curing methods and timing checkpoints
Use this checklist right after pouring to ensure your nosing cures properly.
- Moisten the surface: Keep it damp for 7 days. Use a sprinkler or wet burlap.
- Apply curing compound: After 24 hours, apply a membrane-forming liquid to lock in moisture.
- Monitor temperature: Ideal curing temp is 50-90°F (10-32°C).
- Check humidity: Maintain 75% relative humidity for best results.
- Avoid freezing: Keep the nosing above 32°F (0°C) to prevent strength loss.
- Protect from wind: Shield it from strong winds that can dry out the surface.
- Remove forms: After 48 hours, if possible. Earlier removal can weaken the edge.
- Inspect for cracks: Check daily for any hairline cracks that need sealing.
Quick rule: Curing is a critical period. Don’t rush it or expose the nosing to harsh conditions.
Sealers, toppings, and anti-chip treatments
After curing, protect your nosing with these options:
Penetrating sealers: These soak into the concrete to prevent moisture loss and reduce dusting. Apply after 28 days.
Thin overlays: A thin layer of polymer-modified cement can be applied to provide extra protection and a smooth finish. Compatible with most sealers, but check before applying.
Mechanical nosing plates or strips: These can be attached to the edge to protect it from impact damage. Ideal for high-traffic areas. Regular cleaning is required to prevent dirt buildup.
Compatibility: Always check compatibility between sealers, toppings, and your concrete mix before applying.
Inspection, Common Mistakes, and Repair Strategies
Develop a quick post‑pour inspection routine to catch early issues with the nosing. Look for uneven edges, chips, or hollow spots around the profile. Document noticeable concerns and plan timely repair steps as needed.
Identify frequent on‑site mistakes such as misalignment, inadequate bracing, or improper finishing that can lead to weak spots. For chips or spalls, refer to repair approaches that match the material and finish, and consult product guidelines or local rules when selecting repair materials. If you’re unsure about a repair method, check with the manufacturer or a qualified contractor for guidance.
Visual checkpoints and test indicators
Inspect your concrete nosing after curing to ensure it’s in good shape. Here’s a quick checklist.
- Edge rounding: Check for sharp edges that could cause injury or damage. They should be rounded off.
- Hairline cracks: Look for fine cracks, especially at the top and bottom of the nosing. If present, they might grow over time.
- Delamination signs: Tap the nosing with a hammer. A dull sound indicates delamination – the concrete is separating from its base.
- Crack width: Measure any cracks. Wider than 0.2mm? They need attention.
- Spalling: Check for flaking or chipping, especially at corners and edges.
- Uneven surface: Look for dips or high spots that could cause tripping hazards.
- Discoloration: Stains or discolored areas might indicate moisture issues or contamination.
- Settlement: Compare the nosing to adjacent surfaces. If it’s lower, settlement may have occurred.
Quick rule: Regular visual checks help catch problems early, preventing bigger issues down the line.
Repair and retrofit options for damaged nosings
When your concrete nosing gets damaged, here are some repair options to consider. For serious structural issues, consult a specialist.
- Small chips: Use a concrete patching compound to fill in the damage. Follow package instructions.
- Large spalls: Remove loose material, clean the area, and apply a bonding agent before applying the patch.
- Cracks: Use an elastomeric crack sealer or epoxy injection to repair cracks up to 0.2mm wide.
- Delamination: Remove the delaminated concrete, clean the surface, and apply a bonding agent before repouring new concrete.
- Nosing caps: Install protective nosing caps to prevent future damage at vulnerable edges.
- Resurfacing: For extensive damage, consider resurfacing with an overlay or toppings system.
- Replacement: If the damage is severe and repairs aren’t feasible, replace the entire nosing.
Quick rule: The earlier you catch and fix damage, the cheaper and easier the repair will be.
Conclusion
Taking the time to do the nosing right pays off in safety, durability, and a clean look that lasts. Stick to solid formwork, clean edge lines, proper mix and consolidation, and proper curing to prevent chips and cracks down the line.
To move forward, confirm the profile and formwork are secure, use the right mix for edges, set the nosing with clean joints, compact from the base up, finish without rubbing out strength, and protect the surface during curing. Check your layout first, then place and consolidate in small lifts, finish with a smooth but firm surface, cure properly, and inspect before heavy use. If in doubt, test a small patch first and follow the plan you laid out for formwork, edge control, and protection steps.
Common mistakes to avoid are skipping formwork checks, overworking the edge, and rushing curing or protection. Always slow down at key points: verify the form is square and clean, keep the edge firm as you consolidate, and don’t remove curing protection too early. Safety rules to follow: wear eye and hand protection, keep the work area clear, and never work around wet concrete if you don’t have a stable footing or a clear escape route. If something feels off, pause and reassess before proceeding.
If the project scope feels larger than your experience or time allows, don’t hesitate to call a professional for precise formwork or finishing work. With careful steps, steady hands, and a plan, you’ll end up with a nosing that resists chipping and keeps its edge for years to come. Stay deliberate, stay safe, and measure twice before you cut or fill.
FAQ
How do I decide the nosing width and edge radius without overthinking it?
Use the existing stair dimensions as a guide and follow the product label or manufacturer instructions for edges. If in doubt, stick to a conservative edge that won’t catch shoes. Local rules or a quick consult with a pro can help if you’re unsure.
What should I do if the formwork edge chips during stripping?
Stop, assess the damage, and clean the chipped area. Patch with a compatible repair material and re-seal the edge before continuing. Don’t leave a chipped edge exposed; it will fail sooner or later.
Can I use a standard concrete mix for a nosing or do I need special additives?
Use the mix that the label and instructions for your project specify. Check the bag or manufacturer instructions for any additives or special steps. If unsure, ask the supplier or follow local guidance.
How can I prevent dusting or flaking on the finished nosing after it cures?
Protect the surface during early curing and consider a suitable surface treatment if it’s recommended. Read the product label for timing and compatibility with your finish. If you’re unsure, test a small area or seek guidance on approved sealers.