
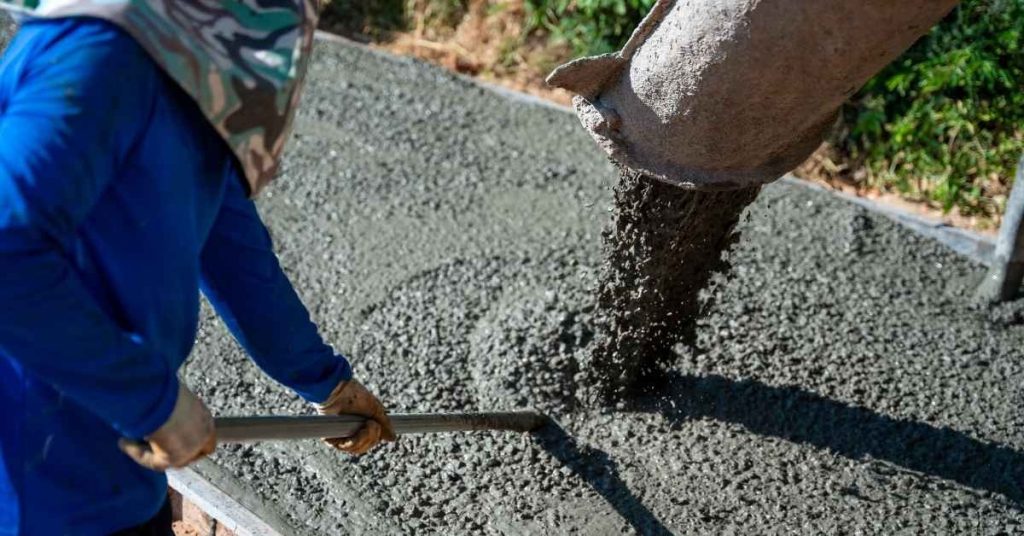
Introduction
Settlement tests for concrete on fill dirt help you assess how a post hole may settle after the concrete cures. Using a simple post hole, you can observe movement and identify if extra reinforcement or different fill is needed. These checks keep the project honest and give you practical results you can act on.
Choose the post hole material thoughtfully—dirt, gravel, crushed rock, or concrete—since each behaves differently as the fill settles. Follow practical steps for setting posts, such as ensuring level alignment and watching for movement after the fill cures, and check product labels and manufacturer instructions for any limits. Be aware that different soil types can change settling risk, so test openings on site and adjust your approach accordingly.
Key takeaways
- Assess soil type, moisture, and drainage to anticipate settlement risk during cure.
- Use hole verticality checks with a level and reference string during set.
- Prefer compacted fill around posts with restrained concrete pour to limit settlement.
- For different soils, choose appropriate post hole materials and cap with gravel or concrete as required.
- Ensure all safety gear, trenching rules, and dust control are followed during tests.
- Document results and compare with local guidance before final fence installation.
Table of Contents
- Introduction
- Key takeaways
- Why Settlement Matters When Pouring Concrete on Fill Dirt
- Pre-Test Site Assessment: Visual Checkpoints and Clues
- Tools and Materials Checklist for DIY Settlement Tests
- Step-by-Step Post-Hole Settlement Test (DIY Procedure)
- Additional Simple Soil-Stability Tests You Can Do Without Lab Help
- Interpreting Results and Deciding on Remediation
- Best Practices for Setting Posts in Fill Dirt with Concrete
- Costs, Safety, and Common Mistakes to Avoid
- Conclusion
- FAQ
Why Settlement Matters When Pouring Concrete on Fill Dirt
Fill dirt isn’t as stable as native soil, and unconsolidated material can settle and compact under load. This can cause tilting, cracking, and stress on posts or slabs before and after a pour. The risks are concrete-specific and show up as movement that affects fences, decks, or slabs anchored in fill.
This section focuses on DIY post-hole settlement tests to gauge tilt and load-transfer behavior. You’ll use simple tools like a plumb line, string line, level, and markers to observe verticality over time. The plan covers short-term and long-term checks, including when to re-dig or reinforce based on noticeable movement or cracking.
How fill dirt differs from native soil
Fill dirt is loose, unconsolidated material brought in to raise the ground level. It’s not like your native soil that’s been there for years, compacted by nature and weather.
Fill dirt can be layered with different materials – sand, clay, organic matter. This mix makes it unstable. It’s looser, holds less moisture, and has more air pockets than native soil.
These differences make fill dirt a poor base for concrete footings or post-holes. Without proper compaction, it can settle over time, causing issues with your concrete work.
Typical failure modes to watch for
Settlement on fill dirt shows up in a few ways. First, you might see your fence posts or deck posts leaning. This is a sign the soil beneath is settling.
Cracks in your concrete slab are another red flag. They can appear as diagonal cracks or hairline fractures. These often indicate differential settlement – different parts of the slab are moving at different rates.
Early testing helps catch these issues before they become major problems. Repairs down the line can be costly and time-consuming, so it’s best to get it right the first time.
Pre-Test Site Assessment: Visual Checkpoints and Clues
Look for surface indicators of settlement risk such as new cracks, uneven slabs, or depressions that suggest loading isn’t evenly distributed. These signs help you decide if you should dig or test first. Don’t ignore recent grading or fill history that could affect compaction and drainage.
Assess drainage patterns around the site, including downspouts and runoff, to anticipate moisture impacts on fill dirt. Observe soil surface moisture, texture, color, and any organic material that might undermine posts or footings. Note utilities and nearby roots that could influence stability.
Visual and historical signs of instability
Before you start digging, use this checklist to spot any signs of instability that could lead to settlement issues.
- Uneven settling: Look for newer cracks in slabs or walls, differential heaving, or new depressions. These suggest uneven load distribution and potential settlement problems.
- Fresh fill: Check if there’s any fresh fill on site. If so, note its type (imported vs native soil) and condition.
- Backed-up water: Observe any signs of moisture anomalies like water pooling or wet spots. These could affect compaction and drainage.
- Nearby construction: Check if there’s recent or ongoing construction nearby that might impact your site’s stability.
- Older cracks: While not an immediate risk, older cracks can indicate underlying settlement issues that may worsen over time.
- Erosion scars: Look for signs of erosion, which can undermine soil stability and lead to future settlement problems.
- Recent excavations: If there are recent excavations on site, they could affect the stability of your fill dirt.
- Unstable fill layers: Any visible signs of unstable fill layers, like loose or crumbly soil, warrant further testing.
Quick rule: If you spot any of these red flags, consider non-invasive tests before digging to assess the site’s suitability for concrete on fill dirt.
What to note for your test locations
When selecting locations for your post hole settlement tests, document these factors to help interpret results and make informed decisions.
- Slope: Measure the slope at each location. Steeper slopes can increase settlement risk.
- Nearby trees: Note any large trees nearby that could affect soil stability with their roots.
- Visible fill layers: Document the different fill layers you see, noting their type and condition.
- Utility marks: If there are utility locate marks on site, note their locations relative to your test points.
- Easements: Check if there are any known easements that could impact your testing or construction plans.
- Soil texture and color: Document the soil’s texture and color at each location. This can help you identify organic material or other issues that might undermine post-holes or footings.
- Moisture condition: Note any signs of moisture, like wet spots or sheen on the soil surface.
- Potential obstructions: If there are known underground features or potential obstructions, note their locations relative to your test points.
Quick rule: The more information you gather at this stage, the better equipped you’ll be to interpret your test results and plan your concrete pour.
Tools and Materials Checklist for DIY Settlement Tests
Core tool set should include a measuring tape, marker, level, and a post hole digger or auger. A small sledge can help adjust forms if needed. Have test stakes and prepped holes ready to observe changes.
Safety gear is essential: gloves, eye protection, sturdy boots, and a first-aid kit. Bring weather protection for extended tests and a simple water test kit to observe settlement over time as a quick check.
Basic tools every tester should have
Before you start, ensure you’ve got the right tools to dig, probe, and record your observations.
- Measuring tape: To measure depth and settlement accurately. Without it, you might miss critical changes.
- Marker: To mark test locations and depths on stakes or posts.
- Level: To ensure your test setup is level and any settlement is genuine, not due to an uneven starting point.
- Carpenter’s pencil: For marking measurements and notes directly onto stakes or posts.
- Durable post hole digger or auger: To create test holes. Skipping this could result in inaccurate readings due to improper hole preparation.
- Small hand sledge: For adjusting forms as needed, ensuring your test setup is solid and reliable.
- Work gloves: To protect your hands from cuts and scrapes during digging and handling materials.
- Eye protection: Essential for safety when using tools like augers or post hole diggers.
Quick rule: Always double-check your tools before starting. A missing tool can lead to inaccurate results or wasted time.
Materials for temporary and permanent post-setting
Choose the right materials to create reliable test setups that mimic real-world conditions.
- Concrete: For creating stable, long-lasting test posts. Consult product instructions for mixing ratios and curing times.
- Aggregate (gravel or crushed stone): To mix with concrete for added strength and stability in your test posts.
- Compactible backfill: Like expanded polystyrene (EPS) or other lightweight, compactible materials to mimic real-world fill dirt conditions.
- Temporary bracing: To support test posts during setup and initial curing. Without it, posts may shift or topple.
- Plastic sheeting or tarps: To protect test setups from rain or other environmental factors that could skew results.
- Zip ties: For securing plastic sheeting or tarps in place. Without them, your protective covering may blow away or shift.
- Durable stakes and string line: To create a level reference for your test posts and ensure accurate settlement measurements.
- Lightweight—yet sturdy—bearing plates or plywood: To stabilize test posts, preventing them from settling prematurely due to instability at the base.
Quick rule: Always follow product instructions and local codes when using materials. Skipping this could lead to inaccurate results or safety hazards.
Step-by-Step Post-Hole Settlement Test (DIY Procedure)
Set up a repeatable test with clearly defined hole sizes, post dimensions, and alignment. Use consistent embedment depth to simulate load conditions. Prepare the soil and forms to standardize comparisons.
Choose a representative post material and apply a consistent load-simulating method. Include safety measures to prevent anything from tipping or failing. Establish a measurement protocol for initial settlement and regular readings to capture trends over time.
Step-by-Step Process
Follow these practical steps to conduct a post-hole settlement test, ensuring safety and accurate results.
- Choose a representative location for your test hole. It should be typical of the area where you’ll pour concrete.
- Mark out the hole dimensions using stakes and string. Aim for 12″ diameter and 36″ depth for a standard test.
- Dig the hole carefully, removing soil in layers to avoid compacting it. Keep the sides vertical.
- Prepare your post or anchor. Use a 4×4 pressure-treated lumber post, 8′ long, with a pointed end for easy insertion into the hole.
- Insert the post into the hole, ensuring it’s plumb and centered. Backfill around the post using the same soil from the hole, tamping it in layers to simulate real load conditions.
- Allow the backfilled soil to settle overnight before proceeding with loading and observation steps.
- Measure the initial settlement of the post using a level or laser level. Record this measurement as your starting point.
- Apply incremental weight or leverage to simulate load on the post. Start with 50 lbs, then increase by 50 lb increments up to 200 lbs. Use bags of concrete mix for consistent weighting.
- Observe and record any immediate movement of the post after each loading increment. Make note of any delayed movement as well.
- After completing all loading steps, clean up the site, removing any excess materials or equipment.
Preparing the test hole and post
Selecting a representative spot and preparing your test hole and post are crucial for accurate results. Here’s how to do it right.
First, choose a typical location for your test. It should be indicative of where you’ll pour concrete, considering soil type, moisture, and surrounding fill.
Next, dig the hole using a post hole digger or auger. Keep the sides vertical to avoid compacting the soil. The hole should be 12″ in diameter and 36″ deep for a standard test.
Prepare your test post by cutting a 4×4 pressure-treated lumber post to 8′ length with a pointed end. This will make insertion into the hole easier.
Loading, tamping, and observation steps
Applying controlled load or tamping actions, observing movement, and recording results are key to understanding settlement risk.
Start by loading the post incrementally. Use bags of concrete mix for consistent weighting. Begin with 50 lbs, then increase by 50 lb increments up to 200 lbs.
After each loading increment, observe and record any immediate movement of the post. Use a level or laser level to measure vertical displacement accurately.
Also, note any delayed movement. Settlement can occur over time due to soil consolidation or other factors. Make observations at regular intervals (e.g., every 24 hours) for several days after loading.
Timing and repeat checks to detect delayed settlement
Delayed settlement can pose significant risks. Here’s how to schedule your observations and interpret results.
After loading the post, observe it at regular intervals. Every 24 hours is a good starting point. Record any further movement using your level or laser level.
Look for thresholds indicating unacceptable settlement risk. If the post moves more than 1/4″ in the first 24 hours, or more than 1/8″ per day thereafter, consider these signs of potential problems. Consult a professional engineer if you’re unsure about your results.
Repeat checks over time will help you understand if settlement is occurring due to soil consolidation, moisture changes, or other factors. Keep detailed records of all observations for future reference.
Additional Simple Soil-Stability Tests You Can Do Without Lab Help
Probing and texture checks help detect layer changes and moisture pockets. Note whether you’re dealing with gritty gravel or cohesive clay/loam in the fill. This informs how the soil will behave under load.
Do a compaction feel test by pressing with a foot or palm to gauge density and moisture impact. A simple drainage test, like a water-in-a-hole check, can reveal infiltration patterns and perched water that affects settlement.
Probe and feel methods for estimating compaction
Grab a sturdy rod, about an inch thick. Push it into the fill dirt at various spots where you’ll place your posts. You’re checking for layer changes and hardness differences.
Hardness: If it’s easy to push in, the soil is loose. If it takes effort, it’s compacted. Layers: If you hit resistance at different depths, there might be different layers with varying compaction.
Use your hands too. Scoop up some dirt. If it feels dry and crumbles easily, it’s likely loose. If it sticks together or feels moist, it’s probably compacted.
Water and drainage tests
Dig a small hole, about a foot deep, in the fill dirt. Fill it with water using a bucket or hose. Mark the water level.
Come back after an hour. If the water’s gone down significantly, drainage is good. If it’s still high or there’s standing water, you’ve got poor drainage. That can lead to settlement problems.
Also, look for signs of perched water – water sitting on top of a layer that doesn’t drain well. This can cause settlement issues too.
Interpreting Results and Deciding on Remediation
Develop pass/fail criteria from your settlement tests based on movement over time and post-settlement observations. Determine if loads are transferring as expected or if movement is problematic. Use simple, practical thresholds to guide decisions.
If movement stays within reasonable bounds, concrete alone may suffice; if not, outline remediation options and sequencing. Consider drainage improvements and re-compaction before structural fixes, and know when to re-pour or replace posts.
When concrete-only setting is reasonable
After running your post-hole settlement test, you might find that the movement stays within acceptable limits. In such cases, using concrete directly in the hole could be sufficient. But remember, this isn’t always a green light.
Acceptable movement range is typically 1 inch or less over time. If your post only moves this much, and it stabilizes within a reasonable period (usually 30 days), concrete alone might work. Keep in mind, though, that this depends on the load-bearing capacity of your soil.
However, if you notice any signs of ongoing movement, or if the test hole shows poor compaction, it’s best to reconsider. Concrete alone might not be enough to prevent future issues. Always err on the side of caution when dealing with your home’s foundation.
Remediation and alternative solutions
If your post-hole test indicates excessive movement or ongoing settling, don’t panic. There are ways to mitigate these issues. The key is to address the root cause.
Poor compaction can be fixed by adding compacted aggregate lifts or using mechanical compaction methods. If drainage is the culprit, improve it by installing French drains or regrading the site. For frost heave issues, consider using heat trace cables or insulating the area.
In severe cases, you might need to use posts on piers or helical anchors. These provide additional support and help distribute loads more evenly. Remember, these fixes should be done by a professional if you’re not experienced in such work.
Before any structural fixes, always prioritize drainage improvements and re-compaction. This helps create a stable base for your concrete. And when in doubt, consult a structural engineer. They can provide tailored advice based on your specific situation.
Best Practices for Setting Posts in Fill Dirt with Concrete
Backfill strategy matters: layer and compact fill gradually around posts, use a granular base, and plan drainage to minimize voids. Contain moisture and ensure proper sequence as you backfill to avoid future settlement risks. Keep the base well-drained and stable.
Choose appropriate compaction practices and tests for each layer, and avoid over- or under-compaction in fill soils. When placing concrete, control pour height and forms to prevent washout or loss of embedment in loose fill.
Layered backfill and compaction strategy
When setting posts in fill dirt, it’s crucial to create a stable base. This is achieved by layering and compacting the soil around your post.
Start with a granular base, like crushed stone or gravel, at the bottom of your hole. This provides good drainage and prevents settling.
Next, add layers of fill dirt, no more than 6 inches deep each time. Use a plate compactor to tamp down each layer. This helps eliminate voids that could lead to settlement over time.
The post should be placed in the center of this compacted base. Gradually backfill around it, ensuring the soil is moist but not wet. This helps with compaction and prevents the soil from shrinking or settling later on.
Concrete placement and curing considerations
Proper concrete placement is vital for a strong, long-lasting post. Use a proper mix – typically a 3:2:1 ratio of cement to sand to gravel.
The slump should be around 4-6 inches. This ensures the concrete flows well but isn’t too watery. Pour the concrete in lifts, no more than 12 inches high at a time, allowing each lift to set before adding the next.
Use forms around your post to contain the concrete and ensure a smooth finish. Make sure they’re secure and level. If your fill is loose, consider using temporary supports or sleeves to prevent the post from moving during curing.
After pouring, use a trowel or screed to level the top of the concrete. Then, allow it to cure for at least 7 days before backfilling completely. This gives the concrete time to gain strength without being disturbed by further backfill.
Costs, Safety, and Common Mistakes to Avoid
Compare practical options for remediation in terms of cost and labor, and note when each option makes sense for a fence, post, or deck. Consider the impact on timelines and the overall project scope. Use common-sense judgments to decide what fits your site.
Follow a step-by-step safety plan for testing and installation on fill dirt, including PPE and trenching precautions. Learn from typical DIY mistakes and keep a pre-test checklist for site prep and post-install monitoring.
Cost-benefit overview of common options
When dealing with fill dirt, you’ve got options. Each has its own cost and labor demands.
Concrete footings in fill: Cheapest upfront, but may not last if soil’s poor. Expect to redo in 5-10 years.
Compacted base: More work, more cost. Lasts longer – around 15-20 years. Ideal for decks and heavy loads.
Replacing fill or alternative anchoring: Most expensive, but longest lasting. Consider if you’ve got the budget and time.
Safety precautions and typical DIY pitfalls
Testing and installing on fill dirt can be risky business. Here’s what to watch out for:
- Inadequate compaction: Leads to settlement. Use a plate compactor, not just your feet.
- Ignoring drainage: Water collects, causes erosion. Ensure proper grading and drainage.
- Skipping follow-up observations: Miss early signs of settlement. Check posts regularly for first year.
- Wrong mix ratios: Concrete doesn’t set right. Follow mix instructions to the letter.
Safety’s key. Don’t cut corners. Your future self will thank you.
Conclusion
Settle this, and you keep the post steady, the surface level, and the project looking right. Do the tests and use the results to guide the fixes, not guesswork.
Check the site, measure and compare, test with a post hole and a small batch of concrete, review drainage and soil around the hole, and then apply a simple remedy plan all in one go. If it’s solid in the first pass, proceed with care; if not, scale back and adjust before you pour again. Safety first and gradual progress keep costs down and outcomes durable.
Avoid these mistakes: skip the pre-test visual checks, assume fill dirt behaves like native soil, or push through large pours when you see movement. Don’t skip PPE or working with a partner when handling heavy materials, and never ignore drainage or water flow around the site. If you see persistent settlement after a test, or the soil reacts unpredictably, pause and get a professional assessment instead of forcing a fix on a bad base.
When to call in a pro is clear: if you notice ongoing movement, large voids, or you’re dealing with load-bearing posts in a critical structure. Otherwise, follow the small-step approach, stay conservative, and you’ll stay safe and avoid costly mistakes. You’ve got this—steady posts, solid concrete, and a finished look you can trust.
FAQ
What types of post hole materials work best for fill dirt?
Post holes can use a mix of materials like compacted gravel, crushed rock, or clean dirt backfill. Concrete is poured after the hole is prepared and the post set. Always follow the manufacturer instructions and local rules for backfill compatibility.
How does soil type affect concrete settlement risk?
Different soils compact differently and can settle at varying rates. Fill dirt tends to settle more than native soil, which increases the risk if the foundation isn’t properly compacted and the post isn’t well anchored. Check your local guidelines and observe how the soil behaves during tamping.
What practical checks help prevent settlement when installing fence posts?
Make sure the hole is straight and deep enough for the post, set a niveau line, and fill gradually with proper compaction around the post. Use a temporary brace or a level to keep the post plumb while concrete cures. Inspect for voids or gaps behind the post before the concrete sets.
What should I verify about post height, backfill, and curing to avoid settlement?
Ensure the post is at the correct height for the finished fence line and that backfill is compacted in layers. Confirm the concrete has adequate support duration per the label or instructions before loading the fence. If in doubt, check product labels and local rules for curing guidance.