

Introduction
Concrete formwork bulge and bow occur when the facing panels deform under poured concrete, and brace spacing determines the frame’s stability. A tight, well-braced layout helps keep panels square and reduces the risk of sudden failures. Before the truck shows up, perform quick checks for obvious bulges, loose braces, and misaligned corners.
Check that braces are evenly spaced and properly connected, and that panels remain plumb and aligned. If you see any bulging, create additional bracing or adjust existing supports according to manufacturer guidance and local rules. If in doubt, halt the pour and re-inspect rather than proceeding, and consider consulting the safety steps in your project notes.
Key Takeaways
- Verify brace spacing aligns with formwork loads, conditions, and engineer guidance.
- Perform last-minute checks for bulge, bow, nails, ties, and anchorage integrity.
- Stop the pour if any brace slips, misalignment, or unexpected movement is observed.
- Document findings with clear photos and notes before engineer review.
- Be aware of back injury symptoms and use proper lifting techniques.
- Emergency bracing options should be limited, temporary, and clearly labeled.
Table of Contents
- Introduction
- Key Takeaways
- Why Formwork Bulge and Bow Happen — Risks and Consequences
- The Pre-Pour Quick-Check Checklist (What to Inspect in the Last 30–120 Minutes)
- Principles for Deciding Brace Spacing (How to Determine, Not a Universal Spec)
- Formwork Components — Which Braces and Ties Do What
- Practical Installation and Fastening Best Practices
- Monitoring the Pour — What to Watch and When to Stop the Pour
- Temporary Fixes and Emergency Bracing Before the Engineer Arrives
- Visual Checkpoints, Documentation, and the Pre-Pour Sign-Off
- Conclusion
- FAQ
Why Formwork Bulge and Bow Happen — Risks and Consequences
Bulges and bows in formwork can lead to serious safety and quality issues on site. Inadequate bracing or weak connections may cause formwork collapse, blowouts, or slurry spills if the pour is not controlled. These outcomes put crews at risk and can trigger costly rework and delays.
Linking deformation to consequences helps crews prioritize inspection focus before trucks arrive. Expect to see potential misalignment, unfinished surfaces, or voids if bulge is not contained. Quick checks and sound mitigation reduce waste and protect the pour schedule.
Common Failure Modes to Watch for
Formwork bulge and bow are often precursors to more serious issues. Regular visual inspections can help identify these problems early.
Bulging occurs when the formwork expands outward under pressure, while bowing happens when it sags or curves inwards due to insufficient support.
Compromised formwork integrity, inadequate bracing, or poorly tied components can lead to these deformations. Regular inspections during installation and before pouring concrete are crucial to prevent them.
Who’s Legally and Technically Responsible
Understanding roles and responsibilities is key to ensuring safety, quality, and compliance with regulations. Here’s who you need to know:
The contractor/formwork installer is responsible for the formwork’s integrity. The concrete supplier ensures the concrete mix meets specifications. The site superintendent oversees daily operations, and the engineer of responsibility (PE) approves designs and ensures compliance.
If deformation is observed, notify all responsible parties immediately. Stop the pour, assess risks, and follow established communication protocols to mitigate potential issues.
The Pre-Pour Quick-Check Checklist (What to Inspect in the Last 30–120 Minutes)
Stability checks should verify brace integrity, alignment, ties, and any visible deformations. Ensure bows are restrained and braces are snug. The goal is to catch issues before concrete starts moving.
Also confirm fresh concrete targets and any last-minute water adjustments won’t alter slump unexpectedly. Review access routes for lines and pump setup to keep paths clear and predictable for the crew.
Structural and Fastening Checks
Before concrete is poured, ensure the formwork structure is sound. Use this checklist to inspect the formwork’s integrity.
- Sheathing: Check plumb and alignment; any deviation could lead to bulging or bowing.
- Ties/Walers/Stiffeners: Verify all are installed and torqued properly. Loose ties can cause formwork to shift.
- Key Fasteners: Ensure they’re present and snug. Missing or loose fasteners can compromise formwork stability.
- Bracing Lines: Confirm straight and fully strapped; crooked lines may not provide adequate support.
- Form Ties: Check spacing and tension; improperly spaced ties can lead to bulging or bowing.
- Bows: Ensure restrained; unrestrained bows can cause formwork to shift during pouring.
- Braces: Verify snug; loose braces may not provide adequate support.
- Formwork Deformations: Inspect for any visible deformations that could indicate instability.
Quick rule: Address any issues immediately to prevent formwork failure during pouring.
Worksite, Logistics and Materials Checks
The right materials and logistics ensure a smooth pour. Here’s what to check:
- Pour Sequence: Confirm with the superintendent; incorrect sequence can lead to delays or poor results.
- Ready-Mix Slump/Temperature: Verify with the supplier; incorrect slump or temperature can affect concrete’s workability and strength.
- Pump/Hose Layout: Inspect for obstructions; blocked hoses can cause delays or improper pouring.
- Gang/Crew Assignments: Confirm with the superintendent; incorrect assignments can lead to confusion or inadequate coverage.
- Temporary Access and Egress: Verify clear paths for workers and equipment; blocked paths can cause delays or safety hazards.
- Emergency Contacts: Ensure available; quick access to superintendent and PE is crucial in case of emergencies.
Final Safety and Communication Checks
Safety and clear communication are vital before pouring. Use this checklist to ensure all is in order:
- Callers/Spotters: Verify in position; improper positioning can lead to miscommunication or safety hazards.
- Radios: Confirm charged; dead radios can disrupt communication during pouring.
- Barricades: Ensure posted; missing barricades can cause unauthorized access to the worksite.
- Pre-Pour Briefing: Complete with crew and subcontractors; inadequate briefing can lead to misunderstandings or safety lapses.
- Weather Conditions: Check for any changes; adverse weather can affect concrete’s curing process.
- Last-Minute Notes: Finalize a 1-page sign-off; this document should include forms, bracing, weather, and any last-minute notes.
Quick rule: Address any issues immediately to ensure safety and efficiency during the pour.
Principles for Deciding Brace Spacing (How to Determine, Not a Universal Spec)
Brace spacing is not one universal spec. It depends on wall height and length, pour rate, formwork type, sheathing stiffness, tie capacity and spacing, and equipment constraints. On site, a single rule won’t fit every project.
Use quick-reference visuals or a brief checklist on site to confirm spacing decisions just before the truck arrives; ensure braces are evenly spaced along the formwork’s length and height, with no gaps or overlaps. If the wall is tall or long, increase brace spacing to maintain stability; if the pour rate is high, decrease brace spacing to handle increased pressure, and always check the label or datasheet for any product-specific limits.
What to Measure and Record to Set Spacing
To determine optimal brace spacing, accurately measure and record the following variables:
Wall Height: Measure from the base of the formwork to the top. This affects how much support is needed.
Length of Wall: Measure along the base. Longer walls may require more frequent bracing.
Pour Rate: Estimate or confirm with your team how fast concrete will be placed into the forms. Faster pours need closer bracing.
Typical Field Guidance and Conservative Ranges
As a starting point, use these commonly used field ranges for brace spacing. Remember, these are not universal values:
Wall Height < 6 ft: Start with 24″ to 36″ spacing.
6 ft ≤ Wall Height ≤ 10 ft: Consider 18″ to 24″ spacing. If the pour rate is fast, reduce this further.
Wall Height > 10 ft: Start with 16″ to 18″ spacing and consult your project engineer for higher walls.
Formwork Components — Which Braces and Ties Do What
This primer explains how walers, rakers, spreaders, tie rods, and sheathing work together. Each element plays a specific role in erection, bracing, alignment, and later stripping. Understand the function to prevent misapplication during the pour.
Safety notes and measurement tips accompany the overview. Learn to confirm plumb and level, spot early bowing risks, and know when to pause and consult a pro before continuing.
Internal Vs External Bracing Systems
Formwork bracing systems can be categorized into two main types: internal and external. Each serves a specific purpose in preventing bulging and bowing during concrete pours.
Internal Bracing Systems use components like tie rods, walers, and rakers/kickers to resist lateral forces from within the formwork. Ensure adequate tie rods and walers are present to maintain form stability. After erection, confirm bracing is secure and plumb/level before pouring.
External Bracing Systems use external components anchored securely to prevent movement. Verify system type matches design intent before erection. If bulging/bowing occurs, pause work, assess cause (internal/external), and reinforce or adjust bracing as needed.
Quick Verification of Common Weak Links
Regularly inspecting formwork components helps prevent failure and concrete spillage. Perform simple visual checks for straightness, plumb/level, and secure attachment during erection and before pouring.
For Tie Rods, ensure they are tensioned to design specification. If slack, tension them accordingly. For Waler, check for bowing or twisting. Straighten and adjust bracing as needed. Inspect Raker/Kicker Footings and Sheathing Attachment Spacing for any signs of weakness.
If weaknesses are detected, pause work, reinforce or adjust the component, and recheck before proceeding with the pour.
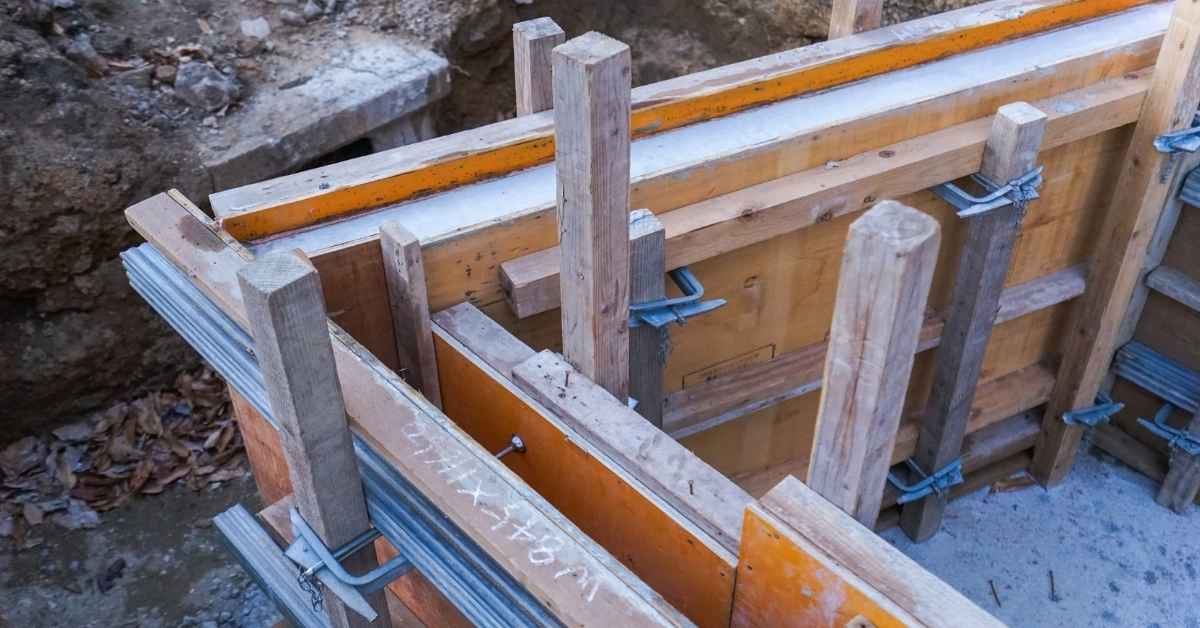
Practical Installation and Fastening Best Practices
Walers should be laid out with clear spacing and alignment to minimize bulge during placement. Keep braces and supports consistent to maintain form geometry. A predictable layout reduces surprises when concrete moves.
Use staggered fastening patterns and corrosion-resistant hardware. Follow a sequencing that creates clear load paths from formwork to supports, and inspect connections before curing begins.
Torque, Nail Patterns and Fastener Checks
Consistent torque application on ties is crucial for even load distribution. Check manufacturer guidelines to ensure proper torque settings.
Proper nailing/staple patterns for sheathing help distribute loads evenly. Follow recommended spacing and stagger rows for optimal support.
Missing or under-driven fasteners can lead to bulging. Inspect each connection, ensuring all fasteners are securely driven.
Edge and Corner Treatment
Corners and slab edges bear concentrated loads. Double up walers/ties in these areas to provide extra support.
Common mistakes include insufficient bracing at corners. Quick fixes involve adding more ties or using L-brackets for better load transfer.
At edges, ensure ties are anchored securely with proper edge formwork. Check for any gaps that could allow concrete to leak out.
Monitoring the Pour — What to Watch and When to Stop the Pour
During the pour, monitor for real-time signs of formwork distress such as bulge, bow, misalignment, delamination, concrete bleed, excessive vibration, and premature settling. Learn to distinguish small, temporary movement from alarms, and be ready to stop if movement persists or grows. Establish clear stop-pour actions and re-check bracing and lattice integrity as the pour progresses, while documenting readings and decisions.
A simple on-site check is to visually inspect for movement or anomalies during the pour. An experienced installer monitors indicators and should stop the pour if a visible bow or persistent movement is observed, then assess and take site-specific action. Keeping a quick-field log of readings, timing, weather, slump, pour rate, and decision authority helps coordination and safety.
Visual and Physical Cues of Distress
Regularly inspect your formwork during the pour for signs of distress. These can include:
Bulge: Swelling or outward movement of the forms.
Bow: Sagging or inward movement in the middle of the forms.
Misalignment: Shifts in the position of the forms relative to each other.
Delamination: Separation of the form layers.
Excessive vibration: Unusual shaking or movement of the forms.
Premature settling: Uneven or excessive sinking of the concrete before it has set.
Emergency Steps If You See Bulging
If you observe bulging during a pour, take immediate action to prevent formwork failure:
Stop concrete delivery: Immediately halt the concrete pump or lower the hopper to cease additional pressure on the forms.
Install emergency shores: If possible, quickly install temporary supports to reinforce the affected area and distribute the load.
Evacuate unsafe areas: Move all personnel away from the bulging section and any other potentially unstable areas.
Notify relevant parties: Contact the project engineer (PE) and site safety officer to inform them of the situation and seek further guidance.
Temporary Fixes and Emergency Bracing Before the Engineer Arrives
Temporary fixes and emergency bracing before the engineer arrives focus on rapid, controlled stabilization. Set up shore installations, use web straps, and place lightweight spreader beams to transfer load and reduce bulging while awaiting guidance. Ensure bracing aligns with the pressure vectors and establish clear PPE, stable work zones, and safety procedures.
Keep a close eye on load-path, alignment, and signs of overloading adjacent walls or floors. If bracing is misaligned or overloaded, realign and redistribute loads immediately or evacuate if unsafe. Document conditions with photos, note anchor points and dimensions, and communicate with the engineer on arrival; preserving original formwork where possible supports a safer handoff.
Safe Stopgap Bracing Options
If bulging is present but stable, implement temporary fixes to prevent further damage before the engineer arrives. Inspect for signs of distress such as cracks or movement.
Verify brace integrity, alignment with pressure vectors, and load distribution. Use shore installations, web straps, lightweight spreader beams, and load transfer techniques to minimize further bulging.
If instability or large movement is detected, evacuate the area immediately and refuse the pour. Do not attempt to fix severe issues; call the engineer or emergency services instead.
When to Evacuate and Refuse the Pour
The safety of the crew and the integrity of the structure are paramount. If severe distress, instability, large movement, creaking, or audible shifts are present, evacuate immediately and refuse the pour.
Inspect formwork condition, brace alignment, and load distribution. If legal/compliance concerns or unsafe conditions such as trip hazards, water, or electrical lines are identified, evacuate and shut off affected utilities; refuse the pour.
Document conditions, note dimensions, anchor points, and communicate with the engineer. Preserve original formwork as much as possible to aid in assessment.
Visual Checkpoints, Documentation, and the Pre-Pour Sign-Off
The section emphasizes visual checkpoints, documentation, and a pre-pour sign-off to verify brace placement, alignment, and readiness before the truck arrives. It covers a photography plan, logs for quality records, and a sign-off form with required signatures and notes, plus a one-page quick-check that fits on site.
Having clear records and a defined sign-off helps catch deviations early and keeps the crew accountable. A quick on-site check and timely escalation prevent formwork issues that could lead to concrete defects, and you should tighten and recheck any loose or misaligned braces before proceeding.
Photo and Measurement Guide
Before the concrete pour, document your formwork’s condition with clear photos and measurements. This helps identify any issues early.
- Plan view of braces: Capture an overview shot showing brace spacing and alignment to check for any gaps or misplacements.
- Elevation of walers: Take a vertical shot to inspect waler height, levelness, and proper attachment to the formwork.
- Closeups of tie rod tension: Zoom in on tie rods to ensure they’re properly tensioned. Check for any loose or broken rods.
- Fastener checks: Inspect all fasteners (nails, screws) to confirm they’re secure and haven’t backed out.
- Plumb check: Verify that the formwork is plumb using a spirit level. Check all four corners.
- Timestamp images: Include a timestamp or date stamp on each photo for easy reference later.
- Label images: Add location details (form number, section, etc.) to each image for organization.
- Safety check: Ensure no obstructions or hazards are present before taking photos. Mitigate any issues found.
Quick rule: Retake images if they’re blurry, out of focus, or missing key elements to ensure accurate record-keeping.
Formwork Handover & PE Notifications
Before the concrete pour, hand over formwork details and notify relevant parties. This ensures a smooth transition to the placement team.
- Confirm superintendent: Ensure the superintendent is available for sign-off on the pre-pour checklist.
- Prepare handover docs: Gather photographs, measurements, and quality logs for handover.
- Notify engineer: Inform the project engineer about the upcoming pour and any notable observations.
- Check formwork condition: Verify that formwork is in good condition and ready for pouring. Check for any signs of distress or damage.
- Review pre-pour checklist: Go through the pre-pour checklist with the superintendent to ensure all items are addressed.
- Confirm truck arrival window: Verify the expected time frame for concrete delivery and adjust plans as needed.
- C.A.R.E. notes: Document any special considerations, assumptions, risks, or exceptions related to the pour.
- Delegate if necessary: If the superintendent is unavailable, delay handover or delegate to an authorized representative.
Quick rule: Do not proceed with the pour if critical information is missing. Reschedule handover if needed.
Conclusion
Maintaining proper brace spacing and staying aligned with the pre-pour checks protects safety, minimizes risk of distortion, and keeps the finished concrete looking right and performing as expected.
Before the truck arrives, confirm the brace spacing and ties match the plan in your area, recheck all fastenings and anchor points, verify the formwork is plumb and square, and perform a final visual survey of all sides. If anything looks off, perform a controlled temporary fix only after you have confirmed the issue with the engineer or supervisor, stop the pour if necessary, and document the status before proceeding with a proper sign-off. Stop the pour if you see persistent bulge, bow, or unsecured elements, and document the sign-off so the next steps are clear and traceable.
Common mistakes to avoid are rushing brace adjustments at the last minute, assuming a single measurement covers all bays, and neglecting to test any temporary fixes in a small, controlled area first. Safety rules are simple: never ignore obvious movement, never overload a brace beyond its intended tolerance, and never proceed without a clear plan and supervisor approval. If you’re unsure about the adequacy of bracing or if the engineer has not weighed in, call in a professional rather than pushing ahead, and take the time to verify every critical point before the truck shows up. With careful checks and a disciplined sign-off, you protect safety, save time, and keep the project on track.
FAQ
What Are Common Symptoms of Back Injuries in Construction Work?
Back injuries often cause localized pain, stiffness, or limited movement. You may notice numbness, tingling, or weakness in the legs, or pain that worsens with lifting or bending. Seek medical advice if symptoms persist or are severe.
What Typically Causes Back Injuries on Site?
Common causes include heavy lifting, improper lifting technique, sudden twists, or repetitive strain. Poor posture, inadequate brace support, and abrupt changes in material load can also contribute. Review your technique and equipment setup to reduce risk.
How Should I Diagnose a Back Injury on the Job?
First, assess the location and intensity of pain, noting any radiation or numbness. If pain lasts beyond a day or is accompanied by weakness or loss of sensation, seek evaluation from a healthcare professional. Follow their guidance on rest, activity modification, and rehab steps.
What Are Safe Pain Management and Staying Active Strategies?
Use the minimum effective approach: rest when needed, apply cold or heat as appropriate, and use over‑the‑counter options only if allowed for you. Maintain gentle, pain‑free movements and gradually reintroduce light activity as tolerance improves, following medical advice. If pain worsens or new symptoms appear, pause work and consult a professional.