
Introduction
Concrete footings for decks and sheds come in three common forms: tubes, pads, and pier blocks. These options provide a stable base that transfers load to the ground and can be installed with basic tools. Choose between them based on the project size, soil, and local requirements.
Each option has its own installation steps, from preparing a level base to setting forms or anchors and letting concrete cure. Materials include formwork or support hardware, concrete or pre-mixed mix, and fasteners, with costs that vary by scope and local supply. Always verify the load ratings and durability for your site and follow the manufacturer instructions, local building codes, and any soil or frost rules.
Key takeaways
- Know your footing options: tubes, pads, and pier blocks, chosen by load.
- Follow manufacturer guidance for each type; local codes may require inspection.
- Prepare site: level, stable soil, and clear drainage before installation.
- Estimate materials and tool needs early to avoid mid-project delays.
- Assess load-bearing needs; choose footing type with adequate durability and keep maintenance.
- Safety: use proper PPE, follow safe excavation practices, and secure overhead work.
Table of Contents
- Introduction
- Key takeaways
- Types of Footings Explained: Tubes, Pads, and Pier Blocks
- Pros and Cons — Performance, Durability, and Adaptability
- Installation Process — Step-by-Step (What to Do for Each Type)
- Planning, Codes, and Site Assessment
- Load, Stability, Durability, and Maintenance
- Costs, Materials, and Tools
- Common Mistakes, Safety, and Troubleshooting
- Environmental Impact, Sustainability, and Hybrid Solutions
- Conclusion
- FAQ
Types of Footings Explained: Tubes, Pads, and Pier Blocks
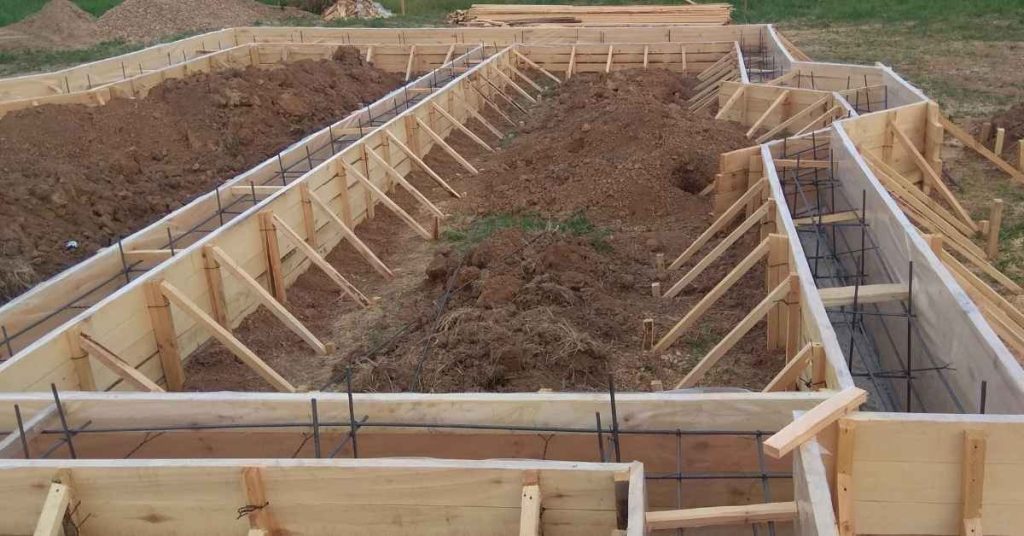
Formed concrete piers using tubes or sonotubes create vertical supports that transfer load through a column of concrete. This method is placed within a selected excavation, reinforced, and poured to form a continuous bearing element. Quick visuals reference how tubes become columns beneath beams or deck framing.
Poured concrete pads are flat, solid footings poured directly on prepared bases, often with a reinforcing mesh or rebar grid. They provide a wide bearing area for decks or sheds on stable soil or compacted gravel. Typical steps include base preparation, form setup, and controlled curing to achieve a level, solid surface.
Formed Piers (tubes/sonotubes)
Poured concrete piers using tube forms, also known as Sonotube forms, are suitable for uneven or sloped sites and areas with deep frost depths. They offer a durable, versatile solution that can adapt to varied site conditions with minimal excavation.
Key aspects of their installation include proper alignment, reinforcement, and cure time. Ensure the tube size meets your load requirements, and verify local frost line depths. Address any misaligned tubes before pouring concrete and ensure adequate reinforcement to prevent cracking.
Consider formed piers for uneven or sloped sites with deep frost depth areas. Always check local building codes for specific requirements.
Concrete Pads (Pre-poured or Site-poured)
Square or rectangular concrete pads, either poured in place or pre-cast, are suitable for supporting point loads and small sheds. They provide a cost-effective and straightforward installation solution, ideal for structures with minimal load requirements.
Before installing, ensure the surface is even and stable. Verify pad size aligns with your load distribution and check local building codes to determine appropriate pad thickness.
Use concrete pads when constructing a small shed or supporting light point loads. Always reinforce properly to prevent cracking.
Precast Pier Blocks / Deck Blocks
Precast pier blocks, designed to accommodate joists or posts, are suitable for floating foundations and situations where minimal excavation is required. They provide a swift installation solution ideal for light structures with limited access.
Proper leveling is crucial during installation. Ensure the block size aligns with your load needs and verify local building codes for pier spacing. Always address any uneven surfaces before installing blocks to prevent movement.
Use precast pier blocks when you have limited access or require a floating foundation. Always check local building codes for specific requirements.
Pros and Cons — Performance, Durability, and Adaptability
Each option offers different load distribution paths, with tubes concentrating load along a narrow column and pads spreading across a broad area. Pier blocks provide a precast, faster option with lift and venting characteristics. Assess how each choice handles typical deck or shed loads and potential settlement in your climate.
Frost protection varies with system depth and soil conditions. Tubes and pads can be set to a deeper bearing, while blocks rely on in-ground support or anchorage. Consider long-term durability under moisture, UV exposure, and chemical contact when comparing options.
Advantages and trade-offs of Tubes (poured piers)
Tubes, also known as poured piers or sonotubes, offer high structural reliability and excellent frost protection. They are ideal for varied site conditions due to their ability to be placed accurately and their minimal settling risk.
However, they require more labor compared to other options, including the need for forms and potentially subcontractors. Additionally, curing time is necessary after pouring concrete into the tubes, which can extend construction timelines.
To ensure proper installation and longevity, verify load capacity with the product label or datasheet. Also, ensure that formwork is set up correctly and that adequate curing time is allowed to prevent any structural issues down the line.
Advantages and trade-offs of Pads
Concrete pads are simple to install and excel at spreading loads evenly, making them ideal for flat, stable sites with no frost heave risk. They require minimal excavation compared to other footing types.
However, they may not provide sufficient frost protection in colder climates, which could lead to settling or shifting over time. Additionally, extensive site preparation is needed on uneven terrain to ensure proper compaction and leveling.
Before proceeding with pad installation, assess soil conditions to ensure they can support the intended load. Proper compaction and leveling are crucial for the longevity of your deck or shed structure.
Advantages and trade-offs of Pier Blocks
Precast pier blocks, also known as deck blocks, offer significant advantages in terms of speed, no-cure buildability, and portability. They can be installed quickly, require no curing time, and are easy to move and adjust on-site, making them suitable for tight access sites.
However, they provide less frost protection compared to tubes or pads, which could be a concern in colder climates. Additionally, their load-bearing capacity is generally lower than that of tubes or pads, and there may be code restrictions in some jurisdictions regarding their use.
Before proceeding with pier block installation, verify local code compliance to ensure they meet building requirements. Also, ensure proper leveling and support are provided to prevent any issues related to settling or shifting.
Installation Process — Step-by-Step (What to Do for Each Type)
Begin with site prep and constraints: verify clearances, drainage, and frost depth per type. Check local code specifics for tubes, pads, and pier blocks before excavating. Gather the materials and tooling required for your chosen method.
Proceed with excavation, base preparation, and formwork where applicable. Position each footing type with careful alignment using traditional or laser methods. Finish with curing, backfill, and final inspections to confirm plan dimensions and load transfer.
Concrete Footing Installation Steps
Follow these steps for a robust installation of concrete footings that ensures structural integrity and longevity.
- Preparation: Evaluate soil conditions, drainage, frost depth, and proximity to structures. Verify required clearances and local code specifics for tubes, pads, or pier blocks.
- Excavation: Dig trenches for tubes (if applicable) or prepare substrate for pads. Ensure proper base preparation for pier blocks, including compacted aggregate if needed.
- Formwork/Placement: Position tube forms, place pads, or set pier blocks according to your layout plan. Establish true level and plumb using strings, lasers, or water levels.
- Reinforcement (if applicable): Confirm reinforcement requirements with the manufacturer or engineer. Install any required rebar or other reinforcements before pouring concrete for tubes or pads.
- Pouring/Backfilling: Pour concrete into tube forms or onto pad bases, adhering to recommended mix ratios and slump levels. Backfill around tubes or pier blocks using suitable materials, compacting in layers to prevent movement.
- Curing: Protect poured footings from extreme temperatures and moisture loss during the curing process (typically 7 days). Follow manufacturer guidelines for optimal curing times.
- Finishing/Post Connection: Once cured, finish surfaces as needed. Connect posts or joists to pier blocks using appropriate fasteners, ensuring proper tension and alignment.
- Final Inspection: Verify dimensions, setbacks, load transfer, and frost depth considerations against your plan before covering or final inspection.
Installing Formed Piers (Tubes)
Proper installation of formed piers, also known as tube footings, ensures structural integrity and longevity. Follow these steps for a successful DIY project.
Layout and Digging: Mark out pier locations according to your layout plan. Dig holes deep enough to reach below the local frost line, ensuring they’re wide enough to accommodate tube forms.
Placing Tube Forms: Insert tube forms into the dug holes, ensuring they’re level and plumb using a string line or laser level. Adjust as needed before proceeding.
Reinforcement (if required): Verify reinforcement requirements with the manufacturer or engineer. Install any required rebar or other reinforcements through the provided openings in the tube forms.
Pouring Concrete: Mix and pour concrete into the tube forms, following recommended mix ratios and slump levels. Ensure the concrete fills the form completely, eliminating voids that could compromise structural integrity.
Curing Considerations: Protect poured piers from extreme temperatures and moisture loss during the curing process (typically 7 days). Follow manufacturer guidelines for optimal curing times to ensure proper strength development.
Post Connection: Once cured, connect posts or joists to the pier using appropriate fasteners. Ensure proper tension and alignment to maintain structural integrity.
Installing Concrete Pads (Poured/Precast)
Proper installation of concrete pads ensures optimal load distribution and stability for your deck or shed. Follow these steps:
Forming/Precast Placement: For poured pads, create the pad base according to your layout plan. For precast pads, position them on a prepared base matching their dimensions. Ensure proper alignment and leveling before proceeding.
Base Preparation (Compaction and Aggregate): Compact the soil beneath the pad using a plate compactor or tamper. Spread a layer of aggregate (e.g., gravel) over the compacted soil to enhance drainage and prevent settling. Re-compact the base if necessary before pouring concrete or placing precast pads.
Leveling/Curing/Anchoring: Level poured pads using a laser level or string line, ensuring they’re even with surrounding surfaces. Allow poured pads to cure for at least 7 days before loading. For precast pads, secure them to the base using suitable fasteners to prevent movement.
Tie-in to Structure Loads: Connect posts or joists to the pad using appropriate fasteners, ensuring proper tension and alignment. Distribute loads evenly across the pad’s surface to maximize its load-bearing capacity.
Installing pier/deck blocks
Correct installation of pier or deck blocks ensures immediate load-bearing capacity and stability for your structure. Follow these steps for a successful DIY project.
Ground Prep and Base/Aggregate: Prepare the ground by removing any debris, leveling, and compacting the soil. Spread a layer of aggregate (e.g., gravel) over the compacted soil to improve drainage and prevent settling. Ensure proper compaction before placing blocks.
Block Placement and Leveling: Place pier or deck blocks on the prepared base according to your layout plan. Use shims if necessary to achieve a true level surface, ensuring all blocks are even with one another.
Immediate Load Considerations: Before loading, verify that blocks are properly seated and stable. Check for any signs of movement or settling before proceeding with post or joist installation.
Fasten Posts/Joists to Blocks: Connect posts or joists to the pier or deck blocks using appropriate fasteners. Ensure proper tension and alignment, following manufacturer guidelines for optimal load transfer and stability.
Planning, Codes, and Site Assessment
Start with a thorough site evaluation of soil, drainage, slope, and accessibility. Identify frost depth and potential seasonal movement that could influence footing choice. Document these observations to inform design decisions.
Check structural bearing, local codes, and permit requirements. Determine when an engineer or designer should be consulted for complex soils or drainage issues. Prepare a pre-build checklist to guide subsequent steps.
Soil, Bearing Capacity, and Frost Considerations
The type of soil on your site significantly influences the choice and sizing of your footings. Expansive soils like clay can shift or heave during freeze-thaw cycles, requiring deeper or reinforced footings.
Frost depth is another crucial factor. High frost depths may necessitate deeper footings to prevent frost heave damage. Always verify local frost-depth requirements as they vary regionally.
To understand your soil conditions better, consider obtaining local soil data or a geotechnical brief. This information can help you make informed decisions about your footing design and ensure its longevity and stability.
Permits, Inspections, and Code Compliance
Before starting any work, it’s crucial to understand the permit requirements and building codes for your chosen footing type in your area.
- Check local building codes: Understand the specific regulations for each footing type (tubes, pads, pier blocks).
- Confirm required permits: Know which permits are needed and how to obtain them.
- Use engineered designs: Ensure that engineered designs are used where codes or loads require them. Consult an engineer if unsure.
- Schedule inspections: Coordinate with your local building department for required inspections during the installation process.
- Avoid common mistakes: Revisit local codes and consult with authorities if permits are denied to prevent delays in construction.
Quick rule: Always consult local codes and obtain necessary permits before starting any work to avoid costly setbacks.
Layout and Elevation Control
Proper layout and elevation control are essential for ensuring your footings align with thresholds, structural spans, and the overall design of your deck or shed.
First, establish a clear datum point to serve as a reference for accurate layout and elevation control. This will help maintain consistency throughout the installation process.
Next, ensure that footing spacing matches the spacing of your structural members to maintain alignment. Properly spaced footings provide better support and prevent structural issues down the line.
Lastly, verify that your footings are level and follow the desired slopes. If any misalignments or inconsistencies arise, address them promptly by adjusting footing elevations or revising your layout as needed.
Load, Stability, Durability, and Maintenance
Evaluate how loads, stability, and moisture affect tubes, pads, and pier blocks across decks and sheds. Compare live and dead loads, point loads, and soil bearing capacity to see which footing best meets the structure’s needs, while considering lateral stability and resistance to overturning. Factor in freeze-thaw exposure, drainage, and the potential for moisture movement to influence long-term performance and maintenance needs.
This matters for longevity and effort spent on site maintenance: choosing the right footing reduces rework and keeps the structure stable through seasons. A practical approach includes verifying soil conditions and ensuring footings are level and plumb before backfilling, then planning for drainage to move water away from the base. For light structures with uniform loads, pier blocks or pads offer simplicity and cost effectiveness, while heavier or unevenly loaded projects may benefit from tubes for improved load distribution and adaptability to terrain; a pro check of soil bearing and load paths helps confirm the best fit. If doorways, railings, or bracing are involved, factor in fastening continuity and spacing to maintain overall stability over time; review moisture management and frost-depth considerations to minimize heave and cracking and to plan for inspection and potential releveling when needed.
Assessing vertical and lateral loads
The first step in choosing the right footing type is assessing the loads your deck or shed will bear. This includes:
- Vertical loads: Dead loads (weight of structure) + Live loads (people, furniture). Estimate these based on square footage and material used.
- Point loads: Concentrated forces at specific points, like where posts meet beams. Calculate using post spacing and beam size.
- Lateral forces: Wind, snow, or seismic forces that can push or pull your structure off its footings. Estimate based on local building codes and structure dimensions.
Soil bearing capacity is also crucial. Consult a geotechnical engineer if unsure about your site’s soil type and strength.
Quick check: Estimate loads before selecting footing type. Pro check: Consult manufacturer or engineer for sizing based on calculated loads.
Weather resistance, drainage, and durability
Exposure to the elements can degrade footings over time. Consider these factors:
- Water exposure: Ensure proper drainage around footings to prevent standing water, which can cause erosion or frost heave.
- Freeze-thaw cycles: Concrete can crack in extreme temperature changes. Use a concrete mix designed for freeze-thaw resistance and consider coatings for added protection.
- Corrosion of hardware: Check if your footing type uses metal components (like rebar or anchors). Choose hardware with good corrosion resistance, especially in moist environments.
Quick check: Ensure proper drainage. Pro check: Verify concrete mix design and consult hardware datasheets for corrosion resistance.
Inspection and maintenance checklist
Regular inspection helps maintain your deck or shed’s structural integrity. Use this checklist annually:
- Level: Check if footings are still level. Uneven settling may indicate a problem.
- Cracks: Inspect for cracks in the concrete, which can indicate settlement or movement.
- Settling: Measure from the top of the footing to the ground. If it’s changed significantly, there might be settling.
- Hardware corrosion: Check metal components for signs of rust or deterioration.
Quick rule: Address any issues promptly to prevent further deterioration.
Costs, Materials, and Tools
Costs hinge on materials, labor, excavation, concrete, reinforcement, and transport. Each footing method shifts these costs, and lifecycle costs—durability, maintenance, replacements—must be weighed against initial outlay for decks versus sheds. A practical tools and materials checklist is provided to help DIYers plan and compare options.
Site and soil conditions, frost depth, drainage, equipment access, and local permit needs influence both cost and feasibility. Tips to reduce costs include bulk buying, cutting waste, and renting equipment where appropriate, without compromising safety; common mistakes include not accounting for waste material. For tubes, verify load bearing and soil suitability; for pads or pier blocks, ensure adequate support and compliance with local codes.
Cost Factors and Lifecycle Considerations
The cost of your concrete footing project isn’t just about the initial outlay. Understanding what drives costs up and how longevity affects total cost of ownership is crucial for informed decision-making.
Deep excavations increase labor and equipment needs, driving up initial costs. If deep excavation is required, expect higher initial costs.
Large concrete volumes mean higher material costs. Consider bulk buying or waste reduction strategies to mitigate this. Regularly review and update cost estimates as project details change to avoid unexpected expenses.
Tools and Materials Checklist
Having the right tools and materials ensures a successful DIY project. Here’s a list tailored for each footing type, plus a universal minimum kit.
- Excavation Tools (Pier Tubes): Post hole diggers, shovels, rented auger drill – For efficient digging of pier tube holes.
- Compaction Equipment: Plate compactor or tamper – To ensure proper soil compaction before pouring concrete.
- Forms (Poured/Precast Pads): Formwork materials, stakes, and ties – For shaping and supporting poured concrete pads.
- Concrete Mixing & Pouring: Concrete mixer, wheelbarrow, trowels, levels – For mixing and pouring concrete efficiently.
- Anchors & Connectors: Appropriate anchors and connectors – To secure footings to the structure and prevent movement.
- Safety Gear: Hard hats, gloves, eye protection – Essential for protecting yourself during work.
Material Specs and Standards Explained
The right materials ensure project longevity and code compliance. Here’s what to check and verify:
- Concrete Strength: Check PSI rating on concrete mix labels – Higher PSI means stronger, more durable concrete.
- Reinforcement: Verify reinforcement type (rebar, wire mesh) and size – Larger sizes provide greater strength.
- UV/Weather Treatments: Check connector treatments for UV and weather resistance – Protects connectors from degradation.
- Manufacturer Specs & Local Codes: Review datasheets and local building codes – Ensure materials meet required specifications and comply with local regulations.
Common Mistakes, Safety, and Troubleshooting
Identify common footing selection and layout mistakes, and explain how to avoid them. Include misjudging frost depth, spacing, or alignment with structural plans. Emphasize the importance of meeting setback rules and utility clearances.
Address excavation, backfill, and curing errors that can compromise stability. Highlight safety practices, including trench work, PPE, and handling heavy components. Outline steps to resolve issues such as misalignment or unexpected drainage problems.
Common mistakes to avoid
To ensure a solid foundation for your deck or shed, it’s crucial to avoid common pitfalls during footing installation. Here are some frequent errors and how to prevent them:
- Inadequate compaction: Improperly compacted soil can lead to settling over time. Always ensure subgrade is properly compacted before installing footings.
- Incorrect depth for frost protection: Footings must extend below the frost line to prevent heaving during freeze-thaw cycles. Verify local frost depths and adjust footing depth accordingly.
- Improper leveling: Uneven footings can cause structural issues. Use a level or laser level to ensure all footings are at the same elevation.
- Underestimating loads: Insufficiently sized or spaced footings may not support the structure’s weight, leading to settling or failure. Calculate loads accurately based on structure size and local codes.
Regularly inspect your site and use appropriate tools for leveling and load calculation to avoid these common mistakes.
On-site safety and risk controls
Safety should be a top priority during footing installation. Here are some essential safety measures and risk controls to implement on-site:
Excavation safety: Use trench boxes or shoring for trenches deeper than 5 feet to prevent cave-ins. Always ensure proper sloping and benching.
Heavy material handling: Follow proper lifting techniques when moving heavy materials such as concrete blocks or bags of cement. Train workers on safe lifting practices to prevent injuries.
Concrete exposure: Protect freshly poured concrete from freezing temperatures during the curing process to ensure its strength and durability. Use appropriate protective measures based on manufacturer guidelines.
Weather risks: Monitor weather conditions and take necessary precautions, such as covering materials or providing temporary shelter for workers, to minimize risks associated with adverse weather.
Troubleshooting settlement and tilt
Uneven settling or tilted footings can lead to structural issues over time. Here’s how to diagnose and address these problems:
Diagnosis: Inspect your structure using a level or laser level to check for signs of settlement or tilt. Look for any visible cracks in the structure that may indicate movement.
Remediation: If settlement or tilt is detected, take appropriate action based on its severity:
- Minor settling or tilting: Relevel footings if possible using appropriate tools and techniques.
- Moderate to severe settlement or tilt: Consult a structural engineer for underpinning options or further evaluation and repair.
Regularly inspect your structure and address any issues promptly to maintain its stability and longevity.
Environmental Impact, Sustainability, and Hybrid Solutions
Evaluate the environmental footprint of tubes, pads, and pier blocks across embodied energy and material sourcing. Consider end-of-life options and transport impacts for each method. Use these factors to inform sustainable decisions.
Explore hybrid approaches and low-carbon options, including recycled content and locally sourced materials. Discuss how to design for decommissioning or repurposing while maintaining performance. Note safety and regulatory considerations when adopting greener solutions.
Environmental considerations and material choices
The materials you choose for your concrete footings have a significant impact on their environmental footprint. Selecting lower-impact options can help minimize your project’s carbon footprint and contribute to a more sustainable build.
- Concrete with recycled aggregate: Reduces embodied carbon by replacing virgin aggregates with recycled materials. Look for products with high recycled content (e.g., 30% or more). Avoid assuming all concrete is equal; verify material specs and consider lifecycle implications.
- Fly ash/slag blends: Incorporating these byproducts from coal combustion and iron production can reduce the need for cement, lowering embodied carbon. Check local availability and ensure they meet required strength and durability standards.
- Limestone calcined clay cement (LC3): This low-carbon alternative to traditional cement offers similar performance with up to 30% lower greenhouse gas emissions. Verify compatibility with other materials and check for suitable mix designs.
- Local materials: Using locally sourced aggregates can reduce transportation-related emissions. Check local quarries for availability and quality.
- Minimizing excavation: Reducing the volume of soil removed from your site minimizes environmental impact. Optimize load paths to reduce concrete volume and consider using shallow footings where possible.
Hybrid and modular approaches
Combining precast blocks with shallow poured pads or partial in-ground piers can offer a balance of speed, cost, and durability for constrained sites. Assess your site’s constraints, available materials, and regulatory requirements before deciding on a hybrid approach.
Precast concrete blocks combined with minimal in-ground concrete can be an efficient solution for limited space. Ensure the blocks are designed to bear loads effectively and provide adequate support for your structure.
Modular systems can also offer advantages in terms of speed of installation and reduced site disturbance. Evaluate load path optimization, durability, and ease of installation for each hybrid approach to ensure it meets your project’s needs.
If your site is constrained or budget is limited, consider hybrid approaches to maximize efficiency. However, do not overlook long-term durability and maintenance implications; design for decommissioning if necessary.
Conclusion
Choosing a footing option comes down to matching the load, site conditions, and long-term durability to your deck or shed plans, then following a careful installation routine that protects against movement and moisture damage. When you align footing type with the site, you improve safety, appearance, and years of trouble-free use.
Plan ahead with a simple, practical checklist in plain language: confirm local codes and site constraints, determine the expected load and frost considerations, pick a footing type that fits the site and your tools, assemble materials and inspect already-installed elements, then follow the installation steps for the chosen method, finish with proper backfill and surface drainage, and set a routine for inspection and maintenance after completion. Throughout, make small tests in a hidden area first and respect curing and backfill guidance to avoid costly mistakes.
Common mistakes to avoid include underestimating load or disturbance when excavating, neglecting frost depth or proper embedment, skipping or rushing the curing stage, and failing to provide adequate drainage or backfill support. Safety rules to follow are clear: wear PPE, locate utilities before digging, keep children and pets away from the work zone, and stop if soil or footing movement is evident and assess before proceeding. If you encounter uncertain soil conditions, conflicting codes, or complex loads, pause and seek guidance rather than pushing ahead.
If the site or project feels beyond your comfort level—especially with uneven ground, poor drainage, or structural connections—consider professional help rather than continuing alone. A professional can confirm loads, depth, and connections, and ensure compliance with local rules. With careful planning, proper checks, and measured steps, you’ll achieve a solid, durable base that supports your structure safely for years to come.
FAQ
What are the main types of concrete footings for decks and sheds, and how do they differ in use?
Footing options include tubes, pads, and pier blocks. Tubes are hollow cylinders poured in place to transfer load below grade, pads are flat concrete bases placed on or below grade, and pier blocks are precast units that sit on the ground and support the structure above. Selection depends on soil conditions, climate, and the weight of the structure.
What is involved in the installation process for each footing option?
Tubes require forming and pouring concrete into a drilled or formed hole, with careful alignment and cure time. Pads involve forming a level, compacted base and pouring a flat slab or footing pad. Pier blocks are placed on a prepared base and require correct placement and leveling. Always follow manufacturer instructions and local guidance for each option.
What are typical material requirements and rough cost considerations to plan for?
Material needs include the footing form or mold, concrete, and reinforcement as applicable. Costs vary with footing type, site prep, and local material prices. Check product labeling, supplier guidance, and local rules to estimate quantities and compatibility with your project.
How do climate, environmental impact, and safety influence footing choices?
Soil moisture, frost depth, and temperature can affect performance and selection. Consider environmental impact by choosing durable materials and proper drainage. Follow safety guidelines for excavation, handling concrete, and tool use, and refer to manufacturer instructions and local regulations for specifics.