
Introduction
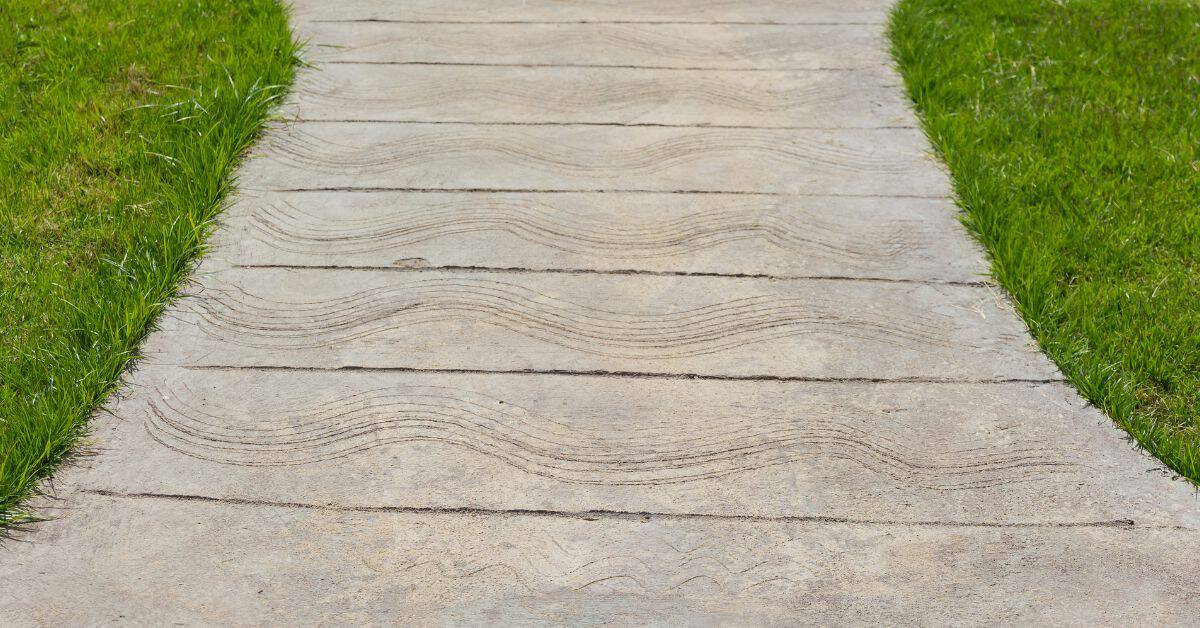
A broom finish on concrete is a textured surface created by dragging a broom across the surface while it’s setting. It adds traction and a subtle pattern, and the exact look depends on the broom type and when you run it. Check the manufacturer’s instructions and local rules for timing and technique, and choose a broom that fits the texture you want.
Techniques vary, but the basic idea is to firm the surface and then brush in one direction for consistent texture. Timing matters—brush after the slab has stiffened enough to hold the pattern but before it hardens fully. Different broom styles leave different marks, so test on a small area and verify from the label or manufacturer for safe options and what to avoid.
Key takeaways
- A broom finish creates linear texture; choose stiff or soft broom accordingly.
- Apply during the early plastic stage, with consistent passes across slabs.
- Timing matters: fatigue of concrete surface affects texture; avoid over-troweling.
- Different broom types yield different textures; test on scrap to choose.
- Inspect for tear-out after curing: inspect edges, joints, and high-traffic paths.
- Wear gloves, eye protection, and keep moisture management to prevent dust.
Table of Contents
- Introduction
- Key takeaways
- What Is a Broom Finish?
- How to Apply a Broom Finish (Step-by-Step)
- Timing and Environmental Conditions
- Texture Options: Light Vs Heavy and Broom Types
- Common Mistakes and How to Avoid Tear-Out
- Surface Preparation: When and How to Remove a Broom Finish
- Flooring Compatibility, Adhesion and Material Specs
- Alternatives to Broom Finish for Long-Term Performance
- Conclusion
- FAQ
What Is a Broom Finish?
A broom finish is a textured concrete surface created by sweeping a broom across a freshly finished slab. The texture differs from a smooth trowel finish, a steel-troweled surface, or an exposed aggregate look. It’s all about leaving shallow grooves that catch the light and provide traction.
The texture is shaped by timing and broom choice. Timing matters so the surface holds the groove without tearing; broom stiffness and weave influence the depth and pattern. The result is a surface with better porosity and grip, suited to walkways, patios, and garages, while weather and maintenance shape how it wears over time. While it can resemble other textures, broomed surfaces emphasize practicality and maintenance considerations for long-term use.
Definition and purpose
A broom finish is created by dragging a stiff-bristled broom over fresh, troweled concrete. This action creates grooves that provide slip resistance and improve traction.
The primary purpose of a broom finish is to enhance safety by reducing the risk of slips and falls, especially in areas prone to moisture or ice.
It’s important to note that this finish differs from smooth (trowel-finished) concrete, which has a more uniform surface with little texture. Unlike exposed aggregate finishes, a broom finish doesn’t reveal the aggregate beneath the surface.
Typical applications
A broom finish is commonly used in exterior, exposed-aggregate areas where traction and slip resistance are crucial. These include:
Sidewalks: To prevent slips on wet surfaces.
Driveways: For better grip when driving in or out, especially in wet conditions.
Patios: To provide a safe surface for outdoor activities and furniture movement.
How to Apply a Broom Finish (Step-by-Step)
Start with a clean, properly prepared slab and address control joints before you finish. After the final pass, plan the broom timing to avoid drag marks or tearing. Coordinate edge work so the brooming doesn’t pull away from form edges.
Choose a broom with the right stiffness and handle grip, and decide on a consistent stroke direction. Apply steady, even pressure and avoid overworking the same spot. Align brooming with joint spacing and any adjacent pours for a uniform texture throughout the area.
Step-by-Step Procedure
The following steps ensure a smooth, textured finish on your concrete slab.
- Check surface: Inspect the final slab surface for any imperfections before proceeding. Why: To avoid embedding issues in the wet concrete.
- Control joints: Cut control joints at the required spacing to control cracking. Why: Prevents random cracks and maintains structural integrity.
- Wait for right time: Allow concrete to set slightly before brooming, usually 2-4 hours after final pass. Why: Brooming too early can cause tear-out; too late may result in a smooth finish.
- Broom timing: Broom when the surface is no longer sticky but still damp. Why: Achieves optimal texture and prevents tear-out.
- Cure properly: Apply curing compound or wet burlap immediately after brooming. Why: Prevents moisture loss, maintains strength, and enhances durability.
Stroke Technique and Pattern
A consistent stroke technique is key to achieving an even broom finish. Here’s how:
Use a stiff-bristled broom: A stiffer broom provides better control over the texture.
Apply steady pressure: Maintain consistent pressure throughout each stroke for uniform depth.
Stroke direction: For parallel strokes, hold the broom at a 45-degree angle to the slab’s edge. For crosshatching, change direction by 90 degrees on subsequent passes.
Visual Checkpoints During Application
Use this checklist while brooming to ensure an even texture and catch any issues early.
- Broom marks: Check for consistent, evenly spaced broom marks. Why: Inconsistencies indicate varying pressure or stroke length.
- Tear-out: Look for areas where the surface is torn or pulled up. Why: Tear-out indicates brooming too early or using excessive pressure.
- Edges: Ensure edges are properly finished without tear-out or drag marks. Why: Edges often require extra attention to avoid defects.
- High-traffic areas: Check for uniform texture in high-use zones. Why: These areas need consistent texture to prevent premature wear.
Quick rule: If you see inconsistencies, recheck your stroke technique and pressure before continuing.
Timing and Environmental Conditions
Timing is critical because the broom needs to interact with the surface as it sets, not when it has fully set. Delays can dull the texture or cause tearing near joints. Rushing the broom can also leave irregular marks or loose fibers in the surface.
Weather and environment influence evaporation, cure speed, and feasibility of a broom finish. Temperature, humidity, wind, and sun exposure all play a role in how deep or shallow the grooves end up. Readiness signals include color change, surface feel, and the absence of excessive bleed water, plus a light tack when touched in a test spot.
Weather and mix considerations
Temperature, humidity, and admixtures play a big role in how fast your concrete sets. Here’s what you need to know:
Heat speeds up setting time. In hot weather, the concrete might set too quickly for a good broom finish. Use retarders to slow it down.
Cold and high humidity slow things down. You might need to use accelerators to get that slab ready on time. Keep an eye on the forecast, and adjust your mix accordingly.
Indicators the slab is ready to broom
Instead of relying on a clock, look for these signs that your slab is ready:
The surface should have a slight sheen. This means bleed water has mostly evaporated. The slab should feel firm, but still slightly plastic.
Try the snap test: Snap your fingers over the surface. If it sounds solid, you’re good to go. If it’s still mushy, wait a bit longer.
Adjusting for slab thickness and sun/wind exposure
Thicker slabs take longer to set. Monitor different areas of your pour. Start brooming from the thickest parts, moving towards thinner ones.
Sun and wind can dry out your slab too quickly. On hot, windy days, use curing methods like plastic sheeting or sprinklers to keep moisture in. In the shade, you might need more time.
Adjust your manpower and sequence accordingly. It’s better to broom a small area well than rush through a big one poorly.
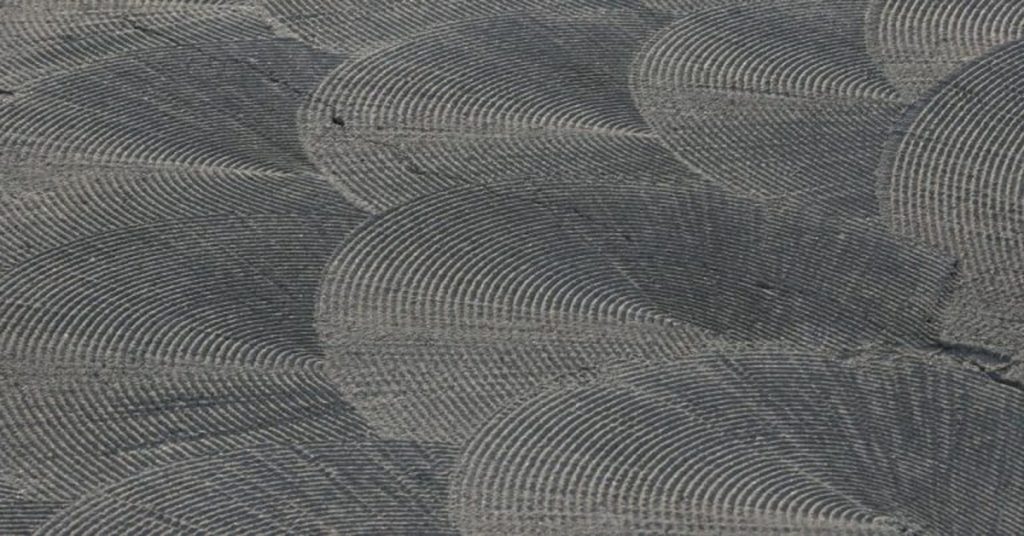
Texture Options: Light Vs Heavy and Broom Types
Light and heavy broom textures serve different purposes. Lighter textures work well for overlays and a smoother appearance, while heavier textures prioritize slip resistance in high-traffic or exterior areas. Consider how each texture will interact with future floor coverings.
Bristle types and broom sizes change groove depth and leave patterns. Natural and synthetic bristles, along with spacing and diameter, shape how deep the grooves go. Texture depth evolves with curing and affects adhesion and compatibility with any subsequent flooring or coatings.
Light vs heavy broom finish
A light broom finish gives a subtle texture, ideal for seamless overlays and interior floors. It’s less slip-resistant but offers a smooth appearance.
A heavy broom finish creates pronounced grooves, providing better traction for exterior surfaces and high-traffic areas. It’s more durable but can show imperfections in the slab.
The choice between light and heavy depends on your project’s needs: prioritize aesthetics or durability?
Broom materials and profiles
Choosing the right broom material ensures a consistent, long-lasting finish.
- Synthetic bristles: Durable, resistant to weathering and chemicals. Look for UV-stabilized bristles for outdoor use. Avoid over-aggressive brooming to prevent substrate damage.
- Natural bristles: Softer, offer a more traditional finish. Not suitable for heavy-duty applications or exterior use due to weathering concerns.
- Bristle spacing: Tighter spacing creates finer grooves, ideal for interior floors and overlays. Wider spacing gives deeper grooves for better traction.
- Bristle width: Narrower bristles create shallower, more uniform grooves. Wider bristles give deeper, more pronounced grooves.
- Bristle stiffness: Stiffer bristles create deeper, more defined grooves. Softer bristles give a lighter, subtler texture.
Visual checkpoints for acceptable texture
Use this checklist once you’ve finished brooming to ensure your texture is uniform and within expected roughness.
- Groove depth: Check grooves are consistent and match the desired finish (light or heavy).
- Groove spacing: Ensure grooves are evenly spaced across the slab.
- Broom marks: Verify broom marks are consistent and parallel.
- Surface appearance: Check for any missed spots, over-worked areas, or tear-outs.
- Edges: Ensure edges have a consistent texture.
- Color variation: Look for any discoloration that could indicate improper curing or contamination.
- Cracking: Inspect for hairline cracks that may worsen with further curing.
- Moisture content: Check the slab’s moisture level to ensure it’s within acceptable limits for your planned flooring product.
Quick rule: If in doubt, step back and assess from a distance. Up-close inspection can miss inconsistencies.
Common Mistakes and How to Avoid Tear-Out
The main drivers of tear-out are improper timing, excessive downward pressure, and overworking the surface. Each factor manifests as torn fibers, gouges, or a dull, uneven texture. Recognizing these signs early helps you adjust on the fly.
Correct timing and surface conditions matter: check the bleed-out, moisture content, and test a small area before full brooming. Tool choice and technique matter too: select the right broom, maintain consistent pressure, and avoid back-and-forth passes over the same spot. Edge and detail work require extra care to keep a uniform texture at borders.
Causes of tear-out
Tear-out happens when the concrete surface is too weak to handle brooming. Here’s what causes it:
Brooming too early (too wet): If you broom before the slab has set enough, the surface will be too soft and tear apart.
Brooming too late (too dry): Waiting too long to broom can cause the surface to harden unevenly. This makes it difficult to achieve a consistent texture and can lead to tear-out.
Dragging debris: If you drag debris or other objects across the surface while brooming, they can gouge the concrete and cause tear-out.
Application techniques to prevent tear-out
Preventing tear-out starts with the right technique:
Timing is key: Broom when the slab has bled enough but is still soft. This usually happens around 2-4 hours after pouring, depending on weather and mix.
Control broom pressure: Apply even, gentle pressure. Too much pressure can cause tear-out, while too little won’t leave a texture.
Coordinate your crew: If you’re working with a team, make sure everyone starts at the same time and works in sync to avoid overworking any section of the slab.
On-the-spot remedies for partial tear-out
If you notice tear-out happening, act fast:
Ease pressure: If the surface is tearing, lighten your touch. It’s better to leave a lighter texture than to damage the slab.
Slow down passes: Take slower, more deliberate strokes. This gives the concrete time to recover and reduces the risk of further tear-out.
Re-break the surface (if necessary): If the damage is minor, you can try lightly re-floating the area with a magnesium float or trowel. But be careful not to overwork it.
If tear-out is extensive, stop and reassess: Continuing may cause more damage. It’s better to stop, let the concrete set further, and then try again.
Surface Preparation: When and How to Remove a Broom Finish
Decide to remove a broom finish when coatings or overlays demand a different bonding profile. The goal is to achieve a surface with proper porosity and minimal laitance for reliable adhesion. If in doubt, verify with the coating or overlay supplier what surface profile is required.
Identify the target surface profile and prep standards, and assess how each broom variant affects removal. Compare methods like grinding, shot blasting, and scarifying, noting their impact on edges and substrate. After removal, prepare the surface by cleaning, laitance removal, and protecting adjacent areas, while using proper safety and dust controls.
Removal methods compared
When it’s time to remove a broom finish, you’ve got options. Each method has its pros and cons, so let’s dive into them.
Grinding: Fast and efficient, grinding creates a fine powdery dust that can be a nuisance. It’s great for small areas but might not be the best choice for wide-open spaces.
Shot Blasting: Effective on large surfaces, shot blasting uses high-velocity particles to remove the broom finish. It can loosen aggregates, so it’s important to follow up with a vacuum or proper cleaning.
Scarifying: This is an aggressive method that digs deep into the concrete. It’s great for heavy broom finishes but carries a higher risk of damaging the surface if not done carefully.
Visual and test checkpoints for proper prep
Before you start applying coatings or overlays, make sure your surface is ready. Here’s a quick checklist to run through.
- Surface Appearance: The surface should look clean and free of contaminants. Any broom marks left behind could cause issues later on.
- Moisture Testing: Concrete needs to be dry before applying any coatings. Use a moisture meter to ensure it’s below 4%.
- Pull-Off Adhesion Test: This test ensures the surface can bond with the new material. If it fails, you might need to re-evaluate your removal process.
- Profile Check: The surface should have a measurable profile (CSP or ICRI) that matches what’s required for your overlay or sealer. Too smooth or too rough can cause bonding issues.
- Laitance Removal: Laitance is the weak, cement-rich layer on top of concrete. It needs to be removed for proper bonding.
- Edge Preparation: Corners and edges often get overlooked but are crucial for a successful application. Make sure they’re properly prepared.
- Contamination Check: Ensure there’s no dirt, grease, or other contaminants on the surface that could interfere with bonding.
- Test Patch: Apply a small test patch of your overlay or sealer to ensure it bonds well. If it doesn’t, you might need to adjust your removal process or wait for the concrete to cure more.
Quick rule: Always follow up with a thorough cleaning after any removal method to ensure a dust-free surface ready for bonding.
Cost and time implications of removal
Removing a broom finish isn’t just about the labor. It adds downtime, potential repairs, and extra costs. Here’s what to consider.
Labor: Each method comes with its own labor cost. Grinding might be faster but creates more dust, while shot blasting can take longer but covers wider areas.
Downtime: The time your surface is out of commission adds up. Plan for this in your project timeline to avoid delays.
Repairs and Rework: If the removal process damages the surface or fails to create an acceptable profile, you’ll need to do repairs or rework. This adds more labor, materials, and time to your project.
Planning Ahead: To minimize these implications, plan ahead. Know what removal method works best for your finish, schedule the work during a suitable weather window, and have any necessary repairs or follow-up work ready to go as soon as the surface is prepared.
Flooring Compatibility, Adhesion and Material Specs
Broom finish alters surface profile and porosity, which in turn influences how coatings and overlays adhere. These factors guide what products will bond best and how long a surface should cure before coating. For reliable results, check with manufacturers about required surface conditions.
Verify key specs such as recommended surface profiles, broom texture depth, and acceptable porosity ranges. Use adhesion tests and monitor moisture to gauge compatibility. Document any supplier recommendations and keep notes or spec sheets for reference during installation and future maintenance.
Coating and Overlay Compatibility
A broom finish can affect how coatings, overlays, and adhesives adhere to your concrete surface. Some systems may require you to remove the texture before application.
For instance, thin, self-leveling overlays typically need a smooth surface for proper adhesion. Removing the broom finish is usually necessary in these cases.
On the other hand, heavy-duty toppings or cementitious overlays might tolerate light texture. However, always check with your product supplier to be sure.
Remember, even if a system can tolerate some texture, it’s crucial to ensure the broom finish is clean and free of contaminants for optimal adhesion.
Adhesion Testing and Standards
Before applying any coating or overlay, perform adhesion tests to ensure your broom finish will hold the new system securely.
Start with a solvent wipe test. This helps identify contaminants that could hinder adhesion. If it passes, move on to more rigorous tests like the cross-hatch or pull-off tests.
Follow manufacturer or industry standard protocols for acceptance criteria. For instance, ASTM D4541 is a common standard for pull-off testing.
Always document your test results and keep records on file.
Moisture, Contaminants, and Substrate Checks
Before installing any floor system, verify key substrate conditions to ensure a successful application.
First, check for moisture. Excessive moisture can cause delamination or even damage your new system. Use a moisture meter to test the slab’s relative humidity (RH) or moisture content.
Next, look out for laitance, a weak, cement-rich layer that can form on the surface during concrete placement. Remove it if present.
Also, ensure any curing compounds have been removed and the slab is clean. Contaminants like curing agents or laitance can prevent proper adhesion of your new system.
Alternatives to Broom Finish for Long-Term Performance
When long-term performance matters, weigh traffic, exposure, and maintenance needs against the appearance you want. Broom finishes are one option, but other approaches may suit your project better. Consider how each choice ages and what upkeep it requires.
Durable alternatives include broom-overlay mixes, resinous coverings, polished concrete, and bonded overlays. Each option has its own installation context and resilience traits. Use a practical decision framework to map options to your space, then plan maintenance, resealing, and potential upgrades in future projects.
Broom-overlay mixes and traffic-rated overlays
When a broom finish isn’t cutting it, consider overlay options. These mimic the texture while boosting strength.
Broom-overlay mixes are cement-based toppings with added aggregates for extra durability. They’re applied over existing concrete and textured with a broom to match your original finish.
For high-traffic areas, traffic-rated overlays are the way to go. These are designed to withstand heavy foot or vehicle traffic. They come in various textures, including broom finishes.
Resinous systems and polished concrete
For long-term durability, consider resinous coatings or polishing your concrete.
Resinous systems are seamless, durable, and resistant to chemicals. They’re great for garages, workshops, or commercial spaces with heavy equipment. They can be textured to mimic a broom finish.
Polished concrete is another option. It’s low-maintenance, easy to clean, and offers a modern aesthetic. It’s ideal for indoor spaces like showrooms, offices, or high-end residential areas.
Decision factors for choosing an alternative
Choosing the right alternative depends on your project’s needs. Here are key selection criteria:
Expected Traffic: High-traffic areas need durable, wear-resistant options like traffic-rated overlays or resinous systems.
Chemical Exposure: If your concrete will face chemical exposure (like in a garage), opt for resinous systems that offer excellent resistance.
Desired Appearance and Lifecycle Cost: Consider the look you want and how much maintenance you’re willing to do. Polished concrete offers a sleek, modern look with low maintenance, while overlays can mimic broom finishes and are relatively affordable.
Conclusion
Finish with confidence by locking in a broom texture that fits your surface and sealer goals, and by keeping safety and durability at the top of every step. A good broom finish is plain to see, and it should hold up under foot traffic without tearing out or delaminating.
Do this next: verify the concrete is cured and dry, choose the right broom type and texture for your space, test a small area first, apply with steady, even passes in the chosen direction, check adhesion with a simple swipe test for sheen and lift, and monitor temperature and humidity to avoid timing mistakes that invite creep or tear-out. If you are removing or changing an existing finish, prep cleanly, remove adequately, and re-test adhesion on a small patch before broad application. When in doubt, pause and re-check the surface, then proceed in small, controlled stages to protect against costly missteps.
Common mistakes to avoid are rushing the timing, using a broom that’s too stiff for the surface, or trying to over-texture a shallow slab. Always wear eye and respiratory protection, work in good lighting, and keep dust down with a vac or damp wipe between passes. If the slab feels damp, cool, or sticky, hold off and revisit the plan; if the substrate isn’t compatible with the finish, or you’re unsure about adhesion specs, call in a pro. Stay patient, follow the checks, and you’ll land a durable, attractive broom finish that won’t bite you later. You’ve got this.
FAQ
How do broom types affect texture and final look?
Different brooms leave different groove patterns and depths. A softer, finer broom gives a lighter texture; a stiff broom cuts deeper. Check the broom label and test on a small area before committing.
When should you apply the broom during finishing?
Apply the broom after the gravel set and bleed water look has started to form, but before the surface stiffens too much. Work quickly and maintain a steady pace so the texture stays even. If unsure, check manufacturer instructions or local guidance for timing windows.
What are common failures with broom finishes and how can I avoid them?
Common issues are drag marks, uneven texture, and tearing the surface. Keep a light touch, sweep in consistent passes, and keep the surface clean of debris. If you see trouble starting, pause and re-check surface moisture and broom condition.
How can I prep the slab to prevent broom finish issues?
Make sure the surface is clean and free of laitance, fill any voids, and verify moisture content is appropriate. Remove curing compounds unless you’re set on a specific finish, and consider damp-curing after finishing to reduce surface cracks. Always follow product labels and local rules for prep steps.