
Introduction
Cleaning soot on fireplaces means removing soot and smoke marks without harming the surface.
Use non-etching cleaners and test on a hidden spot first, then work in gentle, small sections. Avoid abrasive scrubbers and harsh acids; follow label instructions and local rules.
To avoid streaks, wipe from top to bottom and use a clean, damp cloth, then buff with a dry one. Rinse the area with minimal moisture and dry promptly to prevent running or spotting. If any residue remains, re-clean a small area and check the product label for any cautions.
Key takeaways
- Check product labels for “non-etching” and “suitable for masonry” claims.
- Always test cleaners on an inconspicuous area before full application.
- Use non-abrasive applicators to avoid streaks and surface damage during cleaning.
- Match cleaner to surface type per manufacturer instructions and label guidance.
- Wear eye protection and gloves; never mix cleaners or vent improperly.
- Rinse or wipe with clean water after use to prevent residues.
Table of Contents
- Introduction
- Key takeaways
- Quick Overview: Why Soot Is Tricky and Common Mistakes
- Identifying Fireplace Surfaces and Finishes
- Products That Won’t Etch: Safe Cleaner Types and Ingredients to Look for
- Matching Cleaners to Surfaces
- Tools and Materials Checklist
- Step-by-Step Cleaning Techniques to Avoid Streaks
- How to Test Products Safely (Spot Testing and Visual Checkpoints)
- Maintenance, Prevention, and Troubleshooting
- Conclusion
- FAQ
Quick Overview: Why Soot Is Tricky and Common Mistakes
Soot sticks to almost every surface in different ways, so what works on brick may not work on metal or plaster. Some cleaners can etch or dull finishes if they’re too strong or used incorrectly. Common missteps include spraying too much, scrubbing aggressively, or skipping a test before a full clean.
Set expectations for care by understanding that soot needs gentle handling and surface-aware products. Look for guidance on labels, product data sheets, or manufacturer instructions to confirm compatibility. When in doubt, verify with the manufacturer or a local professional before proceeding.
What soot is and how it behaves
Soot is a fine, black powdery substance primarily composed of carbon. It’s produced when organic materials like wood or coal are burned incompletely.
Oil and creosote, byproducts of burning fuel oil or improperly seasoned wood, can also form soot. These are more viscous and stickier than regular soot, making them harder to remove.
Fine ash is another component of soot. It’s a light, flaky material that can easily be blown around or swept away but can still cause streaks if not properly cleaned.
Soot behaves differently on various surfaces: it bonds more tightly to non-porous surfaces like glass and metal, while porous surfaces like masonry absorb it, making it harder to remove.
Common cleaning mistakes that cause etching or streaks
To avoid damaging your fireplace and leaving unsightly marks, steer clear of these common pitfalls:
- Abrasive tools: Using steel wool, harsh brushes, or scouring pads can scratch surfaces.
- Wrong chemistry: Harsh chemicals like bleach or acid-based cleaners can damage some materials and leave streaks.
- Improper rinsing: Not thoroughly rinsing off cleaner can lead to residue buildup, causing streaks over time.
- Wet-dry vacuuming without proper setup: Using a wet-dry vac on surfaces not designed for it (like painted metal) can cause damage.
- Cleaning when surface is hot: Cleaning a recently used fireplace while the surfaces are still hot can cause warping or cracking.
Remember, prevention is key. Always test cleaners on a small, hidden area first and follow manufacturer’s guidelines for your specific surface material.
How surface material changes the approach
The material of your fireplace affects how you should clean it to avoid damage or streaks:
- Masonry (brick, stone): Use mild detergents and soft brushes. Avoid harsh chemicals that can break down mortar.
- Ceramic glass: Specify cleaners designed for glass. Avoid abrasive tools or harsh chemicals that can scratch or dull the surface.
- Painted metal: Use mild detergents and soft cloths. Avoid scrubbing too hard to prevent scratches or paint damage.
- Cast iron: Specify cleaners designed for cast iron. Avoid harsh chemicals that can cause rusting or pitting.
- Stainless steel: Use mild detergents and soft cloths. Avoid harsh chemicals, abrasive tools, or steel wool that can scratch the surface.
- Marble or granite (hearth): Specify cleaners designed for natural stone. Avoid acidic cleaners that can etch the surface.
Using the wrong cleaner or technique on a specific material can lead to cracking, staining, weakened bonds, or other damage. Always check your surface’s rating and follow recommended cleaning methods.
Identifying Fireplace Surfaces and Finishes
Visually identify the main materials you’ll be cleaning, such as brick, stone, metal, and painted surfaces. Feel for texture and note any coatings or sealants that may affect cleaner choice. A faded or chalky finish may need different care than a glossy surface.
Check for visual checkpoints like check for signs of mortar or plaster, paint sheen, or a clear sealant layer. Verify surface type by cross-referencing the manufacturer’s notes or a label on cleaning products you plan to use. If unsure, test on a hidden area first and consult the product instructions.
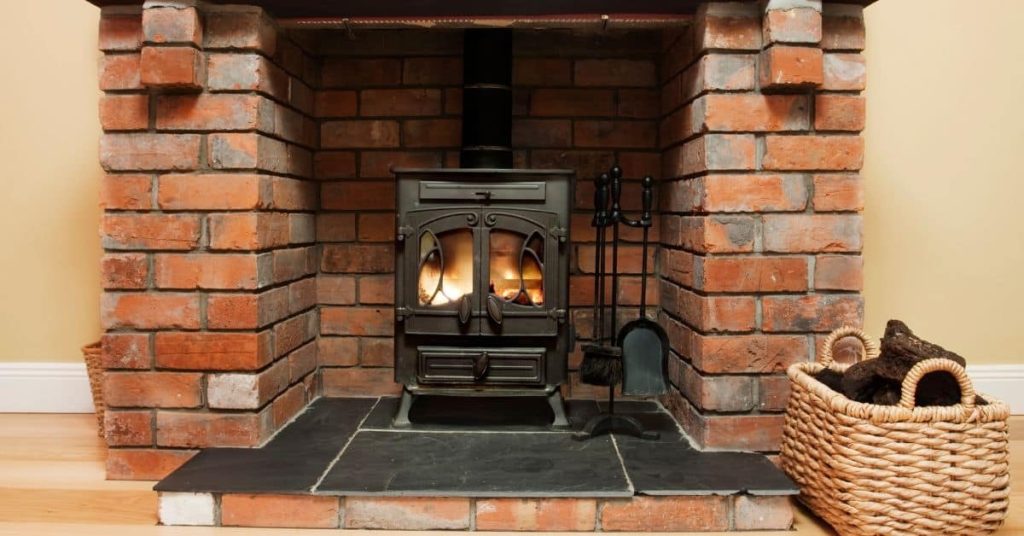
Masonry, brick, and stone
Masonry fireplaces are built from bricks, stones, or concrete blocks. You can spot them by their rough, textured surfaces. Stone fireplaces might have a smoother finish, but they’re still porous.
These materials absorb cleaners differently than smooth surfaces. They soak up liquids, which can lead to streaks if not dried properly. Be mindful of this when choosing your cleaning product and technique.
Pro tip: Always test a small, hidden area first to ensure the cleaner doesn’t discolor or damage the surface.
Glass (door panels and ceramic glass)
Fireplace glass can be regular glass or tempered/ceramic glass. Regular glass is smooth and clear, while ceramic glass has a slightly textured, frosted look.
Ceramic glass requires special care. It’s designed to withstand high heat but can still crack if cleaned with harsh chemicals or cold water when hot.
Pro tip: Never use abrasive cleaners or steel wool on any type of fireplace glass. Always let it cool before cleaning.
Metal, cast iron, and painted surfaces
Metal fireplaces can be bare metal or enameled. Cast iron is a type of metal with a unique finish that requires specific care. Painted surfaces need gentle cleaning to avoid damaging the paint.
Bare metal can tarnish if not dried properly after cleaning. Enameled and painted surfaces can chip or peel if scrubbed too hard. Always use cleaners designed for the specific finish.
Pro tip: For cast iron, use a cleaner specifically made for it to maintain the finish and prevent rust.
Products That Won’t Etch: Safe Cleaner Types and Ingredients to Look for
Choose cleaners described as non-abrasive and pH-balanced to reduce the risk of etching. Enzyme-based or specialty fireplace cleaners can be gentler on organic soot residues. Avoid products with harsh solvents on sensitive finishes unless the label specifically allows it.
Always check the manufacturer guidance, product label, or data sheet for surface compatibility. Look for ingredient types that are recommended for soot removal and avoid components listed as unsafe for your surface. If a label isn’t clear, seek alternatives or ask a store professional.
Mild Alkaline Cleaners and Soap-Based Solutions
Soot is a fine, oily residue that sticks to surfaces. Mild alkaline or soap-based cleaners work well on it without causing etching because they break down the oils and lift the soot off.
Why they’re appropriate: These cleaners are gentle enough for most fireplace surfaces like brick, stone, and glass. They won’t damage seals or finishes when used correctly.
However, be cautious with strong alkaline cleaners as they can strip away finishes if left on too long. Always rinse thoroughly after use.
Enzyme and Eco-Friendly Options
Enzyme-based or biodegradable cleaners break down organic residues like soot without harsh chemicals. They’re safer for you, your family, and the environment.
How they work: Enzymes ‘eat’ away at the soot, while eco-friendly cleaners use plant-derived surfactants to lift it off. Both are less likely to cause damage than harsh chemicals.
These cleaners are great for all-natural enthusiasts and those with sensitive noses. But they might not be as effective on heavily sooted surfaces or tough stains.
What to Avoid: Harsh Acids, Abrasives, and Strong Solvents
Certain cleaners can cause more harm than good. Here’s what to steer clear of:
- Harsh acids (like muriatic acid): These can eat away at mortar, grout, and metal finishes.
- Abrasives (like steel wool or harsh scrubbers): They scratch surfaces, removing protective layers and leaving streaks.
- Strong solvents (like paint thinner or acetone): These strip away finishes and can damage seals around fireplace doors.
- Highly alkaline cleaners: While mild alkalinity helps, strong alkaline cleaners can strip finishes if not rinsed off promptly.
Always check labels for warnings like ‘acidic’, ‘caustic’, or ‘abrasive’. If in doubt, choose a cleaner designed for fireplace soot removal.
Matching Cleaners to Surfaces
Lay out cleaners by surface type and note which ones are marked as safe for brick, stone, metal, or painted finishes. For each material, confirm on the label what is approved and what to avoid. If a cleaner doesn’t state compatibility with your specific surface, skip it and choose a clearly appropriate option.
Always perform a spot test first and follow any manufacturer instructions verbatim. Cross-check the product label, data sheet, or instructions from the manufacturer to ensure you’re applying the cleaner correctly. When in doubt, look for guidance from the cleaner’s technical resources.
Best choices for masonry and brick
For masonry and brick surfaces, you want a cleaner that’s tough on soot but gentle on the material itself. Non-etching degreasers are your best bet here.
These cleaners use mild surfactants to break down soot without damaging the porous structure of bricks or stones. Always spot-test first to ensure compatibility with your specific surface.
Gentle scrubbing is key. Use soft-bristled brushes or cloths, and avoid harsh scrub pads that can scratch or wear away the surface.
For heavy soot buildup, consider using poultices. These are thick, paste-like cleaners that sit on the surface to break down soot. They’re great for tough jobs but need time to work – usually several hours at least.
Best choices for glass doors
Glass fireplace doors can be tricky to clean. You want a cleaner that’s non-abrasive and specifically designed for glass, like specialty fireplace glass cleaners.
Abrasive pads or harsh chemicals can scratch the glass or damage any protective coatings. Stick with mild, soap-based solutions or ammonia-free glass cleaners.
Spray the cleaner onto a soft cloth or sponge, then gently wipe the soot away in circular motions. Buff dry with a clean, lint-free cloth for streak-free results.
Never use acidic cleaners like vinegar on glass doors. They can eat away at the protective coatings and cause damage over time.
Best choices for metal and painted finishes
Metal surfaces and painted or enameled finishes require a light touch. Look for cleaners specifically designed for these materials, often labeled as ‘metal polish’ or ‘enameled surface cleaner’.
These cleaners are formulated to remove soot without stripping paint or damaging the metal underneath. Always spot-test first to ensure compatibility.
Use non-scratching pads or soft cloths for cleaning. Harsh scrubbers can scratch painted surfaces and damage the finish on metals.
Beware of stripper-type chemicals. These are designed to remove paint or finishes, not clean soot. They can accidentally strip away your surface’s protective layer, leaving it vulnerable to further damage.
Tools and Materials Checklist
Gather non-damaging tools like soft brushes, microfiber cloths, and non-scratch pads. Have a spray bottle, clean water, and a dry absorbent towel ready. Include PPE such as gloves and eye protection for safe handling.
Inspect tools for wear before starting; replace frayed brushes or worn pads. Verify that mixing containers and test rags are clean and dry. If you’re unsure about a tool’s suitability, consult the product’s label or the manufacturer’s instructions.
Cleaning tools (brushes, sponges, microfiber, pads)
Before you start scrubbing, make sure you have the right tools to tackle soot without damaging your fireplace surfaces.
- Soft-bristle brush: Nylon or horsehair bristles are gentle on masonry and metal. Check for flexibility; stiff bristles can scratch.
- Non-abrasive pads: Microfiber or lambswool pads are safe for glass and painted surfaces. Avoid steel wool, which scratches easily.
- Natural sponges: Sea sponges or cellulose sponges are soft and won’t scratch. Check for any rough edges before use.
- Scrubbing pad: A non-scratch scrubber with a handle can help reach tight spots. Ensure it’s designed for non-abrasive cleaning.
- Toothbrush (optional): For detailed work on small surfaces or crevices, use a soft-bristle toothbrush.
- Avoid: Steel wool, scouring pads, and stiff-bristle brushes. They can scratch and damage surfaces.
Quick rule: Always check your tools before use to ensure they’re in good condition and won’t cause damage.
Protective equipment and coverings
Safeguard yourself, your fireplace, and nearby surfaces with the right protective gear and coverings.
- Gloves: Disposable or dishwashing gloves protect hands from chemicals. Check for a snug fit to prevent slipping.
- Eye protection: Safety glasses or goggles shield eyes from debris and splashes. Ensure they fit well and provide full coverage.
- Apron: A plastic or canvas apron protects clothing from soot and cleaner runoff. Check it covers your entire cleaning area.
- Drop cloths: Plastic or canvas drop cloths protect hearths and floors from drips and spills. Ensure they’re large enough to cover the entire work area.
- Mask (optional): A dust mask protects against airborne soot particles when dry sweeping or vacuuming. Check it fits securely around your nose and mouth.
Quick rule: Always wear appropriate PPE and use drop cloths to prevent damage from cleaner runoff.
Testing supplies and mixing containers
Before applying cleaners, test them on a small, hidden area first. Here’s what you’ll need:
- Cleaner labels: Clearly label your cleaning solutions to avoid confusion.
- Cotton swabs: Soft-tipped cotton swabs are ideal for applying cleaner to test areas.
- Clear observation cloth: A white or clear cloth helps you see the results of your test clearly. Check it’s clean and free from lint.
- Non-reactive containers: Plastic or glass containers are safe for mixing and diluting cleaners. Avoid metal containers, which can react with some chemicals.
- Timer (optional):strong> A timer helps you keep track of how long your cleaner has been on the surface during testing.
Quick rule: Always test cleaners on a small, hidden area first to ensure they won’t damage or discolor surfaces.
Step-by-Step Cleaning Techniques to Avoid Streaks
Follow a repeatable sequence: dry removal, applied cleaner, light scrubbing if needed, then thorough rinsing and drying. Use smooth, even motions and avoid circular scrubbing that can spread soot. Keep cleaners from pooling on porous materials to minimize moisture damage.
Control water exposure by applying cleaner to a cloth or brush rather than spraying liberally. Dry surfaces promptly with a clean towel or air-dry as recommended by the product guide. If you see streaks forming, pause and re-check the surface type and the cleaner’s compatibility.
Step-by-Step Cleaning Process
Follow this clear, numbered sequence to effectively clean your fireplace without streaks. It starts with preparation and safety checks, moves on to the main cleaning work, and ends with cleanup or final checks.
- Prepare your workspace: Lay down drop cloths and open windows for ventilation.
- Safety first: Turn off power to the fireplace, if applicable. Remove any grates or screens.
- Main cleaning: Follow the steps below to clean the fireplace itself.
- Final checks: Inspect your work and touch up any missed spots.
- Cleanup: Dispose of waste properly and store tools for next time.
Dry cleaning and soot removal first
Start by removing loose ash and soot to minimize airborne dust. Use a HEPA vacuum, if available, to capture fine particles.
Gently knock the fireplace with a soft brush or broom to dislodge any stuck-on soot. Be careful not to damage the surface.
Use a dry, stiff-bristled brush to scrub away remaining loose soot. Work from top to bottom to prevent pushing dirt back onto clean areas.
Wet cleaning: dilution, application, and wiping technique
Mix your cleaner according to the product’s instructions. Start from the bottom or divide the fireplace into panels for systematic cleaning.
Apply the cleaner using a soft sponge or brush in overlapping strokes. Work your way up, ensuring each stroke overlaps the previous one by about 50%.
Wipe away the cleaner with a clean, damp microfiber cloth. Use a circular motion to minimize streaks and follow the direction of the grain if cleaning wood.
Final rinsing and drying to prevent streaks
Rinse the cleaned area with clean water using a damp sponge or cloth. Work from top to bottom, ensuring you remove all cleaner residue promptly.
Dry the surface immediately with a lint-free cloth or towel. This prevents water spots and ensures no streaks remain.
Inspect your work closely in natural light to ensure no missed spots or streaks. If necessary, repeat any steps until you’re satisfied with the results.
How to Test Products Safely (Spot Testing and Visual Checkpoints)
Start with a small, inconspicuous area and apply the product according to the label. Observe any changes in color, gloss, or texture. Note whether there is any etching or dulling after the test spot.
Record the results and wait as long as the label suggests to assess long-term effects. Keep a backup plan ready, such as a different cleaner or a professional option. If you see adverse changes, stop and verify the product’s guidance for your surface.
Step-by-Step Process
Before you start cleaning, follow this checklist to test products safely and avoid damage.
- Prepare the area: Clear the fireplace area. Lay down drop cloths or plastic sheets to protect floors.
- Gather supplies: Have your testing supplies, mixing containers, protective gear, and cleaning tools ready.
- Safety first: Put on gloves, goggles, and a mask. Ensure good ventilation.
- Choose an inconspicuous spot: Find a small, hidden area for your test patch.
- Mix the cleaner: Follow the product’s instructions to mix it with water in a separate container.
- Apply the cleaner: Apply a small amount of the mixture to the test spot using a sponge or brush.
- Wait and observe: Check for color change, dulling, or etching according to the spot-test method.
- Wipe off: If no adverse reactions occur, wipe off the cleaner with a damp cloth after the observation period.
- Document results: Note down the product’s performance and any observations.
- Final check: Inspect the test spot one more time before deciding to use the product on the entire fireplace.
Quick rule: If you’re unsure about a product, always err on the side of caution and don’t proceed with full cleaning until you’re confident it’s safe.
Spot-test method and observation time
Before applying any cleaner to your fireplace, follow this spot-test method to ensure it won’t damage the surface.
- Apply a small amount: Use just enough cleaner to cover about 1 square inch of the test area.
- Spread evenly: Gently spread the cleaner with a soft brush or sponge to ensure even coverage.
- Set a timer: Start a timer for the recommended observation time (usually 5-30 minutes).
- Observe color change: Check if the cleaner darkens, lightens, or changes the color of the surface.
- Check for dulling: Look for any loss of shine or gloss on the surface.
- Inspect for etching: Use a magnifying glass to check for any tiny pits, scratches, or frosty appearance that indicates etching.
- Wipe off: After the observation period, wipe off the cleaner with a damp cloth to see if the surface returns to its original state.
- Wait 24 hours: Recheck the test spot after 24 hours for any delayed reactions.
Quick rule: If you notice any adverse changes during or after the observation period, do not use that cleaner on your fireplace.
Visual checkpoints for etching vs residue
After cleaning, follow these visual checkpoints to ensure you’ve removed all residue and haven’t caused any permanent damage (etching).
- Check under different light: Inspect the fireplace in natural and artificial light from various angles to spot any remaining residue or haze.
- Feel for smoothness: Run your fingers over the surface to check for any rough patches that may indicate etching.
- Look for discoloration: Check if there are any dark spots, streaks, or changes in color that could signal etching or incomplete cleaning.
- Inspect edges and corners: Etching often starts at these areas. Check them closely for signs of damage.
- Compare to untouched areas: If possible, compare the cleaned area with an untouched part of the fireplace to ensure no discoloration or dulling has occurred.
Quick rule: If you find any signs of etching, stop cleaning immediately and consider calling a professional for further assessment.
When to stop and call a pro
Knowing when to seek professional help can save you time, money, and potential damage. Use this checklist to identify signs that you need expert assistance.
- Deep etching: If your cleaner has caused deep pits or significant loss of surface material, stop cleaning immediately and call a pro for restoration.
- Structural issues: If you notice cracks, crumbling, or other structural problems while cleaning, do not attempt to fix them yourself. Call a professional mason or fireplace specialist.
- Chemical damage: If the cleaner causes severe discoloration, dulling, or other adverse reactions, stop using it and consult a pro for advice on how to proceed.
- Unsure about surface type: If you’re unsure whether your fireplace is made of brick, stone, metal, or another material, consult a professional before cleaning to avoid potential damage.
- Professional-grade cleaners needed: If your fireplace has heavy soot buildup, stains, or other tough-to-remove residue, consider hiring a pro with specialized equipment and cleaners.
Quick rule: When in doubt, it’s always better to err on the side of caution and consult a professional before causing further damage.
Maintenance, Prevention, and Troubleshooting
Set a simple cleaning schedule that aligns with your burning habits to minimize buildup. Use proper fuel and avoid excessive burning that causes heavy soot pockets. Document any recurring issues to identify patterns.
For quick fixes, use the gentler options first and avoid aggressive scrubbing. If streaks persist or discoloration reappears, recheck surface type, cleaner compatibility, and whether a professional assessment is needed.
Routine maintenance and quick daily tips
Keep your fireplace clean with these simple habits. Remove ashes daily to prevent buildup. Once a week, give the firebox a light cleaning with a damp cloth or brush to remove any loose soot.
Airing out the firebox after each use helps prevent moisture and creosote buildup. Just open the damper and let fresh air circulate for about 15 minutes.
These regular, quick tasks will minimize heavy cleaning sessions and keep your fireplace looking good year-round.
Common problems and fixes (streaks, ghosting, etch marks)
Streaks: If you’re seeing streaks after cleaning, it’s likely due to residue not being fully wiped off. Go over the area again with a clean, damp cloth.
Ghosting: This happens when soot is removed but leaves a ‘ghost’ image behind. Try using a mild abrasive like baking soda on a damp sponge, then wipe and rinse.
Etch marks: If you suspect etching (chemical damage), stop cleaning immediately. Etching can’t be reversed. Call a professional for advice.
Always spot test first to check for any adverse reactions before applying a cleaner to the entire surface.
Long-term prevention: burning practices and fuel choices
Use seasoned wood. Green (unseasoned) wood creates more smoke and creosote. Make sure your wood has been dried for at least six months.
Maintain proper airflow. Ensure your chimney is clear of obstructions, and the damper is open when in use. Good airflow reduces creosote buildup.
Choose the right fuel. Hardwoods like oak and maple burn hotter and cleaner than softwoods or treated woods. Avoid burning trash, wrapping paper, or other debris that can create harmful byproducts.
Regularly inspect and clean your chimney to prevent creosote buildup and reduce the risk of chimney fires.
Conclusion
Cleaning soot without harming the hearth starts with keeping safety front and center and using cleaners that won’t etch or streak. Build a simple plan, test first, and move methodically from the most visible area to the center. Finishing with a careful maintenance routine will protect the finish and keep the look consistent for years.
Next steps: verify the surface type you’re cleaning, choose a non-etching cleaner aligned with that finish, perform a spot test in a hidden spot, and then proceed with the gentle cleaning steps in the recommended order. Keep the work area well ventilated, wear gloves, and wipe with clean, dry cloths as you go. If a cleaner doesn’t show a safe result in the test, stop and switch to another option or a safer method.
Common mistakes to avoid are using harsh cleaners or abrasive tools that can scratch or dull finishes, skipping the spot test, and rushing through the steps. Follow the safety rules: test first, work small sections, and never mix cleaners. If you ever see color changes, pitting, or persistent residue after multiple passes, step back and consider calling a professional rather than pushing ahead. With careful checks and steady technique, you’ll restore appearance without sacrificing safety or durability.
FAQ
What cleaners are safe for soot and won’t etch my surfaces?
Choose cleaners labeled as safe for fireplace surfaces and non-etching. Look for products that are pH-balanced or specifically noted as non-abrasive. Always test on an unseen spot first and follow the manufacturer’s instructions.
How do I avoid streaks when cleaning soot on brick, stone, or metal?
Work in small sections, apply the cleaner evenly, and wipe in one direction. Rinse with clean water as you go and dry with a microfiber cloth to prevent water spots and streaking. Don’t over-wet the surface and avoid rushing the drying step.
Can I clean soot with simple soap and water?
Soap and water can work on some surfaces, but it may not remove heavy soot or creosote efficiently. If you try it, rinse thoroughly and dry completely. Avoid harsh detergents or ammonia on sensitive surfaces unless the product label says it’s safe.
When should I stop and call a professional?
Stop if you see damage, heavy creosote buildup, or if cleaning causes discoloration. If the soot reappears quickly or you’re unsure about the surface type, check the product label or contact the manufacturer for guidance.