

Introduction
Cleaning concrete after fertilizer spills involves removing salts and stains while rinsing away residue. Fertilizers can leave mineral salts that pull water from the surface and leave pale or dark spots. This guide keeps it practical for DIY work and warns you to follow product labels and local rules.
Start by rinsing the area with plenty of clean water, then use a gentle cleaner if needed. Avoid harsh scrubs that could roughen the surface; test on a small patch first and follow the cleaner’s instructions. Always check the label for rinsing requirements and any safety tips before applying; if in doubt, consult the manufacturer or local rules.
Key takeaways
- Contain spills immediately with absorbent barriers to limit salt spread and staining.
- Rinse with plenty of clean water after partial cleanup to dilute residues safely.
- Wear gloves and eye protection; use non-metal tools to scrub safely.
- Identify staining sources: pigments, iron, or organic fertilizers for targeted treatment.
- Follow local rules for contaminated material disposal and runoff containment.
- Allow time for rinsing and drying before re-sealing or resurfacing if needed.
Table of Contents
- Introduction
- Key takeaways
- Why Fertilizer Spills Damage Concrete: Salts, Acidity, and Staining
- Immediate Response and Containment After a Spill
- Tools and Materials Checklist for DIY Cleanup
- Step-by-Step Cleanup for Salt Residues and Soluble Fertilizer Deposits
- Treating Stains from Pigments, Iron, and Organic Fertilizers
- Rinse Rules: Water Use, Pressure, and Runoff Management
- When Fertilizer Damage Persists: Etching, Pitting, and Surface Repair
- Safety, Disposal, and Local Rules for Contaminated Materials
- Conclusion
- FAQ
Why Fertilizer Spills Damage Concrete: Salts, Acidity, and Staining
Fertilizer spills bring salts to the surface, which can crystallize as the water evaporates and pull moisture from the concrete. This crystallization can create rough spots and micro-fissures that catch dirt. Pigment transfer from granules can leave stubborn stains as fibers and color migrate into the surface.
In addition, the chemical mix can react with the cement and additives, changing the surface chemistry over time. This may lead to a weakened finish and dull appearance if not addressed. The end result is a worn look and more porous concrete that accepts future spills more readily.
Salt deposition and efflorescence explained
When fertilizer spills onto concrete, soluble salts like nitrates and phosphates dissolve in the water. These salts then migrate through the concrete’s pores, seeking a way out.
As the water evaporates, either naturally or due to heat, the dissolved salts are left behind. They crystallize on or just under the surface of the concrete, forming powdery or flaky deposits known as efflorescence.
Efflorescence can cause a white, chalky appearance and may even lead to minor scaling if left untreated.
Chemical etching versus surface staining
Fertilizers can leave behind two types of damage: chemical etching and surface staining. Both are unwanted, but one is more permanent than the other.
Chemical etching occurs when acidic or alkaline ingredients in fertilizers react with the cement matrix itself, permanently damaging it. This results in a pitted, roughened surface that can’t be cleaned off.
On the other hand, surface staining is just that – discoloration on the concrete’s surface. While it looks bad, it doesn’t damage the concrete itself and can often be cleaned or sealed over.
Typical fertilizer ingredients and their likely effects
The active ingredients in fertilizers can vary, but they generally fall into a few categories. Knowing what’s in your fertilizer can help you anticipate how it might affect your concrete.
- Nitrogen (N): Commonly found in urea-based and ammonium-based fertilizers. Can cause efflorescence and surface staining if not rinsed off properly.
- Phosphorus (P): Often present as phosphates, which can also lead to efflorescence and chemical etching if left on concrete too long.
- Potassium (K): Usually found as potash or potassium chloride. Can cause surface staining and, in high concentrations, may even lead to cracking due to its salt content.
- Sulfur (S): Sometimes added for acid lovers like rhododendrons. It can cause chemical etching if left on concrete.
- Iron (Fe) and other micronutrients: Often added as pigments or to correct soil deficiencies. Can leave behind unsightly stains if not rinsed off.
Immediate Response and Containment After a Spill
Act quickly to limit absorption and spread. Contain the area with towels or absorbent material and keep it from entering drains or turf. Remove any movable items from the area to prevent tracking or contamination.
Next, protect yourself with gloves and eye protection, and ventilate the space if indoors. Take note of where the spill occurred so you can reference it when cleaning up. Do a quick check for running water paths that could carry contaminants away from the spill site.
First-minute actions to minimize damage
Act fast, but safely. Here’s what to do first:
Remove excess granules. Use a stiff-bristled broom or brush to sweep up any loose fertilizer pellets.
Dry puddles. If there are liquid spills, use rags or towels to soak up the moisture. Avoid spreading the spill with water; it’ll just make things worse.
Don’t scrub yet. Resist the urge to grab a brush and start scrubbing. Aggressive scrubbing can push the fertilizer deeper into the concrete’s pores, causing more damage.
Containment tactics to protect drains and landscaping
Prevent runoff from reaching sensitive areas with these quick containment methods:
Barriers. Use sandbags, plastic sheets, or even folded cardboard to create a barrier around the spill. This will help contain the fertilizer and prevent it from flowing into drains or garden beds.
Absorbents. Spread cat litter, sawdust, or other absorbents over the spill. These materials can soak up liquids and help solidify any remaining granules for easy cleanup.
Temporary dams. If you have a slope leading to a drain or garden, create a small dam using sandbags, stones, or even a rolled-up towel. This will give you time to clean up the spill before it flows downhill.
Tools and Materials Checklist for DIY Cleanup
Gather basic hand tools like brushes, scrapers, and a stiff broom, plus rags or shop towels. Wear protective gear such as gloves and eye protection, and have a bucket handy. Have safer cleaning options on hand and avoid harsher chemicals unless you verify their suitability.
Keep a supply of clean water for rinsing and a disposal bag or container for contaminated materials. Have a non-bleach cleaner labeled for concrete use, plus a neutralizing or rinse aid if advised by the product instructions. Always check labels and data sheets before mixing or applying cleaners.
Basic tools and personal protective equipment
Before you start cleaning, make sure you have these essentials to protect yourself and work efficiently.
- Stiff-bristle brush: For scrubbing the concrete surface. Soft bristles won’t cut through the stain.
- Plastic scraper: To remove any solid fertilizer residue before washing.
- Buckets (2): One for cleaning solution, one for rinsing.
- Gloves: Protect your hands from chemicals and rough surfaces. Choose rubber or nitrile gloves.
- Eye protection: Safety glasses or goggles to shield your eyes from splashes and debris.
- Kneepads (optional): For comfort when working on hard surfaces for extended periods.
- Old clothes: Wear something you don’t mind getting dirty. Fertilizer stains can be tough to remove.
- Safety cones or tape: To cordon off the work area and prevent accidents.
Quick rule: Always prioritize safety first. Don’t start cleaning without your protective gear.
Cleaning agents: safe household options and commercial choices
Choose the right cleaner for the job. Here’s a list of safe, effective options.
- Gentle detergent: Start with a mild dish soap or laundry detergent mixed with water. It’s gentle on hands and concrete.
- Alkaline cleaners (pH 8-13): These are effective against most fertilizer stains. Use them diluted according to package instructions.
- Poultice materials: For tough stains, consider using a homemade poultice with ingredients like baking soda, hydrogen peroxide, or even mayonnaise.
- Commercial cleaners: If home remedies don’t work, opt for commercial concrete cleaners. Follow package instructions carefully.
- Avoid strong acids: Unless you’re a professional and know what you’re doing, stay away from strong acids like muriatic acid or hydrochloric acid.
Quick rule: Start with the mildest cleaner that works. Save stronger chemicals for tough stains only.
Items to avoid or use with caution
Some cleaning methods and products can do more harm than good if not used properly.
- Strong acids (muriatic, hydrochloric): These can damage concrete if not diluted correctly. Always test on a small, hidden area first.
- Bleach: Bleach is harsh and can damage both your skin and the concrete surface. Use it sparingly and with proper protection.
- High-pressure washers: While they can speed up cleaning, high-pressure washers can also damage concrete if not used carefully. Keep the nozzle at least 12 inches away from the surface.
- Wire brushes or steel wool: These can scratch and damage the concrete surface, making it harder to clean in the future.
Quick rule: When in doubt, test first. Always follow safety guidelines when using harsh chemicals or equipment.
Step-by-Step Cleanup for Salt Residues and Soluble Fertilizer Deposits
Begin with a thorough dry sweep or light brushing to remove loose crystals. Work from the outside edge toward the center to minimize spreading. Avoid pushing residues deeper by scrubbing too aggressively into the surface.
Apply a mild cleaner following the product directions and scrub with a soft brush to lift soluble deposits. Rinse with clean water, ensuring runoff is controlled. Repeat as needed until residues are gone and the surface looks uniform.
Step-by-Step Cleaning Process
This sequence guides you through safely and effectively removing salt residues and soluble fertilizer deposits from your concrete.
- Prepare the area: Clear any debris, wear gloves, and put on safety glasses. Keep children and pets away.
- Dry removal (see next step): Use a stiff-bristled brush to dislodge loose crystals before wetting the surface.
- Wet rinsing (next step): Lightly mist the area with water, then use a soft-bristled brush to work in detergent and rinse thoroughly.
- Multiple rinses: Repeat the wet cleaning process at least three times to ensure all soluble salts are flushed out.
- Final check: Inspect the concrete for any remaining residue. If necessary, reapply the cleaning process or consult a professional.
Dry removal and brushing technique
Before introducing water, safely lift and collect loose salt crystals to prevent further spreading and damage.
Start by gently brushing the surface with a stiff-bristled broom or brush. Use downward strokes to dislodge crystals.
Collect the loosened salts using a dustpan or shovel, being careful not to grind them back into the concrete.
Inspect the area for any remaining loose crystals and repeat the process if necessary.
Wet rinsing and neutral washing approach
Gently clean the concrete with low-residue detergents to dissolve soluble salts, then rinse thoroughly to flush them out.
Lightly mist the area with water to pre-wet the surface. This helps prevent detergent residue from sticking to the concrete.
Apply a neutral-pH detergent (like dish soap or a commercial cleaner) using a soft-bristled brush, working in small sections. Be sure to avoid harsh chemicals that could damage the concrete.
Rinse thoroughly with clean water, using a hose or bucket. Repeat this process at least three times to ensure all soluble salts are removed.
Treating Stains from Pigments, Iron, and Organic Fertilizers
Start with the least aggressive options such as gentle cleaners and mechanical agitation for pigment stains. For iron-rich deposits, avoid acidic cleaners that could etch the surface and instead use products labeled for iron stains on concrete. Organic matter may respond to standard cleaners and gentle scrubbing before any stronger agents are considered.
If a stain persists, test a small hidden area first and adjust based on results. When in doubt, consult the product label or manufacturer instructions for concrete compatibility. Consider seeking professional advice for persistent or widespread staining.
Spot treatments and poultices for localized stains
For pigmented fertilizer stains, try spot treatments first. These are gentle yet effective.
Mix a thick paste of baking soda and water. Apply it to the stain. Let it sit for 15-20 minutes. The baking soda will draw out the pigment.
For tougher stains, use an oxidizer like hydrogen peroxide. Dilute it with water (3:1 ratio). Apply, let it soak, then scrub gently.
Handling metallic or rust-like stains
Iron-rich fertilizers can leave rust-like stains. Test different cleaners on a small area first to avoid damaging your concrete’s finish.
Start with vinegar. It’s mild and won’t harm most surfaces. Apply, let it soak, then scrub. If the stain persists, try a commercial rust remover.
Always follow safety instructions on product labels. Wear gloves and eye protection when using chemicals.
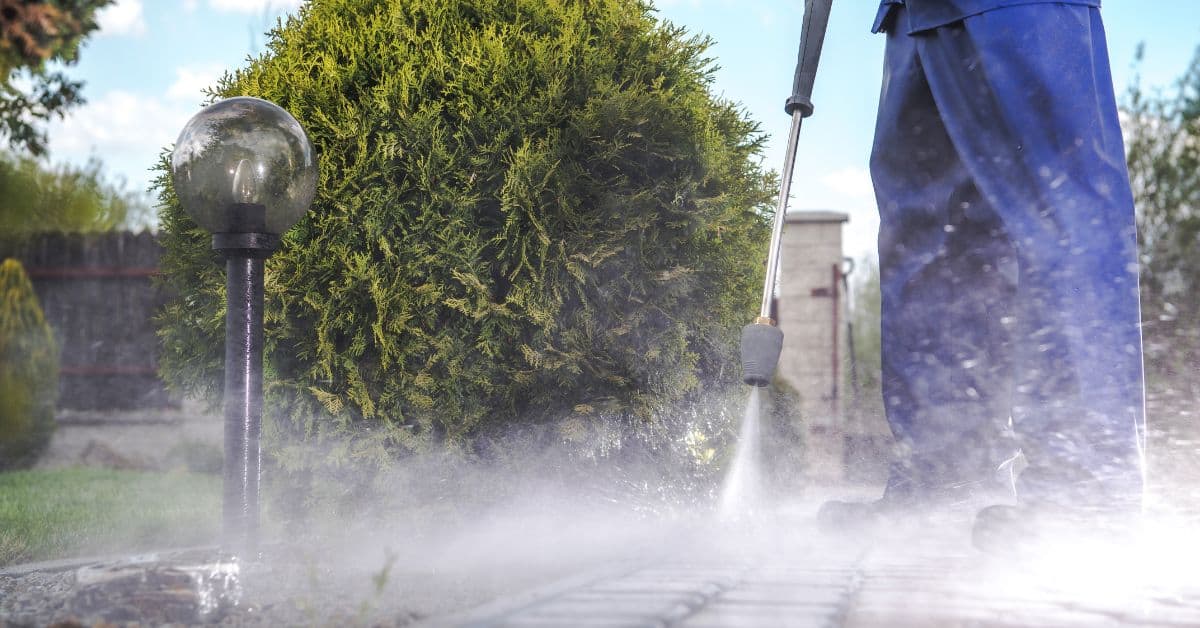
Rinse Rules: Water Use, Pressure, and Runoff Management
Rinse gradually, starting with light water flow to avoid splashing or driving contaminants deeper. Control runoff by directing water to containment or away from soil and plants. Verify that residues have been removed by a follow-up wipe or light scrub.
Use clean water for successive rinses and keep an eye on nearby surfaces that could be affected by splatter. Do not rely on a single rinse; repeated gentle rinses help ensure no cleaner or residue lingers. Always follow local guidelines for disposal and drainage.
Choosing between hose, nozzle, or pressure washer
Start with your garden hose and a standard nozzle for rinsing. This is gentle enough to avoid damaging the concrete’s surface.
If you need more power, try a low-pressure setting on a pressure washer. But be careful – high-pressure blasting can etch the concrete, making it look worn or pitted.
Always test your chosen method on a small, hidden area first to ensure it won’t harm your concrete.
Managing runoff and protecting the environment
Contain the rinse water using barriers like sandbags or absorbent materials. This stops it from flowing into drains or onto your lawn.
Capture the rinse water in a large container or use a pump to transfer it to a designated disposal area. Don’t let it soak into the ground, as this can contaminate soil and groundwater.
Never pour rinse water down storm drains or onto paved surfaces where it can flow into drains.
Signs that rinsing is complete
The most obvious sign is no visible residue left on the concrete. Wipe a damp cloth over the surface to check for any remaining deposits.
A successful rinse will leave the concrete feeling neutral – not slippery or soapy. If it feels different, you may need to rinse again.
Look out for recurring white deposits after rinsing. These could indicate that some residue is still present and needs further cleaning.
When Fertilizer Damage Persists: Etching, Pitting, and Surface Repair
Evaluate whether the surface shows deep etching or pitting beyond routine staining. If the concrete feels rough or hollow in spots, deeper repair may be needed. Patching or resurfacing options should be considered based on the damage extent.
Repair approaches can include surface patching, grinding to smooth irregularities, or applying a suitable sealer. If the damage seems widespread or structural, a professional assessment is warranted. Consider long-term protection strategies to minimize future spills.
Assessing the extent of surface damage
First, look at your concrete. If it’s just stained, you’re lucky. Stains can be cleaned off.
But if you see etching, that’s a sign of chemical damage. It looks like tiny craters or pits. Fertilizer salts have eaten away at the surface.
Check for pitting too. Pits are deeper than etches and can’t be buffed out. They need to be patched.
Feel your concrete. If it’s scaling, that means big chunks could flake off. That’s serious damage.
Repair and restoration options for etched or pitted concrete
For etching, you might be able to buff it out with a concrete polisher. But if it’s deep, you’ll need to grind it down.
For pits, you’ll have to patch them. Use a concrete patching compound and follow the instructions on the bag. It’s like icing a cake – spread it smooth and let it cure.
If your damage is bad, consider hiring a pro. They can grind down the surface, repair it, and resurface it. It’s a big job but it’ll last.
Remember, these repairs won’t be invisible. You might see lines where you patched or ground. That’s normal.
Sealer maintenance and reapplication guidance
After cleaning and repairing, check your sealer. If it’s peeling or flaking, it needs to go.
Before resealing, make sure there are no cleaner residues left. They can mess with the sealer’s bond.
Choose a sealer that’s compatible with your previous one. Check the label. Some sealers can’t be used together.
Apply the new sealer according to the instructions. It’s usually best to do it in two thin coats, letting it dry between each.
Safety, Disposal, and Local Rules for Contaminated Materials
Handle contaminated cloths, absorbents, and tools with care and place them in sealed bags for proper disposal. Personal safety gear should be used during all cleanup steps. Do not burn or dump rinse water where it can enter watercourses or drains.
Follow local disposal regulations for hazardous or contaminated materials and check for any required spill reporting. When in doubt, contact the local waste authority or a professional for guidance. Always verify instructions on product labels and data sheets before disposal or wastewater handling.
Personal protection and safe handling of chemicals
Safety first, mate. Always wear gloves when handling chemicals. They’ll protect your hands from harsh substances.
Eye protection is a must too. Fertilizer spills can cause irritation if they get in your eyes.
Make sure you’re working in a well-ventilated area. Some cleaning products give off fumes that can be harmful.
Always read the product label before use. It’ll tell you what PPE to wear and how to handle the chemical safely.
Proper disposal of rinse water and contaminated materials
How you dispose of your rinse water matters, mate. It’s not just about keeping your concrete clean.
- Storm drains: Never let runoff go into storm drains. They lead straight to local waterways, polluting them.
- Municipal guidelines: Check what your local council says. Some places have specific rules about disposing of rinse water.
- Neutralizing runoff: If you need to collect and dispose of runoff, make sure it’s neutralized first. This means its pH is back to normal.
- Contaminated materials: Don’t throw away cloths or absorbents that have come into contact with chemicals. They can still cause harm if not disposed of properly.
- Hazardous waste facilities: Some places have special facilities for hazardous waste. This is where you should take your contaminated materials.
When to notify authorities or hire environmental cleanup services
If a spill is big, don’t try to handle it alone. You might make the problem worse.
Contact your local environmental or waste authority. They can advise you on what to do next.
If runoff poses regulatory concerns, consider hiring licensed remediation services. They have the know-how and equipment to deal with large spills safely.
Don’t wait. The longer a spill sits, the more damage it can cause. Act quickly to minimize harm to your concrete and the environment.
Conclusion
Clean concrete after fertilizer spills with care to protect the surface, your safety, and the look of your area. The goal is to neutralize salts, prevent further staining, and avoid etching or pitting that costs you time and money.
First, check the area with a small test patch to see how the concrete responds to rinse water and cleaning steps. Then follow a simple sequence: contain the spill, sweep away loose material, apply the cleaning method you chose for salts and soluble deposits, rinse with the right amount of water, and monitor runoff. If you still see dull patches or color changes after rinsing, treat only the affected zones and avoid aggressive pressure or harsh products. Always follow local disposal rules and wear eye protection and gloves when handling cleaners and water spray.
Avoid these mistakes: using high-pressure water or strong acids on a fresh spill, mixing cleaners in ways not described for your products, and rushing through steps without testing first. Keep the work area well ventilated, protect nearby plants and surfaces, and work in small sections so you can see how the concrete responds. If you notice deep etching, visible pitting, or persistent staining after following the rinse rules, pause and reassess before proceeding with repair or professional help.
If the damage seems beyond quick cleanup—deep etching, pitting, or repeated staining despite correct rinsing—call a professional. A trained pro can assess the surface, suggest sealing or patching options, and prevent further harm. Stay practical, stay diligent, and you’ll keep the concrete durable and looking solid for the long haul.
FAQ
How can I tell if fertilizer salts caused etching or dulling after a spill?
Look for rough or peeled spots and a dull surface where the spill happened. If you’re unsure, don’t try aggressive cleaners. Check product labels or manufacturer instructions for guidance.
Can I use household cleaners to neutralize fertilizer salts on concrete?
Avoid strong acid cleaners. For light cleaning, use water with a mild detergent as directed on the label. If you’re uncertain, follow the cleaner’s instructions and local rules.
What is the safest rinse approach after cleaning fertilizer off concrete?
Rinse with clean water and avoid blasting with high-pressure streams that can worsen damage. Contain runoff if needed and dispose of wash water according to local rules and the product instructions.
How can I prevent fertilizer stains from reoccurring during cleanup?
Contain and remove dry residue right away, then rinse thoroughly with clean water. Once the surface is dry, consider sealing if appropriate for your surface, after checking sealing product guidelines.