
Table of Contents
- Table of Contents
- Introduction
- Understanding Diamond Grit Levels and Their Applications
- Step-by-Step Guide to Polishing with Diamond Tools
- Choosing the Right Diamond Tools for Your Polishing Project
- Budget-Friendly Options for DIY Enthusiasts
- Maintenance and Care for Diamond Tools
- Safety Precautions Specific to Using Diamond Tools
- Planning and Preparation Tips for Successful Polishing
- Common Mistakes in DIY Polishing and How to Avoid Them
- When to Seek Professional Help for DIY Polishing Projects
- Environmental Considerations and Disposal of Materials After Use
- Conclusion
- FAQ
- EDITOR NOTES – delete this block before publishing
Introduction
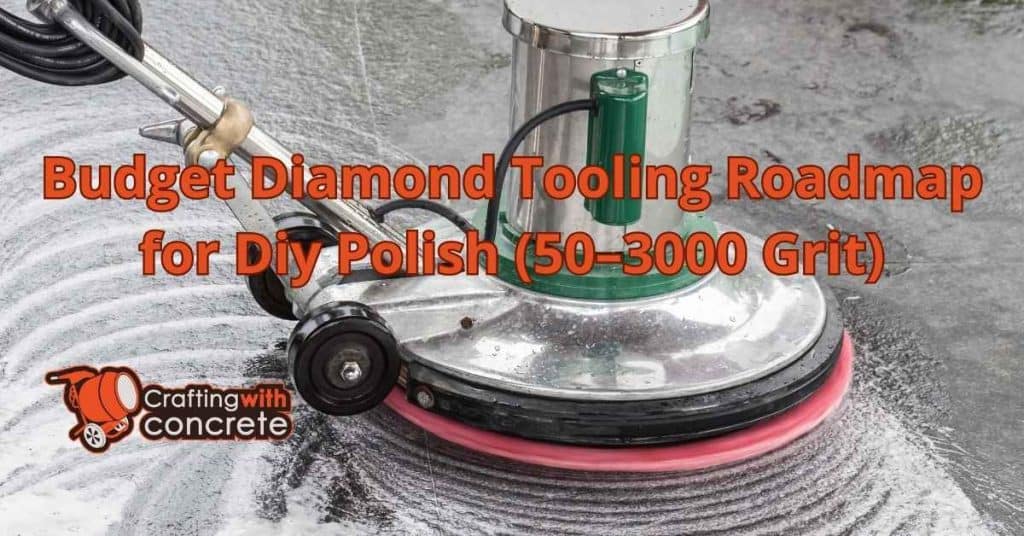
The best budget diamond tooling for DIY polishing ranges from 50 to 3000 grit, offering a comprehensive solution for achieving a smooth, professional finish. In this guide, you’ll discover cost-effective options and practical tips to help you tackle your next polishing project with confidence.
Understanding Diamond Grit Levels and Their Applications

Diamond grit levels are crucial in the polishing process, ranging from coarse 50 grit to fine 3000 grit. Lower grit levels, such as 50 to 200, are ideal for initial grinding and surface preparation, while intermediate grits like 400 to 800 smooth surfaces. Higher grit levels, from 1500 to 3000, achieve a polished, glossy finish.
Understanding the right diamond grit level is essential for achieving the desired finish on various materials. Selecting the appropriate grit ensures efficiency and quality, whether you’re working on stone, concrete, or other surfaces. This knowledge empowers DIY enthusiasts and professionals to make informed decisions, enhancing the quality of their projects.
Low Grit Levels (50–200)
When you’re starting a project that involves diamond grinding, you begin with low grit levels, typically between 50 and 200. These are your go-to for initial grinding and shaping. If you’re working with concrete or stone, this is where you remove the rough edges and get your surface ready for finer work. Think of it as the foundation of your grinding process.
Don’t rush this step. Low grit levels are aggressive, and they can take off a lot of material quickly. Make sure you’re checking your progress often to avoid over-grinding. It’s easier to take off more later than to fix a surface that’s been ground down too much. Use a steady hand and let the tool do the work.
Remember, the goal here is to create a uniform surface without deep scratches. If you see uneven spots, go over them again with the same grit until they’re smooth. Once you’re satisfied with the shape and feel, you can move on to higher grit levels for finer polishing. But don’t jump ahead too soon; proper preparation with low grits sets the stage for a quality finish.
Medium Grit Levels (400–800)
Medium grit levels, ranging from 400 to 800, are your go-to for smoothing and refining surfaces. After you’ve tackled the rough shaping with low grit levels, it’s time to bring in the medium grits. These grits help eliminate scratches left by coarser abrasives and start to give the surface a more polished look. If you’re working on concrete or stone, this is where the magic happens, transforming a rough finish into something much more refined.
When using medium grits, keep an eye on the surface. You want to ensure that the surface is consistently smooth without any deep scratches. If you see any, don’t rush. Go back over those areas until they’re even. This step is crucial before moving on to finer grits. Skipping or rushing through medium grits will leave you with a subpar finish that won’t impress anyone.
Always check your tools to make sure they’re in good condition. Worn-out pads or discs won’t do the job right and can even damage the surface. Replace them as needed to maintain efficiency. Remember, a little patience and attention to detail at this stage will save you headaches later on and ensure a professional-looking result.
High Grit Levels (1500–3000)
When you’re aiming for a polished, mirror-like finish, high grit levels between 1500 and 3000 are your go-to. These grits are perfect for the final stages of polishing, where the goal is to achieve a smooth, reflective surface. If you’re working on a countertop or a floor that needs to shine, this is where you want to be.
Before jumping to high grits, make sure you’ve properly worked through the lower and medium grits. Skipping these steps can lead to a less-than-perfect finish. High grits are not for removing deep scratches or imperfections; they are for refining the surface to perfection.
As you move to high grit levels, ensure your equipment is clean. Any leftover debris can scratch the surface, undoing all your hard work. Also, keep an eye on your technique. Consistent pressure and speed are key to avoiding streaks and achieving that flawless finish.
Step-by-Step Guide to Polishing with Diamond Tools
Polishing surfaces with diamond tools involves a systematic approach to achieve a flawless finish. Start by gathering your diamond tools and safety gear, ensuring the surface is clean and ready. Selecting the right grit levels is crucial, beginning with a coarse grit to remove imperfections and gradually moving to finer grits for a smooth finish.
Understanding the polishing process with diamond tools is essential for achieving professional results, whether you’re a DIY enthusiast or working on a jobsite. Proper technique, such as maintaining consistent pressure and movement, prevents uneven polishing and enhances the surface’s longevity. The final touches, including sealing, ensure the polished surface remains pristine over time.
Step-by-Step Layout Process
Let’s lay out a perfect rectangle using string lines and the 3-4-5 method. This will ensure your project starts with accurate dimensions and right angles.
- Drive the first stake into the ground at one corner of your intended rectangle.
- Measure the desired length of one side and place a second stake.
- Tie a string line tightly between these two stakes.
- Use the 3-4-5 method to create a right angle from the first stake. Measure 3 feet along one string, 4 feet along the other, and adjust until the diagonal is 5 feet.
- Once the right angle is confirmed, measure and place the third stake at the opposite end of the second string line.
- Complete the rectangle by measuring and placing the fourth stake, ensuring it aligns with the first stake.
- Check both diagonals to confirm they are equal, ensuring your rectangle is perfectly square.
Common mistake: Don’t rely solely on visual alignment. Always measure diagonals to confirm squareness. A small error at the start can lead to big headaches later.
Preparing Your Workspace
First things first, clear out any clutter. A tidy workspace is a safe workspace. Move tools and materials that aren’t needed for the polishing job out of the way. This reduces trip hazards and gives you more room to work efficiently. Remember, organization is key to avoiding accidents.
Next, focus on lighting. Good lighting is crucial for spotting imperfections and ensuring a quality finish. If your workspace is dim, set up additional lights. You don’t want to miss a spot because you couldn’t see it. Also, check ventilation. Polishing can create dust, so make sure your area is well-ventilated to keep the air clean and breathable.
Finally, gather your tools. Have all your diamond tools and safety gear within arm’s reach. This includes goggles, gloves, and a dust mask. Don’t waste time hunting for equipment mid-job. A well-prepared workspace makes the polishing process smoother and more efficient.
Polishing Techniques
When it comes to polishing with diamond tools, the right technique can make all the difference. Start by using a consistent pressure across the surface. Uneven pressure can lead to an inconsistent finish and may even damage the material. Move the tool in a steady, overlapping pattern to ensure that every part of the surface is evenly polished.
Keep an eye on the speed settings of your tool. Too fast, and you risk overheating and damaging the surface; too slow, and you might not achieve the desired finish. Adjust the speed based on the material you are working with. Softer materials may require slower speeds, while harder surfaces can handle a bit more speed.
Always monitor the condition of your diamond tools. Worn-out tools won’t polish effectively and can scratch the surface. If you notice the tool isn’t performing as it should, it’s time to replace it. Also, ensure that the workspace is free from debris, as this can interfere with the polishing process and damage the surface.
Finishing Touches
Once you’ve gone through the polishing techniques, it’s time to focus on the final details. Start by thoroughly inspecting the surface. Look for any missed spots or uneven areas. If you find any, go back with your diamond tool and gently polish those sections. Remember, consistency is key for a professional finish, so don’t rush this step.
Next, clean the surface meticulously. Use a damp cloth to wipe away any dust or residue left from the polishing process. This helps reveal the true sheen of your work. For added gloss, consider applying a suitable sealant or polish. This not only enhances the shine but also protects the surface from future wear and tear.
Finally, step back and evaluate your work. Good lighting is crucial here. Move around and view the surface from different angles. This helps in spotting any imperfections that might need attention. If everything looks good, you’re done. If not, don’t hesitate to make those final adjustments. The goal is to achieve a finish you can be proud of.
Choosing the Right Diamond Tools for Your Polishing Project
Selecting the right diamond tools can make or break your DIY polishing project. The tools you choose should match the material you’re working on and the specific demands of your project. Here’s a straightforward guide to help you make informed decisions and achieve the best results.
- Material Compatibility: Ensure the diamond tool is designed for the material you’re polishing. Concrete, stone, and tiles each require specific types of diamond tools for optimal results.
- Grit Level: Choose the appropriate grit level based on the stage of your project. Start with lower grits for initial grinding and move to higher grits for finishing touches.
- Tool Durability: Invest in tools that offer durability and longevity. Cheaper options might save money upfront but could wear out quickly, costing more in the long run.
- Tool Size: Match the tool size to the scale of your project. Larger tools are efficient for big surfaces, while smaller tools offer precision for detailed work.
- Ease of Use: Consider tools that are user-friendly, especially if you’re new to DIY projects. Lightweight and ergonomic tools can reduce fatigue and improve control.
- Budget Constraints: Balance cost with quality. Look for tools that offer the best performance within your budget, and consider second-hand options if necessary.
- Manufacturer Support: Opt for brands that offer good customer support and warranties. This can be invaluable if you encounter issues or need guidance.
Understanding Tool Specifications
Before purchasing, read the tool specifications carefully. Look for details about the tool’s intended use, material compatibility, and recommended maintenance. This information ensures you pick a tool that fits your project’s needs and avoids unnecessary complications.
Budget-Friendly Options for DIY Enthusiasts
For DIY enthusiasts looking to tackle projects without breaking the bank, exploring budget-friendly diamond tooling options is essential. These tools offer a range of applications, from cutting and grinding to polishing, making them versatile for various DIY tasks.
Understanding the balance between cost and performance helps ensure you get the most out of your investment. By sourcing tools from online marketplaces or local suppliers and following proper maintenance tips, you can extend the life of your tools. Beginner-friendly kits are also available, providing excellent value and making it easier to get started on your projects.
Affordable Diamond Tooling Brands
Finding quality diamond tools on a budget is possible if you know where to look. Here are some brands that offer reliable tools without breaking the bank.
- QEP – Known for their tile saws and blades, QEP is a go-to for DIYers working on tile projects. Their tools are affordable and get the job done efficiently.
- DEWALT – While not the cheapest, DEWALT offers great value with their durable diamond blades and drill bits. They last longer, saving you money in the long run.
- SKIL – SKIL provides budget-friendly saws and grinders. Perfect for occasional use, they offer decent performance for the price.
- MK Diamond – This brand offers a range of diamond tools that are both affordable and reliable. Their wet saws are particularly popular among DIY enthusiasts.
- Bosch – Bosch is known for quality and their diamond tools are no exception. They offer a good balance between cost and performance, especially for home projects.
Pro tip: Always check for sales or refurbished tools. You can often find high-quality diamond tools at a fraction of the price if you’re willing to hunt for deals.
DIY Alternatives and Hacks
When you’re working on a tight budget, thinking outside the box can save you a lot of money. Consider using repurposed materials for your projects. Old pallets can be transformed into rustic furniture or garden planters. Just make sure to sand them down and treat the wood to prevent splinters and weather damage.
For those needing specialized tools but not wanting to break the bank, look into tool rental services instead of purchasing. Many local hardware stores offer rentals for a fraction of the cost of buying new. This way, you can access high-quality equipment without the hefty price tag.
Don’t overlook the power of DIY hacks to replace expensive materials. For instance, instead of buying costly decorative tiles, consider painting your existing ones with durable tile paint. This can refresh a space at a fraction of the cost. Always test a small area first to ensure the paint adheres well and looks good.
Maintenance and Care for Diamond Tools
Maintaining and caring for diamond tools is essential to extend their lifespan and ensure optimal performance. Regular cleaning prevents debris buildup, while proper storage techniques help avoid damage and maintain tool integrity. By inspecting diamond tools for wear and tear, you can address issues before they lead to bigger problems.
For those working on DIY projects or at a jobsite, understanding these maintenance practices can save time and money. Using the right lubricants and coolants enhances performance and reduces the risk of tool failure. Safe handling and storage not only prevent accidents but also preserve the quality of your tools, making your work more efficient and effective.
Cleaning and Storage
After using diamond tools, it’s crucial to clean them properly. Start by rinsing the tools with water to remove any debris or dust. Use a soft brush to gently scrub away any stubborn residue. Avoid harsh chemicals; they can damage the tool’s surface. Once cleaned, dry the tools thoroughly to prevent rust or corrosion.
Proper storage is just as important as cleaning. Store diamond tools in a dry, cool place. Moisture is the enemy here, so make sure the storage area is well-ventilated. Keep tools in their original cases if possible, or use a dedicated tool rack. This prevents unnecessary wear and tear.
Always inspect tools before storing them. Look for any signs of damage or wear. Addressing issues early can extend the life of your tools. Remember, a well-maintained tool is a safe and effective one. Don’t cut corners; your future projects depend on it.
Regular Maintenance Tips
First off, always inspect your diamond tools before and after each use. Look for signs of wear, such as cracks or chips. If you spot any damage, stop using the tool immediately. Using a damaged tool can lead to poor performance or even accidents. Replace worn-out parts promptly to keep everything running smoothly.
Pay attention to cooling and lubrication. Overheating is a quick way to ruin a diamond tool. Ensure your tools are properly cooled and lubricated during use. If you’re using water as a coolant, make sure it’s clean and flowing freely. Blocked or inadequate cooling can cause overheating and damage the tool.
Make it a habit to check the alignment of your tools. Misalignment can cause uneven wear and reduce the lifespan of your diamond tools. Adjust the alignment as necessary to ensure even pressure and contact during operation. This simple step can make a big difference in performance and longevity.
Safety Precautions Specific to Using Diamond Tools

When working with diamond tools, it’s crucial to prioritize safety by wearing the right personal protective equipment (PPE) such as safety goggles, gloves, and dust masks. Ensuring your workspace is well-ventilated helps reduce the risk of inhaling harmful dust particles. Proper handling, storage, and regular inspection of diamond tools for cracks or damage are essential to prevent accidents and extend the life of the tools.
Following manufacturer guidelines and instructions not only helps in achieving the best results but also minimizes the risk of tool misuse. Understanding potential hazards like kickback and maintaining control of the tool during operation are vital for a safe working environment. These precautions are especially important for DIY enthusiasts and professionals alike, as they ensure both personal safety and the longevity of the tools.
Protective Gear
When using diamond tools for polishing, wearing the right protective gear is non-negotiable. It keeps you safe from dust, debris, and potential injuries.
- Safety Glasses Protect your eyes from flying particles. Always wear them, even for quick tasks.
- Dust Mask Essential for keeping harmful dust out of your lungs. Choose a quality mask with a proper fit.
- Ear Protection Diamond tools can be loud. Use earplugs or earmuffs to prevent hearing damage.
- Gloves Protect your hands from cuts and abrasions. Opt for gloves that offer both protection and dexterity.
- Steel-Toed Boots Shield your feet from heavy falling objects. A must if you’re working in a cluttered space.
Pro tip: Always inspect your gear for wear and tear before starting. Damaged gear won’t protect you properly.
Safe Handling Practices
When you’re handling diamond tools, the first rule is to always inspect the tool before use. Check for any visible damage or wear and ensure that the tool is clean. A damaged tool can lead to accidents or further damage to the material you’re working on. If you spot any issues, don’t use the tool until it’s been repaired or replaced.
Grip the tool firmly but not too tightly. A relaxed grip will give you better control and reduce fatigue. Make sure your hands are dry and free of any slippery substances. If you’re working in wet conditions, use gloves that provide a good grip, but remember that gloves are part of the protective gear discussed earlier.
Always store diamond tools properly when not in use. Keep them in a dry, secure place where they won’t get knocked around or exposed to moisture. Proper storage prevents rust and damage, keeping your tools in top condition for the next job.
Lastly, be mindful of your surroundings. Keep the work area clear of unnecessary clutter to avoid tripping hazards. If you’re working with others, communicate clearly to prevent accidents. Remember, safe handling isn’t just about protecting the tool; it’s about protecting yourself and those around you.
Planning and Preparation Tips for Successful Polishing
Effective planning and preparation are crucial for achieving successful polishing results. Start by assessing the surface condition to determine the necessary level of preparation. Gather all essential tools and materials, such as diamond tooling and safety gear, and create a detailed plan that outlines each step of the polishing process.
Organizing your workspace and conducting a test patch can significantly enhance the polishing outcome. A clean, debris-free area prevents contamination, while a test patch helps you evaluate and adjust your method if needed. These steps not only ensure a smoother process but also save time and resources by reducing errors and rework.
Material Selection
Choosing the right materials is crucial for achieving a polished finish that lasts. You need to match your materials to the specific demands of your project.
- Abrasive pads: Essential for smoothing surfaces. Choose the grit that matches your project’s needs.
- Polishing compound: Provides the desired shine. Select a compound that suits the material you are working on.
- Sealant: Protects the surface after polishing. Opt for a sealant that offers durability and is compatible with your material.
- Microfiber cloths: Ideal for applying compounds and wiping surfaces without scratching.
- Safety gear: Always have gloves and goggles to protect yourself during the process.
Pro tip: Always test a small area first to ensure your materials are compatible with your surface and deliver the desired results.
Time Management
Start by setting clear goals for your polishing project. Break the work into smaller tasks and set deadlines for each. This keeps you on track and helps avoid the common mistake of underestimating how long each step will take. Remember, rushing leads to mistakes, so allocate enough time for each phase.
Gather all your materials and tools before you begin. This avoids unnecessary trips to the store, which eat into your time. Refer back to your material selection notes to ensure you have everything ready. Having a checklist can be a lifesaver here.
Prioritize tasks based on their impact on the overall project. Focus on the most crucial steps first, like checking base compaction and surface preparation. These foundational tasks determine the quality of the final polish. Don’t get sidetracked by less important details early on.
Finally, set aside time for cleanup and review. A tidy workspace improves efficiency and safety. Plus, reviewing your work as you go helps catch issues early, saving time on fixes later. Stick to your plan, but be flexible if adjustments are needed. Stay organized, and you’ll finish on time without cutting corners.
Common Mistakes in DIY Polishing and How to Avoid Them
DIY polishing projects often go awry due to common mistakes that can easily be avoided with a bit of knowledge. Selecting the right grit sequence is crucial for achieving a smooth finish, and applying even pressure is essential to avoid an uneven surface. Additionally, neglecting to clean the surface between grit changes can lead to imperfections in the final result.
Understanding these pitfalls is vital for anyone looking to improve their DIY polishing skills. Proper technique not only enhances the quality of the finish but also saves time and resources by preventing the need for rework. By maintaining consistent speed and technique, DIY enthusiasts can avoid swirl marks and achieve a professional-looking polish.
Incorrect Grit Usage
Using the wrong grit level can mess up your polishing project faster than you can say “do-over.” If you start with a grit that’s too coarse, you risk scratching the surface, making it look worse than when you started. On the flip side, jumping to a finer grit too soon won’t remove the deeper scratches, leaving you with a dull finish.
To avoid these headaches, always start with the right grit for the job. For rough surfaces, begin with a coarser grit to level things out. Gradually work your way to finer grits for a smooth, polished finish. Don’t skip steps thinking you’ll save time; you’ll just end up backtracking.
When in doubt, test on a small, hidden area first. This way, you can see how the grit affects the material without risking the whole project. Remember, the goal is to enhance, not damage. Choose wisely, and your results will shine.
When to Seek Professional Help for DIY Polishing Projects
While DIY polishing can be rewarding, there are times when calling in a professional is the smart move. Knowing when to seek expert help can save you from costly mistakes and ensure your project is completed safely and efficiently. Here are some scenarios where professional intervention is advisable.
- If you’re dealing with large surfaces or complex designs, a professional can handle the job more efficiently and with better results.
- When the project involves expensive materials, like marble or high-end stone, it’s best to let a pro handle it to avoid costly damage.
- If you encounter deep scratches or significant damage that DIY tools can’t fix, a professional has the equipment and skills to restore the surface.
- For projects requiring specialized equipment you don’t own, hiring a professional can be more cost-effective than renting or buying tools.
- If you’re unsure about the safety of the process or lack experience, a professional can ensure the job is done without risk to you or the material.
- When local regulations require specific disposal methods for waste materials, a professional will know how to comply, avoiding legal issues.
- If the timeline is tight and you can’t afford delays, professionals can often complete the work faster and with fewer interruptions.
Recognizing Your Limits
Understanding your skill level and the complexity of the project is crucial. Don’t let pride lead to mistakes. If you’re in over your head, it’s better to admit it early and call in a professional. This approach not only saves time and money but also ensures a high-quality finish.
Environmental Considerations and Disposal of Materials After Use
Polishing projects, especially those involving diamond tooling and concrete, can have significant environmental impacts. The process often generates dust and uses water, leading to waste materials like slurry. Safe and eco-friendly disposal of these materials is crucial, and whenever possible, opting for biodegradable products can reduce environmental harm.
Understanding and adhering to local regulations for construction waste disposal is essential for compliance and environmental protection. By recycling or repurposing leftover materials and tools, you can minimize waste and contribute to sustainability. These practices not only help the environment but also promote responsible project management on any jobsite.
Eco-Friendly Practices
When polishing, it’s crucial to adopt eco-friendly practices to reduce your environmental footprint. Start by choosing non-toxic polishing compounds. These are better for the environment and safer for you to handle. Avoid products with harsh chemicals that can harm local ecosystems when disposed of improperly.
Always reuse polishing pads whenever possible. Instead of tossing them after a single use, clean them thoroughly to extend their lifespan. This not only reduces waste but also saves you money in the long run. If they’re beyond reuse, ensure they’re disposed of according to local waste management guidelines.
Consider setting up a water recycling system for wet polishing tasks. This means collecting and filtering the water used, so it can be reused instead of being dumped. It’s a smart way to conserve water and minimize pollution. Remember, every drop counts!
Disposal of Waste Materials
Proper disposal of waste materials from polishing is crucial to minimize environmental impact. Here’s what you need to get it right.
- Sealed Containers for collecting dust and debris. They prevent contamination and make transport easier.
- Heavy-duty Bags for larger waste. These are durable and reduce the risk of tearing during disposal.
- Labeling Supplies to clearly mark hazardous waste. This ensures safe handling and compliance with local regulations.
- Recycling Bins for materials that can be repurposed. Keep them separate to streamline the recycling process.
- Protective Gear like gloves and masks. Essential for personal safety when handling waste.
Pro tip: Always check local waste disposal regulations. They vary widely and following them keeps you on the right side of the law.

Conclusion
Polishing with diamond tools can be a rewarding DIY project if you follow the right steps. Start by understanding the grit levels and their specific uses. This knowledge is your foundation. Stick to the step-by-step guide, and you’ll achieve a professional finish without breaking the bank.
Remember, maintenance is key. Keep your tools clean and store them properly to extend their life. Don’t skimp on safety gear—protective eyewear and gloves are non-negotiable. Cutting corners here can lead to accidents.
Avoid common pitfalls like rushing the process or using the wrong grit. These mistakes can ruin your project and waste your time. Lastly, be mindful of the environment. Dispose of materials responsibly to keep your workspace safe and clean.
FAQ
What grit should I start with for polishing concrete?
Start with the lowest grit, usually 50. It removes rough patches and preps the surface. Skipping to a higher grit too soon will leave you with a mess.
How do I know when to switch to the next grit?
When the surface feels smooth and even, it’s time to move up. Don’t rush it, or you’ll waste time fixing mistakes later. Patience pays off here.
Can I skip grits to save time?
Skipping grits is a bad idea. Each step builds on the last. Jumping ahead will leave scratches that are hard to fix.
How often should I check the diamond tooling for wear?
Check the tooling after each pass. Worn-out tools won’t do the job right. Replacing them on time saves you headaches.
Is it okay to use water while polishing?
Yes, water helps keep dust down and cools the tools. Just don’t flood the area; a little goes a long way. Too much water can make a mess.