
Introduction
Scarify, grind, and acid are surface-prep methods used to promote bonding between new concrete and old work. Choosing the right method depends on the old surface condition and the project, and acid often disappoints if not applied carefully. This article explains practical choices in plain language and what to expect when you prep for a new bond.
Follow a practical sequence: scarify or grind to expose sound concrete, then clean the surface thoroughly and remove dust. Choose tools based on method—scarifying tools or chisel, a grinder with a suitable cup wheel, and a stiff broom or vacuum for cleanup. Check product instructions and local rules before applying any chemical treatment, and ensure the surface is dry and properly prepared for the new concrete to bond.
Key takeaways
- Choose scarify for rough mechanical profile; ensure dust control and PPE.
- Grind to create precise profiling and clean edges before bonding new concrete.
- Acid etching often underdelivers; verify compatibility and follow manufacturer surface prep steps.
- Bond strength depends on surface rhythm; sequence: clean, roughen, prime, then apply.
- Use proper PPE; contain debris; manage dust with containment and ventilation.
- Plan the steps and avoid mid-project changes; verify compatibility with new material.
Table of Contents
- Introduction
- Key takeaways
- Quick Comparison and Decision Guide
- Scarifying (Mechanical Ripping) — Method, Tools, and Outcomes
- Grinding — Precision Profiling and Finishing
- Acid Etching — Chemistry, Why It Underdelivers, and Proper Use
- Bond Strength Science and Testing
- Safety, PPE, and Environmental Precautions
- Cost, Time, and Lifecycle Comparison
- Planning, Common Mistakes, and Pre-Job Checklist
- Conclusion
- FAQ
Quick Comparison and Decision Guide
Scarify, grind, and acid etch each create a different surface profile with distinct advantages and downsides. Scarifying yields a rough, mechanical key and generates dust from material removal; grinding produces a controlled, uniform profile with less material disruption; acid etching chemically textures the surface but often achieves only a micro-roughness and can be inconsistent. Consider surface profile, dust and debris, speed, and cost when weighing options for your project.
Use scenarios provide quick orientation: repair patch benefits from a solid mechanical key, overlays demand predictable bonding surfaces, and structural splices require durable edge readiness. A concise decision checklist helps: assess surface condition, confirm substrate readiness, define intended bond strength, and evaluate tolerance for laitance or roughness. Practical constraints include equipment needs, safety considerations for dust or fumes, noise levels, and time-to-progress for each method. Readiness is confirmed by macro and micro texture checks and simple adhesion or pull tests before bonding agents or overlays are applied. Anticipate common pitfalls like over-etching, over-scarifying, or residual contaminants and plan brief remediation steps if they appear.
One-line pros/cons summary for each method
Scarify: Quick, tough on old concrete, leaves rough texture. Grind: Smooth finish, slow, dusty. Acid: Easy to apply, weak profile, can disappoint.
Decision checklist
Use this checklist before starting any prep work to ensure the best results.
- Surface condition: Check for cracks, delamination, or weak spots. Skipping can lead to bond failure.
- Existing substrate: Identify the type and age of concrete. Different substrates require different prep methods.
- Intended bond strength: Determine required bond strength for your project. Higher strength requires more aggressive prep.
- Tolerance for laitance or roughness: Consider the final finish and any overlays. Some methods leave rougher surfaces.
- Equipment needs: Assess availability of tools and safety gear. Inadequate equipment can slow progress.
- Safety concerns (dust, fumes): Consider potential hazards and necessary precautions. Ignoring safety can lead to health risks.
- Noise: Check local regulations and neighbor tolerance. Some methods are louder than others.
- Time-to-progress: Estimate time required for each method. Some methods take longer than others.
Quick rule: The best method balances prep needs, site constraints, and project goals.
Scarifying (Mechanical Ripping) — Method, Tools, and Outcomes
Scarifying uses mechanical ripping to remove laitance, delaminate weak surfaces, and roughen the substrate for mechanical bonding. It differs from grinding by aggressively exposing deeper texture and encouraging interlock with subsequent coatings or overlays. The result is a coarse, irregular surface that improves adhesion for certain systems when a strong mechanical key is required.
Ideal use cases include roughing worn slabs, removing laitance, and exposing aggregate where a robust mechanical bond is critical. It is less suitable for delicate substrates or where surface uniformity is essential for coatings that demand a consistent profile. Tools range from rake-style scarifiers to rotary scarifiers and carbide-tipped bits, with practical guidance on setup, start and finish directions, and maintaining a consistent texture. Preparation focuses on cleaning and moisture checks, dust control, and ensuring the scarified area is free of loose material before bonding. Safety and best practices emphasize avoiding over-roughening, controlling edge feathering, and verifying surface profile to prevent weak bonds or delamination.
Tools and materials for scarifying
The right tools ensure effective and safe scarifying. Here are the essentials:
- Rake-style Scarifiers: Ideal for small to medium-sized projects, these tools offer good control and maneuverability. They typically use replaceable tines that can be adjusted or replaced as needed.
- Rotary Scarifiers: These heavy-duty machines are suitable for large surface areas and deep scarification. They usually come with interchangeable bits and adjustable speed settings.
- Carbide-tipped Bits: Compatible with rotary scarifiers, these bits provide long-lasting durability and can handle tough surfaces. Ensure they match your machine’s specifications.
- Safety Equipment: Essential for protecting yourself and others, this includes safety glasses, ear protection, gloves, and appropriate clothing.
- Dust Control Measures: To minimize dust and improve air quality, consider using a vacuum system or water suppression during scarifying.
- Optional: Heavy-duty Equipment (rent): For large-scale projects or deep scarification, consider renting heavy machinery to save on purchase costs. Always verify tool compatibility with required surface area and depth of scarification.
Step-by-step scarifying process
Follow this workflow for consistent results:
- Mark out areas to be scarified, ensuring clear boundaries and any patterns or designs.
- Check concrete moisture levels. Scarify when the surface is dry to avoid slippery conditions.
- Set up safety equipment and ensure proper ventilation for dust control.
- Start with light passes using a rake-style scarifier or low-speed settings on a rotary machine, gradually increasing depth and pressure as needed.
- Work in manageable sections, maintaining a consistent texture throughout the surface area. For vertical or overhead surfaces, use appropriate safety measures to prevent falls.
- Regularly clean tools during use to remove debris and maintain efficiency.
- Upon completion, inspect the surface for any missed spots or inconsistencies. Use a profile gauge to verify surface profile depth meets requirements.
- Before applying bonding agents, ensure the scarified area is free of loose material by vacuuming or brushing away debris.
Effectiveness, pros, and limitations
Scarifying creates a suitable surface texture for mechanical bonding, enhancing adhesion. Bond strength depends on various factors, including the quality of the substrate, scarification depth, and the chosen bonding agent. Consult with material suppliers for specific recommendations.
Pros: Scarifying is effective in roughening worn slabs, removing laitance, exposing aggregate, and creating a profile that promotes mechanical bonding. It’s also relatively quick and cost-effective compared to other methods like grinding or acid etching.
Limitations: Scarifying may not be suitable for surfaces with severe delamination or weak bond issues. Over-roughening can lead to excessive material loss and weak bonds. In such cases, consider alternative methods or complementary cleaning processes before applying bonding agents.
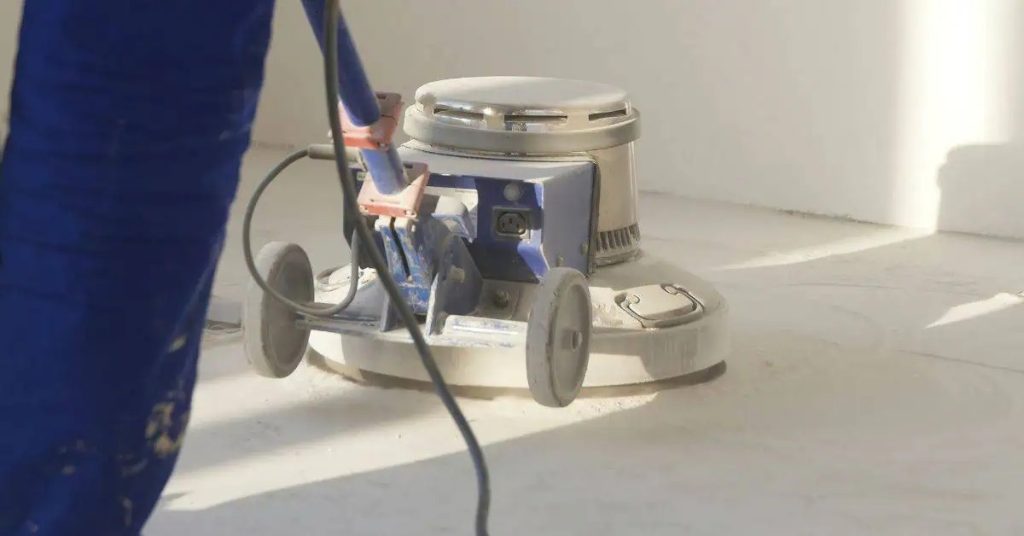
Grinding — Precision Profiling and Finishing
Grinding provides a controlled abrasion that yields a consistent surface profile suitable for bonding and finishing. It differs from scarifying by removing material more selectively and delivering a predictable texture that supports coatings and mortars. The approach is inherently more repeatable, helping to minimize variability in bond performance across the treated area.
Common grinding tools include diamond cup wheels and shrouded grinders, with coarse versus fine profiles chosen to match adhesive or coating systems. A step-by-step workflow covers substrate assessment, protection of surrounding areas, dust control, equipment setup, and progressive profiling validated by profiling tests. Surface texture verification and test methods such as pull-off tests help ensure adequate adhesion potential before patches or coatings are applied. Contamination control and thorough cleaning after grinding are essential to prevent bond failures, along with safety checks for PPE, ventilation, electrical safety, and compatibility with any existing sealers. Compared with acid treatments and scarifying, grinding often yields more predictable, replicable bonding outcomes.
Tools and consumables for grinding
The right tools ensure consistent surface preparation. Here are the essentials:
- Grinders (e.g., angle grinders): Versatile, powerful tools for various profiling tasks.
- Diamond cup wheels: Ideal for concrete grinding; available in coarse and fine grits for different applications.
- Dust shrouds: Crucial for dust containment and safety; ensure they’re intact before use.
- Coarse abrasives (e.g., 16-30 grit equivalent): For strong bond, remove old coatings and prepare surfaces for patching compounds.
- Fine abrasives (e.g., 40+ grit equivalent): For coating adhesion, achieve a smooth finish after profiling.
- Optional: vacuum dust collection systems: Rent or borrow to contain dust and maintain a clean workspace.
- Pro tip: Check disc condition before use; replace worn discs to maintain grinding efficiency.
Process, visual checkpoints, and quality control
Use this checklist for thorough surface preparation:
- Substrate assessment: Inspect old concrete; remove loose material, contaminants.
- Protection of surrounding areas: Cover adjacent surfaces to prevent damage from dust and debris.
- Dust control setup: Ensure dust collection system is functional and properly attached.
- Equipment setup: Securely fasten diamond cup wheels, check grinder functionality.
- Initial pass: Grind with coarse abrasives to remove old coatings, sealers, or weak concrete.
- Overlap technique: Ensure full coverage; re-grind missed spots with overlap technique.
- Profile inspection: Visually inspect surface for sufficient profile; use simple tests like pull-off or standardized measurements.
- Moisture, contamination check: Address any residues to prevent bond failures.
- Final wipe-down: Clean the surface with a suitable cleaner and wipe off grinding slurry.
- Quick rule: If initial passes are insufficient, consider additional methods or follow-up passes for optimal results.
Pros, cons, and typical outcomes
Grinding offers several advantages:
Consistent surface profile: Achieves predictable results for bonding and finishing.
Controlled abrasion: Minimizes damage to old concrete; suitable for delicate areas with proper technique.
Versatile application: Can be used on various surfaces, though may not be ideal for very rough or delaminated slabs. Grinding often yields replicable results but may require additional methods for optimal outcomes in certain cases.
Acid Etching — Chemistry, Why It Underdelivers, and Proper Use
Acid etching chemically modifies the surface by dissolving laitance and weak pastes to create micro-porosity that can improve mechanical key for overlays. It does not produce a deep profile or remove cured concrete. The resulting texture is largely surface-level and may vary with moisture, contamination, and substrate porosity.
Under real-world conditions, etching can underdeliver due to incomplete laitance removal, sealed or glossy surfaces resisting treatment, and moisture or efflorescence becoming trapped beneath overlays. Proper use involves testing on a small area, respecting surface pH and moisture conditions, thorough rinsing, neutralizing and drying before overlays, and waiting for complete dryness. It can work on porous, unsealed surfaces or thin overlays where scarification or grinding isn’t practical, particularly with compatible binder systems. Common mistakes include over-etching, long exposure, and insufficient rinsing; quick in-situ adhesion tests help gauge readiness and guide subsequent bonding steps.
How Acid Etching Works and Its Failure Modes
Acid etching modifies the surface of concrete by using a neutralizable acid to dissolve laitance, a weak paste layer on top of concrete, creating micro-porosity. This improves mechanical keying for overlays but does not remove cured concrete or create deep profiles.
Why it might disappoint: Incomplete laitance removal, sealed or glossy surfaces resisting etching, moisture and efflorescence trapping under the overlay, and inconsistent bonding due to non-uniform surface profile can lead to underdelivering results.
Realistic expectations are key. Acid etching is best suited for porous, unsealed surfaces and thin, non-structural overlays. For better bond strength in structural or heavy-duty applications, consider mechanical methods like scarifying or grinding.
Safe Acid Procedure and Neutralization
Safety is paramount when handling acids. Follow these steps for a safe acid etching procedure:
Preparation: Ensure the surface is clean, dry, and free from contaminants. Check product instructions for dilution ratios.
Application: Apply acid evenly using a sprayer or brush, following manufacturer’s recommended dwell time. Neutralize with a base like sodium bicarbonate to ensure a neutral surface before patching.
Rinsing and Verification: Rinse thoroughly with clean water. Verify the surface is neutral using pH test strips before applying overlays. If unsure about any step, consult product instructions or contact the manufacturer.
When to Avoid Acid Etching and Consider Alternatives
While acid etching has its benefits, there are instances when it’s best avoided. Here are some scenarios to consider:
- High Moisture Content or Efflorescence: Excess moisture can cause poor bonding and efflorescence may reappear under overlays.
- Sealed or Glossy Finishes: Acid etching may not be effective on sealed surfaces, leading to inadequate bonding.
- Structural Overlays or Heavy-Duty Applications: Mechanical methods like scarifying or grinding create a better bond and are more suitable for these applications.
- Environmental Restrictions: Some areas may have regulations restricting acid use. Always check local regulations before starting work.
In such cases, consider alternatives like mechanical surface preparation methods (scarifying, grinding, shot blasting) or consult a professional for tailored advice.

Bond Strength Science and Testing
The core bonding mechanisms for new-to-old concrete involve mechanical interlock from surface roughness and porosity, chemical bonding via surface energy and bond-promoting species, and moisture-driven capillary effects. Substrate history—laitance presence, contaminants, or old curing irregularities—shifts the balance among these mechanisms and informs prep choices.
Testing methods vary, including pull-off adhesion tests, shear tests, and field versus lab conditions. Proper setup covers specimen preparation, and clear reporting guides adhesion decisions. Before bonding, assess moisture content, laitance, contaminants, age, and curing state, since these factors influence expected bond strength and test outcomes. Surface prep options alter porosity and residual contaminants: scarify increases mechanical key, grind adjusts roughness, and acid etching changes surface energy with potential uniformity concerns. Interpret results to determine whether bonding agents or primers are needed, while considering safety and compatibility for testing and prep.
Simple Field Tests and Professional Tests
Before proceeding with any overlay work, it’s crucial to verify the bond strength of your old concrete. Here are some simple DIY checks and professional testing methods:
DIY Checks:
- Visual Inspection: Check for cracks, delamination, or other signs of weakness.
- Knife Scrape Test: Gently scrape the surface with a sharp tool to check adhesion. If material comes off easily, the bond may be insufficient.
- Water Absorption Test: Pour water onto the surface. If it beads up and doesn’t absorb, the surface may be contaminated or sealed, hindering bonding.
Professional Tests: For more accurate results, consider professional pull-off tests. These involve adhering a disc to the surface with an epoxy, allowing it to cure, then pulling it off with a machine to measure adhesion strength. If results are inconclusive or insufficient, consult a qualified contractor or lab for further analysis.
Surface Profile and Cleanliness Criteria
To maximize bond strength, prepare your old concrete surface according to these non-numeric criteria:
Acceptable Surface Roughness:
- Visually inspect the surface. It should have a uniform, rough texture with no smooth or polished areas.
- Feel the surface with a gloved hand. It should feel rough and porous.
No Visible Contaminants:
- Check for any visible dirt, grease, laitance, or debris. These can hinder adhesion.
- If contaminants are present, perform appropriate cleaning methods (such as scarifying, grinding, or acid etching) before proceeding with overlays.
Safety, PPE, and Environmental Precautions
Safety risks vary by method: scarifying generates dust and flying debris with potential blade heat; grinding can produce dust, noise, and possible wheel shatter; acid etching releases toxic fumes and requires handling corrosives carefully. Each method demands specific controls to protect workers and surrounding materials.
Universal PPE includes respirators or tight-fitting masks with appropriate cartridges, eye and face protection, cut-resistant gloves, hearing protection, and sturdy boots. Fit testing and maintenance of PPE are essential. Dust controls rely on dust-collection attachments, local ventilation, enclosed zones, and, when applicable, air monitoring for silica. For acids, follow SDS guidelines, proper storage, dilution rules, on-site neutralizers, splash protection, and eye-wash readiness. Environmental safeguards include runoff containment, tarps, spill kits, and disposal per local regulations. Plan workflows and signage, ensure training, and maintain decontamination procedures post-work to minimize hazards.
PPE and Equipment Safety by Method
Protecting yourself and your team from job site hazards is paramount. Here are the specific personal protective equipment (PPE) and engineering controls needed for each method:
- Scarifying: Protects against impact hazards and noise.
Wear safety glasses, hearing protection, cut-resistant gloves, and high-visibility clothing. - Grinding: Shields from dust and silica exposure.
Use respiratory protection (P100 or organic vapor cartridges), safety glasses, hearing protection, and sturdy work boots. - Acid Etching: Safeguards against chemical burns and fumes.
Wear a respirator with organic vapor cartridges, goggles/face shield, cut-resistant gloves, and protective clothing.
Dust Mitigation, Ventilation, and Waste Handling
Maintaining safe air quality and minimizing environmental impact are crucial. Here’s how to manage dust, chemicals, and waste:
Dust Control: Use HEPA vacuums, dust-collection attachments, or wet methods to control dust generation. Regularly clean and maintain equipment.
Ventilation: Implement local exhaust ventilation (LEV) systems and enclosed work zones to reduce airborne contaminants. Consider using negative pressure if possible.
Waste Handling: Follow manufacturer guidelines for proper disposal of waste materials, including old coating fragments. Neutralize and safely dispose of acidic rinsates according to SDS instructions and local regulations.
Cost, Time, and Lifecycle Comparison
Comparing costs involves upfront material and equipment expenses along with anticipated long-term maintenance or replacement. Scarifying typically incurs higher equipment costs but may reduce long-run maintenance by delivering a robust mechanical bond; grinding usually offers a balance of cost and predictability; acid etching has lower equipment needs but can lead to variable outcomes and potential remediation expenses if the bond fails.
Project duration varies with method, labor intensity, and potential bottlenecks. Rework risk hinges on substrate condition and the chosen prep; scarifying may demand more cleanup for loose material, grinding requires masking and dust control, and acid etching necessitates drying and conditioning time. Surface prep compatibility with existing coatings and moisture conditions influences scheduling. Consider lifecycle outcomes, warranties, and whether certain prep methods affect product warranties or structural considerations when selecting an approach.
Upfront cost and rental vs buy considerations
When deciding between renting or purchasing equipment for surface preparation, consider the following factors:
Initial Investment: Purchasing equipment requires a larger upfront investment but may offer better value in the long run. Renting, on the other hand, has lower initial costs.
Labor Skill Level: More skilled labor may be required to operate certain equipment, which can increase rental or purchase costs.
Consumables: Consider the ongoing expenses of consumable items such as blades, discs, and chemicals. These costs should be factored into your decision-making process.
Long-term value and failure/rework costs
The lifecycle cost of a project is an important consideration when choosing a surface preparation method. Here’s what to consider:
Bond Failures: Inadequate surface preparation can lead to bond failures, resulting in costly repairs or rework.
Maintenance and Repairs: Thorough initial surface preparation can reduce the need for frequent maintenance and repairs, saving you money in the long run.
Potential Downtime: Bond failures and subsequent repairs can cause downtime, leading to lost productivity and additional costs. Investing more initially in thorough surface preparation can help minimize this risk.
Planning, Common Mistakes, and Pre-Job Checklist
Begin with a clear project scope that identifies whether scarify, grind, or chemical prep will be used based on substrate condition, desired outcomes, and long-term durability. Align objectives with the level of bond performance you expect and the limitations of each method. Document your plan to avoid later scope creep.
Assess the surface for laitance, porosity, coatings, moisture, and contamination to determine suitability. Establish a decision framework that weighs depth, dust, vibration, noise, and health implications. Prepare for safety and permits, including PPE, ventilation, containment, and potential acid-handling requirements, with planned emissions and spill controls. Create a pre-job checklist listing tools, bonding agents, moisture mitigation steps, and a testing protocol to verify readiness (such as pull-off tests). Plan site logistics, containment, waste disposal, sequencing, and a clear cleanup and post-prep drying window to prevent premature bonding.
Pre-job inspection and planning items
Before starting any bonding project, it’s crucial to inspect the substrate and plan your approach to ensure a strong bond. Use this checklist to guide you.
- Substrate soundness: Tap the surface with a hammer; listen for hollow or dull sounds indicating cracks or delamination. If ignored, it may lead to weak bonding and potential failure.
- Cracking and movement: Inspect for hairline cracks, settlement cracks, or signs of movement. Unaddressed cracks can compromise bond strength.
- Moisture sources: Check for dampness, efflorescence, or water stains. Moisture can hinder bonding and promote corrosion.
- Laitance and coatings: Inspect for laitance (hazy, weak surface layer) and any existing coatings that could interfere with bonding.
- Porosity and hardness: Estimate the substrate’s porosity and hardness by pressing into it with a trowel or screwdriver. This helps determine the best preparation method.
- Contamination: Check for oil, grease, or other contaminants that could affect bonding.
- Compatibility of repair materials: Ensure new concrete is compatible with existing substrate in terms of composition and performance. Incompatibility can lead to premature failure.
- Local regulations: Check for any local rules or restrictions regarding surface preparation, emissions, or waste disposal.
Quick rule: If the substrate shows signs of deterioration or incompatible materials, re-evaluate your project scope and objectives.
Common Mistakes in Surface Preparation & How to Avoid Them
To achieve a strong bond, avoid the following common pitfalls during surface preparation:
- Skipping profile checks: Verify the surface profile to ensure adequate bonding. Use a profilometer or grid method and aim for an International Concrete Repair Institute (ICRI) suggested profile of 3-7 mils (0.076-0.178 mm).
- Poor cleaning: Inadequate cleaning leaves residues that hinder bonding. Ensure the surface is clean, dry, and free from contaminants.
- Inadequate neutralization: After acid etching, ensure proper neutralization to prevent corrosion and maintain bond strength. Use a pH indicator to confirm neutralization.
- Ignoring safety protocols: Skipping safety measures like personal protective equipment (PPE), ventilation, and dust control can lead to injuries or health issues. Always follow safety guidelines.
Addressing these common mistakes upfront ensures a stronger bond and minimizes rework.
Tools and Materials Checklist
Before installing new concrete, ensure you have the necessary tools and that your surface is prepared. Here’s a concise checklist to guide you:
- Scarifier/Grinder: For mechanical preparation; consider renting or borrowing if needed. Key specifications: Disc diameter (6-12 inches) and speed (0-3,000 RPM). Tip: Ensure proper disc selection based on substrate type.
- Vacuum system: For dust control and cleanup. Key specifications: Capacity (5-15 gallons) and filtration efficiency. Tip: Use a HEPA filter for better dust containment.
- Bonding agents (optional): To enhance bond strength; consider buying or renting application equipment if needed. Tip: Follow manufacturer’s guidelines for mixing, application, and cure time.
- Moisture mitigation steps: Moisture meters, vapor barriers, or surface sealers to control moisture. Tip: Use a quality moisture meter (e.g., calcium chloride or impedance) to verify dryness.
- Pull-off adhesive test kit: To verify bond readiness; consider buying or renting. Key specification: Test area size (1-4 inches). Tip: Perform tests in multiple locations for consistency.
- PPE: Safety glasses, gloves, ear protection, and respiratory protection. Visual cue: Properly donned PPE indicates readiness.
- Functional tools and equipment: Ensure all tools are in good working condition before starting. Visual cue: Tools should be clean, undamaged, and ready for use.
Conclusion
Patching and tying new concrete to old work is safest when you start from solid surface preparation, choose the method that fits the condition of the substrate, and verify bond with a simple test before moving to full-scale repair. The key is to minimize risk to the substrate, control dust and concrete fines, and avoid the surprises that come from over-etching or under-profiling.
Make the plan concrete in your head by following a short, practical check sequence: assess the old surface for soundness and contaminants, decide between scarifying or grinding as the main prep method (acid is typically limited to very light, targeted conditioning or avoided altogether if you need a strong bond), gather and inspect the tools, put on appropriate PPE, clean the surface and create a roughened profile, perform a small test patch or bond trial, follow the chosen method’s recommended finish and cleaning steps, and confirm the surface is ready with a simple bond test before proceeding with full repair or overlay.
Common mistakes to avoid are skipping a real surface cure or cleaning step, using overly aggressive or too-light prep, and rushing the bond test after you finish. Keep safety rules simple: dust control, eye protection, respirator where needed, and proper handling of sharp tools and grinders. Always verify that you follow the manufacturer instructions for any products used and check local rules for surface prep and bonding.
If the project involves structural concerns, uncertain substrate condition, or you are unsure how the existing concrete will react to your chosen method, call a professional rather than pushing ahead. When you proceed, stay methodical, document what you do, and finish with a controlled cure and a clear bond test. With careful prep and disciplined execution, you reduce risk and improve long-term durability.
FAQ
What is the best surface preparation method when bonding new concrete to old concrete?
Choose the method based on the condition of the old surface and the type of bond you need. Scarifying, grinding, and acid etching each have different effects on roughness and cleanliness. Check manufacturer instructions and local rules to confirm applicability for your project.
How do scarifying, grinding, and acid etching affect bond strength?
Scarifying removes surface material and creates a rough profile that can improve mechanical bonding. Grinding produces a cleaner, smoother profile with controlled roughness for a more uniform bond. Acid etching dissolves a thin surface layer but may leave inconsistent results; it often underperforms compared with mechanical methods. Always verify roughness targets and compatibility with your adhesive or mortar.
What tools are typically needed for each method?
Scarifying requires a scarifier or rotor with appropriate bits and a means to control depth. Grinding uses concrete grinders with diamond cup wheels or segments. Acid etching needs safe handling gear and a proper etching solution along with cleaning tools. Confirm tool compatibility with the concrete surface and the job scale from the manufacturer instructions.
What is the proper sequence for preparing a surface before installing a new bond?
Follow a clean-dry sequence: remove loose material, apply the chosen surface preparation method, clean the surface thoroughly, and allow any dust or moisture to dry as required. Check that the surface meets the recommended profile and cleanliness standards before applying the bonding material.