
Introduction
Balcony concrete slopes are the angled surfaces on a balcony that direct water toward the edge so it drains away. This guide covers using screed rails to shape the slope, checking with a laser level, and detailing the edge to keep water from wicking. Work with a steady hand and plan to recheck as you go to avoid low spots at corners.
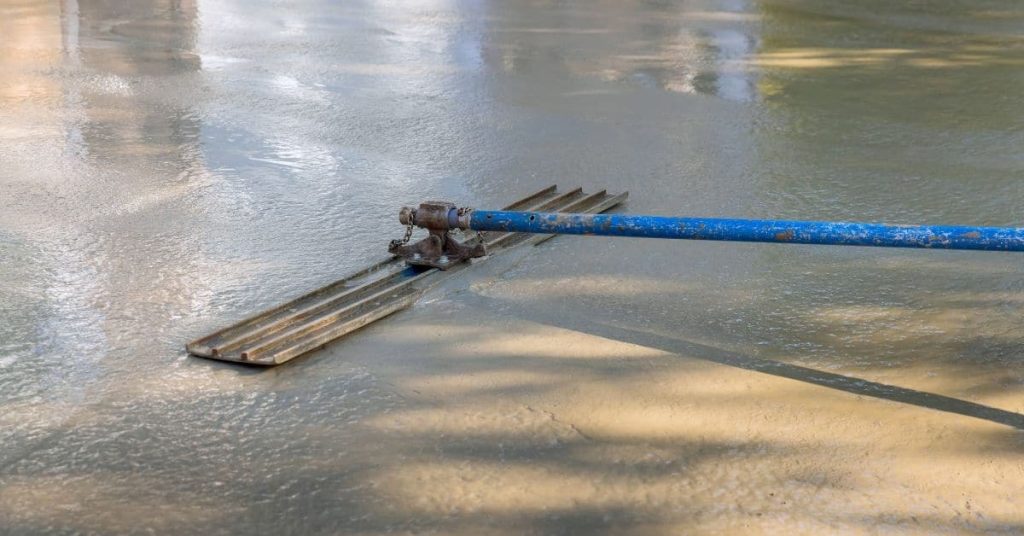
For a large area, set up screed rails at the high point and pull the screed or straightedge across in steady passes. Keep a laser level reference handy to check the slope along multiple spots, and adjust by adding or removing mix at the edge. Wear gloves, eye protection, and keep the work area clean to avoid trips and mistakes.
Key takeaways
- Plan slope direction before screeding, aligning with drain and balcony edges.
- Set screed rails level and stable to maintain uniform balcony slope.
- Use laser level or rotating laser for precise height checks daily.
- Edge detailing includes waterproof transitions and proper bonding with flashing or sealant.
- Inspect for low spots and voids; repair before final curing.
- Safety first: PPE, edge protection, and organized tools reduce on-site injuries.
Table of Contents
- Introduction
- Key takeaways
- Why Correct Balcony Slopes Matter
- Planning and Preparation Before Screeding
- Tools and Materials Checklist
- Screed Rails and Techniques for Large Balcony Areas
- Laser Checks, Measuring and Verification
- Edge Detailing and Waterproofing Transitions
- Common Mistakes, Troubleshooting and Repairs
- Cost, Time Estimates and DIY Vs Professional Decision
- Conclusion
- FAQ
Why Correct Balcony Slopes Matter
The slope of a balcony isn’t decorative; it directs water away from the structure to protect waterproofing and extend finish life. A well-planned grade helps keep coatings, membranes, and deck finishes dry and durable. A flat or ponding surface invites trouble and costly repairs.
Drainage performance ties directly to occupant safety and material longevity. Ponding can contribute to slip risk when wet and freeze-thaw damage in cold seasons. Look for signs of edge issues, clogged drains, and inadequate slope at corners as red flags that drainage isn’t doing its job.
Drainage and water management
Balcony slopes are crucial for managing water away from the structure. A proper fall directs rainwater and melted snow towards drains, preventing moisture intrusion.
Without a slope, water can pond on the surface, leading to standing water that seeps into cracks or weak points in the concrete over time.
Remember, even a slight slope makes a big difference. Aim for around 1-2% gradient towards your drains.
Structural and finish longevity
A well-designed slope protects your balcony’s structural integrity and finish durability. Water that doesn’t pool on the surface is less likely to cause damage over time.
Proper drainage reduces the risk of freeze-thaw distress, where water expands as it freezes, cracking or spalling the concrete.
It also extends the life of coatings or membranes by minimizing exposure to standing water. Regular slope checks ensure your balcony stays protected.
Code and warranty considerations
Before starting any work, check local building codes for required slope ranges. These vary by region, so it’s important to know the specifics for your area.
Also, review product warranties for waterproofing materials. Many require a minimum slope to maintain coverage.
Ensuring your balcony meets these requirements protects you from potential legal issues and voided warranties down the line.
Planning and Preparation Before Screeding
Start with a site-specific survey and access plan that covers balcony dimensions, edge heights, railing clearances, and drainage slopes. Note any weight limits from the structural plan and manufacturer guidelines for balcony use during curing. This sets a safe, workable baseline before any concrete goes down.
Define staging, containment, and pathing to keep moisture, debris, and people moving safely. Coordinate with waterproofing, tiling, railing, and drainage crews to minimize rework and protect existing services. Prepare equipment and safety protocols so you can work efficiently without compromising the balcony or its neighbors.
Site assessment and survey
Before you start, check the balcony’s condition. Look for cracks, loose material, or signs of water damage.
Fall direction: Check where water flows to ensure proper drainage. This helps avoid pooling and future issues.
Drain locations: Locate all existing drains. Make sure they’re clear and functioning properly.
Measure reference elevations using a laser level or similar tool. This ensures your slopes are accurate and consistent.
Permits and building codes
Check if you need permits for this work. Your local building department can advise.
Fire & waterproofing: Ensure your concrete meets fire resistance ratings and waterproofing standards. This is crucial, especially in high-rise buildings.
High-rise safety: Follow rules for working at height. Inspect balconies regularly to ensure they’re safe for work.
Consult with a structural engineer if you’re unsure about any aspect of your project’s compliance with codes and regulations.
Safety plan and PPE
Fall protection: Use guardrails, safety nets, or personal fall arrest systems where necessary. Always wear a harness when working at height.
Edge containment: Install screed rails to contain the concrete and prevent falls.
Ventilation: Ensure proper ventilation to protect against harmful dust and fumes from wet concrete.
Wear appropriate PPE, including hard hats, safety glasses, gloves, and steel-toe boots. Always follow manufacturer guidelines for your specific equipment.
Tools and Materials Checklist
Core tools and consumables include screed rails, straightedges, a laser level, grade rods, floats, trowels, mesh, and appropriate concrete mixes. Add region-specific admixtures only after checking local guidelines and engineer instructions. This list keeps the job moving without constant tool hunting.
Selection criteria focus on rail lengths and materials (aluminum vs. plastic), mix design guidelines, slump targets, and when to involve a structural engineer for concrete specs. Verify compatibility with edge detailing and curing requirements before pouring.
Hand and power tools (screed rails, laser levels, rakes)
Before you start screeding your balcony concrete slope, ensure you have all the right tools. This checklist helps you prepare.
- Screed Rails: Choose aluminum for strength and durability. Check lengths match your longest slope.
- Laser Level: Ensure it’s calibrated before use. Accuracy is key for consistent slopes.
- Straightedges: Use for fine-tuning after screeding. Check they’re straight and undamaged.
- Rakes: Needed to strike off excess concrete. Ensure tines are intact.
- Floats: For finishing the surface. Check for damage or wear.
- Trowels: For final smoothing. Inspect for straight edges and no bends.
Quick rule: Always check tools before use to avoid job-site delays.
Material selection (concrete mixes, additives, edge profiles)
Selecting the right materials ensures a durable, long-lasting balcony slope. Here’s what to consider.
- Concrete Mix: Choose a mix designed for slabs and slopes. Check with your supplier or engineer.
- Admixtures: Consider adding shrinkage-reducing or bonding agents. Follow manufacturer guidelines.
- Edge Profiles: Use durable, weather-resistant profiles. Avoid sharp edges for safety.
Quick rule: Always follow manufacturer specs and engineer instructions for material selection.
Accessories and temporary supports (formwork, mesh, sealants)
These accessories help create a strong, durable balcony slope. Don’t forget to include them in your plans.
- Formwork: Use sturdy, well-maintained formwork. Check for leaks or weak points before pouring.
- Reinforcement Mesh: Include it for added strength. Ensure it’s properly anchored.
- Temporary Anchors: Use to secure formwork. Check they’re secure and level.
- Membrane Protection: Apply a waterproof membrane to prevent dampness. Follow manufacturer guidelines.
- Sealants: Choose compatible sealants for joints and edges. Ensure they’re suitable for your concrete mix.
Quick rule: Always use quality accessories and supports for a strong, lasting balcony slope.
Screed Rails and Techniques for Large Balcony Areas
Establish reference geometry first by using laser checks, string lines, and well-spaced marks to guide screed rail placement. This keeps slopes consistent as you move across wide surfaces. Avoid guesswork that leads to uneven edges or misaligned drains.
Screed rail layout for large areas involves choosing rail type, spacing along the edges and mid-span, and a secure anchoring method to prevent movement during pours. Plan substrate prep, edge containment, and cure conditions so you can maintain a continuous, uniform slope without flattening joints.
Setting screed rails and reference points
Start by establishing your main slope, run, and fall using laser checks and string lines. Mark these reference points across the balcony at regular intervals.
Secure temporary aluminum or steel screed rails to these marks. Use rail spacers along slab edges and mid-span for stability. Anchor them firmly to prevent movement during pouring.
Pro tip: Ensure rails are level and plumb, following your reference lines exactly. This maintains a consistent slope across the entire balcony area.
Pipes, screeders and continuous screeding methods
For large balconies, use pipes or straightedges as additional screeds to maintain a consistent depth. Run them parallel to your rails.
When screeding, work in a smooth, continuous motion. Keep the tool’s edge in contact with the rail and pipe at all times. This ensures an even pass across the entire slab.
Pro tip: Use a 2×4 or similar straightedge for smaller areas to maintain control and consistency.
Working in sections and managing joints
Divide your balcony into manageable sections. Pour, screed, and finish each section before moving on to the next. This helps maintain a consistent slope and avoids redistributing unset concrete.
Create clean construction joints by back-flagging them with a trowel or jointing tool before pouring. This prevents the new slab from bonding to the existing one.
Pro tip: Tie new screeds into existing slabs using a ‘staggered’ approach. This helps distribute loads evenly and prevents cracking at joints.

Laser Checks, Measuring and Verification
Before pouring, select the appropriate laser level and complete calibration steps to ensure horizontal and vertical accuracy. Start with a known reference and confirm line readings align with grade rods across the balcony. A solid setup reduces ongoing rework later.
Establish check-point locations and spacing, such as ends, midspan, and transitions to doors or railings, and decide monitoring frequency. Record readings and flag deviations so you can correct any slope issues before proceeding with more screed passes.
Choosing and operating laser levels for slopes
Laser levels are your eyes on the job. Pick one that’s self-leveling, has a good range, and sits steady on its tripod.
Self-leveling: This ensures accurate readings. Check it works before you start.
Range: The laser should reach from one end of your balcony to the other. Check in real conditions, not just specs.
Laser rod and target workflows (grade rods, check points)
Use this checklist when setting up control elevations with a laser rod and targets.
- Mark ends: Start at both ends. Ensure they’re level and match your plans.
- Midspan checks: Every 2-3 meters, mark midpoints. This catches any dips or humps.
- Transitions: Check where balcony meets doors or railings. These can throw off readings if not accounted for.
- Targets: Use targets to ensure you’re reading the right line. They make it easy to see if your slope’s on track.
- Recheck critical points: After screeding, recheck ends and transitions. These are prone to errors.
- Document readings: Keep a record of your readings. This helps spot trends and troubleshoot issues.
- Compare to plans: Ensure your readings match your plans. If not, adjust your screed rails or re-level.
- Recheck after adjustments: After making changes, recheck your points. Make sure you’re on track.
Quick rule: Always double-check critical points and document readings to keep your slope consistent.
Visual checkpoints and tolerance checks
Lasers are great, but they’re not the only tool in your kit. Use these visual and tactile checks to confirm your slope.
- Drain flow tests: Pour water onto the slab. Watch how it flows. It should follow your planned fall.
- Straightedge runs: Lay a straight edge across the surface. Check for dips or humps. Your slope should be consistent.
- Surface plane checks: Feel the surface with your hands. You should sense the slope, not just see it.
- Check edges: Ensure your edges are level and follow your planned fall. They’re easy to miss but crucial for proper drainage.
- Verify tolerance: Check if your readings are within acceptable limits. Too much variation can cause issues later on.
- Recheck after rain: After it rains, recheck your slope. Rain can affect the surface and change readings.
Quick rule: Always use multiple methods to confirm your slope. This helps catch any errors before they become big problems.
Edge Detailing and Waterproofing Transitions
Edge detailing should define proper geometry, coping alignment, and formwork that transitions cleanly between concrete, parapets, and rail systems. Include cant or slope at the edge to promote runoff and reduce capillary draw into the edge. This helps protect waterproofing up the line.
Interface points with parapets, rail posts, and drains require careful planning for corrosion-resistant fasteners and sealants. Document how posts anchor into the screed without compromising edge integrity and how drains integrate with the slope and membrane system.
Edge profiles, cant strips and drip edges
The edge of your balcony is where water meets concrete. Get it wrong, and you’re asking for trouble. Here’s how to get it right.
Edge profiles guide water away from the facade. They can be formed into the slab or added as a separate piece. Make sure they’re compatible with your parapet and railing system.
Cant strips create a slope at the edge, promoting runoff. They should extend beyond the face of the parapet to prevent water from wicking up behind it.
Finally, drip edges. These little guys stick out over the edge, creating a drip line that keeps water away from your soffit and railing attachments. They’re usually made of metal or plastic and are secured with screws or adhesive.
Junctions with balustrades, drains and expansion joints
Balconies aren’t islands. They connect to other parts of your building. Here’s how to make those connections water-tight.
At balustrades, use a flexible sealant between the post and the concrete. This allows for movement without leaks. Corrosion-resistant fasteners are a must here.
Drains need to be integrated with your screed slope. Seal around them with a compatible, cleanable sealant. Make sure they’re clear of debris and can drain freely.
Expansion joints let your concrete move without cracking. Fill them with a compressible material that won’t allow water through. Seal over the top with a flexible sealant.
Waterproof membranes and protection during finishing
Membranes are your first line of defense against water intrusion. Here’s how to install, protect, and integrate them with your screed and edge flashings.
Install the membrane before you pour your concrete. Make sure it’s properly primed and extends up the sides of any formwork. Overlap seams correctly to prevent leaks.
Protect the membrane during finishing. Cover it with a protective board or plywood until the concrete is poured. This prevents punctures and tears.
Once your concrete is cured, integrate the membrane with your edge flashings. Make sure there’s a continuous waterproofing plane at transitions. Clean the surface before applying any coatings to prevent delamination.
Common Mistakes, Troubleshooting and Repairs
Identify common slope and drainage failures such as low or high edges, midspan sags, and pooling, and verify with laser checks, straightedges, and water tests. Quick diagnostics save major rework later. Don’t overlook subtle signs that hint at deeper issues.
Develop a repair decision tree that distinguishes cosmetic patches from structural fixes. Outline step-by-step approaches for different defect severities and include post-repair checks to confirm the fix holds up to use and weather.
Over-slope, ponding and uneven screeds
Uneven slopes can lead to water pooling, which causes long-term damage. Check your balcony’s slope using a laser level or straightedge.
Low edges: Add a small amount of concrete to the low spots, then re-screed and verify with laser checks.
High edges: Remove excess concrete from high areas before final finishing. Re-check slope after repairs.
Regularly inspect your balcony for ponding. If water pools, it’s too flat – add a slight slope (1/4 inch per foot) towards drains.
Hairline cracks, delamination and poor adhesion
Fine cracks or delaminating surfaces indicate weak bonding. Inspect for inadequate curing, improper surface prep, or incompatible materials.
Surface prep: Clean, prime, and ensure substrate is sound before applying new concrete.
Repairs: Use compatible repair mortars or overlays. For small cracks, use a flexible filler. For larger issues, remove damaged material, prepare the surface, and apply a new layer.
Prevent future problems by using appropriate materials and following proper curing procedures.
Repair strategies and when to call a pro
Minor cosmetic issues can often be repaired DIY. But structural concerns or waterproofing failures may require professional help.
Cosmetic repairs: Patching, surface skim coats, or re-screeding can fix small defects. Always pre- and post-check with laser levels to ensure slope accuracy.
Structural fixes: If you find significant cracks, delamination, or slab removal is necessary, call a pro. They have specialized equipment and expertise for major repairs.
Regular inspections help catch issues early. Don’t hesitate to consult with an expert if you’re unsure about any repair.
Cost, Time Estimates and DIY Vs Professional Decision
Costs come from material choices, slope precision, edge detailing, formwork, reinforcement, and access constraints. Each factor influences the budget, so tally these up with care and check the latest site conditions before committing. Use this to compare DIY vs. contractor scenarios.
Outline typical project sequencing from assessment to curing, highlighting where DIY is feasible and where professional oversight is prudent. Use quotes from multiple contractors and verify credentials to avoid surprises during the project.
Cost factors and budgeting tips
The cost of balcony screed work varies based on several factors. Here’s what to consider:
Access: Upper floor balconies need safe, efficient access for materials and labor. Renting or purchasing specialized equipment like hoists can add to costs.
Waterproofing system: The choice of waterproofing membrane affects the budget. High-end systems cost more but offer better protection.
Labor: Hiring professionals for specific tasks can increase costs, but it ensures quality work and reduces risks. DIY steps can lower labor costs but require time and skill investment.
Time planning and sequencing
Balcony screed projects follow a sequence of tasks. Plan your timeline accordingly:
Assessment & Substrate Prep (1-2 days): Inspect the balcony, prepare the substrate, and address any issues before starting.
Formwork & Reinforcement (1-3 days): Install formwork and reinforcement based on your slope design. This step may take longer if access is limited or complex detailing is required.
Screed Application & Compaction (1 day per 200 sq ft): Apply the screed mix, using laser checks to ensure slope precision. Compact well for a strong, durable finish.
When to hire a professional for balconies (high-risk scenarios)
Some balcony screed projects require professional involvement due to high risks. Consider hiring a pro in these situations:
Complex drainage: If your balcony has intricate drainage needs, like multiple outlets or complex slopes, a professional can ensure proper water management.
Structural overlays: When screeding over existing structures, professionals can assess the substrate’s integrity and reinforce as needed to prevent issues later on.
High-rise access & warranty-sensitive systems: Upper floor balconies with limited access or warrantied waterproofing systems require careful planning and execution. Professionals have the experience and equipment to handle these challenges safely and effectively.
Conclusion
Balcony slopes that are wrong give you leaks, cracks, and a slick, ugly edge. Do the work right, and you get a durable deck that drains properly and looks solid from edge to edge.
First, inspect the area, set a clear target slope, and prepare a clean, stable base. Then work in the practical order: lay screed rails on the prepared substrate, mix and place concrete in controlled lifts, check the slope with a laser or simple level as you go, and finish with proper edge detailing and a transition to waterproofing. Keep the work small, test often, and cure according to the material you choose. Focus on safety first, and verify every critical step before moving on.
Common mistakes to avoid: not cleaning the surface well enough or skipping the planned slope, rushing lifts of screed or misreading the laser checks, and skipping edge detailing or proper waterproof transitions. Safety rules: wear PPE, keep children and pets away, work in good weather, and avoid heavy loads or vibration on fresh concrete. If the project would require extensive demolition, unusual angles, or a long balcony run, consider calling a professional rather than pushing on alone.
When in doubt, get a quick professional check before final curing to confirm slope and waterproofing compatibility. With careful planning and strict adherence to the checks and steps, you’ll finish with a safe, durable balcony that drains well and looks right. Stay steady, stay safe, and you’ll have a solid verdict at the end you can stand on.
FAQ
How do I screed a large balcony area efficiently?
Start with a straight screed rail system or edge board to keep a consistent slope. Work in small, manageable runs, pulling the screed away from the edge with a steady hand to avoid gaps. Check level frequently with a laser or a trusted level and adjust as you go.
What essential grading equipment should I have for hardscaping projects?
Get a straight edge, screed rails or boards, a long carpenter’s level, and a quality laser level or water level. Have a hand trowel, float, and a bucket for minor adjustments. Always check the manufacturer instructions for any tool-specific guidance.
How should I use laser tools for precise leveling on a balcony?
Set the laser to project a level line across the area, and verify the slope at multiple points. Compare the laser readings to your screed rails and adjust the screed as you go. Follow the laser tool’s setup guide and check batteries and mounting safety before starting.
What safety steps are crucial during paver installation and screeding?
Wear eye protection, gloves, and sturdy footwear. Keep the work area clear of trip hazards and follow manufacturer instructions for tools and materials. Stop if you notice cracks, loose substrates, or unexpected movement in the edge details.