

Introduction
Anchor bolts in fresh concrete are bolts placed before the pour to lock in exact locations for the structure.
Getting them right means using simple templates, protecting threads during the pour, and checking alignment as you go. I’ll keep it plain and practical, with no fluff or guesswork.
For proper placement, work from the layout and confirm bolt centers with a simple sight check and measuring edge to edge. Templates can be boards or lightweight forms that guide bolt holes or sleeves; choose something stable and reusable. Protect threads with appropriate caps or plastic protectors and keep concrete from seizing the threads; always verify that the bolts still sit plumb and aligned after the pour.
Key takeaways
- Place anchor bolts accurately using templates tied to fresh forms; verify alignment.
- Use multiple templates for dead-accurate layout across long runs and corners.
- Protect threads during pour with caps or thread protectors; wear PPE and inspect.
- Cast-in-place vs post-installed: follow manufacturer guidance for embedment depth and cure.
- Adhesive anchors need clean holes and compatible adhesives; verify cure times per product.
- On-site calculators or templates help translate layout to real coordinates safely.
Table of Contents
- Introduction
- Key takeaways
- Why Anchor Bolt Placement and Type Matter
- Templates and Layout Techniques for Dead-Accurate Placement
- Installing Anchor Bolts in Fresh Concrete — Cast-in and Post-Installed Overview
- Thread Protection and Preserving Accuracy Through Pour and Cure
- Adhesive Anchors and Quick-Cure Adhesives — Selection and Application
- Tools, Materials Checklist, and on-Site Calculators
- Safety, Common Mistakes, and Troubleshooting on Site
- Practical Next Steps and Trusted Sources
- Conclusion
- FAQ
Why Anchor Bolt Placement and Type Matter
Correct anchor bolt selection and placement influence performance, safety, and long-term durability. It matters for both structural and non-structural connections.
Choose bolts with appropriate load resistance and embedment practices, and verify that the chosen type matches the project conditions and environmental exposure. Inappropriate mismatches can lead to loosening or failure over time if edge distance, spacing, or embedment are not respected.
Understanding loads, embedment, and edge distances
Anchor bolts must resist various loads: tension (pulling out), shear (sideways force), uplift (lifting up), or dynamic (vibrating). Structural connections need heavier-duty bolts than non-structural ones.
Embedment depth is crucial. It’s the distance from the concrete surface to the top of the anchor. Deeper embedment means better resistance to loads. But, it also increases material usage and cost.
Edge distances matter too. That’s the space between the bolt and the nearest edge or corner. Too little, and the bolt could break off under load. Too much, and you waste concrete. Aim for 1.5 to 2 times the bolt diameter from edges, and 3 times from corners.
Relevant codes, standards, and specifications to verify
Before you start, check these: ACI 318-19 (Building Code Requirements for Structural Concrete), AWS D1.4/D1.4M:2015 (Structural Welding Code – Reinforcing Steel), and manufacturer load tables.
Confirm your project’s design documents, including drawings, specs, and calculations. They should match the codes and standards you’re following.
If there are discrepancies or you’re unsure, consult a structural engineer. It’s better to be safe than sorry when it comes to structural integrity.
Templates and Layout Techniques for Dead-Accurate Placement
Transferring locations from drawings to forms should prioritize repeatable templates and measurable tolerances. The goal is to lock in bolt positions before any concrete is poured. Keep the layout consistent across the whole project to minimize drift.
Use a mix of pre-drilled templates, jig blocks, stake-off strings, and laser layout to hold spacing and alignment. Map coordinates carefully and minimize rounding errors as you translate imperial and metric notes to on-site measurements.
Creating and using reusable physical templates
Use this checklist when setting cast-in bolts and conduit positions to ensure accurate placement. Templates help maintain consistency across multiple pours.
- Gather materials: Ensure you have the correct template material (wood, metal, or plastic), fasteners, and anchoring hardware.
- Check template dimensions: Verify the template’s size matches your plans. Tolerance should be within 1/8″ to maintain structural integrity.
- Anchor template securely: Use appropriate fasteners and ensure they’re tight to prevent movement during pouring.
- Mark bolt/conduit positions: Clearly mark where bolts and conduits will go on the formwork using a pencil or marker.
- Check alignment with layout lines: Ensure template marks align with overall layout lines to maintain accuracy across the entire structure.
- Test fit bolts/conduits: Before pouring, test-fit bolts and conduits through the templates to confirm they match up correctly.
- Check for obstructions: Ensure no formwork or other obstacles will interfere with template removal after curing.
- Inspect template condition: Check that the template is in good condition, free from cracks or warping that could affect accuracy.
Quick rule: Always double-check your work. A few minutes spent verifying can save hours of rework and costly mistakes.
Digital layout transfer: CAD, laser, and BIM workflows
Use this checklist when transferring digital designs to your jobsite using CAD, laser levels, or Building Information Modeling (BIM) tools. It’s crucial to ensure accurate placement of elements like walls, doors, and windows.
- Check CAD file scale: Ensure the drawing scale matches the site dimensions. Inaccurate scaling leads to misplaced elements.
- Verify coordinate system: Confirm the CAD coordinates match your jobsite’s reference points. Mismatched coordinates result in layout errors.
- Use correct laser level type: For horizontal layouts, use a self-leveling laser; for vertical, use an alignment laser. Using the wrong type causes inaccurate lines.
- Calibrate total station: Before starting, calibrate your total station to ensure accurate distance and angle measurements. Uncalibrated tools lead to layout errors.
- Check laser level bubbles: Ensure the laser level’s spirit levels are correctly set for accurate horizontal or vertical lines. Bubbles out of level cause inaccurate layouts.
- Confirm BIM model accuracy: Cross-check BIM model dimensions with CAD drawings and site measurements to avoid errors in transferred data.
- Use appropriate layout tools: For large-scale projects, use total stations; for smaller jobs, lasers are sufficient. Using the wrong tool can lead to inaccurate layouts or wasted time.
- Double-check layout before marking: Walk through your layout with a tape measure and ensure all dimensions match your plans. Skipping this step may result in costly rework.
Quick rule: Always double-check your layout tools, settings, and measurements to avoid expensive rework due to layout errors.
Visual checkpoints and measurement verification
Before you pour that concrete, use this checklist to double-check your layout. It’s quick, easy, and helps avoid costly mistakes.
- Check template alignment: Ensure all reusable templates are properly aligned with the formwork. Misaligned templates can cause uneven surfaces.
- Verify dimensions on site: Measure key points on your layout to confirm they match your plans. This helps catch any errors in data transfer from CAD or BIM.
- Check formwork plumb and level: Use a laser level or traditional bubble levels to ensure your forms are square, level, and plumb. Out-of-square forms lead to sloped or uneven slabs.
- Confirm rebar placement: Check that reinforcement bars are correctly placed according to your plans. Incorrect rebar placement weakens the final structure.
- Inspect formwork joints: Ensure all joints in your formwork are tight and clean. Leaky joints can cause honeycombing or other surface defects.
- Check concrete mix design: Verify that the concrete mix delivered matches your specified design. Incorrect mixes can lead to weak or poorly finished slabs.
- Confirm strike-off height: Measure from the top of your formwork to the bottom to ensure it matches your desired slab thickness. Incorrect heights waste material or result in thin, weak slabs.
- Inspect control joints: Ensure all control joints are properly marked and will be cut at the correct time. Skipping this can cause random cracking due to shrinkage.
Quick rule: Always check your layout from multiple angles and perspectives. What looks right from one side might have issues from another.
Installing Anchor Bolts in Fresh Concrete — Cast-in and Post-Installed Overview
Cast-in-place bolts and post-installed anchors each have clear use cases, with distinct pros and cons. Consider where each method shines based on access, tolerances, and project timing. Use the method that best keeps alignment stable through pour and cure.
Layout, edge distance, and spacing discipline are essential for both approaches. Protect threads during pour and curing to prevent damage and movement before the concrete gains strength.
Best practices for setting cast-in anchor bolts
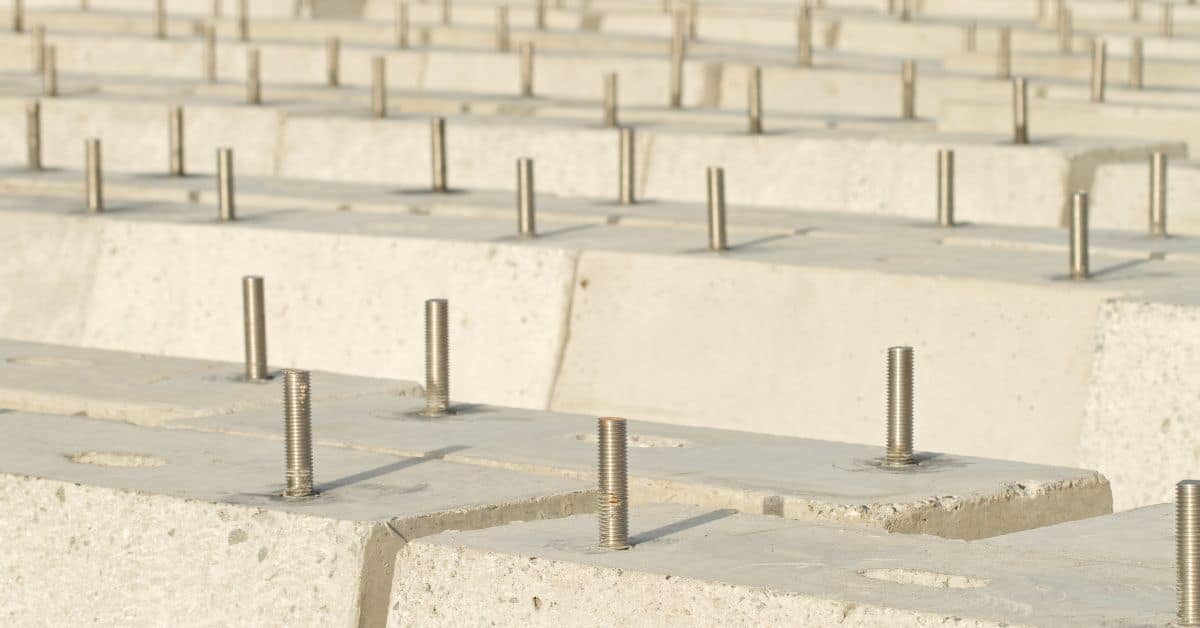
Position your anchor bolts accurately. Mark their locations on the formwork before pouring. Use a template to ensure consistency and precision.
Align bolts plumb, level, and square to the structure. Brace them temporarily to keep them stable during vibration. Time your bolt setting relative to the pour for optimal results.
Use anchor sleeves or washers to protect threads from concrete. Keep bolts clean before pouring to prevent contamination.
When to choose post-installed anchors and drilling planning
Post-installed anchors are ideal when you can’t cast bolts in fresh concrete. They’re great for retrofits, repairs, or when access is limited.
Drill holes in cured concrete using a suitable drill bit. Plan your drilling sequence to minimize vibration and maintain structural integrity. Assess the substrate’s strength before drilling.
Use appropriate anchors based on load requirements, substrate type, and hole size. Follow manufacturer guidelines for installation.
Quality control during pour and curing
Inspect your bolts during the concrete pour. Ensure they’re properly embedded and aligned. Check for any movement or rotation.
Prevent bolt movement by using proper bracing, vibration control measures, and maintaining consistent concrete flow around the bolts.
Cure concrete according to specifications. Monitor bolts during curing to ensure they maintain their alignment and position. Accept or reject embedded anchors based on post-pour verification checks.
Thread Protection and Preserving Accuracy Through Pour and Cure
The main goal is clean threads and flat bearing surfaces after cure. Protectors, plugs, and appropriate masking help achieve that. Plan protection as part of the pour sequence rather than as an afterthought.
Keep bearing surfaces shielded from splatter, control vibration, and prevent concrete ingress into threads. Remove protections at the right time and verify thread diameter and surface flatness during inspection.
Temporary caps, sleeves, and barrier methods
Before pouring concrete, protect your anchor bolts’ threads and bearing surfaces. Here’s how:
Caps and Sleeves: Use plastic or rubber caps and sleeves designed for this purpose. They’re cheap, reusable, and easy to install.
Securing Them: Press fit them onto the bolts, then secure with tape or wire to prevent concrete intrusion during vibration. Use a hammer to tap them on gently if needed.
Materials: For repeated use, consider silicone or rubber caps and sleeves. They’re flexible, durable, and won’t crack under pressure.
Threadbox templates, storage, and post-pour cleanup
Use threadboxes to maintain thread alignment during concrete pours. Here’s a quick checklist:
- Installation: Place threadboxes over bolts before pouring. Ensure they’re level and secure.
- Concrete Coverage: Pour concrete to the correct depth, ensuring threads are fully covered.
- Curing Time: Allow concrete to cure as per manufacturer’s recommendations before removing threadboxes.
- Removal: Gently tap and twist threadboxes off. If stuck, use a hammer and chisel carefully.
- Thread Inspection: Check threads for any damage or contamination.
- Cleaning: Clean threads with a wire brush or compressed air to remove any concrete residue.
- Re-threading/Repair: If threads are contaminated, re-thread or replace bolts as needed. Report any issues within tolerances.
- Storage: Store threadboxes in a dry place, ready for reuse.
Quick rule: Always inspect and clean threads after removal to prevent damage and ensure correct connection later on.
Adhesive Anchors and Quick-Cure Adhesives — Selection and Application
Adhesive anchors come in several categories, each with its own suitability. Match the type to fresh versus cured concrete, and consider environmental compatibility. Look to the label for guidance on use cases and limitations.
Quick-curing formulas can speed up workflows but may affect pot life and tolerance. Follow surface prep, mixing, seating, and cure protocols exactly as instructed by the manufacturer and document results for records.
Adhesive types, substrate compatibility, and uses
Choosing the right adhesive for your anchor bolts is crucial. Here’s a quick rundown:
Epoxy: Great for fresh concrete. Bonds well, resists chemicals, but takes longer to cure.
Polyurethane: Fast curing, good for both fresh and cured substrates. Less resistant to chemicals than epoxy.
Hybrid/Vinyl-ester/Polyester: These are blends or alternatives offering varied performance. Always check compatibility with your specific concrete mix and loads.
Quick-cure adhesives: benefits, limits, and timing
Quick-cure adhesives speed up your workflow. But they’re not always the best choice:
Benefits: Reduce formwork disruption, hasten project handoffs.
Limits: May have shorter pot life or reduced gap tolerance. Avoid in cold/wet conditions as cure times can be unpredictable.
Timing: Use when you need to minimize downtime and don’t mind a bit less working time before the adhesive sets.
Application best practices and inspection for adhesive anchors
Before you start: Check your anchor bolts are clean, dry, and ready. Here’s a quick checklist:
- Surface prep: Clean holes, remove dust, ensure no grease or oil.
- Mixing: Follow ratios exactly. Overmixing can cause air entrapment.
- Injection: Use a syringe with the correct nozzle size. Avoid overfilling.
- Insertion: Ensure bolts are fully seated, no voids, and no air pockets.
- Cure protection: Keep anchors warm (if possible) and moist during cure.
- Load readiness: Check manufacturer’s guidelines for when anchors can bear load.
- Visual inspection: Look for signs of cracking, delamination, or incomplete cure.
- Pull-out test: If required, perform a pull-out test to verify anchor strength.
Quick rule: Always follow the manufacturer’s guidelines. They know their product best.
Tools, Materials Checklist, and on-Site Calculators
A solid on-site kit covers hand tools, power tools, and safety gear. Check tool condition and battery status before starting. Keep blades and bits sharp for clean holes.
Know what anchors and adhesives you have on hand and how to store them. Use calculators or product selectors to size anchors and estimate adhesive quantities, then cross-check with manufacturer guidance.
Essential tools and consumables for cast-in and adhesive anchors
Before you start, make sure you have all the necessary tools and consumables to ensure a smooth installation process.
- Tape measure: To accurately mark out anchor positions. Missing this can lead to incorrect spacing or alignment.
- Chalk line: For snapping straight lines and marking out templates.
- Level: To ensure anchors are plumb and level before drilling.
- Square: For checking right angles during layout.
- Hammer drill & SDS bits: For drilling into concrete. Using the wrong bit can cause damage or inaccurate holes.
- Impact driver: For driving screws in templates and setting anchors.
- Anchor templates: For accurate layout of multiple anchors. Skipping this can result in misaligned bolts.
- Protective caps: To prevent concrete from filling anchor threads during pouring.
- Thread protection sleeves: For protecting threads from damage during handling and installation.
- Torque wrench: To ensure anchors are tightened to the correct specification. Over-tightening can strip threads or cause damage.
- Mixing/extrusion equipment: For preparing adhesive anchors according to manufacturer’s instructions. Incorrect mixing can lead to poor adhesion or curing issues.
Quick rule: Always double-check your tools and consumables before starting any installation to avoid delays or mistakes.
Using calculators and product selectors correctly
Online calculators and app tools can help you select the right anchors and determine adhesive quantities. Here’s how to use them effectively.
- Concrete strength: Enter the design strength of your concrete (e.g., 20-30 MPa). Using incorrect values can lead to insufficient embedment or anchor failure.
- Embedment depth: Calculate this based on the required load and concrete strength. Insufficient embedment can result in pull-out failures.
- Load range: Enter the expected loads (tension, shear, or both) to determine suitable anchor sizes.
- Edge distance: Input the minimum edge distances to avoid splitting or cracking of the concrete.
- Unit preferences: Choose your preferred units (metric or imperial) for consistent results.
- Margin for safety: Always add a margin for safety (e.g., 1.5-2 times the calculated load) to account for unexpected loads or variations in concrete strength.
- Manufacturer guidance: Cross-check calculator results with manufacturer’s data and recommendations to ensure accuracy.
Quick rule: Always validate online calculator results with manufacturer data to ensure you’re using the right anchors and adhesive quantities for your specific application.
Safety, Common Mistakes, and Troubleshooting on Site
Establish a safety framework with appropriate PPE and site controls. Identify hazards such as protrusions, edges, and curing heat or cold. Plan for safe working limits and clear communications.
Pre-install checks prevent common errors: verify type, layout, clean and dry holes, and protection for threads. When issues occur, use structured fixes and document deviations for future maintenance.
Safety protocols during layout, pour, drilling, and tensioning
Always wear appropriate PPE. That’s eye protection, gloves, goggles, and a hard hat when working at height.
Lockout-tagout is crucial if you’re near energized systems. Dust can be a hazard during drilling, so use face shields or other dust control measures.
Be cautious around rebar protrusions and formwork edges. Hot or cold weather can affect concrete curing, so plan accordingly.
Common errors and how to prevent them
Here are some mistakes you should avoid:
- Mislocation: Double-check your templates against structural drawings.
- Improper protection: Use thread protectors or caps to keep threads clean and dry.
- Inadequate hole cleaning: Ensure holes are clean, dry, and the right diameter and depth before installing anchors.
- Wrong adhesive selection: Choose the right adhesive for your substrate and application.
Regular checks and careful planning will help prevent these errors.
Troubleshooting misaligned, contaminated, or under-performing anchors
If you find issues with your anchors:
Misaligned anchors: You might need to re-drill and realign. If it’s a minor issue, you could use epoxy or sleeves to correct.
Contaminated threads: Clean them thoroughly before installing the anchor. If contamination is severe, consider replacing the anchor.
Under-performing anchors: Check if they’re properly embedded and torqued. If not, consult a structural engineer for advice on corrective anchoring or repair options.
Practical Next Steps and Trusted Sources
Build an installation plan that balances upfront material and labor with project schedule and risk. Outline the sequence from pre-planning to cure considerations to stay dead-accurate. Keep it practical and repeatable.
Point to digital tools, templates, and reputable sources for ongoing support. Include a simple decision log and documentation plan to record measurements, deviations, and approvals as the project advances.
Cost drivers and how to estimate project impact
The primary cost drivers for your anchor bolt installation are labor hours, anchor type, adhesive yield, template fabrication, and contingency. Let’s break them down.
Labor Hours: Estimate the time needed for layout, formwork, pouring, and post-pour work. More complex layouts will take longer.
Anchor Type & Adhesive Yield: Different anchors and adhesives have varying costs per unit. Quick-cure adhesives may cost more but save on labor. Get quotes from suppliers for the exact products you need.
Template Fabrication: Pre-made templates can be expensive, while custom ones require fabrication time and material costs. Consider your budget and project timeline when deciding.
App-based tools, calculators, and online communities
Leverage digital tools to streamline your selection process and connect with industry experts for support.
- Adhesive Calculators: Use these to estimate adhesive yield needed. Tip: Round up to account for waste.
- Product Selectors: Find the right anchor and adhesive combo for your job. Warning: Not all combos are compatible, so double-check.
- Submittal Generators: Create professional-looking submittals with just a few clicks.
- Manufacturer Support Channels: Reach out to manufacturers for technical support and product-specific advice.
- Industry Forums & Communities: Join online forums to learn from others’ experiences, ask questions, and stay updated on best practices. Tip: Be respectful and follow community guidelines.
Conclusion
Anchor bolts must be set with care in fresh concrete to protect safety, ensure durability, and keep the finished look clean. When you do it right, you’ll avoid costly rework and you’ll have a solid base for anything you bolt to it.
Keep your method in a simple, repeatable flow: verify layout and bolt type; set up templates that hold dead-accurate positions; cast-in or install post-installed bolts with the right thread protection and cure; keep adhesive or fastener choices within the project’s requirements; and test fit and align before the concrete sets. Do small tests first, document the spacing on a scrap panel, and check alignment with a straightedge or string line before you pour.
Common mistakes to avoid are clear: don’t skip thread protection or contaminate the threads during pour, don’t rely on a guess for spacing or height, and don’t rush cure times or ignore safety gear. Don’t move or bend templates after plastering the bolt holes, and don’t push through a poor seal or over-torque fasteners while the concrete is still green. Use proper PPE, work slowly in the critical window, and verify measurements with a level or plumb line.
If the project is large, uses heavy loads, or involves critical supports, know when to call in a pro. When in doubt about load ratings, anchor type, or complex layouts, stop and get a second check. The right step now is to seal the plan, run a quick demo in a safe spot, and proceed with the confidence that comes from clear checks, proper protection, and disciplined curing. Stay focused, stay safe, and you’ll stay on the right side of solid.
FAQ
How do I properly place anchor bolts in fresh concrete for accuracy?
Set the bolts where you want them before the pour. Use a solid template or a quick jig to hold them steady as the concrete is laid and finished.
What templates work best for dead-accurate bolt positioning?
Simple, rigid templates that lock the bolt pattern in place work. Use them with a flat, level surface so the bolts don’t shift during pour and finish.
How can I protect the bolt threads during and after the pour?
Wrap threads with a protective tape or use a thread protector that won’t contaminate the concrete. Remove or replace protectors after set if they can stay in place without causing issues.
Why is accuracy so critical, and what are common fixes if I’m off?
Accuracy keeps the structure fit and avoids rework. If you’re off, you may need to relocate with inserts or adjust with the approved method per manufacturer instructions and local rules.