
Introduction
Adding gravel to bagged concrete is blending an appropriate amount of aggregate with a pre-mixed concrete product to improve stability and workability. Check the bag or manufacturer instructions for the recommended ratio and how the aggregate should be added. The aim is a consistent mix with fewer voids and a solid, workable set without weakening the concrete.
Compact the mix properly to remove air pockets, using the right tools and a steady, firm technique; poor compaction leads to weak spots. Use a shovel or rake to combine the gravel and powder, then move to the area and work it in with controlled passes or a mechanical compactor as appropriate. Always verify local rules and product labels if you’re unsure about mixing steps or equipment requirements.
Key takeaways
- Verify bagged concrete instructions before adding gravel or altering mix ratios.
- Keep gravel-to-concrete proportions within manufacturer guidance to avoid weak spots.
- Rake or skim gravel into dry mix, then add water gradually while mixing.
- Use a plate compactor or hand tamp to achieve uniform density.
- Wear proper PPE and follow site safety rules during mixing.
- Inspect cured surface and plan maintenance to prevent cracking and settlement.
Table of Contents
- Introduction
- Key takeaways
- When and Why to Add Gravel
- Understanding Mix Proportions and What “Correct Ratios” Means
- Tools and Materials Checklist
- Step-by-Step Mixing Process
- Compaction Techniques for Optimal Stability
- Curing, Finishing, and Long-Term Maintenance
- Cost, Material Selection, and Sourcing
- Safety, Common Mistakes, and Planning Tips for Beginners
- Conclusion
- FAQ
When and Why to Add Gravel
Gravel can be a good idea for certain small repairs or drainage improvements under slabs or driveways. It’s not always the right move, especially where a bagged mix is intended to carry structural loads. Consider patching needs, subgrade conditions, and the anticipated load before adding aggregate.
Use gravel for patching with limited volume, under slabs to aid drainage, or to fill voids in weak subgrades. For footings, slabs, or other structural uses, follow the bag instructions or specs, and avoid adding gravel if not recommended. Always test a small batch and verify bonding with the existing concrete before committing to a full pour.
Use cases and performance goals
Gravel’s role in your project depends on what you’re aiming for. Here are some key use cases:
Load-bearing: If you’re building a driveway, patio, or pathway that needs to support heavy loads, gravel’s your friend. It helps distribute weight evenly and prevents sinking. You’ll want larger aggregates, like 3/4″ or 1-1/2″, for better stability.
Drainage: For areas prone to waterlogging, like around foundations or in low spots, opt for gravel with good drainage properties. Smaller aggregates, such as 1/4″ or pea gravel, are your best bet here. They allow water to flow through easily.
Appearance-wise, smaller aggregates give a neat, tidy look while larger ones provide a more rustic feel. Always check product labels and manufacturer instructions for specific aggregate sizes suitable for your needs.
Structural vs. non-structural projects
When adding gravel to your DIY project, you need to understand the difference between structural and non-structural uses. This helps you choose the right type of gravel and know when to call in a pro.
Structural projects, like foundations or retaining walls, bear heavy loads. Here, you must use structural-grade gravel and follow bag instructions or consult a structural engineer. Check base compaction before adding gravel to ensure stability.
Non-structural projects, such as walkways or drainage paths, don’t bear significant loads. You can use non-structural-grade gravel here, following manufacturer guidelines. Always check local rules for safe gravel sizes and depths.
Understanding Mix Proportions and What “Correct Ratios” Means
Mix proportions describe cementitious material, aggregate, and water in relation to each other. Gravel becomes part of the aggregate and changes how the mix flows and cures. The idea is to balance workability with strength and stability.
Adding gravel alters how easy the mix is to work with, how dense it becomes, and how it compacts in forms. It also affects strength and yield per bag. Always verify exact specs on the bag or from the manufacturer and adjust water or additives as needed.
How gravel affects strength and workability
Adding gravel to your bagged concrete mix can significantly impact both the strength and workability of your final product. Gravel, as part of the aggregate, influences these properties in several ways.
Increasing coarse aggregate like gravel typically increases volume and stiffness, leading to a stronger concrete. However, it can also reduce workability, making your mix harder to handle and pour. This is because there’s less cement paste to coat the aggregates, reducing slump or flow.
To maintain good workability while still gaining strength benefits from gravel, you’ll need to adjust your mix design. Generally, this means adding more cement or water to compensate for the increased aggregate. But remember, too much water can weaken your concrete, so always find the right balance.
Typical DIY proportion approaches and checking specs
When adding gravel to bagged concrete, DIY homeowners often use one of two common mix proportion approaches: lean or standard mixes.
Lean mixes have a lower cement-to-aggregate ratio, typically around 1:6 or 1:7. They’re cheaper but offer less strength and durability. Standard mixes, with ratios like 1:4 or 1:5, provide better performance but cost more.
Regardless of the approach you choose, always check the bagged-mix directions. These will give you specific guidelines for your particular product. For structural uses, it’s also a good idea to consult with an engineer to ensure your mix meets building codes and safety standards.
When adding gravel, you’ll need to adjust water content too. Gravel absorbs water, so you’ll likely need to add more. But be careful not to overdo it, as excess water can weaken your concrete. Start with a small test batch to find the right balance before pouring large amounts.
Tools and Materials Checklist
This checklist identifies the essential tools, safety gear, and material options you should gather before mixing. It also emphasizes safety steps like ventilation, dust control, and proper bag handling. Have a plan for cleanup and spill prevention as part of your setup.
Choose gravel characteristics and bagged concrete options that suit the job, and note how additives may interact. Include PPE, mixing equipment, measurement tools, and a clean, level workspace to keep the job moving smoothly.
Gravel and bagged concrete types explained
Before you start, understand the materials. This checklist helps you choose right.
- Gravel type: Angular crushed stone (better for bonding) or rounded; sizes like 3/8″, 1/2″, 3/4″.
- Moisture content: Dry gravel works best. Wet can cause slump issues.
- Cleanliness: Dirt in gravel weakens concrete. Rinse if needed.
- Bagged concrete type: Type I/II (general-purpose), quick-setting, or portland cement blends.
- Gravel ratio: Commonly 1:3 to 1:6 gravel-to-cement by volume. Too much gravel weakens; too little makes it expensive.
- Admixtures: Plasticizers (for workability), set retarders, air-entraining agents (for freeze-thaw resistance).
- Compatibility: Check labels. Some admixtures don’t play nice with gravel or certain cement types.
- Slump and finish: More gravel means less slump. Expect a rougher finish.
Quick rule: Match gravel size to job needs, keep it clean, and find the right balance with your bagged mix.
Tools for mixing, placing, and compacting
Gather these tools before you start. They’ll make your job easier.
- Concrete mixer: Electric or gas-powered. Easier on the back than a wheelbarrow.
- Wheelbarrow: For small jobs or no power. Get one with good tires for easy rolling.
- Shovels: Round-point for mixing, square-point for placing.
- Troughs: For pre-mixing ingredients and checking moisture.
- Trowel: For spreading and finishing small areas.
- Tamper: Heavy-duty for compacting. Lightweight for edging.
- Screed: For leveling and consolidating concrete in forms.
- Rake: For spreading and leveling gravel base.
Quick rule: Choose tools that fit your job size and strength. Ergonomics matter for DIYers.
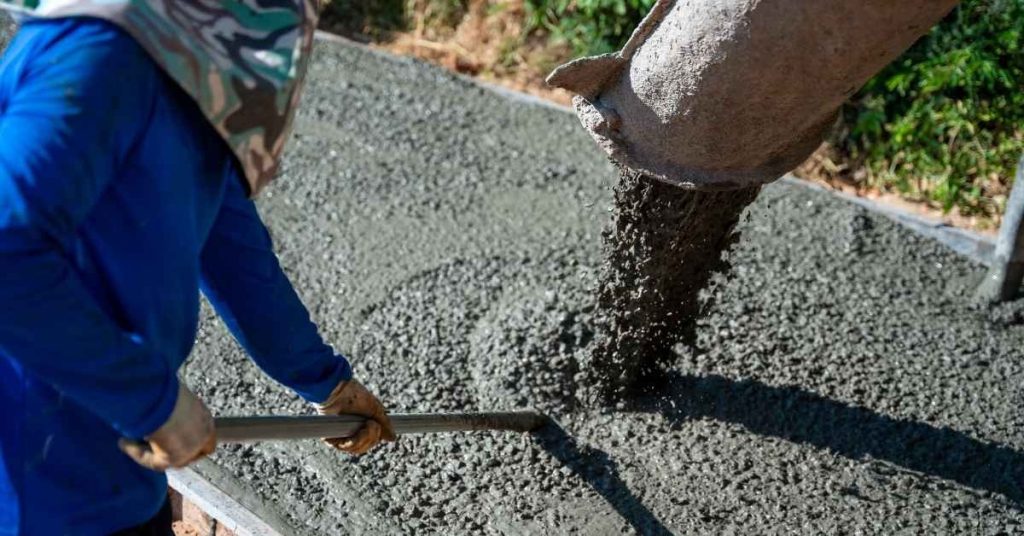
Step-by-Step Mixing Process
Set up a safe work area with the right PPE and a planned batch size. Verify the bagged concrete type and the desired gravel amount upfront. Keep a small, controlled workspace to minimize waste and mistakes.
Add dry components first, then the gravel, and gradually introduce water while mixing until uniform. Do 2–3 test mixes with incremental gravel changes to gauge workability and finish. Document results for future batches and adjust as needed.
Step-by-Step Process
Now that you’ve prepared your site and gathered your materials, let’s walk through the mixing process step by step. This will ensure a strong, durable concrete mix.
-
Check your materials: Before starting, ensure you have all necessary ingredients – cement, aggregate (sand and gravel), water, and any admixtures. Check product labels for exact proportions.
Why it matters: Using incorrect or contaminated materials can weaken your concrete.
Check: Visually inspect materials for contamination or damage.
-
Wet the aggregate: Before adding water, wet down your sand and gravel to prevent dust and ensure even distribution of moisture.
Why it matters: Dry aggregate can absorb too much water, leading to weak concrete.
Check: The aggregate should be damp but not swimming in water.
-
Calculate and measure ingredients: Based on your mix design (typically 1:2:4 or 1:3:6 cement:sand:gravel), measure out each ingredient. For a 50 lb bag of cement, you’ll need approximately 100 lbs of sand and 200-300 lbs of gravel.
Why it matters: Incorrect proportions can result in weak or poorly working concrete.
Check: Weigh or measure ingredients to ensure accuracy.
-
Mix the dry ingredients: Combine cement, sand, and gravel in your mixing tub. Mix well to ensure even distribution of cement.
Why it matters: Inadequate mixing can lead to weak spots or inconsistent strength.
Check: The mixture should be a consistent color and texture.
-
Add water slowly: Gradually add water while continuously mixing. Stop adding water when the mix reaches your desired consistency (similar to thick oatmeal).
Why it matters: Too much or too little water can weaken concrete.
Check: Squeeze a handful of concrete – it should hold together but not be overly wet.
-
Mix for at least 3 minutes: Continue mixing to ensure even distribution of water and a consistent mix.
Why it matters: Inadequate mixing can lead to weak spots or inconsistent strength.
Check: The mixture should be uniform in color and texture.
-
Test the slump: Perform a slump test (see earlier section) to ensure your concrete has the desired workability. Adjust water content if necessary.
Why it matters: Concrete that’s too wet or dry can be difficult to work with and may not set properly.
Pro tip: Always wear appropriate safety gear, including gloves, goggles, and a dust mask when handling concrete. It’s messy work!
Measuring and proportioning guidance
First off, listen up. You gotta measure your materials right for a strong, lasting concrete. Don’t eyeball it, that’s for amateurs.
You’ve got two ways to measure: by volume or weight. Both work, but I prefer weight. It’s more accurate. Check your manufacturer’s instructions to see what they recommend.
By volume: Use a shovel or wheelbarrow to measure out your cement, sand, and aggregate (that’s the fancy word for gravel). A typical mix is 1 part cement to 2 parts sand to 3 parts aggregate. But remember, this is just a starting point. You might need more or less depending on what you’re building.
By weight: This is where you’ll need a scale. Weigh out your materials in the same ratio as above – 1 part cement to 2 parts sand to 3 parts aggregate. A typical bag of cement weighs about 80 lbs, so that’s a good starting point.
Now, here’s where some folks mess up. They mix their first batch and think they’re done. Wrong! You need to do a trial batch first. Mix it up, let it set, then test it. Check the manufacturer’s guidelines for how to do this right. It might seem like extra work, but trust me, it’s worth it.
Mixing techniques for consistent texture
Alright, listen up. You’ve measured your materials right? Good. Now let’s get ’em mixed.
Hand-mixing: If you’re doing small batches, grab a shovel and start turning the pile. Keep it level, add water slowly, and check for lumps. But don’t overdo it. Too much mixing can cause segregation – that’s when your mix splits into layers.
Mixer method: For bigger jobs, use a concrete mixer. Dump in your dry materials first, then add water slowly while the mixer’s running. Check the manufacturer’s instructions for speed and time. You want a consistent, uniform mix, not soup or dust.
Now, how do you know if you’ve got it right? An under-watered mix is dry and crumbly. Over-watered? It’s soupy and won’t hold its shape. Check your mix – it should be like thick mud, easy to spread but holds together. If it’s not, adjust your water, a little at a time.

Compaction Techniques for Optimal Stability
Proper compaction improves density, bond, and durability, especially when gravel is used. Too little compaction leaves voids; too much can push water out and cause segregation. Follow a measured approach to density at each stage.
Layer pours and compact each lift to avoid cold joints. Use hand tools for small jobs and mechanical means for larger pours, while watching for signs of under- or over-compaction. Safety and moisture management are part of a solid plan.
Layering, consolidation, and when to vibrate
The key to proper compaction is layering your concrete. Pour in lifts, no more than 4-6 inches thick.
Why? Thinner layers allow you to reach the bottom of each lift with your tamping or vibration tools, ensuring even consolidation and reducing cold joints.
For small slabs or formwork, hand tamping or manual rammers work fine. But for larger pours, consider mechanical options like a plate compactor or vibration rod. They save time and energy but require proper safety measures.
When to vibrate? Use internal vibration for large, reinforced slabs or footings. It helps remove air pockets around reinforcement. For smaller projects, external vibration or tamping is usually sufficient.
Visual and tactile checkpoints for good compaction
Before stripping forms, inspect your concrete to ensure it’s properly compacted. Here’s a quick checklist.
- Surface appearance: Look for a smooth, uniform surface with no honeycombing or voids.
- Settlement behavior: Check for even settlement across the entire pour. No low spots or humps.
- Lack of voids: Tap the surface with a hammer. A hollow sound indicates air pockets.
- Moisture content: Ensure your mix had enough water to hydrate the cement but not so much that it weakens the concrete.
- Base/subgrade preparation: A well-prepared base ensures even compaction and reduces settlement over time.
- Form tightness: Tight forms prevent concrete from bleeding, ensuring a dense, strong pour.
- Curing considerations: Proper curing maintains moisture in the concrete, allowing it to gain strength evenly.
- Density test: If possible, perform a density test (like the sand cone test) to confirm your concrete’s stability before stripping forms.
Quick rule: If you’re unsure about any aspect of your compaction process, it’s better to err on the side of more rather than less. Over-compacted concrete is stronger and more durable than under-compacted.
Curing, Finishing, and Long-Term Maintenance
Keep concrete moist and protected during the initial curing period using appropriate methods. Avoid rapid drying which can cause cracks. Follow recommended curing durations and conditions for best results.
Finish the surface with appropriate tools and timing, considering how gravel affects texture. Plan for sealing, cleaning, and periodic inspections to catch early cracking or wear. Monitor performance over time and address issues promptly.
Curing Windows and Methods
Proper curing is crucial for your gravel concrete to reach its full strength and durability. Follow these steps:
Moist Curing: Keep the surface damp for the first 7 days. Use plastic sheeting, misting, or curing compounds as directed on the bag.
Timing: Curing should start immediately after finishing and last until the concrete gains sufficient strength (usually 28 days).
Humidity Levels: Maintain high humidity levels around 95% for optimal curing. Shield from rapid drying, especially in hot or windy conditions.
Repair and Maintenance Tips
Regular maintenance extends your gravel concrete’s service life. Here are some tips:
Sealing: Apply a suitable sealer every 2-5 years to protect against water ingress and stains.
Crack Monitoring: Inspect for cracks regularly, especially during freeze-thaw cycles. Address minor cracks promptly with an appropriate filler.
Simple Repairs: For larger cracks or damage, use a concrete repair kit designed for gravel-containing surfaces to prevent further water penetration and freeze-thaw damage.
Cost, Material Selection, and Sourcing
Evaluate gravel types and bagged mixes in terms of workability, drainage, and long-term performance. Price and availability will vary by material and source. Compare options to find a practical balance for your project.
Consider how aggregate choice changes overall cost, including waste, compaction effort, and water or admixture needs. Look for local suppliers, check delivery terms, and verify material compatibility with standard bagged mixes.
Budgeting and choosing materials for value
Material choices significantly impact your project’s cost and durability. Here are key factors to consider:
- Gravel type: Pea gravel is cheaper but may lead to settling issues, while crushed limestone offers better strength at a slightly higher price.
- Aggregate size: Smaller aggregates require more cement and water, increasing cost. Larger ones need more compaction effort.
- Delivery vs bagged: Bulk delivery is cheaper but requires larger quantities. Bagged concrete offers flexibility with a slight premium.
- Cement content: Higher cement content means stronger, more durable concrete at an increased cost.
- Recycled aggregates: Cheaper and eco-friendly, but may have lower long-term performance compared to virgin materials.
Where to buy and what to ask suppliers
When sourcing materials, consider local quarries/dealers, landscape supply yards, or hardware stores. Here’s what to ask:
First, confirm the aggregate size and grading. Ask for a particle size distribution curve to ensure compatibility with your bagged mix.
Next, inquire about moisture content. Excess moisture can affect concrete performance. Ask for dry materials or adjust your mix design accordingly.
Lastly, check for any contamination. Foreign particles can weaken the concrete. Ask about quality control measures and consider requesting a sample for testing.
Safety, Common Mistakes, and Planning Tips for Beginners
Safety comes first with PPE, ventilation, and a tidy work area. Always read the bagged concrete instructions and local codes before starting. Be mindful of concrete dust and skin contact, and protect gravel handling from slips.
Common DIY mistakes include overloading with gravel, under-mixing, and skipping a test patch. Plan for weather, curing, and potential rework to stay on schedule. Create a simple pre-mix checklist and document results to improve future batches.
Safety gear and handling precautions
Protect yourself and your team from potential hazards while working with bagged concrete and gravel.
- Personal Protective Equipment (PPE): Gloves, safety glasses, and a dust mask are essential. In hot conditions, wear long sleeves and pants; in cold, dress in layers.
- Wet Cement Burns: Keep skin dry. Wear rubber boots and gloves designed for wet concrete.
- Gravel Handling: Use shovels with long handles to keep hands safe. Avoid free-standing water and loose aggregates without adjusting mix.
- Proper Ventilation: Ensure your workspace is well-ventilated to prevent dust inhalation.
- Tool Safety: Keep tools in good condition, use them correctly, and store them safely when not in use. Consider renting specialized tools for a reasonable price.
Common errors and how to avoid them
Steer clear of these frequent mistakes when adding gravel to bagged concrete.
- Incorrect Proportions: Stick to the recommended gravel-to-bag ratio. Too much gravel weakens the mix; too little wastes material.
- Overwatering: Add water sparingly, following the mix’s instructions. Overwatering dilutes the concrete, reducing its strength.
- Poor Compaction: Follow compaction guidance to remove air pockets and ensure stability. Neglecting this can lead to cracks and structural issues.
- Inadequate Curing: Allow concrete to cure as directed. Skipping this step weakens the final product.
Regularly check your mix’s surface finish, edges, and for any cracks to catch potential errors early.
Conclusion
Getting the mix right with gravel added to bagged concrete matters for safety, durability, and how long it looks good. When you follow the correct ratios and proper compaction, you win on strength and appearance, and you reduce the chances of cracks or settlement problems down the road.
Next, lock in a simple, practical check: confirm your gravel size and amount match the plan, measure and mix in small batches to verify the texture, have your tools ready and within reach, add the gravel gradually as you mix, pour and spread in manageable portions, compact in thin lifts, and cure with protection until it firms up. Keep the work area clean and dry, watch the weather, and protect fresh concrete from wind, sun, and rain.
Two common mistakes to avoid are adding too much water or too much gravel, which weakens the mix, and skipping thorough mixing or proper compaction, which leaves voids. Always wear eye protection and gloves, keep hands and face away from the concrete while it’s being mixed, and never work alone if you’re lifting heavy bags or moving large pours. If you’re unsure about proportions or the structural load, pause and recheck your plan before proceeding.
If the project involves structural support, heavy loads, or code-specific requirements, consider bringing in a pro rather than pushing on alone. Stay safe, plan carefully, and you’ll finish with a solid, durable result you can be proud of. Stay focused, do the work right, and the job will stand up to time.
FAQ
What is the correct ratio of gravel to bagged concrete, and how do I know it?
Follow the bag’s instructions and any manufacturer guidance for your product. Ratios vary by mix type and intended use, so don’t guess. Check the label, datasheet, or local supplier recommendations for the exact mix you’re using.
How do I mix gravel with bagged concrete powder without messing it up?
Dump the dry mix into a wheelbarrow. Add the gravel in small portions and mix the dry ingredients first until you see a uniform color. Then add water gradually, mixing until you reach a workable, not-too-stiff consistency as per the bag’s directions.
Why is compaction important, and how do I do it correctly?
Compaction removes air pockets and helps the mix set solid. Use a hand tamper or a small compacting tool for slabs and controlled pours; avoid overworking the mix once it’s near surface level. Check for a firm, even surface with minimal air voids before finishing.
What tools and safety precautions do I need for mixing and placing this mix?
Tools: shovel, wheelbarrow, screed or straightedge, tamping tool, bucket, and rags for cleanup. PPE: sturdy gloves, eye protection, and a dust mask as needed. Keep kids and pets away, tie back long hair, and don’t mix near open flames or in poorly ventilated spaces.