
Introduction
Stucco patches can blend in by matching the sand texture, applying a light fog coat, and feathering the edges to disappear. This approach focuses on how the repair looks from close up and at a distance, not on replacing the entire wall. It’s a practical, hands-on method for making repairs less noticeable.
Start by examining the patch area and selecting sand that matches the existing stucco texture. Apply a thin base coat to the repair, then build up with light coats and feather the edges so the new material tapers into the surrounding finish. Always follow the manufacturer’s instructions and any local guidelines for mixing, curing, and finishing, and check the label if you’re unsure.
Key takeaways
- Clarify why picture-framing occurs and plan repairs after proper surface prep.
- Match local sand texture and color before base coats for seamless blending.
- Use fog coats sparingly to unify tone without creating over-saturation.
- Apply feather technique gradually, blending edges beyond patch for invisibility.
- Wear eye protection and a mask during mixing, sanding, and cleaning.
- Check manufacturer guidance and local codes for base coats and sands.
Table of Contents
- Introduction
- Key takeaways
- Why Picture-Framing Happens and When to Repair
- Preparing the Surface for a Seamless Blend
- Selecting Materials: Base Coats, Finishes, and Sands
- Sand Matching Techniques That Actually Work
- Fog Coats and Misting to Unify Texture and Tone
- Feather Technique: Step-by-Step and Advanced Tips
- Tools, Equipment Checklist, and Visual Checkpoints
- Troubleshooting, Durability, Cost Guidance, and Safety
- Conclusion
- FAQ
Why Picture-Framing Happens and When to Repair
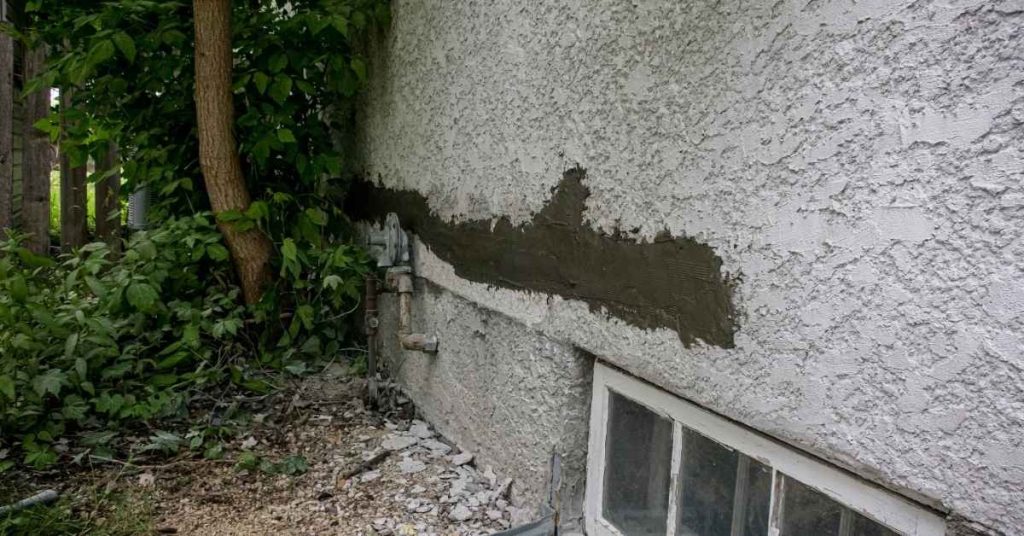
Picture-framing looks like a framed or darkened ring around repaired areas, creating a discolored border that makes patches stand out. Common causes include substrate movement, mix consistency, sealant and mud differences, curing or airflow issues, and surface contamination. Diagnostics focus on moisture presence, temperature differences, and sheen or texture mismatches to separate causes from paint layer differences.
Practical checks include adhesion tests, moisture measurements, and color or texture sampling to judge match and firmness. For repair, feathered-edge patching suits small areas, while larger patches use compatible stucco mixes and careful curing; resurfacing may be more durable or cost-effective in some cases. A quick visual cue and proper edge sealing help prevent future framing, and verify compatibility with finishes such as sand, fog coats, and feathering to ensure a cohesive result.
Common causes of haloing and visible edges
Visible outlines around stucco patches, often referred to as ‘haloing’ or ‘picture-framing’, are typically caused by differences in materials, application, or curing. These discrepancies can result in discoloration, darker rings, or a framed appearance around repairs.
The most common culprits include:
- Differences in sand content or type between the original stucco and the patch material.
- Variations in finish or sheen due to improper mixing, application thickness, or curing conditions.
- Incompatible sealants or mud used for the patch, leading to mismatched textures.
To diagnose the cause, inspect the patch edges under consistent lighting. Compare the sheen, texture, and color of the patch with the surrounding area. If a visible outline is present, consider repatching with compatible materials or resurfacing to minimize future framing.
Assessing Stucco Repair Needs: Patch vs. Recoat
The appropriate repair method for your stucco surface depends on the size, depth, and number of affected areas. Evaluate these factors to decide between spot repair, larger patching, or full resurfacing.
Estimate the total area of visible patches. For one small patch (<1 sq ft) with shallow depth, consider spot repair using feathered-edge patching. This technique blends the patch edges into the surrounding surface for minimal visibility.
For multiple patches or larger areas (>1 sq ft), consider larger patching or full resurfacing to maintain consistency and durability across your stucco surface. To assess depth, use a level or straight edge to measure the gap between the original surface and the patch.
Consult a professional if unsure. They can provide expert advice on cost-effectiveness and long-term durability when deciding between spot repair, larger patching, or full resurfacing.
Preparing the Surface for a Seamless Blend
Assess the existing stucco and substrate to identify damage, moisture issues, and bond-breaking conditions, then clean and prep the surface for a seamless patch. Remove loose, friable material with controlled methods, and follow with thorough cleaning to remove dust, oils, and contaminants. Establish a plan for bonding, texture, feathering, and substrate porosity to support a uniform cure and avoid hard “picture-framing” edges.
A careful prep supports reliable adhesion and a natural blend, with a tested approach to moisture, curing, and finish. Plan a bonding agent or primer suited to the substrate and patch blend, and run a sample area to verify tack, set time, and color match before full application. Stake the process by noting that skipping surface cleaning can lead to poor adhesion and patch failure; perform a quick moisture check, and have an experienced installer assess substrate stability. If moisture levels are high or the substrate is unstable or damaged, address these issues first. If loose stucco was removed too aggressively, switch to a controlled mechanical method to protect the substrate from damage.
Cleaning, removing damaged material, and surface profile
The condition of the existing stucco significantly impacts the success of your patch. Properly preparing the surface ensures a strong bond and seamless blend.
- Loose Stucco: Remove using soft brushes or low-speed grinders to prevent further damage. Tip: Be cautious not to gouge the surface with tools.
- Dust: Thoroughly clean the area to remove dust, oils, and contaminants. Spec: Use a suitable cleaning solution or degreaser for your substrate. Tip: Ensure no residue remains that could hinder adhesion.
- Contaminants: Remove any visible debris or contaminants with soft brushes or vacuums. Tip: A clean surface promotes better adhesion and curing.
- Hard Material: If material is too hard to remove by hand, use a low-speed grinder equipped with a suitable blade. Caution: Avoid creating new visual steps or unevenness.
- Uneven Surface: Use controlled sanding methods to smooth the surface and create a keyed edge. Tip: This helps prevent ‘picture framing’ and promotes better adhesion.
Checking substrate and moisture conditions
The condition of the underlying substrate is crucial for proper adhesion and to prevent future issues. Assess it before proceeding with repairs.
Moisture: Check for excessive dampness using a non-contact moisture meter or visual inspection. Stake: Moisture can compromise adhesion and cause cracking. Fix: Address any moisture issues before patching.
Lath/Mesh Integrity: Inspect the lath/mesh by gently tapping the surface with a hammer, listening for hollow or weak spots. Stake: Damaged lath can lead to poor adhesion and further damage. Fix: Reinforce or repair damaged areas before proceeding.
Substrate Stability: Evaluate the overall stability of the substrate. Pro Tip: If conditions are poor, consult a structural expert for assessment and repairs.
Edge profiling and feathering prep
Shaping the patch perimeter enables a graduated feather effect, preventing hard edges and ‘picture framing’.
Edge Profiling: Gradually reduce the thickness of the stucco at the patch perimeter using controlled sanding. Tip: Create a feathered effect to blend with the existing stucco.
Visual Steps: Use a straight edge to check for levelness and ensure no new steps are created during removal or profiling. Caution: New visual steps can lead to ‘picture framing’.
Flexible Filler: If edge profiling creates new visual issues, use a flexible filler to smooth out imperfections before blending. Tip: This helps create a seamless transition between the patch and existing stucco.
Selecting Materials: Base Coats, Finishes, and Sands
Choosing the right patch mortars starts with separating base coats from finish stucco mixes. Base coats cover bulk fill and structural work, while finish mixes provide color and a skim layer; check labels for recommended ratios and curing guidance. Sand type and gradation influence texture, color, and bonding, so select a sand that matches the existing surface and supports the chosen finish, and note when to use additives or bonding agents.
Understanding the application sequence helps avoid a picture frame edge; plan base, scratch, fog or feather, and final skim with proper feathering. Sand choice matters for texture and color, so assess whether the existing stucco is smooth or rough and choose the gradation accordingly. Quick practical checks include rinsing a small amount of sand to inspect particle shape and re-sanding if needed, while considering cure methods and weather, since working time and moisture affect adhesion.
Choosing compatible base and finish mixes
When selecting patch mortars for your stucco repair, ensure they are compatible with your existing stucco to avoid adhesion or curing issues. Base coats, used for bulk fill and structural work, should have similar binders as your existing stucco. Finish stucco mixes, applied as color-matching skim coats, should also be compatible in terms of pH levels and cure times.
Check the label or datasheet of your patch mortar to ensure it has similar binders, pH levels, and cure times as your existing stucco. If they differ significantly, consider using a bonding agent or primer to improve adhesion.
Incompatible patch mortars may lead to adhesion issues or curing mismatches. To avoid this, inspect the patch after initial application. If it appears different in color or texture, recheck compatibility and make adjustments as needed.
Sand types, grain size, and how they affect appearance
The type of sand used in your patch mortar can significantly impact the visual and tactile appearance of your stucco. Sharp or rounded sands, natural or manufactured, each have unique textures that should match your existing surface.
To achieve a seamless blend, first inspect your existing stucco for its sand type and particle size. Then, select a matching sand for your patch mortar to maintain consistency in texture. Incorrect sand selection can result in visible texture mismatches, so it’s crucial to get this step right.
Compare the texture of your patch with the existing surface. If they differ significantly, re-evaluate your sand selection and consider testing different types or gradations before proceeding with the full repair.
Additives, bonding agents, and colorants
Admixtures and pigmented additives can help match the appearance and adhesion of your patch mortar to your existing stucco. However, incorrect selection may cause adhesion problems or color mismatches. To avoid this, carefully consider which additives are appropriate for your repair.
Before applying any additives, test them on a small area first. Check their compatibility with other materials in your patch mortar by referring to the label or datasheet. If your existing stucco has specific admixtures or pigments, try to match them as closely as possible in your patch.
Inspect the patch after initial application. If it appears different in color or shows signs of poor bonding, recheck your additive selection and make necessary adjustments. Incorrect additives can lead to visible issues, so always test before full application.
Sand Matching Techniques That Actually Work
Identify the exact sand color, particle size, and texture of the existing stucco to match it as closely as possible. Use a sampling protocol to collect representative samples from exterior and interior areas and test blends through sand grading and sieving to mimic the original particle spectrum.
Blending strategies help reproduce color, texture, and microtexture, with attention to consistent grain size and fade lines. Quick checks under different lighting, a pro check of color and texture across areas, and noting batch details help ensure reproducibility; if samples appear inconsistent, collect additional samples from various locations and heights to avoid common mistakes and refine the blend.
Visual, Tactile, and Wet/Dry Comparison Methods
To achieve an accurate match, compare your sample with the existing stucco under various conditions. Start by examining both in natural light to assess color and texture.
Next, wet both samples and observe them again. Stucco appears darker when wet, helping you fine-tune your color match. Also, feel the texture of each sample with dry and wet hands to ensure consistency.
Finally, compare under artificial light in the evening to simulate ni