
Introduction
Stucco over AAC or soft masonry requires managing suction and choosing a suitable base coat to ensure a durable finish. Prepare the substrate properly and assess suction levels before applying any finish coat. Always check the product labels and manufacturer instructions for compatible base coats and local requirements.
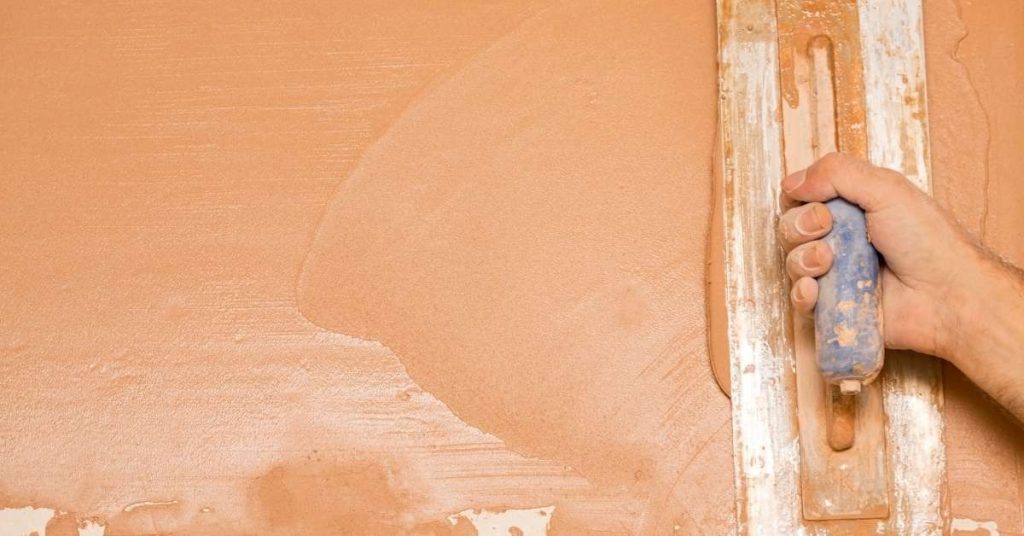
Practice proper application techniques for plaster systems, including even troweling and proper joint spacing. Install flashings and control joints where required, and plan for movement and moisture drainage. Seal joints or surfaces with an appropriate sealer like Resene Limelock according to label directions, and double-check local rules.
Key takeaways
- Verify AAC or soft masonry suction level before base coat; adjust primer accordingly.
- Surface prep: clean, dry, and mechanically abrade loose fibers for best adhesion.
- Use proper primer selection and suction-control methods to reduce pinholes.
- Install control joints and flashings before base coat; embed mesh correctly.
- Check compatibility: Resene Limelock sealer compatibility with chosen base coat and mesh.
- Follow curing, sealing timing, and safety steps; document materials used.
Table of Contents
- Introduction
- Key takeaways
- Why Suction Control Matters with AAC and Soft Masonry
- Surface Preparation and Visual Checkpoints
- Suction-Control Methods and Priming Options
- Base Coat Options and Selection Criteria
- Mesh Reinforcement, Embedding Technique and Common Mistakes
- Control Joints, Flashings, and Fastening Considerations
- Curing, Sealer Application and Finish Selection
- Safety, Documentation, Tools & Materials Checklist, and Visual Aids
- Conclusion
- FAQ
Why Suction Control Matters with AAC and Soft Masonry
Substrate suction in AAC and soft masonry is the capillary pull that draws moisture from your base coat. High or uneven suction changes workability, slows or speeds drying, and affects adhesion and cure. Checking suction before picking a base coat helps you choose the right mix, primer, and application plan.
In the field you can do quick checks—finger touch, tack tests, or simple moisture indicators—and reserve formal suction tests if results are unclear. Suction levels guide whether you use primers or polymer-modified mixes and influence cure timing and bleed. If suction is high, conditioning the surface and adjusting base coat parameters saves you from pinholes and weak initial bond.
How suction and porosity alter stucco performance
Suction in AAC and soft masonry draws moisture from your base coat, affecting its workability, adhesion, and curing. High or uneven suction can lead to premature drying, pinholing, and poor bond strength.
High suction: Expect faster set rates, reduced open time, and increased risk of delamination. Porosity amplifies these effects, as it provides more pathways for moisture transfer.
Low suction: Base coats remain workable longer, allowing better trowel-out and improved adhesion. However, low suction can also lead to bleed issues if not managed properly.
Field checks to evaluate suction and porosity
Before applying any base coat, assess your substrate’s suction and porosity. On-site checks help verify conditions, while lab tests provide precise measurements.
Quick field checks: Perform a finger test (feel for moisture), tack test (apply a small amount of adhesive and observe drying time), or use simple moisture indicators like calcium chloride tubes.
These methods give you an idea of suction levels, but they’re not precise. For critical projects, consider manufacturer or lab suction/absorption tests to quantify substrate conditions.
When to test: Always perform field checks before starting work. If results are unclear or critical to project success, follow up with lab tests.
Decision flow: pre-wet, prime, or use specialty adhesive
Test results guide your choice of substrate conditioning and base coat. Pre-wetting, priming, or using notch/key adhesives help manage suction and improve performance.
High suction: Consider pre-wetting the surface to reduce initial suction, applying a bonding primer for better adhesion, or using a specialty adhesive designed for high-suction substrates.
Low suction: Pre-wetting may not be necessary. A bonding primer can still improve adhesion, and using a standard base coat with proper trowel-out should suffice.
Always follow manufacturer recommendations based on your test results to ensure optimal performance.
Surface Preparation and Visual Checkpoints
Substrate prep for AAC, soft masonry, and insulated substrates sets the stage for a solid coat. Do straight-edge checks for flatness and note high or low spots, cracks, and obvious contaminants. Remove loose material, laitance, curing compounds, paint, and sealers before moving on, and plan masking and temporary covers.
Mask any adjacent joints and openings before you clean and dry the surface, and cover areas that weather or dust could affect. The goal is to prevent transfer of contaminants and ensure the base coat can grip. Check moisture, temperature, and humidity readings and postpone if conditions aren’t right, and always follow the label or datasheet for timing advice.
Preliminary checks for AAC, XPS and soft masonry
Before you start preparing your surface, use this checklist to ensure it’s ready.
- Flatness: Use a straight edge to check. High or low spots can cause issues later.
- Soundness: Tap the surface. Hollow sounds indicate loose material.
- Loose material: Remove any loose pieces to prevent them from falling into your mix.
- Curing compounds: Ensure they’re fully cured before proceeding.
- Efflorescence: White powdery deposits can hinder adhesion. Clean if present.
- Cracks: Inspect for hairline cracks that need filling.
- Moisture content: Check with a moisture meter. Too much can cause problems later.
- Substrate temperature: Ensure it’s within the recommended range for application.
Quick rule: If in doubt, consult your substrate supplier.
Builder-supplied flashings: installation and inspection
Before you start rendering, ensure these flashings are correctly installed.
- Presence: Check all openings have flashings.
- Correct placement: Ensure they’re properly positioned to direct water away from the wall.
- Compatibility: Verify they’re compatible with your chosen stucco system.
- Seals: Check all seals are intact and secure.
- Damage: Inspect for any damage that needs repair.
- Builder coordination: If changes are needed, coordinate with your builder.
Quick rule: Always inspect flashings before starting work to prevent water intrusion.
Clean, mask and protect: practical visual checkpoints
Before you start cleaning and masking, use this checklist for a thorough job.
- Loose material: Remove any before cleaning to prevent clogging your equipment.
- Dust: Clean thoroughly. Dust can affect adhesion.
- Oils and release agents: Remove these as they can hinder adhesion.
- Paint and sealers: Ensure these are fully removed or compatible with your stucco system.
- Masking joints: Protect adjacent joints from contamination.
- Windows and finishes: Mask to prevent damage during application.
- Temporary covers: Use these to protect masked areas from weather exposure.
- Photographing: Document your work for quality records and future reference.
Quick rule: Always clean, mask, and protect in sequence to ensure a smooth application process.
Suction-Control Methods and Priming Options
Suction control means slowing the rapid moisture draw from the substrate so the base coat can grab on without sealing the wall airtight. The main options are pre-wetting, dilution primers, acrylic bonding agents, and admixtures, and each plays differently with stucco over AAC or soft masonry. Follow the product datasheets for mixing, application thickness, cure cues, and safety, and choose an option based on the substrate’s porosity and capillary action. Keep the install in the right order: pre-wet or primer first, then the bonding agent if used, then the base coat or stucco system.
This matters because AAC and soft masonry behave differently when suction is strong or weak, and the wrong method can waste time or cause adhesion issues. Using a data-sheet–driven plan helps you avoid guesswork, set realistic expectations for drying, and know when to reapply or rewater if suction remains high. It also gives you a practical flow for field checks like saturation level, tackiness, and film appearance, plus guidance on adhesion tests or moisture readings to confirm you’re ready for the next layer. If in doubt, check product labels, datasheets, or manufacturer instructions and adjust your plan to what those documents say for your substrate and base coat system.
When to pre-wet vs use a primer or bonding agent
Pre-wetting is quick and easy but requires immediate follow-up. Primers and bonding agents offer more flexibility but need time to dry.
Use pre-wetting: when you have limited time before applying the base coat, like on hot days or when working with a tight schedule. It’s ideal for AAC which dries fast.
Use primers/bonding agents: when you need to control suction over a longer period, like with soft masonry that absorbs moisture slowly. They’re great for jobs where you can’t apply the base coat immediately after pre-wetting.
Proper application of bonding primers and dilutions
Follow manufacturer instructions for dilution ratios. Field test to confirm proper coverage and drying time.
Typical dilutions: range from 1:1 to 1:4, depending on the primer’s concentration and substrate porosity. Start with a lower ratio for AAC or soft masonry that drinks up moisture quickly.
Drying times: vary based on dilution, temperature, humidity, and substrate type. Allow at least 2-4 hours before applying the base coat, but check for tackiness to be sure.
Using adhesive notch/key coats on AAC
A notched key coat improves adhesion by creating mechanical interlocks with the base coat. It’s crucial when working with AAC, which has a smooth surface and can be slippery.
When to use: always use a notched key coat on AAC. It’s especially important in humid conditions or when using thin-set mortars that don’t provide enough suction control on their own.
Apply the key coat after pre-wetting or priming, then notch it with a trowel before the mortar sets. Allow it to dry slightly before applying the base coat.
Base Coat Options and Selection Criteria
Base coats come in three main families: cementitious, polymer-modified, and render adhesives. Each has its sweet spot for substrates like AAC or soft masonry, and each handles movement and hairline cracking differently; your choice also affects texture and how the next skim coat or finish render will behave. Look for compatibility cues on the product label and follow the manufacturer’s guidance for surface prep, mesh reinforcement if needed, and any primer requirements before you coat.
This matters because the wrong base coat can lead to early cracks, delamination, or suction issues that ruin the finish you want. Check substrate moisture, pH, cleanliness, and bond strength before committing, and plan for how movement will be managed with mesh or reinforced render. Use the decision framework—substrate type, project conditions, finish quality, curing expectations, and cost—to pick a base coat that stays durable and paint-ready in your climate and jobsite conditions. If you’re unsure, verify specifics with the product datasheet and local guidelines.
Cementitious vs Polymer-Modified Base Coats
Cementitious base coats are durable, affordable, and suitable for most AAC or soft masonry substrates. They’re made from cement, sand, and water, with added admixtures for improved performance.
Polymer-modified base coats, on the other hand, offer enhanced flexibility and crack-bridging capabilities due to their polymer content. They’re ideal for substrates prone to movement or hairline cracking.
Note: Always refer to technical data sheets for specific limits and recommendations.
Breathability and Moisture Management Considerations
AAC and soft masonry are porous materials that can absorb and release moisture. Base coat choice should consider breathability to prevent moisture buildup, which could lead to issues like efflorescence or mold growth.
Cementitious base coats have lower permeability but still allow some vapor movement. Polymer-modified base coats offer better breathability due to their open structure.
Tip: For high-suction substrates or humid climates, opt for more breathable base coats to manage moisture effectively.
Specialty Base Coats for High-Suction or Irregular Substrates
Certain substrates, like high-suction AAC blocks or irregular soft masonry surfaces, may require specialty base coats. These products are formulated to address specific challenges and provide better performance.
Render adhesives, for instance, offer excellent bond strength on difficult-to-stick surfaces. Some polymer-modified base coats are designed for high-suction substrates, while others have enhanced flexibility for irregular surfaces.
Important: Always follow manufacturer guidance when specifying and applying specialty base coats to ensure optimal results.

Mesh Reinforcement, Embedding Technique and Common Mistakes
Choose alkali‑resistant mesh compatible with your substrate (AAC or soft masonry) and follow edge and corner treatment guidance. Embed the mesh into the first base or scratch coat, stagger joints, and key in depth so there are no air pockets. Make proper overlaps at seams and around openings, and reinforce corners with beads or wrap as needed to prevent exposure.
Correct setup reduces cracking and keeps the mesh in place through cure. If you’re unsure about overlap widths, embedment depth, or fastener use, check the label or datasheet and follow manufacturer instructions. The right mud consistency and suction control help prevent detachment and ensure a solid finish.
Best practices for embedding fibreglass mesh
The key to successful stucco application over AAC or soft masonry is fully embedding the mesh into the base coat without wrinkles. This ensures a strong bond and prevents cracking.
Start by laying the mesh flat on the wall, aligning it with the edges. Use a straight edge to keep it taut and avoid wrinkles. Apply the first base coat (scratch coat) evenly, ensuring full coverage of the mesh.
Key depth: The mesh should be embedded at least 1/4″ into the base coat for proper adhesion. Use a trowel or comb to press it firmly and remove any air pockets.
Overlaps, corner butterflies and mesh placement at openings
Proper overlap and reinforcement at critical junctions prevent stress concentration points that can lead to cracking. Here’s how to do it right.
Overlaps: Stagger mesh joints by at least 6″ when overlapping. This distributes the load evenly and prevents weak spots. Overlap by a minimum of 4″ on each side of seams, corners, and reveals.
Corners: Use dedicated corner beads to reinforce outside corners. For inside corners, wrap the mesh around the corner, overlapping it by at least 2″.
Openings: Around doors and windows, terminate the mesh at least 4″ from the edge of the opening. Reinforce with a separate piece of mesh if needed.
Common mistakes and how to avoid them
Here are some common installation errors that lead to cracking or exposure, along with quick checks to catch them early.
- Insufficient embedment: Check for mesh exposed at the surface. If found, apply more base coat and re-embed.
- Exposed mesh edges: Ensure all edges are fully embedded or protected with a flashing or corner bead.
- Improper overlap: Inspect overlaps to ensure they’re staggered and wide enough. Add more base coat if needed.
- Wrinkled or damaged mesh: Check for wrinkles or damage before applying the next coat. Repair or replace as necessary.
- Skipping suction-control measures: Ensure the surface is properly primed or pre-wetted to prevent premature detachment.
Regularly inspect your work and fix any issues promptly to ensure a durable, long-lasting stucco finish.
Control Joints, Flashings, and Fastening Considerations
Control joints control cracking by giving stucco a planned expansion path when over AAC or soft masonry, with care taken to align joints with openings, edges, and corners. Flashings must be integrated at penetrations and transitions, and fasteners chosen to fit the substrate while leaving proper embedment and corrosion resistance. Always defer to manufacturer instructions and local authorities for exact specs and installation details.
The point is practical: good joint planning and flashing details keep moisture out and cracks in check, especially where movement and temperature vary. Expect to check for proper sealant, overlaps, and fastener layout during install, and adjust for substrate irregularities or wind and load conditions. Avoid common mistakes by sticking to product guidance and governing rules, and by validating fastener type, spacing, and finishing steps with the labels and manuals.
Control Joint Setouts and Common Installation Pitfalls
Control joints are crucial to accommodate substrate movement and prevent cracking. Here are some common mistakes to avoid:
- Improper spacing: Too wide or too narrow joints can lead to excessive cracking. Follow the 1/8″ per foot of wall rule.
- Misaligned with openings: Joints should align with windows, doors, and corners to control cracks at these points.
- Ignoring substrate irregularities: Field conditions like temperature changes, moisture, or curing substrates can affect joint placement. Adjust as needed.
- Insufficient depth: Joints should go deep enough (usually 1/4″ to 3/8″) to control cracking effectively.
Regularly inspect your work and make adjustments as necessary to avoid these pitfalls.
Flashing Detail Coordination and Water Management
Integrating flashings with the render system is vital for directing water away from joints and openings. Request flashing changes when necessary to maintain a continuous moisture barrier.
At penetrations: Flashings should extend at least 4″ above the stucco surface and be lapped properly over the stucco.
Around openings: Flashing should wrap around windows and doors, extending under the sill and head flashing. Ensure proper laps with adjacent flashings.
Regularly inspect flashings for any gaps or tears that could allow water intrusion.
Fastener and Anchor Considerations for Masonry Overlays
Choosing the right fasteners is crucial for a successful stucco overlay on AAC or soft masonry. Always follow manufacturer guidelines for length, type, and installation method.
Substrate-appropriate anchors: Use anchors designed for your specific substrate (e.g., concrete screws for AAC).
Corrosion resistance: Choose fasteners with appropriate corrosion resistance for your climate.
Safety with powder-actuated tools: Always wear proper safety gear and follow manufacturer instructions when using these tools. Never use them on live electrical wires or gas lines.
Curing, Sealer Application and Finish Selection
Control suction and protect the stucco during curing to prevent rapid moisture loss. Use pre-wetting, light misting, and shading or wind protection, and choose primers and sealers that promote uniform moisture release and adhesion with the base coats and finish paints. Always consult product datasheets for application rates.
Finish choices and reflectance affect long-term performance, so pick a finish with the right porosity and alkali resistance for your system. Keep tabs on substrate moisture, alkalinity, surface prep, and the window for temperature and humidity, and verify data sheets for each product. This helps prevent cracking, delamination, and premature wear.
Protecting work during initial cure
The first few days after applying stucco are critical. You need to protect your work from harsh weather conditions.
Sun: Direct sunlight can dry out the render too quickly, causing cracks. Keep it shaded using tarps or other materials.
Wind: Wind also speeds up drying. If possible, position fans to blow across the wall, not directly at it. Or, use windbreaks like banners or screens.
Follow product curing instructions. Some may require misting or wetting down during hot, dry conditions. Monitor your work closely and adjust protection as needed.
Sealer and primer application techniques
Sealers and primers prepare the surface for paint. They improve adhesion, seal pores, and promote even moisture release.
Use a compatible sealer or primer with your base coat. For AAC/soft masonry, consider using a penetrating sealer that doesn’t form a skin, to allow moisture escape.
Apply sealers/primers evenly, following the manufacturer’s instructions. Use a paintbrush for edges and a roller for large areas. Don’t overapply – it can trap moisture and cause issues.
Tip: Always check compatibility with your base coat and finish paint. Consult product datasheets.
Paint/finish choice, LRV and maintenance implications
The type of paint you choose affects how your wall looks and performs over time. Consider Light Reflectance Value (LRV) – it’s a measure of how much light a color reflects.
Higher LRV means more reflection, which can help keep your home cooler in summer. But it also shows every imperfection. Lower LRV hides flaws better but absorbs heat.
Choose an alkali-resistant paint for AAC/soft masonry. It’s designed to withstand the alkaline nature of these materials.
Check technical notes or consult with a professional to find the right LRV for your climate and desired look. Regularly inspect your walls, touching up as needed to maintain performance and appearance.
Safety, Documentation, Tools & Materials Checklist, and Visual Aids
This section covers the safety gear you need, how to run a clean, safe render job on AAC or soft masonry, and the essential tools, materials, and on-site documents. You’ll find PPE needs, decontamination steps, fall protection, and scaffold safety, plus how to set up the mixing area, handle wet render, manage waste, and respond to spills or weather changes. It also lists the core tools, base coats, bonding agents, cement mix, water sources, and protective coverings you should have, plus the important documents to keep handy and camera-ready for QA and warranty checks.
Keeping these checklists and visuals current matters because it helps you stay organized, protects everyone on site, and supports warranty claims if issues arise. By documenting substrate prep, base coat application, render thickness, curing conditions, and edge details with photos or video, you create a clear record of compliance and workmanship you can review later or show to a homeowner or inspector. This guidance helps you avoid common missteps and makes future maintenance and troubleshooting much smoother.
Safety protocols and recommended PPE
Before you start any render work on AAC or soft masonry, ensure you’ve got the right safety gear and follow these protocols.
- Eye/face protection: Wear safety glasses with side shields to protect from debris and dust.
- Respirator: Use a half-face respirator with P3 filter to protect against render dust.
- Gloves: Wear work gloves for grip and hand protection.
- Hard hat: Protect your head from falling objects with a hard hat.
- Fall protection: Use harnesses, lanyards, and anchor points when working at heights.
- Scaffold/toe-board safety: Ensure scaffolds are secure, level, and have toe-boards to prevent falls.
- Decontamination: Set up a wash station for cleaning hands, tools, and equipment.
- Fall-risk controls: Identify and mitigate fall risks by using safety measures like guardrails and warning signs.
Quick rule: Always do a project-specific risk assessment before starting work.
Tools, materials checklist and material specs explained
Before you start, make sure you have all the necessary tools and materials for your render job on AAC or soft masonry.
- Hand/power tools: Trowels, hawks, floats, mixers, drills, and screwdrivers are essential.
- Mesh: Fibreglass mesh for reinforcement. Check compatibility with AAC/soft masonry.
- Base coats: Choose base coats suitable for AAC or soft masonry. Read product data sheets to confirm.
- Bonding agents: Use bonding agents to improve adhesion between old and new render.
- Cement mix: Prepare cement mixes according to manufacturer’s guidelines for your substrate.
- Water sources: Ensure a clean, reliable water supply for mixing and curing.
- Mixing paddles: Use appropriate mixing paddles for your mixer type.
- Protective coverings: Tarps or plastic sheets to protect work during initial cure.
- Site cleanliness gear: Brooms, dustpans, and trash cans for keeping the site tidy.
Quick rule: Always check SDS and product data sheets to ensure compatibility with your substrate and job conditions.
Visual checkpoints, photo guide and documentation to collect
Take photos and videos at key stages of your render project for quality control and future reference.
- Substrate prep: Photograph the prepared substrate before applying base coat.
- Base coat application: Capture images of base coat being applied to ensure even coverage.
- Render thickness: Measure and photograph render thickness at various points on the wall.
- Curing conditions: Document curing conditions, including temperature and humidity levels.
- Edge details: Photograph edges, corners, and openings to check for proper embedding of mesh and flashing details.
- Control joints: Record the location and spacing of control joints.
- Flashings: Document flashing details at windows, doors, and other openings.
Quick rule: Keep all documentation in a secure, easily accessible place on-site for quick reference during QA checks and warranty claims.
Conclusion
Get this right and the stucco covers evenly, lasts longer, and looks sharp, without tearing into the wall or wasting material. Safety first keeps you from costly mistakes and rework.
First, plan your steps in order: verify surface readiness, choose a suitable suction-control and priming combo, pick a compatible base coat, apply mesh and embed correctly, set control joints and flashings, then cure and seal. Test a small patch, follow the product directions, and keep the area clean as you go. When in doubt, do a dry run and measure your substrate, moisture, and ventilation before committing.
Common mistakes to avoid include skipping initials tests or proper priming, using the wrong base-coat type for AAC or soft masonry, and skipping control joints or proper flashing. Always wear eye protection and gloves, secure ladders and edging, and work with a partner for long stretches. Check moisture, avoid freezing conditions during cure, and never force a bond with improper embedding or over-wetting the mix.
If you run into uncertain substrate conditions, inconsistent suction, or you see cracking or solvent smells during curing, call a qualified pro rather than pushing through. When you finish, document materials, methods, and tests so you can verify durability down the line. Stay deliberate, stay safe, and you’ll end up with a durable, good-looking finish that protects the wall for years to come.
FAQ
How should I prep the AAC or soft masonry substrate before plastering to control suction?
Clean the surface and remove loose material. Dampen the substrate lightly and avoid pooling water. Check that any paint or coatings are compatible with plaster and follow the manufacturer’s guidance for suction control products.
What are practical application techniques for plaster systems on this substrate?
Apply a primer or bonding agent per the product instructions to improve adhesion. Work in moderate, consistent coats and keep the edge of each coat from drying too fast. If the surface starts to suck up moisture, pause and re-wet or re-apply primer as needed.
How do I install flashings and control joints correctly in this setup?
Place flashings at detail lines and terminations as required. Embed control joints in the base coat at regular intervals or where movement is expected, following the guidance for your system. Use compatible sealant and flashing materials and test fit before finishing.
Can I seal with Resene Limelock and finish with X200, and what should I check?
Yes, but verify the Limelock label for substrate compatibility and cure times. After sealing, follow with the X200 topcoat if the product is compatible with your base coat. Read the manufacturer’s instructions for any restrictions or compatible primers.
What maintenance steps help keep stucco over AAC or soft masonry performing well?
Inspect annually for cracks, delamination, or water staining. Clean surfaces with a gentle method and touch up small cracks promptly with the correct base coat and finish. For any doubt, check product datasheets or local rules before proceeding.