
Introduction
Expansion joints in stucco at additions accommodate differential movement between the new addition and the existing structure while avoiding water traps.
Plan for joints at the connection and detail how the joint will be filled and flashed without creating water traps. This article keeps the language plain and focuses on practical steps you can check on site.
Look for signs of inadequate joint design such as cracking near the joint, unexpected moisture staining, or stiff movement in cold weather. Use proper detailing and sealing methods, and verify with manufacturer instructions and local rules before starting. Check that flashing, caulk, and bedding align with the system you’re using.
Key takeaways
- Understanding stucco expansion joints in additions, addressing differential movement without water traps
- Design principles for joints to allow movement while preventing water intrusion during EIFS or traditional stucco
- Detailing to avoid water traps, ensure proper drainage paths and flashing continuity
- EIFS vs traditional stucco joint strategies, noting differences in movement control and expansion gap behavior
- Installation best practices with on-site safety: PPE, ladder safety, scaffolding, and material handling
- Inspection and maintenance cues for differential movement areas; catch cracks early to prevent moisture
Table of Contents
- Introduction
- Key takeaways
- Why Expansion Joints Are Critical at Additions
- Design Principles for Expansion Joints in Stucco Additions
- Detailing to Avoid Water Traps and Manage Drainage
- EIFS Vs Traditional Stucco at Additions — Joint Strategy Differences
- Installation Best Practices and on-Site Safety Guidelines
- Inspection, Maintenance, and Long-Term Care for Differential Movement Areas
- Cost, Value, and Decision-Making for Expansion Joint Solutions
- Conclusion
- FAQ
Why Expansion Joints Are Critical at Additions
Differential movement is when the existing shell and the new addition respond differently to temperature, moisture, and settlement. A continuous, properly located joint helps accommodate those differences without forcing cracks. This reduces opportunities for water to find its way behind the siding or stucco at the interface.
Common problem interfaces show up where blunt edges meet rooflines, inside and outside corners, and window returns. Those areas tend to transfer stress and trap moisture when there is no planned joint. A well designed joint strategy uses perimeter joints, movement compatible sealants, backer rods, and appropriate flashing to keep weather out and movement controlled.
Movement types that joints must accommodate
Expansion joints in stucco additions need to account for three main types of movement:
Thermal expansion/contraction: As temperatures rise and fall, materials expand and contract. Joints allow these movements without stressing the structure.
Moisture-driven movement: Moisture can cause materials to swell or shrink. Joints help prevent cracking due to these changes.
Structural settlement: Over time, structures settle and shift slightly. Joints accommodate these movements and prevent stress from building up at the interface between the existing structure and the addition.
Typical failures when joints are omitted or detailed poorly
When expansion joints aren’t properly designed or installed, several problems can arise:
Edge cracking: Without a joint to accommodate movement, stress builds up and causes cracks at the edges of the addition.
Delamination: Moisture trapped behind the stucco can cause it to peel away from the substrate, leading to delamination.
Trapped moisture: Without proper drainage, water can become trapped in the joint, leading to mold and rot.
Sealant failure: If joints aren’t properly sealed or backer rods aren’t used, sealants can fail, allowing water intrusion and further movement damage.
Design Principles for Expansion Joints in Stucco Additions
Location and spacing matter. Place joints relative to overhangs, corners, openings, and transitions to minimize obvious seams and limit water entry paths. Plan for movement without creating new leakage points.
Joints have different roles, such as isolating substrate movement or providing drainage. Choose between control joints and expansion joints based on how the assembly moves and where water will travel. Coordinate with lath, sheathing, and framing to keep details consistent.
Joint placement and recommended spacing guidance
Placing joints at strategic locations helps minimize visible seams and water intrusion. Start by identifying substrate transitions, plane changes, and large uninterrupted wall runs.
At overhangs and corners, place joints 12″ to 18″ from the edge to avoid stress concentrations. For door/window openings, maintain a joint at least 6″ away from the opening’s edge.
When transitioning to other wall systems or at addition-ceiling interfaces, align joints where possible to minimize seams. Always consult with your manufacturer or engineer for specific spacing guidance tailored to your project.
Joint width selection and movement capacity
The joint’s width depends on the expected total movement, material compatibility, and finish thickness. Wider joints accommodate more movement but may be less aesthetically pleasing.
For stucco additions, expect movements ranging from 1/8″ to 3/16″. A good starting point is a joint width of 1/4″ for most applications. However, always confirm the movement capacity with sealant or manufacturer data during design.
Tip: Narrower joints (1/8″ to 3/16″) work well in areas with minimal movement, while wider joints (3/16″ to 1/2″) are suitable for high-movement zones. Always consider the finish thickness when selecting joint width.
Compatible joint materials and backing options
The right material choice ensures a durable, long-lasting joint. Consider using compression seals, backer rod plus sealant, or metal/PVC isolation profiles.
- Compression Seals: These are preformed strips that compress to fill the joint. Specify those tested for adhesion to stucco/EIFS and compatible with your substrates.
- Backer Rod Plus Sealant: A backer rod provides initial support, followed by a sealant application. Choose a backer rod with good compression recovery and a sealant with suitable movement capacity and adhesion properties.
- Metal/PVC Isolation Profiles: These profiles isolate the joint from the substrate, preventing stress transfer. Specify those designed for stucco/EIFS systems and compatible with your substrates.
Warning: Using incompatible materials can lead to cracking, staining, or weak bonds at the joint, compromising its performance over time.
Detailing to Avoid Water Traps and Manage Drainage
Joint design should promote shedding of water through proper drainage planes and flashing. Sloped profiles and continuous membranes help prevent standing water at joints. Keep joints tied into roof overhangs and transitions so drips don’t collect at the interface.
Sequencing matters: start with sheathing and weather barrier, then flashing, and finally stucco or EIFS. Visual checks should confirm there are no low points, misaligned flashing, or gaps that could trap moisture. Choose compatible flashing and sealant systems for long term performance.
Flashing and drainage-plane integration
Integrating flashing and drainage planes is crucial to prevent water from getting trapped at expansion joints. Here’s how:
Through-wall flashing should extend from the exterior wall into the joint, creating a continuous path for water to exit. It must be properly sealed at both ends.
The water-resistive barrier (WRB) needs to wrap around the addition and continue into the joint. This ensures incidental water is directed outwards rather than inwards.
Sealant interfaces should be staggered, with each layer overlapping the one below it. This creates a stepped profile that sheds water instead of trapping it.
Joint profile geometry that sheds water
The shape and design of your expansion joints play a significant role in preventing water from ponding and causing capillary entrapment. Here are some tactics:
Use short, recessed joints. This reduces the surface area where water can collect.
Include a drip profile at the bottom of your joint. This encourages water to drip off rather than sit in the joint.
Avoid horizontal pockets and ensure all returns are sloped. This prevents water from collecting and promotes drainage.
EIFS Vs Traditional Stucco at Additions — Joint Strategy Differences
EIFS offers more elasticity and drainage options, while traditional stucco relies on rigid lath and backing. Movement at additions will behave differently between these systems, affecting joint locations and detailing. Understanding these contrasts helps prevent hidden cracks and water intrusion.
Joints should reflect the system type, with careful consideration of interior versus exterior placements and how insulation thickness interacts with expansion joints. Don’t overlook substrate prep, attachment methods, and flashing transitions that affect performance and durability.
Water-managed EIFS joint considerations
EIFS systems are designed to manage water differently than traditional stucco. They have built-in drainage planes and weep screeds that allow moisture to escape. This changes how you detail isolation joints and transition details.
Isolation Joints: Place them where the EIFS meets other materials, like at additions or around windows. This breaks up the continuous surface and allows for movement without stressing the system.
Transition Details: At transitions to other materials, use a discontinuous adhesive approach. This means not applying adhesive all the way to the edge of the EIFS board. Leave a small gap (about 1/4 inch) to allow for expansion and contraction.
Hard-coat stucco joint practices
Traditional hard-coat stucco, backed by lath or mesh, requires different joint detailing. It’s rigid and less forgiving to movement than EIFS.
Lath/Mesh Transitions: At additions, use a continuous lath/mesh transition. This helps distribute stress evenly across the interface and prevents cracking.
Control vs Expansion Joints: Use control joints where you want to direct cracks (like at regular intervals on large surfaces). Use expansion joints where you expect significant movement (like at additions or around openings).
Masonry-to-Frame Interfaces: Pay special attention to these junctions. They’re hard to move and can cause cracking if not detailed properly. Use expansion joints here, and consider using a flexible material like caulk in the joint to absorb movement.

Installation Best Practices and on-Site Safety Guidelines
Start with clean, dry, sound substrate and verify flashing details at the interface. Protect open joints from weather during construction using temporary barriers or coverings. A solid prep sets the stage for reliable movement joints.
Follow a logical sequence for profile installation, backer rod sizing, and sealant tooling. Include safety steps for cutting, anchoring, and handling materials, along with PPE and fall protection when needed. QA checks throughout the process help catch issues early.
Pre-installation checks and substrate prep
Before you start, check your substrate. It needs to be clean, dry, and sound.
Moisture is the enemy here. Check for any signs of dampness or mold. If it’s wet, wait until it’s dry before proceeding.
Ensure the surface is flat. Any major dips or bumps will show up in your finished joint.
Check that the substrate is secure and can handle the weight of the stucco. Remove any incompatible coatings like paint or oil-based primers.
Safe cutting, anchoring, and sealant application
Safety first when cutting profiles. Use a sharp blade and cut away from your body. Wear safety glasses.
When fastening, don’t overdrive the screws or nails. You could damage the substrate or cause the profile to split.
Prime the back of the profile before you apply it. This helps with adhesion and longevity.
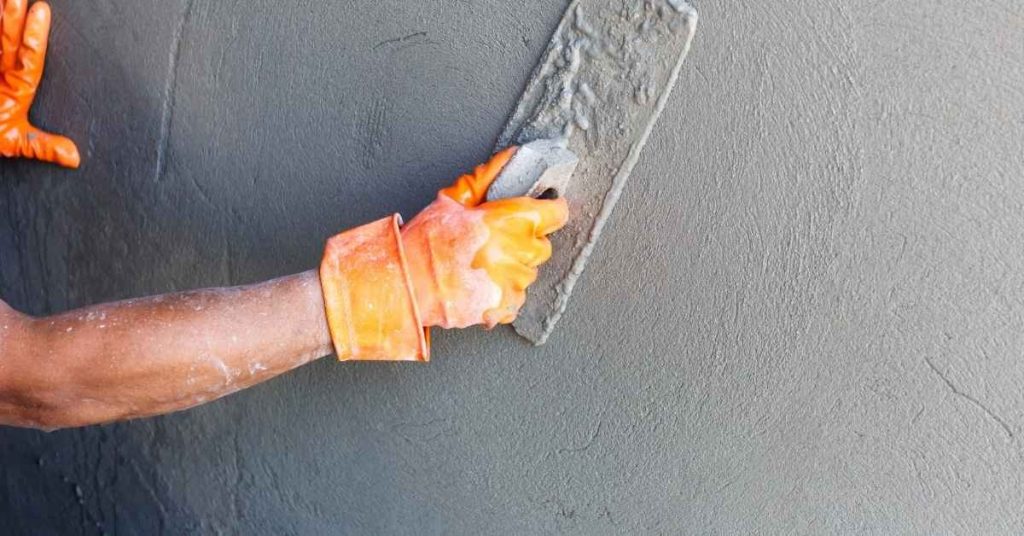
Tooling the sealant is crucial. It ensures a smooth finish, proper adhesion, and prevents air pockets. Follow the manufacturer’s instructions for tooling depth and technique.
Inspection, Maintenance, and Long-Term Care for Differential Movement Areas
Define the scope of movement zones at additions, including expansion and control joints and transitions between old and new stucco. These areas are critical for keeping water away from concealed spaces. Regular checks help catch issues before they worsen.
Inspect for cracks, sealant wear, backing gaps, and flashing performance. Document signs of deterioration and test adhesion when practical. Establish a maintenance plan with resealing and flashing refreshes to prolong service life and minimize leaks.
Visual checkpoints and diagnostic signs
Regularly inspect your stucco addition for any visible signs of deterioration. Use this checklist to guide you.
- Sealant shrinkage: Check if sealants have pulled away from joint edges or show signs of cracking.
- Cracking at joint edges: Inspect for hairline separations or widening gaps, which could indicate movement.
- Staining: Look for discoloration on the surface, especially around joints, as it may signal moisture intrusion.
- Bulging finishes: Check for any bulges in the stucco finish, which could indicate substrate deterioration behind the joint.
- Efflorescence: Inspect for white, powdery deposits on the surface, as it may indicate moisture migration through the joint.
- Rust spots on lath: Check for rust on metal lath, which could signal water intrusion and corrosion.
- Corrosion of metal control joints: Inspect for any signs of corrosion or deterioration on metal control joints.
- Weathering at flashing and weep holes: Check if the flashing around joints is damaged or if weep holes are clogged, as it could trap water.
Quick rule: If you notice any of these signs, investigate further to prevent minor issues from becoming major problems.
Maintenance tasks and service intervals
Regular maintenance is key to keeping your stucco addition in top shape. Follow this checklist for timely upkeep.
- Inspect sealants: Check the condition of sealants every 6-12 months, depending on local climate and exposure.
- Clean joints: Before resealing, clean the joint thoroughly to ensure proper adhesion. Use a mild detergent and water, then rinse and let it dry.
- Reseal joints: Reseal every 3-5 years, or as needed based on visual inspection and climate conditions.
- Replace failed backer rod/sealant: If sealants are compromised or backer rods are damaged, replace them promptly to prevent water intrusion.
- Re-flash at joints: Inspect and re-flash joints every 3-5 years, or as needed based on visual inspection and climate conditions.
- Improve drainage: Ensure proper drainage by keeping gutters clean and directing water away from the foundation to prevent water trapping.
- Document records: Keep photographic and written records of your maintenance work for future reference and warranty purposes.
Quick rule: Always follow manufacturer recommendations and adjust service intervals based on local climate exposure and visual inspection results.
Cost, Value, and Decision-Making for Expansion Joint Solutions
Cost drivers include profile type and size, finish removal needs, and the complexity of waterproofing at transitions. Each factor influences labor time and material usage. Understand how these choices affect long term performance and future maintenance.
Frame a lifecycle view by weighing potential savings from reduced leaks and warranty protections. Use a clear bid evaluation approach that lists must-have items, material options, and contractor qualifications to guide decisions.
Budget drivers and retrofit vs new-construction choices
Expansion joint detailing costs vary greatly depending on several factors. Complex transitions, like going from EIFS to traditional stucco, or navigating around architectural features, drive up labor and material costs.
Partial retrofits might seem cheaper, but they can lead to water traps if not done right. Weigh the cost of partial work against full re-detailing to avoid future repairs.
Access requirements also impact budget. If you need scaffolding or lifts, expect additional costs.
Remember, cheapest isn’t always best. Cutting corners on expansion joints can lead to costly water damage down the line.
Warranty, insurance, and ROI considerations
Check manufacturer warranties for joint systems. Some cover only materials, others include labor. Make sure you understand what’s covered.
Contractor workmanship guarantees are crucial too. A good contractor will stand behind their work.
Proper detailing reduces long-term repair risk. It can prevent water intrusion and subsequent damage, saving you money in the long run.
Insurance-wise, preventing leaks is better than fixing them. Proper expansion joints can help avoid costly insurance claims and premium increases.
Conclusion
Expansion joints aren’t optional fluff — they protect safety, keep the stucco looking straight, and prevent costly cracks from differential movement. Do the work right, and you’ll avoid water traps, leaks, and a sagging facade as the addition settles.
Start by confirming the joint locations, spacing, and required gaps, then verify drainage paths and flashing details, plan the sealant type and backing, and finally test a small mock-up area for water flow and movement before committing to the whole project. Move in a deliberate order: check design intent, confirm substrates, install or repair joints, seal and waterproof carefully, then verify with a quick water test at a manageable scale. Treat every step as a safety check and a quality control point.
Common mistakes to avoid are skimping on drainage and slope, using the wrong joint details for EIFS versus traditional stucco, and skipping proper curing and sealing. Always keep safety gear handy, test in a small area first, and never force a joint that doesn’t fit the movement plan. If conditions or materials complicate the job, don’t push through—consult a pro for joint detailing, flashing, or moisture testing. With solid planning and careful execution, you’ll finish confident and ready to stand behind a durable, clean-looking addition.
FAQ
What exactly are stucco expansion joints in additions, and why do they matter?
Expansion joints give stucco a place to flex when the house moves. Without them, movement can crack or delaminate the finish and trap water behind the wall. They’re essential where the addition meets the old wall or other hard transitions.
How do I detail joints to avoid water traps while allowing movement?
Leave a clear gap at the joint and use backer rod and a compatible sealant. Don’t seal across the gap with stucco; use flashing and proper drainage so water doesn’t wick into the joint. Follow the product labels for compatible sealants and install per manufacturer instructions.
What signs tell me my joint design isn’t working?
Visible cracks at the joint, mortar or stucco pull-away near the joint, or water staining near the joint after rain are red flags. Excessive cracking at adjacent panels or doors/windows can also mean the joint isn’t handling movement well.
What tools and materials should I have for proper installation and sealing?
Backer rod, compatible exterior sealant, masking tape, and a chisel or knife for clean edges. Flashing or sill pans where the wall meets the addition help control water. Always check the sealant’s label for surface prep, cure time, and temperature range.