
Introduction
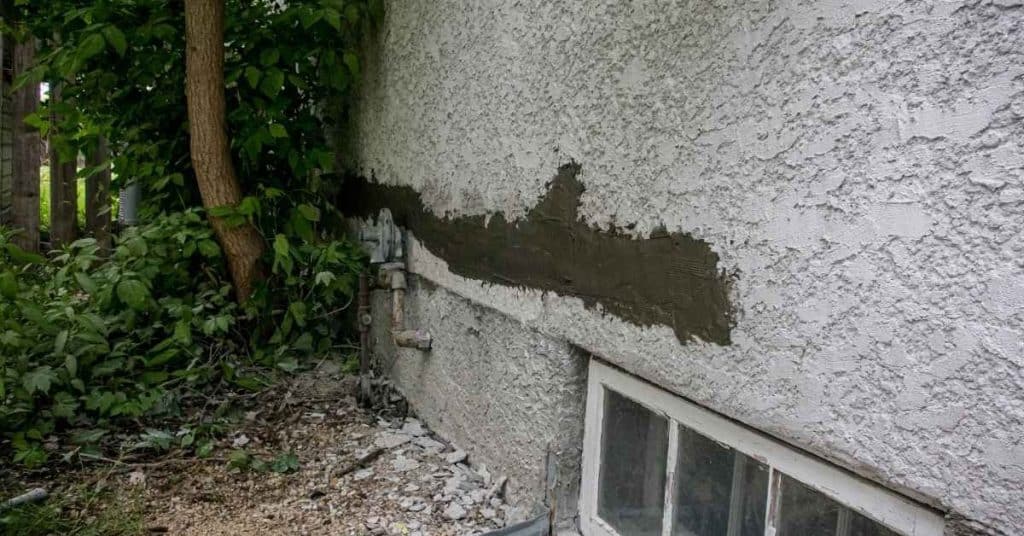
Stucco that meets soil should be corrected, but the least-invasive fix depends on what is behind the finish. If soil or mulch is simply covering an intact, open base termination, safely lowering and redirecting the grade may solve the contact problem without removing stucco. If the base is soft, cracked, hollow, wet, missing a proper termination, or concealing damaged sheathing or framing, regrading alone is not a repair. The wall needs a small exploratory opening, a localized rebuild, or professional assessment.
Do not try to create a permanent repair by burying a patch, adding surface caulk, or attaching a strip of metal to the face of the stucco. First identify the wall assembly, correct roof runoff and irrigation, confirm whether grade can be lowered safely, and then decide whether the existing drainage plane is intact.
Key takeaways
- Move soil or mulch away only if doing so will not expose or undermine the footing, slab edge, waterproofing, utilities, or adjacent hardscape.
- For conventional stucco, clearance is measured to the weep screed or approved termination—not merely to the visible finish.
- Regrading stops ongoing soil contact; it does not repair damaged stucco, wet sheathing, corroded lath, or a missing drainage-plane termination.
- Conventional stucco over framing, stucco over masonry, and EIFS need different repair details.
- A surface drip edge, caulk, parging, or generic concrete patch is not a substitute for an integrated flashing and drainage detail.
- Stop DIY work if the footing, wall assembly, structural condition, or hidden moisture damage is uncertain.
Table of Contents
- Introduction
- Key takeaways
- Why Stucco at Grade Is a Problem
- Inspecting the Wall: a Diagnostic Checklist Before You Touch Anything
- Low-Impact, Temporary Fixes That Stop Further Damage
- Adding Flashing and Termination Without a Full Tear-Off
- Partial Removal and Rebuilding the Lower Course (Minimal Invasive Replacement)
- Tools, Materials, and Material Specs Explained
- When to DIY, When to Call a Pro, and Permitting/Code Considerations
- Conclusion
- FAQ
Why Stucco at Grade Is a Problem
Soil against stucco keeps the base wet, blocks inspection, and can wick moisture into cracks and vulnerable interfaces. Efflorescence, staining, softened finish, and corrosion at exposed metal are warning signs, not proof by themselves of hidden rot. Damage becomes more serious when persistent wetting reaches wood sheathing, framing, fasteners, or insulation behind a framed wall.
How stucco is commonly expected to sit relative to grade
A six-inch gap is a common field benchmark, but it is not a universal rule or a guarantee that the wall is safe. Under the 2024 IRC model language for conventional exterior plaster, the weep screed is generally required to be at least 4 inches above earth and 2 inches above paved areas. The water-resistive barrier (WRB) is required to lap the screed flange, with lath terminating on the flange. Existing conditions, local amendments, foundation details, and the cladding system can require a different approach; consult the applicable IRC wall-covering provisions and local authority before treating a measurement as a repair detail.
Typical signs that contact is already causing damage
Look for persistent staining, white mineral deposits, cracks concentrated at the base, loose or bulging finish, rust staining, insect activity, or soil and mulch packed against the wall. Tap suspicious areas gently: a distinctly hollow sound or movement can indicate loss of bond, but it does not identify the condition of materials behind the stucco.
On the interior, water staining, a musty odor, softened trim, or recurring dampness near the same wall increase the need for a controlled opening or professional investigation. Do not assume a moisture-meter percentage taken on stucco is a wood-moisture reading; metal lath, salts, aggregate, and the meter scale can distort or limit the result.
Inspecting the Wall: a Diagnostic Checklist Before You Touch Anything
Start outside, during dry conditions if possible. Photograph the whole wall and close-ups of the base before moving soil. Track downspouts, roof runoff, irrigation overspray, nearby planters, and hardscape that directs water toward the wall. Locate buried utilities before excavating.
Exterior Visual Inspection and Recording
- Grade line: Photograph the distance from soil or mulch to the lowest visible stucco edge, screed, or accessory. Record where the termination is hidden.
- Drainage: Note ponding, downspout discharge, splashback, blocked drains, and soil that slopes toward the wall.
- Base condition: Mark cracks, staining, efflorescence, soft areas, rust staining, loose finish, and hollow-sounding areas.
- Contact points: Remove vines, stored materials, mulch, and soil that touch the wall only after confirming they are not concealing a foundation detail.
- Visible components: Look for a metal or plastic weep screed, exposed lath, WRB, rigid foam, masonry, or a prior patch. Do not assume every wall has the same layers.
- Documentation: Photograph conditions with a ruler or tape measure in the image. This is useful when comparing changes or obtaining estimates.
Interior Clues, Moisture Testing, and a Controlled Opening
- Interior clues: Check the matching interior wall for stains, odor, peeling finishes, soft trim, or recurrent dampness.
- Moisture meter: Use readings to compare suspect locations with dry control areas. On wood, use the meter’s correct wood setting and record probe depth and location. On stucco or masonry, treat many readings as comparative rather than a direct percentage of wall moisture.
- Confirm the assembly: Inspect an existing damaged edge, penetration, crack, or concealed location first. Identify whether you have cement stucco over lath, stucco over masonry, or a synthetic system with foam and embedded mesh.
- Opening: If the termination is hidden or damage is suspected, open only a small, planned area sufficient to see the base layers. Avoid cutting blindly through lath, WRB, insulation, sheathing, or concealed services.
Stop before excavation if the footing depth or foundation geometry is unclear, soil begins to ravel beneath the footing, waterproofing is exposed or damaged, or utilities have not been located. Keep dry grade, drainage, and visible separation between soil and vulnerable materials as part of pest prevention as well as moisture control.
Low-Impact, Temporary Fixes That Stop Further Damage
The first repair is usually water control: redirect roof discharge, correct irrigation, remove plant contact, and lower or reshape soil where it is safe to do so. These steps can stop continued wetting while you determine whether the wall base itself is sound.
Regrading and simple drainage fixes
Do not choose an excavation depth by habit. Work from the actual termination and foundation conditions. Move soil away in shallow, controlled stages; preserve a slope that sheds water away from the house; and do not create a low trench that collects runoff against the foundation. Extend or redirect downspout discharge so it does not saturate the repaired area.
Regrading may be the complete solution only when the termination is visible, open, and intact, and inspection finds no delamination, ongoing moisture, or substrate damage. Keep mulch, soil, finish material, and sealant out of any drainage openings after the grade is restored.
Surface patching, caulking, and parging for minor problems
Use a compatible stucco patch only for a localized defect after the moisture source is controlled and the backing is sound. Match the patch to the existing stucco system; generic concrete repair mix is not automatically compatible with a plaster assembly.
Caulk belongs at properly designed movement joints and penetrations when the joint and sealant are appropriate. It does not create a missing drainage plane. Do not parge over a wet, soil-contact base, bury a new patch, or use caulk as the primary water-management detail. Related guidance: Hairline Stucco Cracks Over Framing: When It’s Normal Movement vs. a Missing Joint.
Adding Flashing and Termination Without a Full Tear-Off
A localized repair can preserve most of the wall, but it must restore the assembly rather than merely cover the edge. On conventional framed stucco, that means evaluating the WRB, lath, flashing or weep screed, sheathing, and stucco together. The target is a shingle-lapped drainage path that sends water out at the base.
Retrofitting a metal flashing/termination detail
Do not assume that metal can be slipped through a saw cut beneath existing lath. Whether that is possible depends on the assembly, access, manufacturer detail, and whether cutting would sever reinforcement or interrupt the WRB. A small exploratory opening is the appropriate first step when the bottom of the system cannot be confirmed visually.
If the opening shows an intact, repairable framed-wall assembly, remove enough finish to reach sound material and rebuild the termination using compatible components and the applicable detail. The replacement WRB and flashing must lap in a drainage direction; surface caulk at the cut edge is not equivalent to that integration. If that continuity cannot be restored from the opening, expand the repair only as needed or hand the work to a building-envelope or stucco professional. Related guidance: Stucco Around Roof-to-Wall Kickout Flashing: Fixing the Most Common Leak Detail.
Surface-mounted drip edges and external capillary breaks
Do not treat surface-mounted drip edges, adhesive drainage strips, scuppers, or a metal strip fastened to finished stucco as general substitutes for an integrated termination. They may be part of a manufacturer-approved detail for a specific system, but they do not by themselves reconnect a hidden WRB, lath, and weep path. Avoid relying on them to solve a buried or missing base detail.

Partial Removal and Rebuilding the Lower Course (Minimal Invasive Replacement)
Partial removal is appropriate when the base is damaged but the condition is limited enough that the surrounding wall can remain. Remove only to sound material—but far enough to inspect and repair the drainage-plane termination and any affected backing. Replacing the face coat over wet sheathing, loose lath, or a damaged WRB only hides the problem.
Preparing the substrate, WRB, and lath for a repair section
- Protect windows, landscaping, and adjacent finishes. Use eye protection, gloves, hearing protection where needed, and dust controls. Cementitious stucco cutting and grinding can create respirable silica dust; avoid dry cutting where practical, use wet methods or suitable dust collection, keep others out of the work area, and do not dry sweep the debris.
- Make a controlled opening at the damaged base. Work carefully enough to identify the layer sequence before widening it.
- Inspect for wet or deteriorated sheathing, framing, insulation, corroded lath, torn WRB, and blocked or missing termination components. Stop for soft or damaged framing, widespread wetting, or conditions you cannot evaluate.
- Remove damaged material, allow the repair area to dry as required by the selected system, and replace only with compatible WRB, flashing or screed, lath, fasteners, and plaster materials.
- Fasten lath according to the lath type, substrate, corrosion exposure, required penetration, and the applicable manufacturer and code detail. There is no universal fastener length for every wall.
- Rebuild the drainage path before replacing plaster. Verify that the termination remains open and will stay above the finished soil or paving.
Applying stucco finish and blending to match existing wall
Use a compatible stucco product and follow its coat, reinforcement, weather, and curing instructions. Feather the finish edge only after the underlying layers are complete. Color and texture matching often require a sample patch; a visually good patch is not proof that the drainage detail is correct.
Protect fresh work from weather as directed by the product manufacturer. Do not close, coat, or bury the repair while materials or the cavity remain wet. After the first significant rain, inspect the base for staining, blocked drainage openings, renewed efflorescence, or pooling.
Tools, Materials, and Material Specs Explained
Tools and safety gear for inspection and localized repair
- Assessment: tape measure, camera, marker, straightedge or level, small probe, and a moisture meter used on the correct material scale.
- Grade work: shovel, rake, wheelbarrow, and utility-location information before digging.
- Opening and repair: hand tools suited to the confirmed assembly; use powered cutting only when necessary and with dust controls.
- PPE: safety glasses, gloves, boots, hearing protection for powered tools, and respiratory protection appropriate to the work and applicable requirements.
Choosing Flashing, Lath, Mortars, and Sealants
Select materials as a compatible system. Corrosion-resistant weep screed or flashing, lath, fasteners, WRB, and plaster must suit the substrate and exposure. Galvanized metal is not automatically unsuitable, and stainless steel is not automatically necessary; durability depends on the product coating and thickness, cut edges, salts, moisture exposure, and compatibility with nearby metals and fasteners.
EIFS is not conventional cement stucco. It commonly uses insulation board, reinforcing mesh, base coat, finish coat, and system-specific drainage accessories. Because the materials and repair details differ, confirm the system before patching; the AWCI overview of stucco and EIFS differences explains why look-alike finishes should not be repaired interchangeably.
When to DIY, When to Call a Pro, and Permitting/Code Considerations
Choose the smallest repair that restores the wall
- Grade-only work may be enough: Soil is high, the open termination is visible and undamaged, drainage can be improved safely, and there is no evidence of wet or loose material.
- Open a small area first: The termination is buried, blocked, missing, or uncertain, but there is no clear evidence of extensive damage.
- Plan a localized rebuild: The base is cracked, soft, hollow, loose, visibly wet, or corroded, and the opening confirms a repairable, limited area.
- Call a professional: You find framing rot, sheathing damage, widespread delamination, persistent interior moisture, structural movement, inaccessible WRB or lath, suspected EIFS without a confirmed repair method, or any footing, waterproofing, or utility concern.
What to ask contractors and what belongs in an estimate
Ask the contractor to identify the assembly and show how the proposed work restores drainage continuity at the base. A useful estimate states the exploratory scope, removal limits, WRB and flashing or screed detail, lath and plaster replacement, grade restoration, cleanup, permit responsibility, and how concealed damage will be handled. Get clarification before accepting vague language such as “seal base” or “install flashing” without a detail.
Local permits or inspections may apply to the repair scope. Contact the local building department when the work involves substantial removal, a change to the wall assembly, or uncertain code requirements.
Conclusion
Start with safe drainage and grade correction, then verify the wall base. If the existing termination is open and the assembly is sound, no tear-off may be needed. If soil contact has damaged the finish or concealed a failed termination, remove only enough material to inspect and rebuild the complete detail—or stop and bring in a qualified professional.
The finished repair should shed water away from the wall, keep the base termination visible and open, and leave no soft, hollow, visibly wet, or buried repair material behind.
FAQ
Can I fix stucco touching soil without removing the whole wall?
Often, yes. If the problem is high soil or mulch and the existing base termination is intact, open, and undamaged, safely lowering and redirecting the grade can be enough. If the termination is missing, blocked, or damaged, or the base has loosened or become wet, a localized opening and repair may be necessary.
How do I know whether I can lower the soil safely?
Stop before digging if you cannot identify the footing, slab edge, waterproofing, drainage components, hardscape support, or buried utilities. Do not excavate until soil falls away beneath a footing or until a foundation detail is exposed without understanding how it should be protected.
Can I add flashing from the outside and caulk it?
Not as a general repair method. A correctly functioning framed-stucco base needs an integrated drainage path between the WRB, flashing or weep screed, lath, and stucco. Surface caulk and metal do not recreate that path when the hidden layers are discontinuous. Related guidance: Deck Ledger Through Stucco: Retrofit Flashing Strategy That Preserves Drainage.
When should I stop DIY work?
Stop for structural movement, framing or sheathing deterioration, extensive loose stucco, persistent interior moisture, uncertain wall layers, suspected EIFS, footing concerns, damaged waterproofing, or utilities. Those conditions require a qualified stucco, EIFS, building-envelope, foundation, or waterproofing professional as appropriate.