
Introduction
Setting concrete forms dead straight means aligning the formwork so the edges stay true and parallel, using stringlines and corner checks. Start with a clear plan for measuring and placing the forms, and keep a simple layout to guide edges, corners, and cleats. Check squareness at key points with a stringline, a level, and simple reference corners, then adjust before you pour.
Gather the basic materials for formwork, including straight boards or panels, fasteners, and stakes, and review what your project requires. Assemble the forms by securing straight, supported edges, setting stringlines tight, and aligning corners before final tightening. Follow best practices by rechecking alignment after any movement, keeping forms clean and supported, and documenting any deviations to verify a true pour.
Key takeaways
- Plan form dimensions from drawings and site measurements before stakes and stringlines.
- Use consistent stake spacing and verify corners with carpenter square and stringline tension.
- Select material specs for plywood, dimension lumber, and bracing per project requirements.
- Set corner stakes accurately, brace panels, and wear PPE to protect edges.
- Stringlines should be taut, level, and checked against fixed reference points.
- Recheck alignment and plumb after assembly and just before concrete pour.
Table of Contents
- Introduction
- Key takeaways
- Planning Your Formwork and Measurements
- Tools, Materials and Material Specs Explained
- Setting Corner Stakes and Achieving Square Corners
- Stringline Techniques for Dead-Straight Forms
- Assembling and Bracing Concrete Forms
- Accuracy Checks During Assembly and Immediately Before Pour
- Environmental and Soil Factors That Affect Alignment
- Common Mistakes, Safety Best Practices, and Cost-Saving Tips
- Conclusion
- FAQ
Planning Your Formwork and Measurements
Translating drawings into on site layout starts with turning elevations, contour lines, and dimensions from plans into stakes, strings, and reference points that the crew can follow accurately. Establish true lines for straight forms and corner squareness, and decide acceptable tolerances for walls, foundations, and supports. Prepare a measurement and layout checklist that covers all required tools, reference points, and verification steps before any cutting or staking begins. Confirm elevations, slopes, and pour sequencing align with project specifications and site conditions. Plan for clear on site communication and safety considerations in the layout process.
Verify specifications by consulting the label, product data sheet, or manufacturer instructions as needed, and cross check with local rules or project guidelines. Outline how to handle excursions, whether rework or adjustments are appropriate, and document acceptance criteria before proceeding. Include notes on safety, weather contingencies, and sign-offs to ensure everyone understands the plan. Create a concise log that records decisions, changes, and responsible personnel for layout checks. This preparation reduces confusion when turning drawings into real forms on the ground.
Establishing a site datum and reference lines
Begin by setting a stable benchmark using a surveyor’s level or laser level. This should be in an area unaffected by site conditions to ensure accuracy.
Use this benchmark to transfer elevations across the site quickly and efficiently with a laser level or water level. This will help maintain consistent form heights throughout the project.
Pro Tip: Always verify your benchmark with a second independent check to ensure its accuracy.
If the site is flat, a single benchmark may suffice. However, for sloped sites, multiple benchmarks might be necessary to account for changes in elevation.
Layout strategy and measurement tolerance
Choose layout points that are easily identifiable on-site and correspond to drawing references. These will serve as your starting point for setting out formwork.
Mark offsets for form widths using a tape measure or laser distance meter, ensuring consistency across the site. This will help maintain straight forms and square corners.
Note: If tolerances are not specified in the project plans, consult with your engineer or use an industry standard of 1/8″ per 10 feet.
Use a laser level to quickly check and adjust form heights to meet project tolerances. This will help ensure that your forms are set up correctly before pouring concrete.
Calculating concrete volume and ordering allowance
Estimate the volume of concrete needed from form dimensions using the length x width x height (LxWxH) formula. This will give you a rough estimate to work with.
Check delivery minimums and lead times with your concrete supplier to ensure timely delivery. Some suppliers may have minimum order quantities or require advance notice for deliveries.
Pro Tip: Add a contingency allowance of at least 5% to account for spillage, waste, and unforeseen factors that may arise during the pour.
If the volume is large, consider ordering concrete in stages to match your pour sequence. This can help prevent waste and ensure that you have enough concrete on hand when needed.
Tools, Materials and Material Specs Explained
List essential tools and materials used for formwork, with quick guidance on choosing quality, straight stock and compatible plywood thickness for typical loads. Include lumber, plywood, stakes, fasteners, ties, and release agents, and note when upgrades are warranted for higher demands. Explain how to distinguish between common lumber grades and treatments and how these choices affect form stability and leakage risk. Include practical criteria for selecting plywood and sheathing, including grading, waney edges, panel size, and joint needs. Provide clear decision points for upgrading when needed to meet project requirements.
Clarify release agents and form coatings and consider environmental impact and compatibility with concrete. Emphasize checking local codes and manufacturer specs for material grade and treatment, and compare against supplier recommendations. Outline how material choices influence reuse, durability, and ease of removal after a pour. Provide a simple framework to decide when higher-load or higher-moisture-rated panels are appropriate for the project conditions.
Lumber, Plywood and Hardware Selection
When selecting lumber for your concrete formwork, consider using straight, quality stock. Common boards (2×4 to 2×10) are suitable for most typical loads, while heavier members like 2×12 or 4×4 may be needed for higher loads.
Plywood thickness should also be considered based on the formwork load and span. For typical applications, 3/4″ or 5/8″ plywood is sufficient. However, for higher loads or longer spans, consider upgrading to thicker panels like 1-1/2″ or even 2″.
For tie systems and stakes, look for options with adequate length and diameter to provide the necessary rigidity. Corrosion-resistant materials are recommended to prevent rusting in concrete exposure.
Tools and Measuring Equipment
Having the right tools is crucial for setting up accurate and stable formwork.
- Tape Measure: Essential for taking precise measurements. Ensure it’s calibrated and in good condition.
- Level: A 2-foot or 4-foot level is standard for checking horizontal surfaces. For longer spans, consider a laser level.
- Stringline Tools: Used to create straight reference lines. Include a reel, line, and pins or clamps.
- Plumb Bob: Helps ensure vertical alignment of your forms. A 2-ounce bob is suitable for most applications.
- Circular Saw: Essential for cutting lumber to size. Consider renting a high-quality saw if you don’t own one.
- Drill and Driver Set: Needed for driving screws and bolts into formwork. A cordless drill with a set of driver bits is convenient on-site.
- Sledgehammer or Dead Blow Hammer: Used to tap forms into place or remove them after curing. Rent if necessary.
- Wheelbarrow or Mixing Cart: For transporting and mixing concrete. Consider renting a powered cart for larger jobs.
Setting Corner Stakes and Achieving Square Corners
Establish corner references with snap lines from batter boards or stakes, then confirm true 90-degree corners using simple geometric checks. Transfer the corner positions to all four corners, including corner stakes, forms, and stringlines, and note stake height and alignment. Re-check corners after initial setup before proceeding with forms.
Diagonals are a quick on-site cue: if diagonals are equal, the rectangle is square, and rechecking after tamping catches movement that can alter alignment. Pro check: Experienced installers verify all four corners before proceeding with form setup, and if diagonal measurements are unequal, recheck and adjust corner stakes. Common mistakes include slippage and inconsistent stake heights; keep all stakes at the same level to maintain accuracy.
3-4-5 triangle and other squaring methods
To ensure your corners are square, use the classic right-triangle measuring technique. Here’s how:
Stake your initial corner locations. Then, measure 3 units along one stake using a measuring wheel or tape. From that point, measure 4 units perpendicularly on the adjacent stake. The distance between the ends of these measurements should be 5 units. This forms a right-angled triangle, confirming a square corner.
If the final measurement isn’t 5 units, adjust your stakes until it is. Common mistake: Off measurements can lead to skewed corners. Always recheck and recalculate if needed.
Diagonal measurement and cross-checks
To confirm consistent rectangular dimensions, measure diagonally from one corner to the opposite. Here’s how:
Stake your corners, then use a measuring wheel or tape to record the diagonal length. Repeat this process for both diagonals. In a perfect rectangle, these measurements should be equal.
If diagonal lengths are not equal, recheck and adjust corner positions until they match. Common mistake: Unequal diagonals indicate skew, so always double-check your layout.
Batter boards and temporary bracing for layout control
To keep offsets and corner positions visible and stable during work, use batter boards and temporary lines. Here’s how:
Stake your corners, then set batter boards at each one, ensuring they are level and stable. Stretch a stringline between the batter boards at each corner using a measuring wheel or tape to confirm correct length.
Check that all stringlines are taut and true, with no sagging or misalignment. If not, adjust your batter boards until they are. Common mistake: Sagging or misaligned stringlines can lead to inaccurate layout, so always check and adjust as needed.
Stringline Techniques for Dead-Straight Forms
Clarify the purpose of stringlines for defining form faces, edges, and corners, including how to establish baseline height and alignment relative to the finished surface. Describe methods to set and tension lines using stakes, guy lines, tension reels, and clamps to minimize sag, slack, and deflection over long spans. Explain how to transfer exact line height to form work with laser levels, chalk lines, and calibrated stakes, and how to verify consistency along the entire run. Provide a practical checklist for true horizontal and vertical alignment at corners and along long runs, verified with reference tools.
Share tips to reduce line drift in windy conditions and outline how to re-tension or adjust lines without losing prior references. Discuss common pitfalls and quick corrective actions such as re-tensioning, repositioning stakeouts, and rechecking corners to maintain dead straight forms. Emphasize documenting the alignment process for accountability during the pour.
Tensioning, anchoring and sag compensation
Properly tensioned stringlines ensure accurate formwork. Use stakes or clamps to anchor lines securely at both ends.
Tension: Pull lines taut but not overly tight to prevent breaking. A common method is the ‘walk-the-line’ technique: pull line until it sags slightly, then walk along it, pulling evenly and adjusting tension as you go.
Sag compensation: To minimize sag over long spans, use guy lines or tension reels. Guy lines can be anchored at regular intervals to support the main stringline. Tension reels allow for easy adjustment of line tension.
Transferring elevations and slopes with strings
Accurate elevation transfer is crucial for consistent form heights. Use laser levels, chalk lines, or calibrated stakes to mark line height at regular intervals.
Laser Levels: Set laser level on a stable tripod at the desired elevation. Align stringline with laser beam and mark points along the line where it intersects the beam.
Chalk Lines/Calibrated Stakes: Attach chalk box or calibrated stake to stringline at the correct height. Pull line taut, then snap a chalk line or drive stakes at regular intervals to mark elevation.

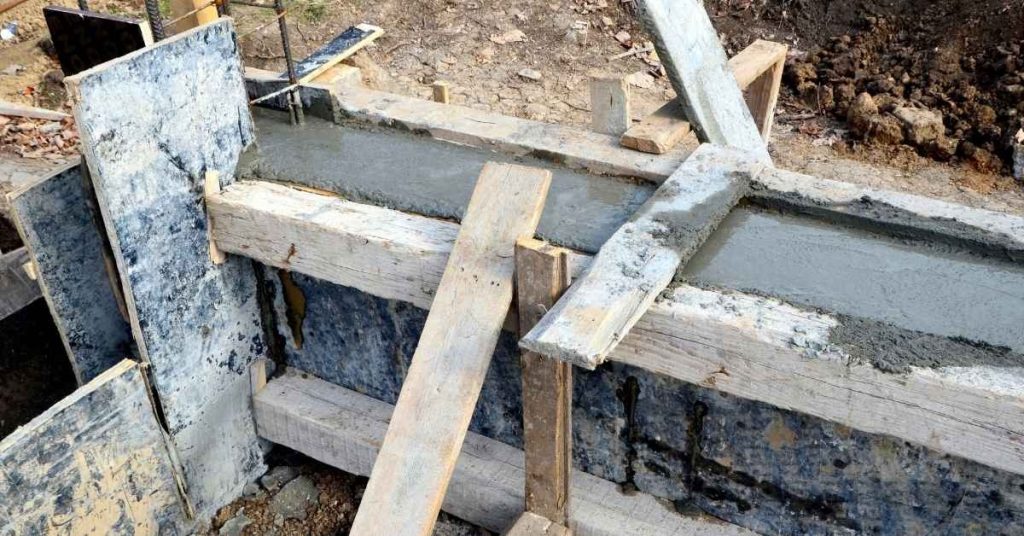
Assembling and Bracing Concrete Forms
Describe the panel placement flow from outer corners inward, ensuring alignment with stringlines and established reference marks to maintain straight walls. Define fastening strategy including type and spacing of fasteners, use of panel clips or ties, and edge bracing to resist concrete pressure without bowing. Develop a progressive bracing plan that specifies where to place initial braces, how to advance bracing as forms rise, and the role of diagonal and backing braces to maintain plumb and square during the pour. Include methods to verify alignment during assembly with stringlines, a spirit level, and known good diagonal checks at each corner.
Identify pause points and adjustment procedures to correct misalignment before proceeding, and specify when to add extra bracing or reseat panels. Emphasize keeping work organized and checking fit before moving to the next stage to prevent form movement during concrete placement.
Panel installation and alignment sequence
Begin installing concrete form panels at the outer corners, using established corner stakes as your starting point.
Quick check: Before securing each panel, verify its level using a straight edge across the top. This ensures that all panels are aligned horizontally.
Pro check: After checking level, use a spirit level or stringline to ensure the panel is plumb (vertical). Adjust and recheck before proceeding if any misalignment is found.
If a panel is not plumb or level after adjustment, remove it, correct the issue, and reinstall. Common mistakes include improper stake placement or using warped panels.
Bracing spacing, tiebacks and load considerations
Space braces along the length of your forms according to the manufacturer’s guidelines or as recommended by a structural engineer. This ensures that your forms can withstand lateral pressure from the concrete.
Quick check: Before pouring, ensure all tiebacks are taut and properly anchored to prevent movement during the pour.
Pro tip: Use diagonal bracing for added stability and resistance against lateral pressure. This helps maintain form squareness and plumb during the pour.
If you expect extra loads due to height, slope, or other factors, consult a structural reference or engineer to ensure adequate reinforcement. Failure to do so could result in form failure and compromised safety.
Accuracy Checks During Assembly and Immediately Before Pour
A progressive verification plan moves from assembling the forms to the moment before pour, checking plumb, level, line straightness, corner squareness, and gaps. Each check has acceptance criteria defined in the project notes or manufacturer guidance, and clear actions to take if something is out of tolerance.
This approach helps prevent misalignment and costly rework. A pro check follows a planned sequence, starting from assembly, and if anything is out of tolerance, reset forms and re-check. If forms are out of alignment or tolerance, reset forms and re-check; common mistakes include overlooking small gaps, so use quick visual cues and feeler gauges to verify gaps and pack or shim as needed.
Using Levels, Lasers, and Plumb Tools for Verification
Ensure your forms are perfectly aligned and level before pouring concrete with these practical checks using spirit levels, rotary or line lasers, and plumb bobs.
- Spirit Level: Check horizontal alignment during assembly. Key spec: Length should match form width for accurate readings. Jobsite tip: Use a 2′ or 4′ level for quick adjustments.
- Rotary Laser: Verify level and plumb simultaneously. Key setting: Set to your desired tolerance. Pro tip: Use with a laser receiver for precise readings.
- Line Laser: Align forms along the length. Key spec: Choose one that projects over the required distance. Jobsite warning: Ensure laser is secure and won’t shift during checks.
- Plumb Bob: Check vertical alignment at corners. Key tip: Use a plumb bob with a long string for better accuracy.
- Plumb Tool (Speed Square): Quickly check if walls are perfectly vertical. Key spec: Choose one with clear, easy-to-read vials. Jobsite fix: Re-adjust forms, re-level, and re-check if readings are out of tolerance.
Visual Checkpoints and Gap/Seal Inspection
Before pouring concrete, visually inspect your formwork to catch any issues that could lead to leaks or bulges.
- Twisted Panels: Check if panels are warped or twisted. How to confirm: Compare diagonals and check for uneven gaps.
- Uneven Top Lines: Ensure top edges of forms are level. What goes wrong if skipped: Inconsistent slab thickness.
- Gaps Between Forms: Inspect for any gaps that could leak. How to confirm: Use a feeler gauge or measure with a straight edge.
- Form Tie Holes: Check if they’re properly plugged. What goes wrong if skipped: Concrete may leak through holes.
- Brace Integrity: Ensure braces are secure and not twisted. How to confirm: Gently push on bracing points.
- Formwork Alignment: Check if forms are square and aligned. What goes wrong if skipped: Concrete may bulge or slab may crack.
- Concrete Accessories: Ensure all accessories (e.g., anchors, bolts) are secure. How to confirm: Tug gently on each accessory.
Quick rule: If gaps are within specified range, proceed with the pour. If not, seal gaps using appropriate materials and methods, re-check, and sign off on pre-pour condition.
Environmental and Soil Factors That Affect Alignment
Explain how soil softness, frost, slope, water, and wind can shift stakes and lines, and provide guidance on mitigating these effects before and during the pour. Include pre-pour soil checks to assess bearing capacity, moisture content, and recent compaction, ensuring stakes and stringlines have solid footing. Discuss frost and seasonal temperature considerations and how frost heave, thaw cycles, and ambient temps can influence forms, with guidance on delaying pours or using appropriate materials where needed. Consider slope, grade, and drainage impacts and plan for additional bracing or temporary drainage to prevent line movement.
Address water management and wind effects, including perched water and gusts that can disturb lines, and suggest covers, windbreaks, and ballast. Outline verification and protection protocols during the pour, including rechecks after weather changes and soil shifts, and use temporary protections like bracing and sandbags to maintain alignment. Emphasize establishing a cadence for rechecking before concrete placement.
Dealing with uneven or soft ground
Uneven or soft soil can cause forms to shift, leading to misaligned concrete. Before setting your forms, perform a quick visual check of the soil conditions around stakes and batter boards.
Pro tip: Assess soil bearing capacity and moisture content using a penetrometer or dynamic cone penetrometer before pouring. If the soil is soft or uneven, consider compaction, shimming, or heavier staking to stabilize your forms.
Common mistake: If forms shift during assembly, recheck soil conditions and adjust stakes or use temporary bracing as needed.
Weather and timing considerations
Adverse weather conditions can cause formwork to move, affecting alignment. Inspect forms and stringlines after heavy rain or wind gusts for any movement.
Pro tip: Monitor local weather forecasts and consider delaying the pour if severe weather is expected. If wind gusts are strong, use temporary covers, windbreaks, or secure forms with ballast to prevent line disturbance. In areas with frequent freeze/thaw cycles, delay the pour until stable temperatures are reached, use insulation, or consider thermally resistant materials.
Common mistake: If weather shifts cause form movement, recheck stringlines and perform square checks before continuing with the pour.
Common Mistakes, Safety Best Practices, and Cost-Saving Tips
Common mistakes in setting concrete forms include misaligned stringlines, failing to verify 90-degree corners with 3-4-5 checks, and uneven footing or settled supports. Over-tightening panels can bow the form, and neglecting braces can lead to form failure during the pour. Quick corrective actions include realigning stringlines, re-shimming or re-bracing, and rechecking level and plumb before pour.
Safety best practices for formwork crews—PPE, fall protection, secure bracing, proper panel handling, tool organization, and lockout procedures—keep crews protected and forms reliable. Practical cost-saving tips rely on reusing and maintaining panels, cleaning and sealing to extend life, planning material orders to reduce waste, batching tasks to limit moves, and choosing higher-quality bracing where it matters to prevent rework. A quick visual check or tape measure confirmation can catch obvious misalignment before the pour.
Top Mistakes to Avoid and Quick Fixes
To ensure formwork integrity and pour success, be aware of these common pitfalls and their immediate corrective steps.
- Misaligned stringlines: Realign them immediately. Check your stringline tensioning and anchoring.
- Unchecked corners: Use the 3-4-5 diagonal check to verify squareness. Adjust forms for true square if needed.
- Loose bracing: Tighten braces evenly to prevent form failure during pour. Regularly inspect formwork during assembly and before pouring.
- Uneven footing or settled supports: Re-shim or re-brace as necessary to maintain level and plumb.
Postpone the pour until all tolerances meet specifications to avoid costly mistakes.
Safety Procedures and Personal Protective Equipment
Prioritize worker safety and injury prevention with these on-site safety checks, safe bracing removal sequence, and recommended PPE.
- Fall protection: Use fall arrest harnesses when working at height. Ensure anchors are secure and rated for the load.
- Handling heavy panels: Wear appropriate PPE including gloves and safety glasses to protect from impact injuries.
- Bracing removal sequence: Remove braces in a safe, controlled manner to prevent form collapse. Start from the bottom and work upwards.
- Lockout procedures: Follow lockout/tagout procedures for machinery near forms to prevent accidents during setup and pour.
- Tool organization: Keep tools organized and easily accessible to minimize trips and falls. Consider renting or borrowing tools instead of purchasing if costs are prohibitive.
Budgeting and Cost-Saving Strategies
Efficient use of resources without compromising form integrity involves careful planning, reuse, repair, and material substitution. Batch tasks to limit redundant moves and plan material orders to reduce waste.
Inspect panels for signs of wear. Reuse or repair them instead of replacing if possible. Cleaning and sealing forms extends their lifespan, saving you money in the long run.
Invest in higher-quality bracing when necessary to prevent rework and costly failures. While it may seem counterintuitive, investing in better materials upfront can save you money by reducing labor costs and preventing expensive mistakes.
Conclusion
Achieving a solid, safe, and visually accurate form hinges on careful planning, verification, and disciplined execution that respects the loads and soils involved. When you get the alignment right, you reduce the risk of costly rework and gain a durable, better-looking pour.
Before pouring, verify measurements and conditions in a natural-language checklist: confirm stake positions and line up the corners with a square, set and level the forms, run the stringline tightly and check for sag or slack, brace and secure all formwork, review material specs and hardware compatibility, and re-check any environmental or soil factors that could shift alignment before you lift or pour.
Common mistakes to avoid include skipping a full corner check, over-torquing bracing which can bow the form, and neglecting to re-check after any movement or settling. Always keep safety at the forefront: wear PPE, avoid over-relying on a single clamp or stake, and test the setup in a small area if you’re unsure before committing to a full pour.
If conditions are unstable, or if you’re unsure about soil bearing, weather impacts, or complex corners, consider bringing in a professional rather than pushing ahead alone. With careful planning, consistent verification, and deliberate bracing, you can complete the task confidently and finish with a clean, straight result that stands the test of time.
FAQ
What should I plan for formwork before starting any assembly?
Make a rough layout of the area and mark the intended edges. Confirm the overall dimensions and alignment with stakes or stringlines. Check that the planned forms will fit the space and allow for access and cleaning after pouring.
What materials are typically needed to build concrete forms?
Common items include form boards, sheathing, bracing, fasteners, and stakes. Use materials suitable for the concrete mix and expected exposure. Always follow the product label or manufacturer instructions for use and compatibility.
What are the essential assembly steps for setting up formwork?
Lay out the edge lines, drive stakes, and secure form boards to the stakes. Place bracing to keep the forms from bowing and to maintain alignment. Check that the forms are clean, level, and square before any concrete is placed.
What are best practices to avoid common formwork mistakes?
Double-check alignment with a stringline or measuring tools before bracing. Ensure joints are tight and sealed where needed. Inspect for gaps and secure fasteners to prevent movement during pour and vibration. If unsure about a detail, consult manufacturer instructions or local guidelines.