
Introduction
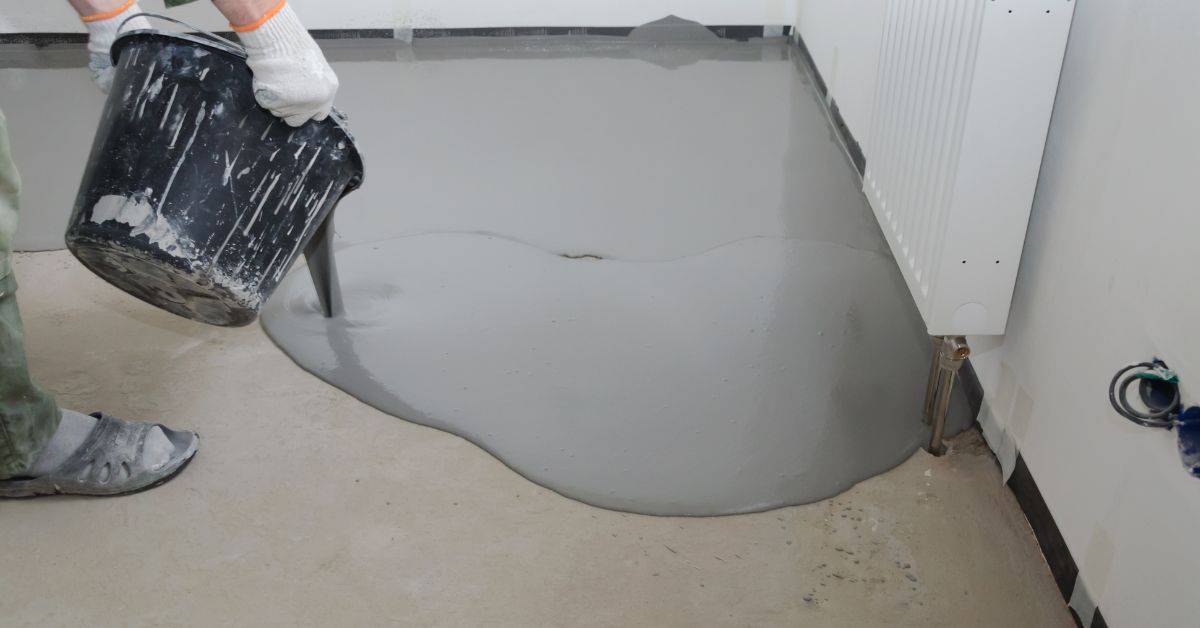
Self-leveling overlays are thin, cement-based compounds poured over concrete to create a smooth, level surface. They are applied after proper substrate preparation to fill minor irregularities and set with minimal manual leveling. A proper dam at edges and openings helps keep the mix in place as it cures.
People doing this at home should understand there are different types of self-leveling materials and how they respond to your substrate. Choosing the right primer and following the manufacturer’s guidance on cure time and compatibility with the overlay matters for a reliable result. Think of it as a hands-on project that rewards careful prep, a clean mixing area, and steady edging as you move from dam to dam.
Key Takeaways
- Select self-leveling material based on substrate type, strength, and cure time.
- Install dams to confine overlays and maintain designed thickness and flow.
- Profile and clean substrate before priming to improve bonding and reduce defects.
- Choose primers compatible with both substrate and overlay to avoid peeling.
- Mix design and additives influence pinholes and ripples; follow manufacturer guidelines.
- Apply in steady passes, maintain ambient conditions, and avoid over-troweling.
- Wear PPE, follow ventilation and product safety data throughout prep and curing.
Table of Contents
- Introduction
- Key Takeaways
- Types of Self-Leveling Materials and How to Select One
- Substrate Preparation: Dams, Profiling, and Surface Cleaning
- Primers and Bonding Strategies
- Mix Design, Additives, and Materials That Reduce Pinholes and Ripples
- Application Techniques to Prevent Pinholes and Ripples
- Quality Control, Field Testing, and Visual Checkpoints
- Curing, Jointing, Sealing, and Long-Term Durability
- Troubleshooting Common Problems and Field Fixes
- Conclusion
- FAQ
Types of Self-Leveling Materials and How to Select One
Choose based on how the material flows and settles, how long it stays workable, and what preparation the substrate requires. Consider temperature and humidity limits that affect bond and cure. Review surface compatibility with the intended final finish to avoid issues with coatings or overlays.
Evaluate data sheet statements on compressive strength, shrinkage control, and resistance to defects like pinholes. Look for guidance on environmental windows, thickness ranges, and priming or bonding requirements. Use a practical checklist to compare substrates, finishes, budget, and expected traffic to decide whether to consult the manufacturer or a pro.
Cementitious and Polymer-Modified Products
Cementitious and polymer-modified self-leveling materials offer high strength and durability. They are suitable for most concrete substrates but may require proper priming to ensure adhesion.
Flow/settling characteristics, cure time, and working time should be checked before application. Ensure substrate temperature and humidity conditions are suitable.
Verify compressive strength, shrinkage/crack-bridging ability, and resistance to pinholes in datasheets. For high traffic areas or heavy loads, consider cementitious products with added polymers for increased strength and durability. If pinholes occur, recheck the priming system and application sequence. Consider adding a bonding agent if necessary.
Gypsum or Gypsum-Based Systems and Specialty Mixes
Gypsum systems provide good leveling and finishing capabilities but are sensitive to moisture. They are best suited for interior, low-traffic areas with controlled moisture conditions.
Flow/settling characteristics, cure time, and working time should be checked. Ensure the substrate is dry and free from excessive moisture before application.
Evaluate compressive strength, shrinkage/crack-bridging ability, and resistance to pinholes. Note any special installation requirements due to moisture sensitivity. Avoid gypsum systems in high humidity or wet areas. If blisters occur, recheck substrate preparation and ensure the surface is dry before application.
Choosing by Project Needs and Finish Requirements
Selecting the right self-leveling material depends on the project’s specific needs, including thickness required, traffic load, final finish, and moisture conditions.
Flow/settling characteristics, cure time, working time, and substrate preparation needs should be checked. Consider the planned final surface and priming requirements.
Evaluate compressive strength, shrinkage/crack-bridging ability, resistance to pinholes, gloss level, chemical and abrasion resistance, and long-term durability in datasheets. For thin overlays, consider materials with good flow characteristics. For heavy traffic or high loads, select products with high compressive strength and abrasion resistance. If ripples occur, recheck the application sequence and ensure proper mixing, pouring, and spreading techniques are followed.
Substrate Preparation: Dams, Profiling, and Surface Cleaning
Substrate preparation is the crucial foundation for a successful self-leveling overlay. Focus on achieving the target surface profile, removing all contaminants, and controlling containment, edge detailing, and moisture checks before any primer or mix is applied. Verify the roughness with a profile method or test patch, and document that the surface is clean, dry, and properly contained to prevent movement or spills during the install.
Skipping proper prep can lead to pinholes, ripples, or delamination that undermine the overlay’s performance and longevity. For a DIY project, the payoff is clear: a reliable, uniform surface that resists defects and yields a smooth, durable finish. Taking the time to validate SSP/RP, confirm contaminant removal, and confirm moisture levels reduces rework, protects adjacent areas, and supports proper edge and joint detailing for a clean, lasting result.
Building Effective Dams and Edge Stops
Properly constructed dams prevent self-leveling overlay from migrating to unwanted areas. Inspect dams for integrity before overlay application, repairing any damages or gaps.
Verify dam height, width, and placement align with project requirements and adjacent slab protection. If dams are not properly installed, reinstall or supplement them to prevent overlay migration.
Repair damaged dams, fill gaps with appropriate material, and ensure proper adhesion to the substrate for optimal results.
Mechanical Profiling, Laitance Removal, and Crack Repair
Effective surface preparation improves overlay bond strength and longevity. Inspect the surface using a profile gauge or test patch to identify laitance removal needs, cracks, and appropriate roughness.
Ensure mechanical profiling equipment is functioning properly; verify target surface profile (SSP/RP) is achieved. If not met, reprofile the surface until the target SSP/RP is reached.
Repair cracks with suitable material, remove laitance, and re-profile if necessary to meet SSP/RP requirements for optimal overlay performance.
Cleaning and Moisture Checks
A clean, dry substrate ensures optimal overlay performance and longevity. Verify surface cleanliness using visual inspection or approved test method; check moisture/vapor levels with CM readings or calcium chloride test.
Identify common contaminants; select appropriate cleaning methods based on datasheet recommendations. If moisture/vapor levels are too high, implement appropriate drying methods (e.g., heat, ventilation) and re-check before proceeding.
Re-clean the surface if contaminants remain; implement moisture mitigation strategies if necessary for a successful overlay application.
Primers and Bonding Strategies
Choosing the right primer is essential for self-leveling overlays on concrete. Match the primer to substrate type, porosity, alkalinity, moisture vapor transmission, contaminants, and ambient conditions. Consider primer family and bonding mechanism—acrylic, epoxy, polyurethane, and cementitious primers—and whether you need chemically bonding or physically bonding performance.
A practical workflow includes assessing porosity and moisture, checking surface prep prerequisites, and verifying compatibility with the overlay system. Skipping or using the wrong primer can lead to delamination, pinholes, and reduced long-term durability. A quick check is to confirm the label or datasheet recommends the primer for the substrate and conditions; if in doubt, check with the manufacturer.
Choosing the Right Primer for Substrate and Overlay Type
Selecting a suitable primer is crucial for optimal bonding between your concrete substrate and self-leveling overlay. Begin by assessing your substrate’s condition:
Porosity, moisture vapor transmission, and alkalinity are key factors to consider, as well as the presence of contaminants and ambient conditions.
Consult product technical data to verify compatibility with your chosen overlay system. For porous or contaminated substrates, acrylic or epoxy primers offer better penetration and bonding. If your substrate has high alkalinity or moisture vapor transmission, consider a cementitious or polyurethane primer for resistance to these conditions.
Primer Application, Coverage, and Adhesion Checks
Apply the primer evenly to achieve a uniform layer, ensuring consistent bonding and finish. Inspect the surface for any missed spots or uneven coverage before applying the overlay.
Follow manufacturer’s instructions for mixing, application temperature, and drying time. If the primer appears patchy or inconsistent, re-apply it to ensure full coverage. Consider using a primer with better flow characteristics if necessary.
Before applying the overlay, perform adhesion pull-tests on a small, hidden area to confirm proper bonding. If adhesion is poor, re-evaluate your application process and primer choice, and perform additional tests before re-applying.
Mix Design, Additives, and Materials That Reduce Pinholes and Ripples
Mix design dictates how a concrete overlay flows, traps air, and finishes smooth. Each basic component—cement, aggregates, and water—along with the water-cement ratio, affects slump, bleed, and surface quality. Admixtures such as plasticizers, air-entraining agents, and retarders modify pinhole formation and ripple development by changing flow and air content.
Understanding these effects helps you balance workability and finish on site. A practical approach is to observe slump and bleed and adjust only within safe limits, checking product labels or datasheets for guidance. Avoid adding water to reach a target slump; instead, adjust dosage per manufacturer instructions to maintain appropriate water-cement ratio.
Aggregate, Fillers, and Polymer Modifiers
The composition of your self-leveling overlay mix begins with the aggregates and fillers. These influence flow, air entrapment, and surface finish, affecting aimed slump and bleed control. Always inspect for contamination or foreign materials before use.
Verify aggregate size distribution and grading on the label or datasheet to ensure they meet your project’s needs. If using a polymer-modified product, confirm compatibility with your chosen primer and overlay type.
To adjust flow properties, consider the following: if slump is too low, increase aggregate content; if bleed is excessive, reduce water or add more aggregate.
Defoamers, Retarders, and Viscosity Modifiers
Admixtures like defoamers, retarders, and viscosity modifiers play a crucial role in controlling pinhole formation, ripple development, flow, and setting time. Ensure proper mixing to avoid lumping or insufficient dispersion.
Review the datasheet for recommended dosage rates. If using a retarder, monitor temperature to prevent premature setting. To address issues:
– If excessive foaming occurs, adjust defoamer dosage; if setting time is too short, increase retarder dosage.
Application Techniques to Prevent Pinholes and Ripples
Establish batching discipline with consistent materials, water content, and admixture dosing. Maintain steady slump and temperature to avoid sudden viscosity changes that lead to defects. Plan a controlled pour to minimize stops and rework.
Coordinate pour rate, movement, and tooling to encourage air release without overworking the surface. Ensure primed substrates are dampened appropriately and monitor moisture balance to prevent dips at joints. Track ambient conditions and adjust the working window to keep the surface open without drying too fast.
Mixing, Measured Water Control, and Pour Sequencing
Accurate batching is crucial for consistent overlay performance. Verify materials, water content, and admixture dosing before mixing to ensure a homogeneous blend.
Monitor slump and temperature during mixing. Sudden viscosity changes due to temperature fluctuations can lead to pinholes. If the initial mix is incorrect, re-batch with the correct materials and water content.
Control water addition to maintain a consistent slump. Too high or low water content can cause soft mixes and flow interruptions. Adjust water addition accordingly to prevent these issues.
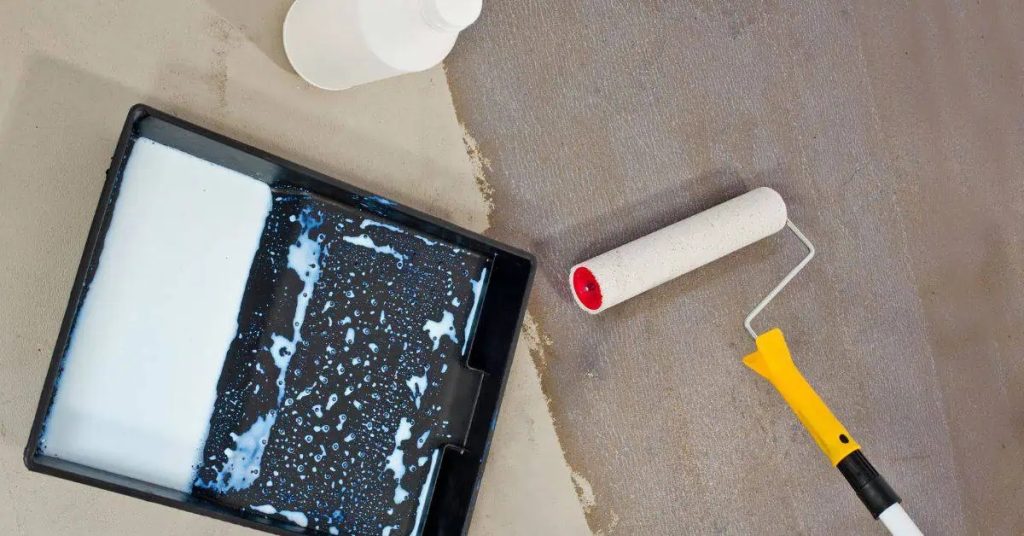
Deaeration, Spiked Rollers, and Finishing Tools
Effective deaeration and proper tooling are essential to prevent pinholes and ripples. Use the right tools for your project and maintain them properly.
- Spiked Rollers: These tools help release trapped air during initial passes. Check for air bubbles or trapped air during use. Rent or borrow if needed.
- Trowels (Screed, Bullfloat): Use these for controlled screeding and consolidation. Ensure they are clean and functional before use. Consider renting for short-term projects.
- Pin Rollers: These help release entrapped air without overworking the surface. Check for proper functionality and cleanliness before use.
- Bullfloats: Ideal for large, flat surfaces. Ensure they are in good condition and suitable for your project’s size.
- Edge Tools (Wedges, Edgers): Use these to work edges and corners. Check for proper functionality and cleanliness before use.
Quality Control, Field Testing, and Visual Checkpoints
Before mixing, verify substrate cleanliness, moisture content, surface profile, and ambient conditions with clear pass/fail criteria. Establish criteria that must be met to proceed. Prepare for real-time observations during placement.
During the pour, perform moisture, adhesion, and surface checks to detect air, voids, and ripples. Use field tests like pull checks where feasible and document results. Include edge, joint, and cure readiness assessments in the inspection plan.
Pre-Pour and in-Process Tests for Self-Leveling Overlays
Ensure optimal performance and longevity of self-leveling overlays on concrete by conducting these tests before mixing and during placement.
- Substrate Cleanliness: Inspect for dirt, grease, or contaminants. Use a cleanliness test kit if unsure.
- Moisture Content: Check with a non-destructive moisture meter to prevent delamination from excess moisture.
- Surface Profile: Verify laitance removal and surface roughness using a profilometer or visual inspection.
- Temperature: Measure substrate temperature; ideal range is 50-90°F (10-32°C).
- Humidity: Maintain relative humidity between 40% and 70%.
- Ambient Conditions: Ensure the environment is suitable for mixing, placement, and curing.
- Moisture Migration: Conduct non-destructive tests or RH/calcium chloride tests to prevent pinholes and ripples.
- Porosity Targets: Confirm porosity levels meet specifications to minimize defects.
- Compatibility of Primers/Bonding Agents: Verify with the overlay manufacturer before application.
- Surface-Dryness Checks: Ensure substrate is dry for optimal primer adhesion.
- Small Pull Tests: If feasible, perform small-scale pull tests to confirm adhesion potential.
Key Rule: If the substrate fails any pre-pour test, address issues or reject the pour. Re-evaluate and re-test as necessary.
Visual Checkpoints and Tolerances During Placement
During the placement of self-leveling overlays, use this checklist to monitor quality and initiate corrective actions promptly.
- Mix consistency: Check for uniform consistency. Inconsistencies may lead to poor flow and defects.
- Dosing: Verify proper dosing of materials according to the mix design.
- Pump/flow behavior: Monitor pump performance and flow characteristics.
- Air entrainment: Inspect for air bubbles or voids, which can cause pinholes.
- Voids: Look for areas with reduced material, leading to weak spots.
- Pinholes: Identify small holes on the surface, indicating improper curing or substrate issues.
- Surface ripples: Check for waviness or unevenness, suggesting incorrect application technique or substrate preparation.
- Edge runs and seams: Inspect edges and corners for proper coverage and seamless transitions.
Quick rule: If defects or inconsistencies are observed during placement, initiate corrective actions immediately to prevent further defects and maintain overlay quality.
Curing, Jointing, Sealing, and Long-Term Durability
Effective curing, thoughtful joint planning, and proper sealing are the core factors that determine the long-term performance of self-leveling overlays on concrete. Focus on selecting approved curing methods, understanding how ambient temperature, humidity, and airflow influence cure quality, and coordinating joint placement so overlay joints align with substrate joints and edge details. Plan for backer rods or pre-formed joint shapes to prevent telegraphing, and distinguish between when to use penetrating sealers versus film-forming finishes to balance slip resistance and color stability.
Quality checks during curing and sealing matter just as much as the initial installation. A simple on-site touchstone is the finger-nail test to gauge surface stiffness, followed by moisture readings and joint integrity inspections before moving to sealing or finishing steps. Understanding how durability is affected by abrasion, chemicals, and UV exposure helps set maintenance cycles, re-coating intervals, and criteria for early repairs or resurfacing if pinholes, crazing, or micro-cracks appear or if environmental conditions are not within the cure range. An experienced installer typically verifies the overlay has reached its target strength before proceeding with jointing and sealing, and if conditions are off, adjusting cure time or applying heat may be necessary to protect long-term performance.
Curing Methods and Timing for Thin Overlays
Proper curing ensures strength and durability of your thin overlay. Follow these guidelines to minimize defects:
Approved Curing Methods: Use water, misting, moisture-retaining covers, or curing compounds as recommended by the manufacturer.
Target Cure Times: Allow the specified cure time for the overlay, typically between 24 and 72 hours. Check product labels or datasheets for exact timelines.
Ambient Conditions: Monitor temperature, humidity, and airflow during curing. If ambient temperature is below recommended range, use heaters or other warming methods to maintain suitable environment. Adjust conditions if pinholes, crazing, or micro-cracks appear.
Joints, Saw Cuts, and Sealant Detailing
Proper joint planning is essential for preventing overlay cracking and ensuring long-term durability. Follow these steps:
Inspect Backer Rods/Pre-formed Joint Shapes: Ensure they are in good condition to prevent telegraphing through the overlay.
Align Overlay Joints: Align joints with substrate joints and edge details. Decide on control vs expansion joints, and determine timing for joint installation based on product recommendations.
Install Expansion Joints: If the overlay is subject to significant movement, install expansion joints to accommodate it. If joints crack or show signs of failure, re-evaluate your joint design and installation methods, considering wider joints, additional reinforcement, or different sealant types.
Troubleshooting Common Problems and Field Fixes
Identify root causes of pinholes, ripples, and trowel marks by examining substrate moisture, contaminants, primer adherence, mix consistency, air entrapment, and cure conditions. Use targeted checks to pinpoint issues quickly. Prepare to adjust the plan as needed.
Document practical field repairs, such as skim coats or local patches, and determine when full removal is required. Include preventive measures and workflow adjustments to reduce recurrence, and maintain a written log of outcomes for traceability.
Addressing Pinholes and Air Entrapment
Pinholes and air entrapment can compromise the integrity and aesthetics of overlays. Before repairs, conduct adhesion pull tests to assess bond strength.
Inspect surfaces visually during application and post-application for pinholes, bubbles, or blisters. For localized superficial pinholes, fill with a compatible leveling compound, re-prime, and re-level. For widespread or severe air entrapment, rework the substrate, adjust trowel pressure/speed, and rescreed/re-level.
To prevent issues, maintain consistent priming, proper ambient conditions, staged curing with moisture control, and adjust mix design to reduce air entrapment and shrinkage.
Addressing Ripples, Trowel Marks, and Flow Irregularities
Ripples, trowel marks, and flow issues can impact the appearance and durability of overlays. Before application, assess substrate conditions by checking surface profile and performing a moisture vapor emission rate (MVER) test.
For minor ripples, re-level with an appropriate trowel, adjust pressure/speed, and refloat if necessary. To address persistent trowel marks or flow issues, tack-clean the surface, refloat with proper bleed-out, and re-prime as required.
Maintain consistent mix design, proper damming and profiling, and appropriate ambient conditions during application for best results.
Common DIY Mistakes to Avoid
Avoiding common mistakes ensures overlay longevity, reduces rework, and saves time/money. Regularly review and update knowledge of best practices, product specifications, and industry standards.
- Inadequate surface preparation: Ensure substrate is clean, dry, and free from contaminants to prevent adhesion failures.
- Improper mix design: Follow manufacturer instructions for water-to-powder ratio and adjust as needed based on ambient conditions.
- Ignoring visual checkpoints: Regularly inspect surface during application and post-application to identify any issues early.
- Inconsistent priming: Apply primer evenly and consistently to promote adhesion and prevent delamination.
- Neglecting cure conditions: Maintain appropriate temperature, humidity, and protection from elements during curing.
If a mistake is minor and easily rectified, correct it immediately and proceed with application. For significant or persistent mistakes, stop work, reassess conditions, and consult with experienced professionals before proceeding. Document field fixes with outcomes for traceability and implement preventative measures in future projects.
Conclusion
Safety and durability hinge on proper preparation, careful mixing, and controlled curing, so take deliberate, stepwise actions rather than rushing to finish the job. When done correctly, a self-leveling overlay protects the substrate and delivers a smooth, even surface that looks professional and lasts.
Proceed with a clear, practical checklist: confirm the substrate is sound, dry, and clean, then select a material appropriate for the conditions; set up dams and profiling, apply the recommended primer or bonding system, and mix the product exactly as the manufacturer directs; test a small area to confirm flow and flatness, then apply in a steady, continuous pass, avoiding over-working the mix; monitor cure time, keep joints sealed, and perform field tests and visual checks before use; finally, complete jointing, sealing, and long-term durability steps with attention to any pinhole or ripple signs and rework only as needed.
Common mistakes to avoid include skipping substrate cleaning or damding, using the wrong primer or bond method for the concrete, under- or over-mixing, applying too thick or too thin a layer, and rushing cure time or neglecting joint and seal work. Keep safety at the forefront: wear appropriate PPE, ventilate when required, follow labeling, and never mix or apply outside the recommended temperature and humidity ranges. If the area is large, has structural concerns, persistent moisture, or complex jointing patterns, consider professional guidance to prevent costly mistakes.
If you’re unsure about moisture readings, substrate cracks, or large-scale overlays, seek experienced help before proceeding. When you follow the steps above and test as you go, you’ll gain confidence and reduce the risk of damage, saving time and money in the long run.
FAQ
What Are Self-Leveling Overlays and When Should I Consider Using Them?
Self-leveling overlays create a flat, smooth surface over concrete. They are useful for repairing minor unevenness, filling shallow irregularities, and preparing a good base for décor or floor finishes.
What Types of Self-Leveling Materials Are Available, and How Do I Choose Between Them?
Common types include cementitious blends and resin-based overlays. Read the product label to compare strength, cure time, and surface finish, and match the choice to your project needs and environment.
How Should I Prepare the Substrate, Including Dams and Profiling, for an Overlay?
Create dams at edges and transitions to confine the overlay. Mechanically profile the key areas and ensure the surface is clean, free of dust, and compatible with the overlay product.
How Do Primers Influence Bond, and How Do I Select the Right Primer?
Primers improve adhesion and moisture management between concrete and the overlay. Choose a primer specified by the overlay manufacturer and verify compatibility with your substrate and the chosen material.
What About Mix Design and Additives to Reduce Pinholes and Ripples, and What Should I Check on the Product Label?
Some blends include additives to improve flow and reduce air entrapment. Check the label or data sheet for recommended ratios, mixing guidelines, and any cautions, and follow local instructions for use and curing.