
Introduction
Sealant tooling tricks are the practical steps you use to finish joints on concrete, stucco, and brick with clean, smooth lines. This article covers backer rod, bond breakers, and straight-line tooling as core methods. It aims to help you get a neat, durable seal without guesswork.
Sealants vary by material, so choose products appropriate for concrete, masonry, and wood surfaces, and always check manufacturer guidance and local rules. Learn where backer rod goes, how to insert it correctly, and how grip strips and bonding breakers influence the finish. We also touch on using log gap caps to achieve a clean top edge and what to look for during the tool-out process.
Key takeaways
- Select sealants by substrate: silicone for masonry, acrylic for interior gaps, polyurethane where needed.
- Backer rod should fit depth and compressibility; avoid over-compression to maintain seal.
- Grip strip and log gap cap improve edge transitions when using flexible sealants.
- Follow surface prep: clean, dry, remove paint, and roughen with proper execution.
- Tooling technique matters: create continuous beads, shape with a slick tool, avoid jogs.
- Safety and maintenance: wear eye protection, ventilate, cure times per manufacturer, inspect seals periodically.
Table of Contents
- Introduction
- Key takeaways
- Quick Project Planning and Joint Assessment
- Tools and Materials Checklist
- Types of Sealants and Best Uses for Each Substrate
- Backer Rod and Bond Breakers — Roles and Selection
- Surface Preparation for Concrete, Stucco, and Brick
- Application Techniques and Tooling for Crisp, Professional Lines
- Troubleshooting Common Problems and Fixes
- Weather, Safety, Maintenance, and Cost Considerations
- Conclusion
- FAQ
Quick Project Planning and Joint Assessment
Begin by outlining how each joint will behave during use, considering movement types and material behavior for concrete, stucco, and brick. Identify climate effects that could drive joint design decisions and maintenance needs.
Clarify finish goals early—textured, painted, or smooth—and align with architectural lines and edge treatments. Plan scope, timeline, and sequence with awareness of weather, cure times, and access requirements, so work proceeds smoothly.
Assess joint geometry and expected movement
Begin by evaluating the size of each joint. Use a ruler or tape measure for an estimate, but for accurate results, measure joint width and depth precisely.
Next, inspect the substrate for signs of movement such as cracks or gaps. This will help you understand if the joint is subject to thermal expansion, settlement, or vibration.
Incorrect assessment may lead to inadequate sealant performance and premature failure. If a joint is wide (over 1/2 inch) and/or deep (over 1/4 inch), and substrate shows signs of movement, consider using a larger backer rod and flexible, high-performance sealant.
Define performance goals and finish expectations
Identify key performance needs such as waterproofing or structural sealing. Also, determine the desired finish – whether it should be textured, painted, or smooth to match surrounding surfaces.
Review project requirements and inspect surrounding surfaces for aesthetic blending. This will help you choose appropriate products that meet both functional and aesthetic goals.
Inadequate product selection may result in poor aesthetics, functionality, or durability. If waterproofing is critical and the surface must be paintable, choose a paintable, water-based sealant with an appropriate bond breaker.
Tools and Materials Checklist
List essential hand tools and measurement gear for caulking work, including a caulk gun, putty knives, scrapers, a utility knife, and a tape measure. Include a straight edge and a finishing tool or damp sponge for clean lines.
Gather primary materials like backer rod, bond breakers, and the appropriate sealant types, noting whether they are concrete, stucco, or brick compatible. Check product labels or datasheets for temperature ranges, cure times, and compatibility before purchase.
Essential tools (guns, knives, tooling bits, cleaners)
To ensure a professional finish, gather the right tools for applying and cleaning sealants.
- Caulk gun: Choose one with adjustable control for smooth bead application. Consider renting or buying a power caulking gun for larger projects.
- Putty knives (6-in-1, 8-in-1): Useful for cutting and trimming sealant beads. Select sizes based on joint width.
- Steel or polymer scrapers: Ideal for removing old caulk and preparing surfaces. Choose a stiff-bladed model for better control.
- Utility knife: Essential for cutting backer rod, bond breakers, and masking materials. Use a sharp blade for clean cuts.
- Tape measure: Measure joint widths accurately to select appropriate tools and materials.
- Straight edge (metal or wood): Helps create straight lines and ensures even application of sealants.
- Caulk finishing tool or dampened sponge: Smooth out sealant beads for clean, professional results. Use a damp sponge to avoid streaking.
- Solvent or detergent cleaner: Essential for cleaning tools and surfaces before and after application. Choose a cleaner compatible with your sealant type.
Consumables and accessories (backer rod, bond-breaker tape, masking)
Use this checklist to ensure you have the right consumables for a successful sealant application.
- Backer rod: Select a material (foam or rubber) and diameter slightly larger than the gap. Follow manufacturer guidance for compatibility with your chosen sealant.
- Bond-breaker tape: Choose a tape that matches your substrate to prevent adhesion of sealant to the surface. Alternatively, use a primer recommended by the sealant datasheet.
- Masking materials (painter’s tape, masking paper): Protect adjacent surfaces from sealant drips and overspray. Choose a low-tack tape to avoid paint damage.
- Wipes or rags: Use for cleaning up spills and removing excess sealant during application.
- Release agent (if needed): Apply to tools and surfaces to prevent sealant adhesion, ensuring easy removal of tapes and clean lines.
- Spacers or shims: Maintain even joint widths by using spacers or shims during application. This helps create consistent bead sizes.
- Cleaning/safety supplies: Gather gloves, goggles, and other personal protective equipment (PPE) for safe handling of sealants and cleaners.
Quick rule: Always check product labels and datasheets to ensure compatibility between consumables and your chosen sealant type.
Types of Sealants and Best Uses for Each Substrate
Common sealant chemistries include silicone, polyurethane, acrylic/latex, hybrid, and mortar-like formulations. These map to the movement, moisture, and temperature demands of concrete, stucco, and brick. Check adhesion, UV resistance, and paintability in the product data sheets and labels, and note backer rod sizing and bond-breaker compatibility.
Understanding how each option behaves helps prevent failure in joints subject to weather, dampness, and temperature cycling. For DIY readers, perform a simple adhesion test after curing, verify UV stability, and confirm paintability before full application; prepare the surface and backer rod properly to improve results. Always check local guidelines and manufacturer recommendations for prep, cure times, and weather conditions.
Best choices for concrete joints and cracks
Concrete’s strength and durability demand robust sealants that handle heavy loads, wide joint movements, and harsh conditions. For horizontal joints with heavy traffic or load-bearing, consider mortar-like or textured sealants. These products can withstand high pressure and mimic the appearance of concrete.
For cracks or narrow gaps with significant movement, opt for flexible, elastic sealants, such as hybrid or polyurethane options. These sealants can accommodate substrate movement without cracking or failing.
Pro tip: Always verify adhesion to concrete, UV resistance for outdoor exposure, and cure times for quick handling in the product’s technical data sheet.
Best choices for stucco and brick joints
Stucco and brick surfaces require sealants that bond well to textured masonry, accommodate substrate movement, and can be painted or textured to match finishes. For stucco surfaces with wide joint movement, consider acrylic/latex sealants. These sealants offer good elasticity and can be painted to match the existing finish.
For brick surfaces with narrow gaps and moderate movement, opt for silicone or hybrid sealants. These products provide better flexibility and UV resistance, ensuring longevity in exterior applications.
Pro tip: Always check adhesion to masonry substrates, UV resistance for exterior exposure, and paintability for color matching in the product’s technical data sheet.
Backer Rod and Bond Breakers — Roles and Selection
Backer rod controls sealant depth and shape; bond breakers prevent three-sided adhesion to extend joint life and allow movement. Understand how each component contributes to long-term performance.
Consult product sheets for density, compatibility with concrete, stucco, brick, and chosen sealant, and to choose the right installation approach. Pay attention to recommended seating depth and squeeze-out prevention.
Backer Rod Types and Placement Technique
Selecting the right backer rod is crucial for maintaining optimal sealant depth, shape, and longevity. Here are three common types:
Closed-cell foam provides high compression resistance and minimal sealant show. It’s ideal for joints requiring firm support.
Open-cell foam offers flexibility and sound dampening, making it suitable for movement-prone joints.
Braided backer rod is another flexible option, often used in irregularly shaped or corner joints. Insert the rod at 1/4 to 1/2 of the joint width, ensuring it’s not over-compressed or distorted.
When to Use Bond-Breaker Tape or Primer
Bond breakers prevent adhesion failures and maintain joint flexibility. Here’s when to use them:
For irregularly shaped joints or corners, apply bond-breaker tape along with the backer rod.
If warranty requirements specify a liquid bond breaker or substrate priming, use the recommended product according to manufacturer’s instructions.
Always confirm compatibility with chosen sealant, substrate, and backer rod using product sheets. Proper surface preparation and installation technique are also crucial to prevent adhesion failures.

Surface Preparation for Concrete, Stucco, and Brick
Assess substrate health and acceptance criteria, ensuring no active moisture or efflorescence and that the surface profile will support adhesion. Note any manufacturer-recommended substrate conditions before sealing.
Clean thoroughly to remove dust, oils, waxes, and curing compounds, then verify the surface is dry. Document the target profile and follow any primer or bond-breaker requirements specified by manufacturers.
Cleaning and Degreasing Methods
Thorough cleaning is crucial for successful sealing. Remove dust, dirt, and any contaminants that could hinder adhesion.
Mechanical Cleaning: Use wire brushes or scrubbing tools to dislodge loose material. For larger surfaces, consider using a pressure washer.
Chemical Cleaning: Apply appropriate cleaners or degreasers to remove oils, waxes, and curing compounds. Always follow the manufacturer’s instructions for safe usage and disposal.
Repairing Edges and Collapsed Joints
Before applying new sealant, ensure your surfaces are clean and stable. This involves repairing any damaged or collapsed joints.
Remove Failed Sealant: Use a utility knife to cut back any old, failed sealant. Ensure you remove all traces to prevent adhesion issues with the new sealant.
Repair Loose Mortar: If there’s loose mortar or material at the edges, carefully remove it using a trowel or chisel. This ensures your new sealant bonds only where intended and doesn’t adhere to unstable materials.
Application Techniques and Tooling for Crisp, Professional Lines
Introduction
This guide presents a repeatable workflow for applying sealant beads on textured masonry and flat concrete. It covers gun setup, surface preparation, extrusion, smoothing, masking removal, backer rod selection, masking prep, initial bead placement, tooling methods, and timing cues to achieve consistent profiles and prevent common finishing errors.
Effective technique minimizes underfill, squeeze-out, air pockets, and moisture-related adhesion issues. It includes texture-specific tips for stucco and brick. Before proceeding, perform a quick on-site surface clean/dust test, and verify depth, moisture, and movement. Post-application steps cover masking removal timing, cleanup, cure considerations, and troubleshooting common issues like smeared edges or split beads, with notes on using partner tools to shape without pulling material.
Gun control, bead sizing, and depth control
For consistent sealant application, maintain a steady hand while operating the gun. Move it at a constant speed to avoid uneven beads.
Bead width: Match the bead size to the joint size for optimal performance. A wider joint requires a larger bead.
Depth control: Use backer rod to set consistent depth and achieve proper sealant geometry. For wide and deep joints, use a larger backer rod; for narrow and shallow joints, use a smaller one or none at all. Adjust gun pressure and speed to avoid underfill or overfill.
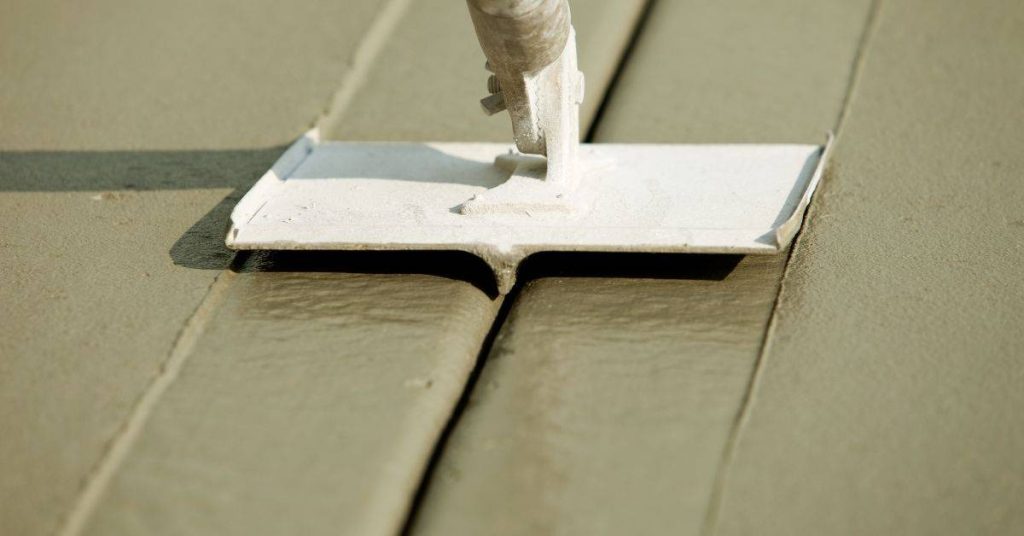
Tooling methods for clean lines and matched texture
Proper tooling ensures professional-looking, durable sealant beads. Choose the right tools based on joint type.
- Swipe: Use a caulk tool or putty knife to swipe excess sealant off the surface. Ideal for flat concrete and narrow joints.
- Roll: Apply gentle pressure with a rolling motion using a caulk roller or sponge. Suitable for textured surfaces like stucco or brick.
- Caulk tool cornering: Use a caulk tool to create sharp corners and clean lines, especially in 90-degree angles.
- Masking tape removal: Remove masking tape promptly after tooling to prevent smearing or pulling off sealant. Timing depends on the tape’s manufacturer instructions.
- Partner tools (brush, sponge): For textured surfaces, use a brush or sponge to texture the bead and blend it with the surrounding material. This helps create uniform lines without pulling off sealant.
Troubleshooting Common Problems and Fixes
Common sealant failures on concrete, stucco, and brick include adhesion problems, shrinkage cracks, voids, staining, and premature cracking. For each issue, plan surface prep, backer rod use, compatible primers and sealants, and appropriate joint design, and always check cure times and material compatibility before repair. A careful diagnosis and timely rework with proper tooling and clean-up prevent recurrence.
Having a practical diagnostic checklist helps catch issues early and guide fixes. Skipping surface prep can lead to adhesion failure, so feel the surface to ensure it is dry and free of debris, then clean and prepare as product instructions require. An experienced installer checks for contaminants, cracks, or loose material before sealing, and uses the right backer rod, primer, and tooling to promote durable, clean joints.
Fixes for Adhesion Failure or Separation
Adhesion failures occur when the sealant fails to bond with the substrate. Cohesive failures happen within the sealant itself.
Diagnose: Check surface prep, cure stage, and compatibility of sealant with substrate. Inspect for adhesive (clean substrate) or cohesive (sealant tearing) failure.
Repair: For adhesive failures, re-prep the surface, apply a compatible primer, and reapply the sealant. For cohesive failures, remove the failed sealant, clean the surface, and reapply a compatible sealant.
Common mistake: If adhesion issues persist, replace the entire sealant system to ensure compatibility and proper installation.
Correcting Uneven Beads, Blowouts, and Staining
Uneven or stained sealants can detract from appearance and may not provide adequate protection.
Diagnose: Check application technique, cure stage, and compatibility of sealant with substrate and environment. Inspect for overfilled joints (blowouts), sagging, or stains on masonry surface.
Repair: For overfilled joints, tool off excess sealant, allow it to cure, and re-tool for clean lines. For
Prevention: Use proper application techniques, manage substrate texture, and follow manufacturer’s guidelines for temperature and humidity limits during installation and cure.
Weather, Safety, Maintenance, and Cost Considerations
Explain how temperature, humidity, and rain influence mix, cure, movement, and overall performance. Interpret manufacturer specifications and warranty guidelines to determine suitable application windows.
Summarize safety, PPE, ventilation, and disposal practices for sealants. Discuss realistic maintenance cycles and factors that affect long-term cost, enabling informed budgeting and planning.
Weather and Timing Considerations
Applying sealant at appropriate temperatures and weather conditions ensures optimal performance. Extreme temperatures, high humidity, and rain can hinder the curing process and joint performance.
Do not apply sealants:
- In extreme heat or cold outside the manufacturer’s specified range.
- When high humidity is expected within 24 hours of application.
- During or immediately after rain.
Consult the manufacturer’s label, datasheet, or instructions for suitable temperature and humidity ranges. Postpone application if conditions are unfavorable until they improve.
Safety, cleanup, and long-term maintenance
Proper safety measures and routine care extend the lifespan of your sealants. Here’s what you need to know:
- PPE: Wear appropriate personal protective equipment as recommended by the manufacturer.
- Ventilation: Ensure adequate ventilation during application, especially indoors.
- Solvent handling: Follow manufacturer’s guidelines for safe use and disposal of solvents.
Regularly inspect joints for signs of failure such as cracking, pulling away, or mold growth. Address any issues promptly to maintain warranty eligibility and prevent further damage. Document all maintenance activities for future reference and budgeting.
Cost vs. lifecycle decision guide
When choosing between product classes, consider both upfront material cost and expected lifespan, maintenance frequency, and aesthetic outcomes:
- Upfront cost: Compare initial material costs.
- Expected lifespan: Consider the manufacturer’s specified lifespan for each product.
- Maintenance intervals: Evaluate how frequently re-sealing will be needed.
- Aesthetic outcomes: Assess potential rework costs if the chosen product doesn’t meet your aesthetic needs.
Higher upfront cost may be worth it for products with longer expected lifespans and reduced long-term maintenance. Conversely, lower upfront cost products may have shorter lifespans and frequent maintenance requirements, leading to higher total lifecycle expenses. Regularly review and update your product choices based on performance data and changing budget priorities.
Conclusion
Sealant work on concrete, stucco, and brick hinges on careful planning, proper materials, and clean, controlled execution to protect the structure and maintain a neat appearance. By following the steps discussed and respecting safety guidelines, you reduce the risk of leaks, cracks, and costly call-backs.
Verify substrate readiness, correct backer rod and bond breaker selection, and a thorough surface prep before you apply sealant. Confirm the weather window, edge cleanliness, and masking, then lay the bond breaker and backer rod in the joint, apply the sealant with steady tooling, and finish with crisp edges. Allow for appropriate cure time and perform a final inspection in good light, with attention to edging and interior corners. If anything seems off during any step, pause, recheck the materials and the instructions, and adjust before continuing.
Common mistakes to avoid include skipping surface prep, using an incompatible sealant for the substrate, and rushing the tooling or cure process. Always follow the product label, wear appropriate PPE, and keep the work area ventilated. Protect adjacent surfaces and test a small area first to confirm adhesion and finish before proceeding. If you encounter significant substrate movement, large structural gaps, or persistent leakage after sealing, consider bringing in a professional to assess the movement, moisture, and framing conditions before continuing.
When to call a professional: if you detect ongoing cracking, excessive substrate movement, or moisture behind the joint, or if the scope involves high-risk areas or accessibility issues. Otherwise, with careful planning, proper materials, and disciplined technique, you can achieve durable, clean joints that look good and hold up over time. Stay patient, work methodically, and your results will be solid and professional.
FAQ
What sealants work best for concrete, stucco, masonry, and wood substrates?
Look for sealants labeled for each substrate and for the environment. Silicone is often durable on non-porous materials, acrylics are common for interior work, and polyurethane can handle movement and moisture better. Always check the label for compatible substrates, paintability, and any cure or application instructions.
What are effective backer rod installation techniques?
Select a backer rod diameter that fits the joint and compresses slightly when seated. Push it into the joint so it sits below the surface and leave room for the sealant to form a proper bead. Follow manufacturer guidelines for depth and compression to ensure the sealant adheres and cures correctly.
How and when should grip strip be used in joint projects?
Grip strip can define a consistent edge and reduce squeeze-out in wider joints. Place it along the edges of the joint area before applying sealant, pressing it to fit the groove or joint contour. Remove or trim the strip as needed after tool finishing to leave clean edges.
How do I choose tools and how should I prepare for sealing work?
Use a caulk gun that fits your cartridge and a sharp cutter for opening the cartridge. Have a putty knife or scraper for cleanup and smoothing, and a damp cloth for finishing touches. Always follow the sealant’s instructions for surface prep, curing, and any special tool recommendations.