
Introduction
A sand float stucco texture is a lightly rough, matte finish achieved by floating mortar with a sanded tool to create texture. This article covers practical techniques and the feel of the finish when you’re applying it on a DIY project. It stays away from glossy shine and aims for a consistent, hand‑worked look.
Choose the right sand float, finishing trowel, and a workable mix so you can keep momentum without overworking the surface. Apply in workable windows, maintain a consistent motion, and watch for a uniform matte texture as you go. If shine starts to show, ease off, rework in a controlled pass, and check the product label or local guidelines for guidance on achieving a matte look.
Key takeaways
- Use consistent hand angle and circular motion to maintain even sand float texture.
- Align tool edge with substrate joints to prevent ridges and shine.
- Time open time by local conditions, plan mixing and application window accordingly.
- Keep surface mapping clear: mark highs, lows, and transition points before finishing pass.
- Avoid glossy sheen by light, even passes; avoid overworking corners.
- Safety: wear eye/skin protection; work in ventilation and clean spills promptly.
Table of Contents
- Introduction
- Key takeaways
- Overview: What Sand Float Stucco Is and Why Matching Matters
- Tools and Materials Checklist
- Surface Preparation and Mapping the Match
- Tool Angles and Technique: How Angles Change the Finish
- Timing: Mixing, Open Time, and Environmental Windows
- Avoiding Shine and Achieving a Uniform Matte Finish
- Common Mistakes, Troubleshooting, and Repair Blending
- Safety, Cost Considerations, and Project Planning
- Conclusion
- FAQ
Overview: What Sand Float Stucco Is and Why Matching Matters
Sand float finish is a cementitious exterior texture that uses fine aggregate and controlled application. It’s commonly seen on stucco surfaces, patches, and extensions. Matching texture matters for seamless aesthetics and moisture performance.
Visually, aim for a consistent grain, a natural random swirl or pattern, and a uniform surface sheen. These elements help repairs blend with surrounding areas and maintain similar water-shedding behavior. Preparation checks include substrate cleanliness, moisture balance, cured patch compatibility, and the suitability of patching compounds and sealants for a sand float finish.
When to Match Versus Replace the Finish
The first step is deciding whether to match your existing texture or replace it entirely. Here’s when to consider each:
Match if: damage is minor, substrate is sound, and you want a seamless repair.
Replace if: extensive damage, substrate needs replacement, or you’re changing the look of your home long-term.
Visual Characteristics to Target
To achieve a seamless match, focus on these three visual elements:
1. Aggregate/Grit Look: Match the size and type of aggregate in your existing finish.
2. Stroke Pattern: Replicate the random swirl or pattern left by the trowel’s motion.
3. Sheen: Mimic the surface gloss level to maintain similar water-shedding behavior and appearance.
Tools and Materials Checklist
Essential mixing and application tools include a plaster/masonry hawk and trowels, a Keene or rubber float, a margin trowel, a mixing drill with paddle, buckets, and spray bottles for cure control. Have a small plywood or cement board for testing substrates.
For materials, have a cementitious stucco mix with the appropriate sand ratio, plus any lime or reinforced mixes if recommended. Include bonding agents or additives, different aggregate sizes, colorants, and any acrylic or elastomeric finishes the manufacturer suggests for matching sheen and hardness.
Hand tools and mixing/finishing equipment
Before you start, ensure your tools are in good condition. Here’s a checklist to help.
- Plaster/Masonry Hawk: Check for any bends or damage that could affect texture.
- Finishing Trowel (12″): Ensure it’s smooth and unchipped for even application.
- Margin Trowel (6″): Inspect for straight edges to create clean lines.
- Keene Float or Rubber Float: Check float condition; worn-out floats can’t achieve desired texture.
- Mixing Drill with Paddle: Ensure it’s powerful enough and in good working order.
- Buckets (5-gallon): Use clean, undamaged buckets to prevent contamination.
- Water Spray Bottle: Check for leaks or clogs that could affect water flow.
- Cure Control Spray Bottle: Ensure it’s filled with the correct solution and works properly.
Quick rule: Well-maintained tools ensure consistent texture and finish.
Material components and additives
Before mixing, check your materials. Here’s what to look for.
- Cementitious Stucco Mix: Confirm Portland cement to sand ratio and match existing finish.
- Lime or Fiberglass Reinforced Mixes: If recommended, ensure they’re compatible with your project.
- Bonding Agents: Check compatibility with your mix and follow manufacturer’s directions.
- Additives (Retarders, Accelerators): Ensure they won’t react negatively with your mix or climate conditions.
- Aggregate Sizes: Match existing finish; wrong size can affect texture.
- Colorant Options: Test colors to match existing finish exactly.
- Acrylic/Elastomeric Finishes: Check sheen and hardness match with existing finish.
Quick rule: Matching materials ensures consistent texture, color, and durability.
Test patch and sampling kit
Before applying to the entire surface, create test patches. Here’s what you need.
- Small Plywood or Cement Board: Use for testing; easy to move around.
- Different Sand Sizes/Mixes: Try various sizes and mixes to match texture.
- Various Floats (Keene, Rubber): Test different floats to achieve desired finish.
- Sample Molds/Templates: Use to replicate existing keene/sand-float textures exactly.
- Masking Tape: Create clean edges on test patches.
- Surface Primer/Bonding Coat: Apply as per manufacturer’s specs for accurate testing.
Quick rule: Multiple trial patches help refine texture, sheen, and finish before application.
Surface Preparation and Mapping the Match
Assess substrate condition by looking for cracks, spalling, efflorescence, moisture, and paint compatibility. These checks determine repairs or moisture mitigation needed before texture work.
Cleaning and profiling involve removing dirt, grease, and loose material, then lightly abrading glossy surfaces to create a mechanical bond. Map high/low spots and transitions to guide texture application and ensure even blending with the surrounding area.
Assessing and documenting the existing finish
Before you start, take a close look at your current stucco finish. You’re checking for grain size, stroke direction, and shine.
Grain Size: Note if it’s coarse or fine. This affects how you’ll mix your new material.
Stroke Direction: See which way the strokes go. You want to match this in your new work.
Take photos and measure small sample areas for reference. These will guide you as you work.
Repairs, bonding, and priming
First things first: fix any loose material or cracks. Use a trowel to fill gaps and a brush for small repairs.
Keying: Lightly abrade glossy surfaces with sandpaper. This creates a mechanical bond and helps your new material stick.
Now, prime the area. Follow product guidance here. Some primers need time to cure before you apply your texture.
If your substrate is porous or has high moisture content, use a bonding agent instead of or in addition to primer.
Planning the work area and mock-up location
Before you dive in, lay out your work zones. Keep tools and materials organized for smooth workflow.
Do a mock-up in an inconspicuous spot first. This lets you practice and make adjustments without it being too obvious.
Create a sample panel too. This gives the homeowner or client something to approve before you start the full application.
Remember, planning ahead saves time and materials in the long run.
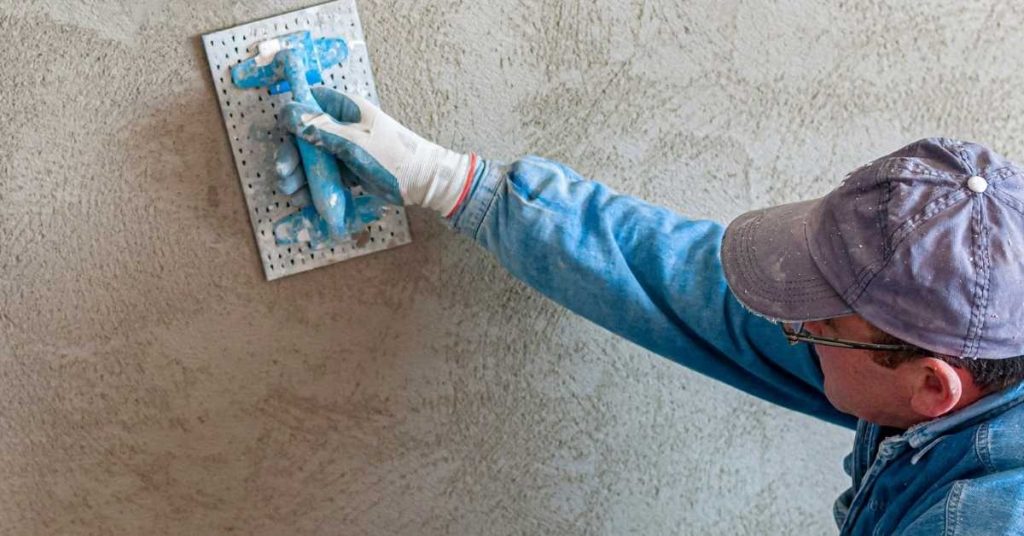
Tool Angles and Technique: How Angles Change the Finish
Float and trowel angles influence texture depth, aggregate exposure, and perceived sheen. Roughly shallow, mid, and steep angles provide different visual cues for the final look.
Test angles on sample panels to document results before applying to the real surface. This helps you choose the right range for your texture goal and keeps results predictable.
Angle categories and expected visual effects
Tool angles, when working with sand float stucco, can greatly influence the final texture. Here’s what to expect from different angles:
Shallow Angles (Horizontal): These expose less aggregate, creating a smoother, more uniform finish with minimal sheen.
Mid Angles: A balance between horizontal and vertical, mid-angles reveal some aggregate while maintaining a relatively smooth surface. This results in a subtle texture with moderate sheen.
Steep Angles (Vertical): These expose the most aggregate, creating a rough, textured finish with high sheen.
Pressure, stroke speed, and stroke pattern
The pressure you apply and how fast you move your tool can significantly change the texture:
Light Pressure, Slow Speed: This combination exposes less aggregate, resulting in a smoother finish with lower sheen.
Heavy Pressure, Fast Speed: More pressure and speed expose more aggregate, creating a rougher texture with higher sheen.
Stroke patterns also matter. Directional strokes can create linear textures, while cross-hatching blends new work into old for a seamless look.
Corners, edges, and transitions
Matching existing finishes around openings and corners requires careful technique:
For edges, feather your strokes to blend new work into old. Start with a steep angle near the edge, gradually shifting to a shallower angle as you move onto the surface.
At corners, use a trowel or float at a 45-degree angle to create a smooth transition between surfaces. For inside corners, use a smaller tool to work carefully along the edge.
Always check your progress and adjust angles as needed to maintain consistency with the existing finish.

Timing: Mixing, Open Time, and Environmental Windows
Keep mix consistency and slump under control to avoid flash set and to maintain plasticity. Check batch-to-batch consistency and recognize over- versus under-watered mixes by feel and workability.
Plan placement within the product’s open time and note how temperature, humidity, and wind affect setting. Use small patches to verify timing, texture, and sheen before the full application.
Mixing for Workability
Water content and admixtures are key to achieving the right texture and set time. Too much water makes a soupy mix that sets too fast, while too little results in a dry, crumbly finish.
Add water slowly, mixing well after each addition. Aim for a workable consistency – like thick peanut butter. If it’s too stiff, add more water; if it’s too runny, add more cement or sand.
Admixtures can speed up or slow down set time and affect texture. Start with small batches to test different admixture amounts and types before committing to the full wall.
Environmental Impacts on Timing
Temperature, humidity, and wind all affect how quickly your stucco sets and finishes. Hot, dry conditions speed up setting; cool, humid ones slow it down.
Hot/Dry: Shade the wall if possible. Work early in the morning or late in the evening when temperatures are cooler. Keep the mix covered until use to prevent water evaporation.
Cool/Humid: Apply a heat source, like heat tape, to accelerate setting. Keep the area dry and well-ventilated to prevent mold growth.
Windy: Shield the wall from wind with tarps or screens. Wind dries out the mix too quickly, causing it to set too fast and flash set.
When to Stop Working and When to Recoat or Texture Over
Don’t rely on clock time alone. Watch for visual and tactile cues that the surface is ready for finishing.
Stop working when the surface is no longer sticky but still slightly damp. This is usually around 20-30 minutes after application, depending on conditions. Use a small trowel or your finger to test.
For recoating or texturing over, wait until the surface is dry to touch. This could take anywhere from a few hours to overnight, depending on weather and mix composition. Perform test touches in an inconspicuous area before committing to the full wall.
Avoiding Shine and Achieving a Uniform Matte Finish
Unwanted shine comes from overworking the mix, making the float too smooth, or using incompatible materials. Each cause shows up differently in the texture and sheen.
Describe the correct float technique and angles to minimize sheen, including light, steady pressure and short passes. Test a pocket patch to preview shine under real lighting and adjust before full work.
Technique adjustments to reduce sheen
The key to avoiding shine is not overworking the stucco. Use a light touch and avoid re-stroking areas.
Select a float with a textured surface, not too smooth. Smooth floats can burnish the surface, causing unwanted gloss.
Float angle: Hold your float at a 45-degree angle to the wall. This helps distribute pressure evenly and prevents overworking.
Pressure: Apply consistent, light pressure. Too much pressure can cause the stucco to reflect light, creating shine.
Material and aggregate selection to control sheen
The type of sand and aggregates used in your mix can significantly impact the final finish’s reflectivity.
- Coarse Sand: Use coarse sand for a more textured, matte finish. It helps scatter light instead of reflecting it.
- Fine Sand: Avoid fine sand as it can create a smooth surface that reflects light, causing shine.
- Additives: Certain additives like silica sand or fibers can help control sheen by breaking up the surface. Look for additives specifically designed to reduce gloss.
- Avoid Incompatible Materials: Stay away from materials that can cause cracking or staining, which can reflect light and increase shine.
- Test Patches: Always test your mix on a small area first. This allows you to adjust the material composition before applying it to the entire surface.
Final treatments and surface conditioning
After the initial float, don’t stop there if you notice some shine. There are still ways to break it up without losing your texture.
Dry Brushing: Once the stucco is dry, use a stiff-bristled brush to gently scrub the surface. This can help break up any glossy areas.
Light Re-float: If you notice shine after the initial float, lightly re-float the area with a dampened float. Be careful not to overwork the surface.
Gentle Texturing: Use a textured tool like a comb or a stiff-bristled brush to gently texture the surface. This can help scatter light and reduce shine.
Always test these methods on a small, hidden area first to ensure they don’t negatively impact your finish.
Common Mistakes, Troubleshooting, and Repair Blending
Identify defects such as visible patches, texture or color mismatch, and glossiness next to the new work. Document where they appear to guide fixes.
Diagnose root causes related to angles, timing, and mix consistency, then follow a step-by-step troubleshooting workflow on sacrificial patches. Use feathering and progressive passes to blend repairs into the existing finish.
Fixing overworked or shiny areas
Shiny spots happen when the finish coat is overworked, leaving a glossy film. Here’s how to fix it:
Abrade lightly: Use fine-grit sandpaper (220-320) to gently abrade the shiny area. Be careful not to remove too much material.
Re-texture: Re-wet the area and use your sand float at a shallow angle, around 15-30 degrees, to redistribute the material and restore texture. Work in controlled strokes.
Feather edge: If necessary, perform a small feathered overlay using a trowel with a wider blade to blend the repaired area into the surrounding texture.
Dealing with visible seams and texture mismatch
Visible seams and mismatched texture can occur due to improper timing or inconsistent tool angles. Here’s how to blend them:
Incremental feathering: Use a trowel with a narrow blade to lightly skim coat the seam, working from both sides to create a smooth transition.
Matched mock-ups: Create small samples of the desired texture on scrap material. Hold these up to the repair area to ensure consistency before proceeding.
Thin skim coat: As a last resort, apply a thin skim coat over the entire affected area to even out the texture. Be sure to match the thickness of the surrounding finish coat.
Color and pigment concerns when matching
Matching color can be tricky due to shifting tints during drying. Here’s how to ensure a good match:
Test pigments: Make small samples with varying pigment levels to find the best match. Let them cure under conditions similar to your job site.
Aging effects: Consider how the color will change over time. Make additional samples and let them age to ensure consistency.
Multiple samples: Create several small samples to account for variations in texture, drying conditions, and aging. This increases the likelihood of a good match.
Safety, Cost Considerations, and Project Planning
Safety and PPE essentials include eye and ear protection, respirators for dust, gloves, long sleeves, and proper footwear. Ensure ventilation and scaffold use if applicable, and follow safe handling of cementitious mixes and pigments.
Outline waste containment and environmental practices, equipment safety checks, and regional cost variability. Map a realistic timeline from site prep to final cure and seek multiple local quotes to plan accurately.
Safety and PPE best practices
Your safety on the jobsite is paramount. Here’s what you need:
Eye Protection: Wear ANSI Z87.1-rated safety glasses or goggles to protect from flying debris.
Ear Protection: Use earplugs or earmuffs when using power tools like mixers or sanders.
Respiratory Protection: A NIOSH-certified respirator is crucial for dusty tasks. Long sleeves, gloves, and sturdy footwear complete your PPE.
Estimating materials, labor, and testing time
Material choices impact your result. Here’s what to consider:
- Cement: Type I or II for most jobs. Look for ASTM C150 standards.
- Aggregates: Sand and lightweight aggregates. Avoid fine sand for better workability.
- Pigments: Pre-blended or custom. Test before use to avoid color surprises.
- Mixers: Electric or gas-powered. Rent based on job size.
- Labor: Plan for 2-3 people per 100 sq ft of surface area.
- Testing Time: Allocate time for mock-ups, curing, and inspections. Retesting may be needed.
Job sequencing and scheduling around weather
Weather plays a significant role in your schedule:
Mock-ups: Plan these before full-scale work. Allow 2-3 days for curing.
Weather Windows: Schedule work during optimal temperatures (50°F – 90°F). Avoid rain, snow, or extreme heat.
Curing and Inspections: Plan these into your schedule. Contingency time for retouching is essential.
Conclusion
Achieving a durable, uniform matte finish that matches the surrounding stucco hinges on clean prep, correct tool angles, and respect for timing and weather. When you control those factors, you avoid shine, seams, and costly rework, and you protect the structure you’re finishing.
First, map the area and plan the work in logical steps: prep the surface, organize tools and materials, test a small patch for open time and texture, apply with the proper angles, monitor the blend as you go, protect the new texture during cure, and document any tweaks for future patches. Work in logical passes, and stop if conditions shift outside the environmental window. Use the safety gear, keep a tidy work area, and check for drips or glossy spots after each pass.
Common mistakes to avoid are overworking the surface, using the wrong angle or too much water, and letting open time run out or stretch too long. Don’t rush one pass, don’t chase a shine with extra elbow work, and never apply in temperatures or humidity outside the tested window. Safety rules are simple: wear eye and skin protection, keep ladders and platforms stable, and keep kids and pets away from the fresh texture. If in doubt, test first and repair with small, controlled patches rather than redoing large areas.
If the project has large patches, damaged substrate, or tricky weather windows, consider bringing in a pro. Start with a small test area to confirm you’re within your limits, and push forward only when you’re confident in the timing, angles, and finish. Stay practical, stay safe, and you’ll end with a professional-looking result you can be proud of.
FAQ
What sand float texture application techniques help you control the finish?
Keep the float at a consistent angle and steady motion. Work in small, overlapping passes to prevent lines from stacking. Don’t rush; texture builds as you go, not in one quick pass.
What tools are essential for a sand float finish, and why?
You’ll want a sand float with a clean, narrow edge for fine control and a sturdy handle for leverage. Have a hawk and trowel for edge work and touch-ups. Keep a stiff brush or broom handy for light texturing and closing out any shiny spots.
When is the right time to apply sand float textures, and what should I watch for?
Texture after the base coat has set enough to hold a footprint but before it hardens fully. Test a small area to gauge drag and capture; if it sticks or tears, wait a bit longer. Environmental factors like heat and wind can shorten or stretch open time; adjust accordingly.
How do I avoid shine and keep a matte look without sacrificing color or bond?
Maintain a consistent tool angle and don’t over-work any one spot. Don’t press hard on the float in one area or you’ll smooth out texture and create shine. If you see a glossy patch, blend it with adjacent texture rather than restarting.