
Introduction
Tackling roofing problems can seem daunting, but with a clear plan and understanding of the timeline, you can confidently address common issues yourself. This guide walks you through each step, from initial inspection to final repairs, ensuring you stay on schedule and within your DIY capabilities.
Before you start, it’s crucial to understand that roofing work requires careful planning and adherence to safety protocols. Always prioritize safety over speed, as rushing can lead to accidents or improper repairs.
The Roof Repair Timeline: From Inspection to Completion
Roof repairs follow a specific timeline to ensure the work is done correctly and safely. Here’s a step-by-step breakdown of the process, including estimated timeframes for each stage:
- Inspection (1-3 hours): Begin by inspecting your roof visually from the ground using binoculars. Look for missing or damaged shingles, curling edges, or moss growth. Then, use a ladder to get a closer look at potential problem areas.
- Preparation (2-4 hours): Gather all necessary tools and materials, including a ladder, roof brackets, sealant, asphalt cement, replacement shingles, and personal protective equipment (PPE). Ensure you have the right safety gear, such as a harness, non-slip boots, gloves, and a hard hat.
- Repair (2-8 hours): The repair time varies depending on the extent of damage. For minor leaks, reseal flashing and replace damaged shingles using a proper weather window. For major damage or uncertain structural integrity, stop DIY work immediately and contact a licensed roofer.
- Cleanup (1-2 hours): After completing repairs, clean up the work area thoroughly. Remove any debris, dispose of waste materials properly, and store leftover supplies appropriately for future use.
By following this timeline, you can efficiently address common roofing problems while maintaining a safe and organized workspace.
Key takeaways
The prep time mentioned above includes gathering tools, materials, and ensuring your safety equipment is in order. Proper preparation helps minimize delays during the repair process, keeping your project on schedule.
- Inspect shingles and flashing to identify leaks, curling edges, or missing granules early.
- Always wear harness, non-slip boots, gloves; set fall-arrest plan before work.
- Gather ladder, roof brackets, sealant, asphalt cement, replacement shingles; check compatibility.
- Fix minor leaks with flashing reseal and shingle replacement using proper weather window.
- For major damage or uncertain structure, stop DIY; contact licensed roofer promptly.
- Review lease and local codes for permits, warranties, and landlord obligations before repairs.
Table of Contents
- Introduction
- Key takeaways
- Common roofing problems and how to identify them
- Safety precautions and personal protective equipment
- Tools and materials checklist
- DIY step-by-step fixes for common issues
- When DIY is not appropriate — call a professional
- Tenant-landlord considerations and legal remedies
- Preventative maintenance to avoid future roofing problems
- Local regulations, permits, and warranty considerations
- Conclusion
- FAQ
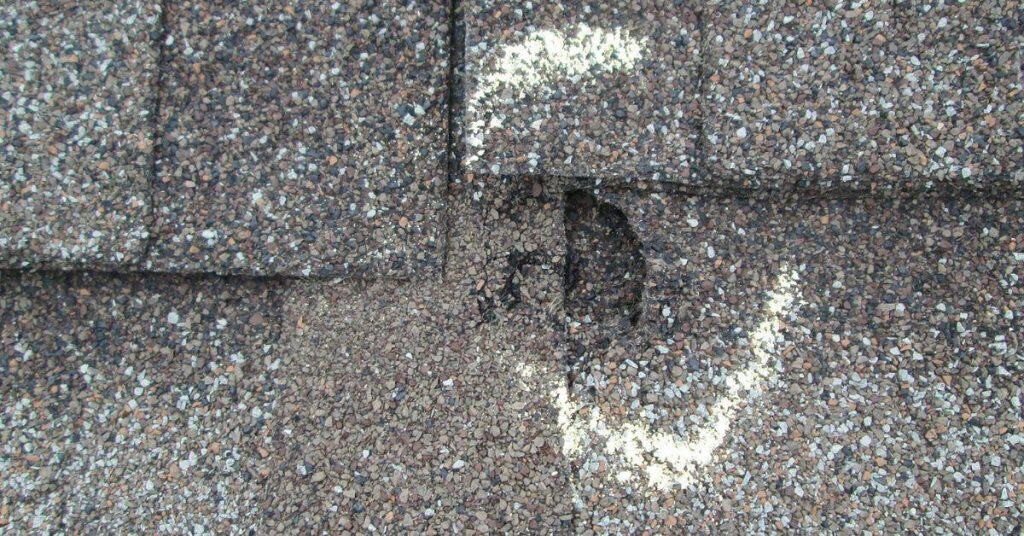
Common roofing problems and how to identify them
From ground level you can spot obvious issues like missing or curling shingles, visible granule loss, exposed nails, staining on siding, and ponding near eaves after rain. In the attic, look for signs of leaks, condensation, dark streaks, damp insulation, or daylight peeking through deck or soffit areas. On the roof surface, inspect flashing around chimneys and vents, note warped or displaced shingles, exposed fiberboard, and any ice dam evidence; distinguish cosmetic wear from structural failure by tracking moisture paths and movement with weather changes.
Ground indicators translate into attic and surface clues, so document patterns of staining that align with roof planes and interior walls. Use quick checks such as tapping suspected boards for hollow sounds to flag potential rot or delamination. If issues are cosmetic, they stay localized to surface materials; structural concerns often show movement, sagging, or widespread moisture damage that requires professional assessment. Always verify product specifications and local rules before any repair and plan priorities accordingly with photos and notes from all angles.
Visual checkpoints and evidence to collect
Before you start any repairs, document the damage. This helps prioritize fixes and can be useful if you need to involve a pro or your landlord.
- Photograph: Take clear pictures of all visible damage from different angles.
- Measure: Note down dimensions of damaged areas, missing shingles, etc. This helps when buying replacement materials.
- Check attic/ceiling: Look for water stains, mold, or daylight showing through. These indicate leaks and structural damage.
- Granule loss: Check for lost granules on gutters or at the base of your downspouts. This signals worn-out shingles.
- Curling/buckling: Inspect shingles for signs of curling edges or buckling, which can lead to leaks.
- Exposed nails: Look for nails popping out from under shingles. This can cause leaks and further damage.
- Staining on siding/decks: Dark stains may indicate water intrusion or algae growth due to poor drainage.
- Ponding: Check for standing water near eaves, especially after rain. This could mean your roof isn’t draining properly.
Quick rule: Always document damage before starting repairs.
Risk level and ‘stop rules’
Safety first! Know your limits. Here are clear signs to stop DIY work and call a professional.
Pitch: If your roof has a steep pitch, it’s dangerous to attempt repairs yourself. Pros have the right gear for high-pitch roofs.
Structural rot: If you find soft spots, rotting wood, or significant sagging, stop immediately. These indicate serious structural damage that needs pro attention.
Severe water intrusion: Heavy leaks, especially those causing extensive interior damage or affecting electrical systems, require immediate professional help to prevent further harm and potential hazards like electrocution.
Unsafe weather: Never work on your roof in bad weather. High winds, heavy rain, snow, or ice make it too dangerous for DIY repairs.
Lack of safety gear: If you don’t have a harness, sturdy ladder, non-slip boots, and other necessary safety equipment, stop and get the right gear before proceeding.

Safety precautions and personal protective equipment
Fall prevention starts with guardrails, anchor points, and a buddy system; never work alone when on a roof. Watch for fatigue and set a clear stop point if you feel unsteady or weather turns. When you must climb, secure the ladder firmly and maintain three points of contact at all times.
Dress for the job with non-slip roofing shoes, gloves, eye protection, and long sleeves; use a respirator or dust mask if coatings or dusty debris are present. Check weather windows and avoid work in storms, high winds, or glare-rich conditions that hinder visibility. Have a dedicated first-aid kit and a plan for calling for help if a fall occurs or someone is injured.
Ladder and Roof-Access Best Practices
Selecting the right ladder is crucial. Choose one that’s tall enough to reach your roof but not so tall it becomes unstable.
Set up your ladder at a 1:4 angle – for every 4 feet away from the wall, lower the base by 1 foot. This provides a secure climbing surface and helps prevent tipping.
Always maintain three points of contact while ascending or descending – two hands and one foot, or two feet and one hand.
Secure your ladder at the top and bottom using hooks or ropes to prevent slippage. Before stepping onto the roof, check for secure footholds and safe entry/exit points.
Electrical, Gas, and Structural Hazards
Before climbing onto your roof, look around for any nearby power lines. Keep a safe distance from them at all times.
Inspect skylights and walkways for fragility or weakness. Avoid stepping on them if they show signs of damage.
Check for signs of compromised decking or joists. If you notice sagging, cracks, or other defects, stop work immediately and consult a professional. These could indicate serious structural issues that require expert assessment.
If your home has gas lines running near the roof, be extra careful not to damage them with ladders or tools. If you suspect any damage, turn off the main gas valve and contact a professional immediately.
Tools and materials checklist
Core tools include a tape measure, chalk line, pry bar, hammer, utility knife, kneepads, and a drill with driver bits; add an oscillating tool and a circular saw for more involved tasks. Ensure you have the right roofing fasteners and a basic safety setup to match common caps and sealants. Verify compatibility with your chosen underlayment and shingles before buying in bulk.
For fasteners and sealants, choose roof-rated nails or screws with corrosion resistance and note the recommended bead size and cure times per product label. Underlayment options vary by climate; select synthetic or felt with attention to thickness and UV exposure ratings, and stock a waste factor for cuts. Flashing materials should match your metal choices (aluminum, copper, or galvanized steel) and include appropriate nails, snaps, and seam tape; check compatibility with vent boots and corners for a clean, durable fit.
How to choose materials and temporary fixes
Before you dive into repairs, know when to use temporary patching versus permanent materials. Here’s a quick checklist.
- Roof tape: Use for small gaps or tears. Not a long-term solution.
- Tarps: Ideal for large areas, but need secure attachment to prevent wind damage.
- Sealant: Good for minor leaks around vents or chimneys. Avoid using on slopes.
- Underlayment: Use as a base layer before shingles. Essential in wet climates.
- Shingles: Buy matching ones if possible. Otherwise, blend them in carefully.
- Flashing: Replace damaged pieces immediately to prevent water intrusion.
- Nails/screws: Use appropriate fasteners for your roof type and material.
- Safety gear: Always use a harness when working on steep slopes.
Quick rule: Never rely solely on temporary fixes. They’re band-aids, not cures.
Budget planning and estimated cost ranges
Before you start spending, understand what goes into roof repair costs. Here’s a breakdown.
- Materials: List them out first. Quantities depend on square footage and waste factor.
- Rentals: Tools like lifts or nail guns might need renting. Factor this in.
- Labor (if hiring): Get quotes from local contractors for accurate pricing.
- Permits: Check if you need them. Some repairs may require approval.
- Waste disposal: Factor in dumpster rental or waste removal costs.
- Safety gear: If you’re hiring, ensure they have proper PPE.
- Contingency (10-15%): Always plan for unexpected expenses.
Quick rule: Don’t skimp on quality materials or safety. They’ll save you money in the long run.
DIY step-by-step fixes for common issues
Task scope includes replacing a few damaged shingles, fixing vent/flashing around vents or chimneys, patching small leaks, clearing and resealing gutters, and resealing penetrations. I’ll give quick time estimates and a difficulty level for each so you can plan a single-day or weekend effort. Always pause if you hit unfamiliar conditions or structural concerns.
Prep safety and tools first: STAY off a wet roof, wear PPE, and gather caulk, flashing, roof cement, and gutter guards as needed. Then follow concise, task-specific steps in order, with a clear rationale and a checklist to complete before moving to the next repair. After finishing, perform a leak test and inspect from the interior for any signs of moisture intrusions.
Step-by-Step Repair Process
Follow these practical steps to safely and effectively tackle common roofing issues. Start with preparation, then perform the main repairs, and finish with cleanup.
- Inspect your roof and gather tools: Check for damage, collect necessary materials, and ensure you have a stable ladder.
- Safety first: Wear appropriate PPE, including gloves, safety glasses, and a harness if needed. Turn off power to nearby electrical lines.
- Remove damaged shingles or flashing: Carefully lift tabs of surrounding shingles, pry up the damaged piece, and remove nails.
- Inspect underlayment: Check for water damage or rot beneath removed materials. If found, replace affected areas.
- Replace and secure new materials: Install new shingles or flashing, using roofing cement to seal around edges. Nail in place, ensuring proper alignment.
- Reseal penetrations: Apply a bead of roofing cement around vents, chimneys, and other openings to prevent water intrusion.
- Clean up: Remove debris, gather tools, and inspect your work from ground level for any missed spots.
- Test for leaks: Use a garden hose to simulate rain conditions. Check interior ceilings and walls for signs of moisture.
Temporary Emergency Repairs
When faced with active leaks, use these quick fixes to stop water intrusion until permanent repairs can be made. Always prioritize safety and use appropriate materials.
Tarping: Place a tarp over the damaged area, securing it with weights or additional tarps if necessary. Ensure edges overlap and are well-sealed.
Sealant patches: Apply roofing sealant directly to leaks, creating a thick, even layer that covers the affected area completely. Allow to dry before testing.
Temporary flashing: Use aluminum flashing or roofing cement to temporarily cover gaps around vents and chimneys. Ensure edges are well-sealed to prevent water intrusion.
Replacing Shingles and Repairing Flashing
Follow these steps to remove damaged shingles, inspect underlayment, replace flashing, and seal properly to prevent future issues.
Removing damaged shingles: Lift tabs of surrounding shingles, use a pry bar to carefully lift the damaged piece, then remove nails. Work slowly to avoid damaging nearby materials.
Inspecting underlayment: Check for water damage or rot beneath removed materials. If found, cut out affected areas and replace with new underlayment before installing new shingles or flashing.
Replacing and sealing flashing: Install new flashing, using roofing cement to seal around edges. Ensure proper alignment and secure in place with nails. Apply additional cement as needed to create a watertight barrier.

When DIY is not appropriate — call a professional
If you encounter large roof-area damage, a sagging deck, widespread rot, a complex or multi-angled roof system, or active leaks threatening structure, pause the DIY plan and call a pro. These conditions often require specialized equipment and structural evaluation. Always document findings and communicate clearly with an experienced contractor.
To work with pros, verify licenses and credentials, and outline liability, warranty, and insurance implications upfront. Create a decision checklist that weighs safety risks, permit needs, cost, and timelines; keep photos and notes handy for your discussion. Prioritize safety and understand when to escalate to licensed help before proceeding.
How to Document Damage
Before you pick up the phone to call a professional, gather evidence of the damage. This will help them assess the situation accurately and may be crucial if you need to make an insurance claim or take legal action.
Take clear, well-lit photos from various angles, focusing on affected areas. Include shots of any underlying structures or issues that contributed to the damage. Also, document the timeline of events leading up to the problem.
Keep a written record of repair attempts, dates, and costs. If you’ve notified your landlord or insurer, keep copies of those communications too. All this information will support your case and speed up the process.
Find and Vet Roofing Contractors
When it’s time to call in the pros, you want to make sure you’re hiring a reputable company. Start by asking for references from friends or neighbors who’ve had similar work done.
Check their licenses and insurance. They should have liability insurance to protect both parties in case of accidents. Also, ensure they’re licensed to perform the specific type of work you need.
Get a written estimate from each candidate. This should include a detailed breakdown of costs, materials, and timeline. Make sure it aligns with your expectations and budget. Lastly, check if they require any permits for the job – some contractors will handle this, others won’t.
Tenant-landlord considerations and legal remedies
Tenant rights and landlord responsibilities typically frame roof/ceiling problems as habitability issues; expectations and timelines vary by jurisdiction. Start with documenting the problems and notifying the landlord in writing with dates, photos, and descriptions. Expect a response that outlines next steps and repair timelines.
Understand how repairs interact with lease obligations, access for contractors, and any temporary fixes allowed while work is arranged. Keep records of all communications and repair attempts; consult local housing authorities or legal aid if the landlord stalls. Review potential effects on rent, deposits, or lease renewals as issues persist.
Repair-and-deduct and withholding rent (stop rules)
In some cases, tenants can withhold rent or use the repair-and-deduct method to force their landlord to make necessary repairs. However, these are serious measures that should only be taken after understanding local laws and documenting every step.
Repair-and-deduct allows you to fix the problem yourself and deduct the cost from your rent. Before proceeding, get written confirmation from your landlord acknowledging the issue. Keep receipts and document the process thoroughly.
Withholding rent is riskier. It’s typically a last resort when landlords fail to address habitability issues. Check local laws first; it may be illegal in your area. Always notify your landlord in writing before withholding rent, detailing the problem and giving them a reasonable time to fix it.
Reporting hazardous living conditions and filing claims
If your landlord is unresponsive or unwilling to address serious health and safety issues, report the problem to local authorities. Start with your city or county’s building/health department. They can inspect the property and enforce repair orders.
For immediate hazards, call code enforcement. They can issue emergency repair orders if necessary. If you’re unsure who to contact, look up your local housing authority or tenant advocacy groups for guidance.
If repairs aren’t made after these steps, consider small-claims court or housing court. These courts handle disputes between landlords and tenants. You’ll need to prove the landlord knew about the problem and failed to address it. Keep detailed records of all communication, photos, and any evidence supporting your claim.
Preventative maintenance to avoid future roofing problems
Seasonal maintenance helps you catch issues early and extend roof life; set a simple routine for each season and a monthly quick check. After storms, inspect for missing shingles, damaged flashing, worn vent boots, and dented metal; document and address promptly. Keep a log of findings and repairs for reference.
Gutter care and vegetation management are essential: clean gutters, ensure downspouts direct water away from the foundation, and trim overhanging branches. Check attic ventilation and insulation for proper function, and schedule minimal DIY tasks with professional help for anything beyond your comfort zone. Maintain a practical schedule and know when to escalate issues.
Visual inspection schedule and what to record
Regular visual inspections help catch potential problems early. Use this checklist every season.
- Spring: Check for missing or damaged shingles, inspect gutters, trim overhanging branches.
- Summer: Look for signs of heat damage (curling shingles), check attic ventilation.
- Fall: Inspect roof after storms, clear leaves and debris, prepare for winter.
- Winter: Check for ice dams, inspect flashing around chimneys and vents.
- Monthly: Quickly check for leaks in the attic, ensure all vents are clear.
Quick rule: Keep a maintenance log. It’s useful for resale or insurance claims.
Common DIY mistakes to avoid
Even with the best intentions, these common mistakes can cause more harm than good. Learn from them.
- Working on wet/icy roofs: Slippery surfaces increase risk of falls. Wait for a dry day.
- Overdriving fasteners: Driving nails or screws too deep can damage shingles and cause leaks. Be gentle.
- Improper flashing: Incorrect installation leaves gaps, allowing water to seep in. Follow manufacturer’s instructions.
- Incompatible materials: Using different types of shingles or mixing old and new can cause issues. Keep it consistent.
Remember, prevention is better than cure. Always prioritize safety and use the right tools.
Local regulations, permits, and warranty considerations
Local building codes affect what you can DIY and when permits are needed; locate the code book or online resource and review roof provisions that apply to your project. Note any thresholds for permits, venting requirements, and fire-rating standards. Always confirm you’re aligned with current rules before starting work.
Permits, inspections, and timing vary by location; understand how to apply and what inspections will cover. Warranty implications depend on manufacturer guidelines and proper installation, so keep documentation of materials and methods. For insurance, disclosures and compliance play a big role in claims; preserve safety and compliance records for future reference.
How permits and inspections typically work
Before you start any major roof repair, check if a permit is required. Here’s a simple checklist to guide you.
- Permit needed: Check local building codes or call your municipal office to confirm. Work without a permit can lead to fines and forced demolition.
- Application process: Visit your local permitting office, fill out the application, pay fees, and submit required documents like blueprints or detailed repair plans.
- Inspection schedule: Inspections are usually scheduled after framing, before insulation, and upon completion. Keep track of these dates to avoid delays.
- Unpermitted work consequences: If caught, you may face fines, penalties, or even have to redo the work at your own expense.
- Permit expiration: Most permits expire after a set period. Check yours and renew if necessary before starting any work.
- Final inspection: Once complete, schedule a final inspection. Pass this, and you’re good to go!
- Record-keeping: Keep all permit-related documents for your records and in case of future inspections or claims.
Quick rule: Always get permits before starting major work. It’s the law, and it protects you from costly mistakes.
Protecting warranties and insurance claims
To keep your manufacturer warranties valid and insurance claims covered, follow these steps:
Use approved materials: Stick to the materials recommended by the manufacturer. Using subpar or unapproved products can void your warranty.
Keep receipts: Maintain records of all purchases related to your roof repair. You’ll need them for claims and warranty purposes.
Notify insurer before major repairs: Inform your insurance company about any significant work done on your roof. They may require documentation or inspect the work themselves.
Follow proper installation methods: Ensure you’re installing components correctly to maintain warranty eligibility. If unsure, consult a professional or the manufacturer’s guidelines.

Conclusion
Protecting your home starts with safety and durable work. When you fix it right, you keep water out, preserve the roof’s look, and reduce costly problems later.
First, inspect for leaks or missing shingles, then check the attic for moisture, grab your PPE and the tools you need, and follow the fixes in small, measured steps. Start with a clear plan, test a small area, and progress methodically from top to bottom, resealing joints and flashing as you go. If a problem looks deep or unsafe, pause and reassess before continuing, and always recheck your work after a rain test.
Two common mistakes to avoid are skipping safety gear or rushing up ladders, and using the wrong sealant or fasteners for your roof type. Keep a firm grip on the ladder, maintain three points of contact, work in dry, calm conditions, and never force fasteners or sealants—match them to your shingles and underlayment. Also don’t ignore local permits, warranty rules, or landlord-tenant requirements that could affect what you can fix yourself.
If you encounter structural damage, widespread leaks, or a sagging roof, or if you’re unsure about any step, call a professional rather than pushing on. A quick consult can save you from costly mistakes and hidden damage. Stay practical, stay safe, and keep moving forward with confidence on your next, solid repair.
FAQ
What should I check first when I find a roof leak?
Start by finding where the water is coming in. Look for stopped up gutters, missing shingles, or damaged flashing. Don’t assume the leak is right above the water spot.
Can I fix a leak myself, or should I call a pro?
You can fix small issues like loose shingles or clogged gutters. If you see widespread damage, rotten sheathing, or multiple leaks, call a pro. Bad fixes can collapse later, so know your limits.
How do I stop a leak temporarily until I can repair it?
Cover the area with a tarp or plastic sheeting and secure it with weights or nails. Keep people off the roof and away from the edge. This buys time, but it is not a real fix.
What safety steps should I follow when working on a roof?
Use a sturdy ladder, wear non-slip boots, and have a helper. Never work on a wet or windy day. If you’re unsure, stop and call a pro.