

Introduction
Rock pockets are hollow spots or voids that appear on the surface of formed concrete faces. They form when aggregate or cement settles away from the surface during pour, leaving visible pockets. Proper formwork, consistent pour, and careful surface preparation help prevent them.
Symptoms include small pits and rough spots on the face that you can feel with your hand. Causes include inadequate consolidation, improper vibration, and moisture or form-release issues during pour. Prevention and repair materials rely on proper consolidation, surface preparation, and patching compounds or epoxy repairs chosen to match the surface.
Key Takeaways
- Identify rock pockets by hollow sounds, rough surfaces, and visible voids after cure.
- Verify proper consolidation during pour to prevent air voids and surface defects.
- Implement vibration and proper chute placement to minimize rock pockets during placement.
- Use clean, properly mixed concrete and consistent slump to reduce defects.
- Inspect faces frequently: plan for patch materials, curing, and tool readiness.
- Safety: wear PPE, avoid wet surfaces, and follow manufacturer instructions.
Table of Contents
- Introduction
- Key Takeaways
- What Are Rock Pockets and Why They Matter
- Causes of Rock Pockets During the Pour
- Prevention Techniques to Implement During Placement
- Tools, Materials, and Safety Checklist
- Step-by-Step Cosmetic Repair Process for Rock Pockets
- Visual Checkpoints and Quality Control During Pour and Repair
- Common Mistakes and Troubleshooting
- Planning, Timeline and Cost Considerations
- Conclusion
- FAQ
What Are Rock Pockets and Why They Matter
Rock pockets appear as dimples, rounded hollows, or rough pockets on formed concrete faces. They often vary in size and depth, making them distinguishable from some other surface flaws. Recognizing these cues helps decide whether a repair is cosmetic or indicates a deeper issue.
These pockets can influence moisture movement, durability, and long-term surface quality if left untreated. They may be purely cosmetic in shallow cases but could signal larger concerns where cover depth or embedded reinforcement is involved. Effective prevention during pour and careful planning for repairs are essential to maintain performance and appearance.
Rock Pockets: Definition & Identification
Rock pockets are small to medium-sized depressions or hollows that appear on the surface of formed concrete. They are typically characterized by a dimpled, rounded appearance with a rough texture.
These imperfections can vary in size from approximately 1-2 inches (coin-sized) up to around 4-6 inches (hand-sized), with depths varying accordingly. To identify rock pockets:
- Inspect formed concrete faces visually.
- Feel the surface by touch for any rough or hollow areas.
If numerous or deep, consult a structural professional for assessment.
Cosmetic Vs. Structural Significance
Rock pockets can be purely cosmetic issues or indicate deeper problems with consolidation or formwork that may require structural assessment.
Shallow pockets with no signs of moisture intrusion are usually cosmetic and can often be repaired cosmetically. However, assess pocket depth, potential moisture intrusion, and overall surface condition to determine the severity.
If pockets are deep or show signs of moisture intrusion, consider a structural assessment. For unclear cases, consult a structural engineer for expert advice.
Causes of Rock Pockets During the Pour
Void formation commonly stems from inadequate consolidation, under-vibrating, or uneven pour rates that trap air and create visible pockets on formed faces. Overworking the mix or mismanaging placement can also contribute to rock pockets. These conditions lead to irregular surface textures that reveal the underlying voids.
Segregation and honeycombing, where coarse aggregate separates from paste, and insufficient paste near forms can produce large voids and rough, pitted surfaces. Surface laitance, bleed water, and washout at the form surface weaken bonding and contribute to chalky or powdery patches that hint at deeper deficiencies.
Poor Consolidation and Vibration Gaps
Inadequate compaction during concrete placement can lead to the formation of voids, resulting in visible rock pockets on formed faces. Inspect freshly poured concrete for any unconsolidated areas or excessive air bubbles.
Proper use of vibrators and consolidators, as per manufacturer guidelines, is crucial to ensure thorough compaction. If unconsolidated areas are present, re-vibrate or consolidate the area immediately to prevent rock pocket formation.
If rock pockets do form, use a suitable repair mortar to fill and smooth the voids before final finishing.
Formwork, Joints, and Release Agent Issues
Improperly prepared or maintained formwork can cause visible defects on concrete faces. Ensure release agents are applied evenly and correctly to prevent adhesion and surface imperfections.
Inspect formwork for cleanliness, proper alignment, and secure bracing before pouring. If formwork is dirty or misaligned, clean and adjust it immediately to avoid rock pocket formation due to formwork issues.
If rock pockets or other defects occur despite these precautions, use a suitable repair mortar to address the problem areas.
Mix Design and Aggregate Effects
Inappropriate mix proportions and aggregate sizes can lead to segregation, honeycombing, and visible rock pockets. Monitor slump during pouring to ensure consistent workability and proper paste-to-aggregate ratio.
Verify that the mix design adheres to relevant standards, such as ASTM C94, and aggregates meet required specifications. If slump is too high or low, adjust the mix design accordingly to prevent rock pocket formation.
If rock pockets form due to segregation or honeycombing, use a suitable repair mortar to fill and smooth the voids before final finishing.
Prevention Techniques to Implement During Placement
Plan the placement sequence and consolidation approach to ensure aggregates are fully encapsulated without trapping air. Control pour height and path, coordinate stops, and time vibration to avoid introducing new voids near corners or edges. A consistent approach helps minimize pockets on formed faces.
Establish a clear vibration strategy, including equipment choice, insertion depth, and duration, while avoiding over-vibration that can loosen near surfaces. Proper formwork management, tight joints, and careful sealing help prevent voids and reduce pocket formation during cure.
Formwork Preparation and Best Practices
Proper formwork setup prevents voids and ensures concrete face quality. Begin by inspecting forms for cleanliness, alignment, secure ties, sealed joints, and appropriate face textures before pouring.
If forms are dirty or misaligned, clean and align them before proceeding. A final walkthrough to verify all checks are complete is crucial prior to concreting.
In case voids occur, remove formwork, clean the area, apply a suitable patching material, and reapply formwork.
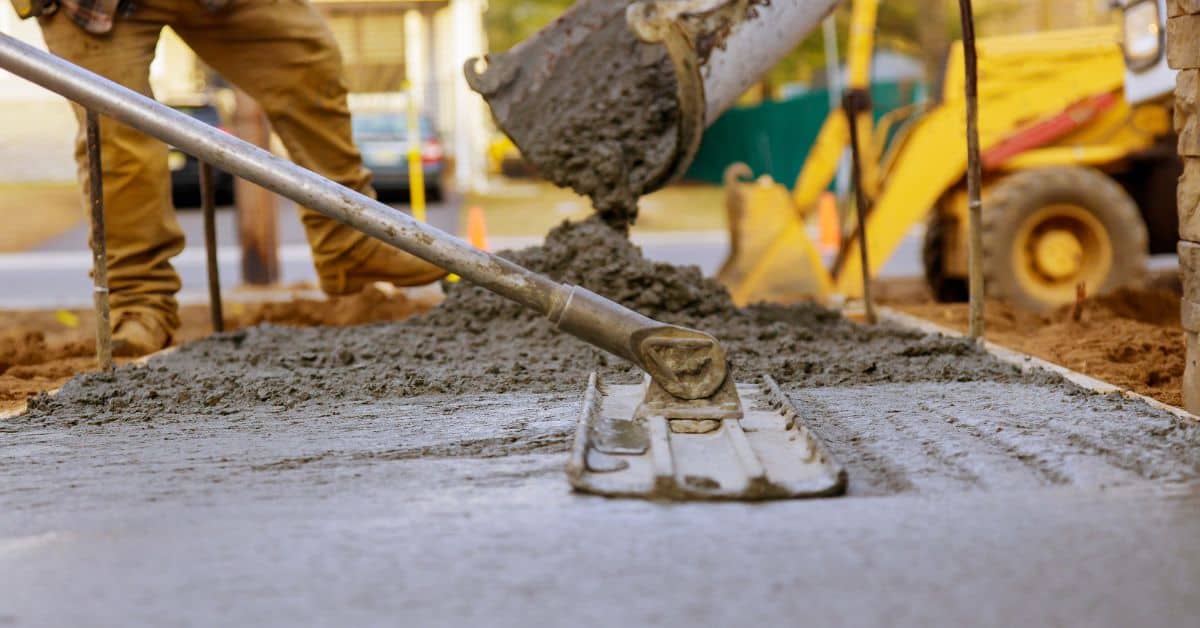
Proper Placement and Consolidation Methods
Efficient placement and consolidation minimize air entrapment and rock pockets. Plan pour height, chute path, stops, and vibration timing to fully encapsulate aggregates without trapping air.
Monitor the concrete surface during the pour for signs of excessive bleeding or segregation. If such issues are observed, adjust the placement sequencing and consolidation plan accordingly.
If rock pockets form, use a suitable chipping hammer to remove affected material, clean the area, and apply a cosmetic repair.
Mix Control and Delivery Considerations
Appropriate mix design and delivery ensure consistent concrete quality with minimal defects. Conduct drag-out tests to assess concrete’s flowability and workability during delivery.
Verify slump, air content, and other relevant properties at the batch plant and upon arrival at the jobsite. If mix properties deviate from specified values, initiate corrective actions with the batch plant or adjust placement methods.
If rock pockets occur due to mix issues, remove affected material, clean the area, and apply a cosmetic repair using a compatible patching material.
Tools, Materials, and Safety Checklist
Maintain PPE and site protection discipline, with hard hats, eye and face protection, gloves, and appropriate footwear. Consider respiratory protection if dust or curing agents are involved, and ensure clear zones around the pour to keep debris away from the work area. Implement fall protection where needed for elevated work.
Check materials compatibility by reviewing datasheets and SDS, including curing compounds, patch materials, and admixtures. Verify slump and pH guidance from the manufacturer and confirm that aggregates and cementitious mixes meet project requirements before use.
Tools for Pouring and Consolidation
Appropriate tools are crucial to prevent rock pockets during concrete placement.
- Vibrators: Vital for consolidating concrete, ensuring it fills all spaces. Verify frequency (100-200 Hz) and amplitude (0.5-2 mm) suitability with your mix.
- Hand tools (trowels, floats): For finishing and smoothing surfaces. Inspect for damage before use.
- Screeds: To strike off excess concrete and level the surface. Ensure they are long enough to span forms.
- Leveling tools (straightedges, lasers): For checking and maintaining proper slope and elevation. Calibrate before use according to manufacturer instructions.
- Inspection aids (flashlights, magnifying glasses): To detect voids or honeycombing during placement. Use to examine formwork joints and corners.
- Optional: Concrete vibrator monitor: Measures vibration levels. Consider renting/borrowing for occasional use; purchase if frequent.
Repair Materials and Specification Notes
Choosing the right repair materials is essential for durable cosmetic results.
- Cementitious patching material: Match strength, slump, and pH to original mix. Check manufacturer data for compatibility.
- Sealants (epoxy, polyurethane): For filling small voids or cracks. Ensure they are compatible with chosen curing compound.
- Curing compounds (membranes, sprays): Protect repaired areas from moisture loss and early-age cracking. Follow application instructions.
- Release agents (form oils, waxes): Apply to form surfaces to prevent adhesion of concrete. Choose one compatible with mix design.
- Optional: Colorants: Match the color of existing concrete for seamless repairs. Test before use to ensure a good match.
Safety and Environmental Controls
Use this checklist to protect workers and minimize environmental impact during repair work.
- PPE (hard hats, eye/face shields, gloves): Wear appropriate PPE at all times. Inspect before use for damage or wear.
- Respirators: Use when working with curing agents or dust-generating tasks. Ensure proper fit and protection.
- Boot/shoe protection (steel-toed boots): Protect feet from falling objects and compression hazards.
- Fall-arrest systems: Secure as per local regulations when working at heights. Inspect before use.
- Shop/haul areas: Keep dust and debris away from the pour zone to minimize slip, trip, and fall hazards.
- Waste management: Dispose of concrete waste responsibly, following local regulations. Recycle if possible.
- Noise control (earplugs, earmuffs): Use when exposed to high noise levels from tools or equipment.
- Fire prevention: Keep flammable materials away from heat sources and open flames. Have fire extinguishers on-site.
Quick rule: Always prioritize safety over speed. If unsure about any aspect, stop work and consult with a supervisor or safety officer.
Step-by-Step Cosmetic Repair Process for Rock Pockets
Begin with identifying root causes and severity by assessing pocket size, frequency, and location, along with any underlying consolidation issues. Use these findings to choose an appropriate repair approach and implement preventive measures for future pours. Document the assessment for maintenance records.
Prepare the surface with cleaning and monitoring for loose material, then select compatible repair mortars or bonding agents. Follow a practical workflow that includes profiling, substrate preparation, material application, and controlled curing to achieve durable cosmetic results.
Step-by-Step Repair Process
This step-by-step guide walks you through the process of repairing rock pockets in concrete, from preparation to final checks. Follow these practical steps for a successful DIY repair.
- Prepare the work area: Clean the surface, chip off loose concrete, and contain dust. Mask edges to prevent overspill. Wear appropriate PPE.
- Assess damage: Identify pocket size, frequency, location, and underlying pour/consolidation issues. Determine repair approach based on your findings.
- Abrade the substrate: Use a grinder or similar tool to roughen the surface for better adhesion. Be sure to wear safety glasses and gloves.
- Clean defects: Remove all dirt, debris, and loose material from the pockets using a wire brush or compressed air.
- Check substrate moisture: Ensure the concrete is dry before applying repair materials. Use a moisture meter if unsure.
- Apply repair material: Follow manufacturer’s instructions for mixing and application of your chosen repair mortar, epoxy, or polyurethane injection.
- Detail formwork (if needed): If repairing large pockets or areas, use formwork to achieve the desired shape and finish. Ensure it’s secure and well-sealed.
- Cure properly: Follow curing strategies specific to your chosen repair material. Keep the repaired area moist and at recommended temperatures for optimal results.
- Perform final checks: Inspect the repair for any signs of poor adhesion or incomplete cure. If issues persist, consult a specialist before proceeding with further repairs.
Assessment and Surface Preparation
Before starting any repair work, it’s crucial to assess the damage accurately and prepare the surface properly. This ensures your repair materials adhere well and last.
Inspect the pockets: Measure their size, count their frequency, and note their location. Check for underlying pour or consolidation issues that may require additional attention.
Prepare the surface: Remove any loose concrete using a chipping hammer or similar tool. Clean the area thoroughly to remove dirt, grease, and other contaminants. Ensure the surface is dry before proceeding with repairs.
Safety first: Wear appropriate PPE, including safety glasses, gloves, and a dust mask. Contain dust using plastic sheets or similar barriers to prevent it from spreading.
Mixing and Selecting the Repair Compound
Choosing the right repair material is vital for a successful repair. Read and follow product labels, datasheets, or manufacturer instructions carefully.
Repair mortars: Choose a mortar that matches your existing concrete’s strength and texture. Consider using polymer-modified mixes for enhanced durability.
Epoxy or polyurethane injections: These are ideal for smaller pockets and can be used to fill voids from the backside of the concrete. Ensure they’re compatible with your substrate and follow manufacturer guidelines for mixing and application.
Bonding agents: Use these to improve adhesion between the repair material and the existing concrete. Apply them according to the manufacturer’s instructions before applying the repair mortar.
Application, Finishing, and Curing
The main work involves applying the repair material, finishing it to match the existing surface, and ensuring proper cure for durability.
Apply the repair material: Follow manufacturer’s guidelines for mixing and application. Use a trowel or similar tool to apply the mortar evenly, filling pockets completely. For epoxy or polyurethane injections, follow the specific application techniques outlined by the manufacturer.
Finish the surface: Trowel the repair material smooth, matching the texture of the existing concrete. If using formwork, ensure it’s well-sealed and secure before applying the repair material.
Cure properly: Follow curing strategies specific to your chosen repair material. Keep the repaired area moist and at recommended temperatures for optimal results. Use a sealer compatible with your repair material to protect the repaired area from future damage.
Visual Checkpoints and Quality Control During Pour and Repair
Before pouring, confirm formwork alignment, surface cleanliness, and moisture status, along with cure protection and embedding placement. Establish target properties like slump and air content, and verify form release won’t contaminate the surface. Clear pre-pour checks reduce the risk of pockets forming.
During the pour, monitor rate and consistency, and assess vibration for uniform compaction without surface disturbance. Inspect for visible voids, honeycombing, or partially filled zones along formed faces and plan immediate remediation if necessary.
Inspection During the Pour
Conduct regular visual checks throughout the pouring process to ensure a smooth surface and prevent rock pockets on formed concrete faces.
- Pour rate: Monitor the pour rate to maintain consistency and alignment, preventing low spots that could lead to rock pockets.
- Consistency: Assess the mix’s consistency. Inconsistencies can result in voids or honeycombing.
- Alignment: Ensure proper vertical alignment to minimize rock pockets at the face. Misalignment can cause pooling and differential settlement.
- Consolidation/vibration: Inspect for air voids near formed faces. Inadequate consolidation or vibration can trap air, leading to defects.
- Edge finishing: Verify proper edge finishing. Poorly finished edges can result in rock pockets.
- Thickness control: Check thickness control along the formed face. Inconsistent thickness can cause visible voids or honeycombing.
- Pooling/differential settlement: Look for pooling or differential settlement, which can worsen rock pockets after cure.
- Void detection: Inspect for visible voids, honeycombing, or partially filled zones along formed faces. Early detection allows for corrective actions during the pour.
Quick rule: If voids or defects are observed, implement corrective actions during the pour or plan repairs immediately to prevent further issues.
Post-Repair Acceptance Criteria
After completing a repair, inspect the area to confirm successful repair and meet cosmetic goals.
- Visible defects: Inspect repaired areas for any visible defects or signs of poor bonding. Incomplete repairs can lead to further deterioration.
- Pocket depth: Measure pocket depth and compare it to the initial assessment. Significant differences may indicate incomplete repair.
- Surface smoothness: Assess overall surface smoothness and uniformity. Irregularities can indicate poor finishing or bonding.
- Pass/fail thresholds: Define pass/fail thresholds for pocket size/number, surface smoothness, and adhesion indicators to ensure the repair meets quality standards.
- Documentation: Require photo records, a signed checklist, and technician sign-off to document the repair process and results.
- Follow-up verification: Plan follow-up verification after cure and against cosmetic goals. This ensures long-term durability and aesthetic appeal.
Quick rule: If the repair does not meet acceptance criteria, re-inspect, re-evaluate, and implement corrective actions if necessary to ensure a successful repair.
Common Mistakes and Troubleshooting
Identify frequent causes of rock pockets during pour, such as improper aggregate distribution, excessive vibration, or gaps in formwork, and compare these with common repair failures like inadequate cleaning or poor bonding. Distinguish between construction flaws and repair deficiencies to target fixes effectively.
Pre-pour planning should address form release, edge alignment, and joint conditions, with attention to surface moisture and porosity. Surface prep and bonding strategies for repairs require proper cleaning, abrasion, and compatible patch materials that match the existing surface and structural needs.
Errors During Placement and How to Correct Them
To achieve a smooth concrete pour and prevent rock pockets, avoid these common mistakes:
- Over-reliance on surface troweling: Excessive troweling can cause laitance buildup, leading to voids. Avoid over-troweling and allow concrete to self-level.
- Poor vibrator technique: Improper vibration can result in improper consolidation and rock pockets. Use appropriate vibration techniques and monitor aggregate distribution.
- Improper formwork sealing: Inadequate sealing allows concrete to leak through, creating voids. Inspect forms for proper sealing before pouring.
- Excessive vibration time: Over-vibration can cause segregation and rock pockets. Monitor vibration time and avoid over-vibrating.
Regularly inspect your pour, monitor aggregate distribution, vibration technique, and formwork condition to prevent rock pockets and ensure a smooth pour.
Repair Pitfalls and How to Avoid Them
To achieve durable, cosmetic repairs, be aware of these common mistakes:
- Mismatched materials: Using incompatible patch materials can lead to failed repairs. Verify patch material compatibility with existing concrete and structural requirements.
- Inadequate surface prep: Poorly prepared surfaces result in weak bonding. Thoroughly clean and prepare the surface before applying repair materials.
- Premature loading: Loading repaired areas too soon can cause damage. Allow adequate curing time before subjecting repairs to heavy loads.
- Inconsistent application techniques: Varying application methods can lead to inconsistent results. Optimize application techniques and maintain consistency throughout the repair process.
Regularly reassess your repair strategy, select appropriate materials, and optimize application techniques to prevent failed repairs. Consider using bonding agents or polymer-modified mortars if necessary.
Planning, Timeline and Cost Considerations
Prevent pockets by aligning the pour plan with formwork quality, consolidation, curing methods, and joint layout to minimize pocket formation from the start. Embed prevention and inspection milestones into the schedule, with buffers for curing periods and weather holds. Use unit-based and lifecycle cost thinking rather than raw rates when budgeting for prevention and remediation.
For DIY readers, plan to gather current local labor rates, material pricing, and lead times from suppliers and trades to ground budgeting in reality. Regular QA/QC checks and clear repair protocols help catch issues early, from pre-pour formwork checks to post-pour inspections; if pockets are discovered, implement repair procedures promptly to prevent cosmetic and structural issues. Skipping formwork quality checks can lead to uneven surfaces, so start with thorough form inspection and maintain a documented decision path for when to escalate to remediation.
Scheduling and Coordination Guidance
Integrate rock pocket prevention strategies into your pour plan. Ensure formwork quality, proper consolidation, effective curing methods, and strategic joint placement to minimize pocket formation.
Timeline mapping is crucial. Embed prevention and inspection milestones in your project schedule, allowing for buffer periods due to weather holds or extended curing times.
Coordinate with your team to ensure everyone understands their role in preventing rock pockets. Regular communication and clear expectations will help maintain quality control throughout the pour process.
Cost Estimation Approach
Estimate costs for both preventing and remediating rock pockets to make informed decisions. Identify labor, material, and equipment factors involved in each process.
Unit-based and lifecycle costs should be considered over raw rates. Evaluate the long-term impact of preventing rock pockets versus fixing them later.
Gather current local labor rates, material pricing, and lead times from suppliers and trades to base your budgeting on reality. Regularly review and update these figures to maintain an accurate cost estimate.
Use a decision framework that compares preventing rock pockets with fixing them later. Consider transitioning to remediation when prevention costs become comparable to repair costs, and document the trade-offs for future reference.
Conclusion
Preventing rock pockets and repairing them correctly protects safety, improves durability, and keeps finished surfaces looking right. By applying careful planning during the pour and sticking to proven cosmetic repair steps, you reduce the risk of hidden voids that can worsen over time and require costly fixes later.
Proceed with a simple, whole-work checklist in the flow of action: verify the surface is clean and free of loose material, confirm formwork and reinforcement are properly placed, confirm the concrete mix and pour sequence align with the plan, monitor placement and vibration to avoid segregation, ensure the surface is screeded and finished within target timing, perform any cosmetic repair steps promptly after initial set following the approved method, and complete a final visual check for uniform texture and color, documenting any anomalies for future reference.
Common mistakes to avoid include rushing the pour or the patching, over- or under-vibrating, allowing moisture or surface contaminants to linger, skipping curing steps, and applying patches without matching the surrounding texture or using incompatible materials. Safety rules are simple: wear the right PPE, test small areas first, keep the work area protected from weather and excessive heat or cold, and follow product labels and manufacturer instructions for patches or fillers. If anything feels uncertain or the structural integrity could be at stake, pause and reassess.
When to call a professional is clear: if you encounter significant voids that could indicate formwork failures, persistent cracking, or water intrusion, or if the project involves structural elements or code compliance concerns, seek a qualified contractor or engineer. With careful steps and careful judgment, you can finish with confidence and a durable, clean result that lasts.
FAQ
What Are Common Symptoms of Rock Pockets on Concrete Surfaces?
Look for hollow spots or areas that sound hollow when tapped. You may also see small voids or craters on the face of the concrete after form removal or during finishing.
What Causes Rock Pockets to Form During the Pour?
Rock pockets arise when aggregates settle unevenly or are trapped behind forms. Poor consolidation, improper slump, or inadequate vibration can allow air pockets to remain and create voids in the finished surface.
What Prevention Techniques Can Reduce Rock Pockets During Placement?
Ensure proper mix consistency for the job and use effective consolidation methods. Verify form alignment and tightness, and vibrate the concrete adequately to help release trapped air and settle aggregates evenly.
What Materials Are Typically Needed for Repairing Rock Pockets?
Use a repair mortar or patching compound compatible with the existing concrete, clean the defect area, and prepare a bonding agent if required by the product instructions. Have simple tools like a trowel, chisel or grinder for surface prep, and a damp sponge for finishing.
What Is the Step-by-Step Cosmetic Repair Process for Rock Pockets?
Clean the area and remove loose material. Dampen the void and apply the repair material in thin layers, compacting each layer. Smooth the surface and cure according to the product instructions, then finish to match surrounding texture as needed.