

Introduction
Tackling soft or dusty plaster surfaces can seem daunting, but with a clear timeline, you’ll transform your walls from fragile to firm in no time. This guide walks you through the process step by step, ensuring you understand how long each task takes and when to move on to the next.
Before you start, gather your materials and set aside dedicated time for each phase of the project. Let’s dive into the timeline for repairing soft/dusty plaster surfaces using consolidants and re-skim.
For the full guide, see Soft Dusty Plaster Surfaces: Consolidants, Re-Skim Options, and Stop Rules.
The Step-by-Step Timeline for Repairing Soft/Dusty Plaster Surfaces
Repairing soft or dusty plaster surfaces involves several stages, each with its own duration. Here’s a detailed timeline to help you plan your project:
- Preparation (1-3 days): Start by identifying the affected areas and assessing their condition. Remove any loose material, clean the surface, and lightly abrade it to improve consolidant penetration.
- Consolidation (2-5 days): Choose a compatible consolidant based on your substrate type. Mix and apply the consolidant according to manufacturer guidelines, allowing proper tack time between coats. Typically, you’ll need 2-3 thin coats for optimal results.
- Drying & Curing (1-7 days): Allow the consolidant to dry and cure completely before proceeding with re-skim or any further work. This step is crucial for ensuring a strong, durable surface.
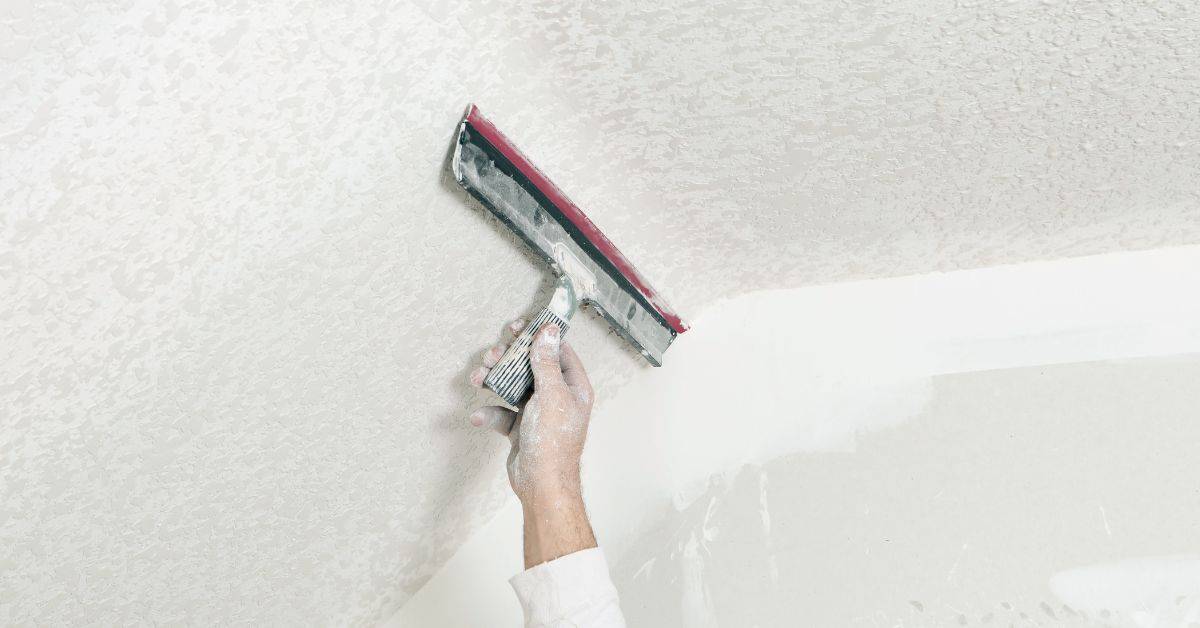
- Re-Skim (2-4 days): Once the consolidant has cured, apply a thin layer of fresh plaster or joint compound to create a smooth, even surface. Allow this layer to dry and cure as well.
- Finishing & Maintenance (Ongoing): After re-skim, lightly sand any rough spots, wipe away dust, and prime the surface for painting or wallpapering. Regularly inspect your walls for signs of wear or damage, and address any issues promptly to maintain the longevity of your repairs.
Total project duration: 7-19 days
Key takeaways
Proper preparation is key to a successful repair and can significantly impact the overall timeline. Taking the time to clean and abrade the surface ensures better consolidant penetration, which in turn speeds up the drying and curing process.
- A wall fixative is a resin-based consolidant that stabilizes dusty surfaces.
- Identify substrate type (plaster, lime plaster, gypsum, stone) before consolidating.
- Clean dusty walls and remove loose material prior to consolidant application.
- Apply consolidant in thin coats, allow tack time per manufacturer instructions.
- Stop consolidating when the surface firms but remains breathable or dusty.
- For old facades, assess joints and masonry, choose compatible consolidants and mortar.
- Wear appropriate PPE and follow manufacturer safety data when applying consolidants.
Table of Contents
- Introduction
- Key takeaways
- What Is a Consolidant and Why It Matters for Soft or Dusty Plaster
- Types of Consolidants and Best Uses by Substrate
- Preparing Soft/Dusty Plaster Surfaces for Consolidation
- Application Methods and Best Practices for Different Consolidants
- When to Stop Consolidating and Start Re-Skimming
- Finishing, Maintenance, and Long-Term Monitoring
- Safety, Regulatory and Cost Considerations
- Conclusion
- FAQ
What Is a Consolidant and Why It Matters for Soft or Dusty Plaster
A consolidant is a treatment that aims to stabilize weakened plaster and reduce surface dusting, so the wall can support a skim coat. It helps the surface bind together rather than simply cleaning or filling holes. The goal is to restore cohesion before any re-skimming takes place.
Consolidation differs from cleaning or patching because it penetrates the matrix and binds the fibers, while cleaning removes loose dust and patches cover defects without improving interior strength. Look for signs that consolidation is needed, such as heavy dusting, powdery surfaces, or loose aggregates, and know when it may not be appropriate, like when the surface is sound but dusty. Choose breathable, low-viscosity formulas that suit the plaster type, moisture conditions, and future skim compatibility, and follow basic steps like patch testing, proper surface prep, and a check for rigidity after treatment before moving to skim.
How consolidants work (chemistry in brief)
Consolidants are like superglue for your plaster. They fix crumbly or dusty surfaces by penetrating deep, binding loose particles together, and sometimes forming a protective film on top.
Silicates, like sodium silicate, work by forming a gel that binds with the plaster’s calcium. They’re great for strengthening and preventing further crumbling.
Acrylics and alkoxysilanes also penetrate and bind, but they form a thin film on the surface too. This can help protect against water damage and improve durability.
Each has its uses, so check your product’s label or manufacturer instructions to pick the right one for your job. Remember, no consolidant can fix weak base compaction, so check that first before you start.
When consolidation alone is sufficient vs. when you must re-skim
Before deciding, check your plaster’s condition. Consolidation might be enough if:
Penetration test: Stick a needle into the plaster. If it goes in easily but doesn’t crumble, consolidation could work.
However, if the plaster is:
Crumbling or flaking off, you’ve got a degraded layer that needs re-skimming. Check its thickness – if it’s more than 1/8″ (3mm), you’ll need to re-skim.
Always remember, consolidation doesn’t fix deep damage. It just strengthens what’s left. So, if in doubt, check with a pro or your local building codes.

Types of Consolidants and Best Uses by Substrate
Consolidant categories include silicate-based or inorganic options, acrylics, ethyl silicate or alkoxysilane types, and lime-based formulations. Each category has its own chemistry, strengths, and typical substrate targets, affecting how it behaves with plaster. Consider breathability and how the product interacts with moisture as you choose.
Build a substrate-specific map that pairs consolidants with lime plaster, gypsum, cement render, and historic lime-based mixes, noting when you should prioritize breathability versus hardening. Before applying, perform a pre-assessment of pH, salinity, and moisture, and test on a small patch after cleaning the area. Plan for the recommended penetration depth, coating cycles, and drying times, ensuring future skim layers remain compatible. Document substrate conditions to support future maintenance and avoid over-consolidation or whitening and related issues.
Silicate and alkoxysilane consolidants
Silicate-based and alkoxysilane consolidants are inorganic, mineral-friendly products that penetrate deep into the substrate. They’re ideal for lime plasters and historic mineral mixes.
Strengths: Deep penetration, excellent compatibility with mineral substrates, and they enhance the surface’s mineral structure.
However, avoid using them on gypsum-based plasters as they can cause efflorescence. Always patch test first to ensure compatibility.
Organic/acrylic consolidants and sacrificial coatings
Acrylic consolidants are typically used indoors on non-mineral substrates like gypsum plasters. They form a protective film on the surface.
Strengths: Easy application, good for controlled indoor environments, and suitable for non-mineral surfaces.
Downsides include reduced breathability compared to inorganic consolidants and potential issues with adhesion when re-skimming. Use them sparingly on historic finishes due to their reversibility concerns.
Preparing Soft/Dusty Plaster Surfaces for Consolidation
Start with a clear scope and indicators of degradation, such as a powdery surface or hollow sounds, to decide if consolidation is appropriate or if re-skim should come first. Use a quick visual and tactile checklist to gauge depth of degradation and plan zones for treatment. Clear signs guide your approach and help prevent unnecessary work.
Safety comes first with PPE and containment, and map out moisture considerations during an assessment. Gentle cleaning methods should come first—dry brushing, soft vacuum with a brush attachment, and light damp wiping only if needed. Remove loose material carefully and document edges to guide subsequent consolidation or skim steps, then perform a controlled depth test to classify areas by depth for targeted consolidation decisions.
Simple onsite tests to assess cohesion and depth
Before diving into consolidation, perform quick tests to understand the severity of your plaster’s degradation. These simple checks help you determine how deep the damage goes and what treatment is needed.
Tape Test: Stick a piece of duct tape onto the affected area, press firmly, then pull it off quickly. If dust comes off on the tape, the surface needs consolidation or re-skim.
Pin-Prick Test: Gently poke the plaster with a pin. If it feels hollow or crumbles easily, there’s core degradation that requires attention.
Scraping Test: Use a scraper to lightly scrape the surface. If material comes off easily, you’ve got friable particles that need removal before consolidation.
Tools and materials checklist for safe prep
Before starting any work, ensure you have the right tools and safety gear. This list covers essentials for preparing soft/dusty plaster surfaces.
- Personal Protective Equipment (PPE): Gloves, goggles, and a dust mask to protect against debris and dust.
- Dry Brush: A soft-bristled brush for gentle dry cleaning of the surface.
- Vacuum with Soft Brush Attachment: To remove dust without damaging the surface.
- Cleaning Agents: Mild dish soap and water for minimal damp wiping, avoid harsh chemicals.
- Scraper or Putty Knife: For removing loose material and leveling the surface.
- Knife or Scratch Awl: To perform depth tests on the plaster.
- Tape Measure: To document edges and transitions for later reference.
- Consolidant of Choice: Silicate, alkoxysilane, or organic/acrylic consolidant based on your substrate’s needs (refer to earlier sections).
Quick rule: Always check your tools and materials before starting work. Missing something could lead to further damage or an incomplete job.
Application Methods and Best Practices for Different Consolidants
Identify which consolidants suit soft or dusty plaster and choose the application method accordingly, such as brush, low-pressure spray, or injection. Prepare the surface by dust removal and gentle brushing, and test substrate porosity to determine absorption prior to treatment. Start with the appropriate method for the task and proceed with careful surface prep.
Follow guidance for dilution and mixing suited to common products, and perform quick field checks to verify correct consistency and avoid over-saturation. Plan sequencing and layering, including whether to apply one or more coats and whether to wet-on-dry or damp-intervals, accounting for drying times under your conditions. Manage absorption to prevent pooling, use ventilation or barriers as needed, and know when to stop if the surface shows signs of over-saturation or haze. Safety, tooling, cleanup, and re-coat timing should be part of the routine, with clear criteria for moving to re-skim or additional consolidants if required.
Layering strategy and timing between coats
The typical consolidant application involves multiple coats. Here’s how to space them out.
Water-based binders: Apply 2-3 coats, allowing each to dry for at least 12 hours before the next. Test tack-free by gently touching the surface with a clean cloth.
Silicate/silicone-based hardeners: These often require fewer coats (1-2). Wait until the surface is completely dry and non-tacky, usually 24-48 hours, before applying the next coat. Always follow product-specific guidelines.
Visual checkpoints during application
Regularly inspect your work to ensure proper penetration and avoid failures.
- Wetting pattern: Watch for even coverage. Inconsistencies may indicate a problem with absorption or application.
- Color change: The surface should darken slightly as the consolidant penetrates. No change might mean insufficient penetration.
- Absence of surface sheen: A dull, matte finish indicates good penetration. A shiny surface suggests over-saturation or inadequate drying time.
- Powdering returns: If dust reappears after application, the consolidant hasn’t penetrated deeply enough.
- Flaking: Large flakes or chunks falling off indicate severe failure. Stop treatment immediately and reassess your surface.
- Bubbles or blisters: These suggest over-saturation or trapped moisture. Allow the consolidant to dry further before reapplying.
- Uneven drying: Check for areas that dry faster than others. This could indicate inconsistent application or absorption issues.
- White haze: A white residue after drying suggests over-saturation. Wipe off excess consolidant immediately to prevent this.
Quick rule: Inspect your work regularly, and don’t hesitate to stop treatment if you notice any of these issues.
When to Stop Consolidating and Start Re-Skimming
Set clear decision thresholds for stopping consolidation, such as achieving reduced dusting and a cohesive surface that looks and feels solid. Use simple cohesion and dusting checks to determine pass or fail, and note any waiting periods between tests. These cues help you decide when consolidation is ready for the next step.
Understand the risks of over-consolidation and premature skimming, including trapped moisture, altered porosity, or a surface that won’t breathe. Establish practical waiting times and environmental controls, and check compatibility with plaster, lime, and any existing coatings before skimming. A straightforward decision flow or checklist can guide you from initial improvement to final re-skim, with guidance on re-testing and stopping rules if criteria are not met.
Criteria for surface readiness for skim coats
The consolidant’s job is to strengthen and stabilize your plaster. But before you start skimming, ensure it’s ready. Here are the signs:
Pull-off cohesion test: After 72 hours, perform a simple pull-off test using duct tape. If it pulls off cleanly with no residue, your surface is ready.
Drying time: Even after passing the cohesion test, wait another 48-72 hours to ensure proper drying and adhesion of your skim coat. No rush here; let it cure right.
Choosing an appropriate skim material after consolidation
The skim material you choose impacts the final finish and longevity of your work. Here are suitable options:
- Lime-based: Ideal for historic buildings or where breathability is crucial. Use NHL (Natural Hydraulic Lime) 3.5 or 5, rated at least 1:2. Avoid fast-setting types to prevent weak bonds.
- Gypsum-based: Suitable for interior walls with low humidity. Use a high-quality gypsum plaster, rated at least 1:4. Not recommended for exterior or high-humidity areas due to potential cracking.
- Cement-lime: A good balance between strength and breathability. Use a mix of 1 part cement to 3-6 parts lime (NHL 3.5 or 5), rated at least 1:3. Avoid using pure cement plasters, which can lead to cracking.
Finishing, Maintenance, and Long-Term Monitoring
Choose finishing options that stay breathable and compatible with consolidated plaster, such as lime paints or limewash, while avoiding sealers that trap moisture. Consider silicate-based coatings that allow vapor transfer and match the project’s historic or decorative goals. Plan the finish once consolidation has fully cured and surface moisture is suitable.
Apply finishes with proper prep and thin, well-sequenced coats, respecting the needs of dusty or soft plaster. Establish a maintenance routine with gentle cleaning that won’t abrade the surface, and schedule periodic reapplication of breathable or sacrificial coatings as needed. Include a long-term monitoring plan with regular checks for dusting, cracks, damp spots, or recurrence to decide if re-skim or re-consolidation is warranted.
Long-term monitoring checklist
Use this checklist annually or semi-annually to keep an eye on your consolidated plaster surfaces. Early detection prevents major issues.
- Check for cracks: Even hairline cracks can worsen over time. Seal small ones immediately.
- Look for new dusting/powdering: This indicates the surface is breaking down again. Re-consolidate if necessary.
- Inspect for damp spots: Moisture encourages further deterioration. Address any water ingress problems promptly.
- Check moisture levels with a hygrometer: Ensure readings are within acceptable ranges (10-25% relative humidity).
- Document changes: Keep records of your inspections and interventions for future reference.
- Inspect corners and edges: These areas are prone to cracking. Apply extra care during maintenance.
- Check around windows, doors, and vents: Ensure no water is entering through these openings.
- Reapply sacrificial/breathable coatings as needed: If the finish looks worn or patchy, reapply to maintain protection.
Quick rule: Regular checks help you stay ahead of problems. Don’t wait for major issues to arise.
Common mistakes and troubleshooting
Avoid these common pitfalls when maintaining consolidated plaster surfaces.
- Using non-breathable sealers: These trap moisture, causing further damage. Always use breathable products.
- Insufficient cleaning before finishing: Dirt and debris prevent proper adhesion of finishes. Thoroughly clean the surface first.
- Over-applying consolidants or coatings: Too many layers can cause cracking and peeling. Apply thin, even coats only.
- Ignoring micro-cracks: Small cracks left untreated grow larger, leading to more extensive repairs.
- Not allowing proper curing time: Rushing the process leads to poor results. Always let consolidants and coatings cure fully before applying additional layers or finishing.
Addressing these issues promptly keeps your plaster surfaces in top condition.
Safety, Regulatory and Cost Considerations
Define PPE and safe handling practices, including respirators or masks, eye protection, gloves, and protective clothing, plus procedures to minimize exposure during dust generation and consolidant work. Emphasize ventilation and local exhaust strategies to control airborne particles. Plan around your site’s needs to keep the work safe.
Note regulatory and environmental duties, such as rules for hazardous dust, waste disposal, and labeling, and consider lead paint or asbestos factors if present. Document disposal routes and cleaning protocols to prevent cross-contamination, and know when to call a conservation professional for heritage or uncertain materials. Finally, keep in mind cost considerations and budgeting factors like product type, treated area, coats, surface condition, labor, and safety gear, without quoting fixed prices.
When to call a specialist
Consolidating soft or dusty plaster surfaces can be tricky. Know when to step back and call in the pros.
Structural movement: If you notice cracks that are wider than 2mm, or if walls seem to be moving, stop. This could indicate structural issues that need professional assessment.
Extensive moisture sources: If there’s a persistent damp problem, like water coming in from outside or condensation, don’t try to fix it yourself. You might be dealing with a bigger issue that needs expert attention.
Heritage-listed surfaces: If your home is listed or in a conservation area, any work done should be sympathetic to the original materials and methods. Consult a heritage specialist before starting any work.
Material specs and standards explained
Choosing the right consolidant is crucial. Here’s what you need to look for on those datasheets.
- VOC content: VOCs are volatile organic compounds that can harm your health and the environment. Look for low or zero VOC products.
- Penetration depth: This tells you how far into the plaster the consolidant will reach. Deeper penetration means better bonding, but too deep might cause staining.
- Compatibility with lime: If your plaster contains lime, make sure the consolidant is compatible. Some products can react badly with lime and cause damage.
- Cure time: This is how long it takes for the consolidant to dry and become effective. Longer cure times mean less dust, but it also means you’ll be waiting longer before you can apply a skim coat.
- Avoid: Products with high VOC content, shallow penetration, incompatibility with lime, or very short cure times. These could cause cracking, staining, weak bonds, and excessive dusting.

Conclusion
Repairing soft or dusty plaster is a practical step that pays off in safety, durability, and a clean, lasting finish. Go slow, test your approach, and respect the limits of the material to avoid costly mistakes.
Make it happen with a simple, stepwise check: confirm the wall is sound and won’t shed dust, select a compatible consolidant for the substrate, clean and lightly abrade the surface, perform a small-area test, mix and apply per manufacturer guidance, wipe off excess, and allow proper curing before deciding if you need additional passes or to proceed with re-skim and finishing. Treat each task as a separate check and document what you observe to guide the next step.
Two common pitfalls to avoid are overdoing consolidation or using the wrong product for the substrate, and skipping a test patch or venting the area. Always wear approved PPE, work in a well-ventilated space, and stop if the surface doesn’t accept the consolidant or if there are signs of new cracking or moisture issues. If a project spans large areas, involves structural concerns, or you’re unsure about regulations or costs, call in a professional and don’t push past your comfort zone—the right move now can save you time and money later, and you’ll sleep easier knowing the work is solid.
FAQ
What is a wall fixative and when should I use it?
A wall fixative is a consolidant-like spray used to bind dust and loose material to the surface. Use it only when you have light, dusty, or powdery plaster that flakes off with a touch. Always follow the manufacturer’s instructions and test on a hidden area first.
What surfaces can consolidants be used on?
Consolidants work on soft or friable plaster, lime plasters, cement plaster, and some stone or brick surfaces. Check the product label to confirm compatibility with your substrate. If you have mixed or unknown materials, test a small area and consult the manufacturer guidance.
How do I properly prepare and clean dusty walls before consolidating?
Remove loose dust with a soft brush or vacuum. Gently wipe surfaces with a damp cloth if allowed by the product instructions, then let dry completely. Do not oversaturate; follow the consolidant’s prep instructions for best adhesion.
What are practical application methods for consolidants, and what to avoid?
Apply in thin, even coats as directed by the label, usually with a brush or spray. Work from top to bottom and avoid pooling or over-wetting. If you’re unsure about a method, stop and verify with the product’s instructions or ask the supplier.
What comes after consolidation—post-repair plastering and skimming basics?
Once the material is stabilized, you may need to re-skim or plaster lightly to restore a uniform surface. Use appropriate plaster for the substrate and let it cure as recommended. If you’re unsure about skim thickness or finishing, check product guidance or get a quick second opinion on-site.