
Introduction
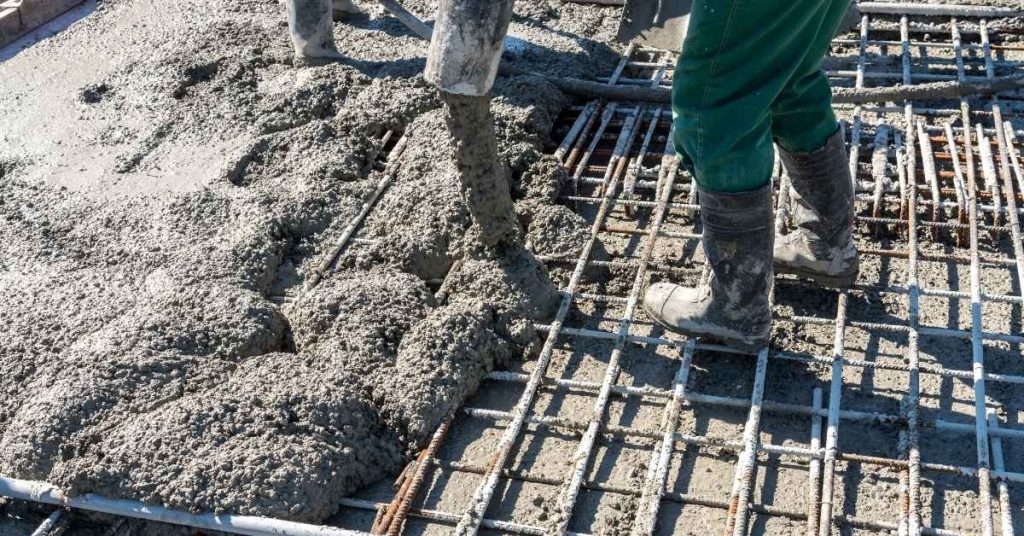
Repairing concrete after jackhammering nearby means fixing hairline cracks and damaged patches so the surface can take load again and look even.
Microcracks form from vibration and shifts, and prep is needed to keep new material from pulling away. Start by cleaning dust and debris, then let the area dry. Roughen the surrounding concrete to give the patch material a better grip, and apply a bonding agent as directed by the product instructions.
Key takeaways
- Assess microcracks and spalls promptly after jackhammer operation to prevent further damage.
- Clean and roughen the surface using PPE; provide mechanical key for patches.
- Choose compatible patch material and confirm adhesion with manufacturer instructions.
- Apply patches in thin increments, cure conditions, and avoid early traffic on repaired areas.
- Inspect for hollow spots, debonding, or new cracks and rework promptly.
- Implement ongoing monitoring and preventive measures to minimize re-cracking risk.
- Do not ignore structural indicators; escalate assessment if damage worsens.
Table of Contents
- Introduction
- Key takeaways
- Understanding Jackhammer-Induced Damage and Microcracks
- Initial Assessment and Diagnosis
- Determining Whether Damage Is Cosmetic or Structural
- Preparing the Damaged Area for Repair (Surface Prep)
- Choosing the Right Patch Material and Adhesion Strategies
- Step-by-Step Patching Procedure for Microcracks to Larger Spalls
- Ensuring Long-Term Adhesion and Preventing Re-Cracking
- Testing, Monitoring, and Troubleshooting Post-Repair
- Conclusion
- FAQ
Understanding Jackhammer-Induced Damage and Microcracks
Jackhammering nearby can create several crack patterns in concrete. These patterns include very thin cracks, small delaminations, spalls, and more extensive structural problems. It helps to separate microcracks from hairline cracks and from larger cracks caused by shifting loads.
Vibration and impact produce different damage signatures. Look for where cracks start, how they grow, and whether there is loose material. This section helps set realistic expectations for what signs mean deeper trouble.
Types of cracks and what they mean
Jackhammering can cause various types of cracks on your concrete. Understanding these helps you assess the damage.
Microcracks: These are tiny, hairline cracks barely visible to the naked eye. They’re common after jackhammering but usually harmless if not growing.
Hairline cracks: Slightly wider than microcracks, these can be seen with a keen eye or under magnification. Still minor, but keep an eye on them.
Spalling: This occurs when small pieces of concrete break off, leaving a rough, pitted surface. It’s more serious as it indicates deeper damage.
Structural cracking: These are wide cracks (usually over 0.1 inches) that run deep into the concrete. They can compromise structural integrity and need immediate attention.
How vibration causes microcracking
Jackhammering vibrates the concrete, causing microcracks in several ways:
Fatigue: The repeated stress from vibrations tires out the concrete, leading to tiny cracks.
Debonding at aggregate-matrix interfaces: Vibrations can cause the aggregates (rocks) inside the concrete to shift slightly, creating small gaps where water and air can enter, weakening the structure.
Localized tensile stresses: The vibrations create tiny areas of tension that exceed the concrete’s strength, resulting in microcracks.
When to call an engineer
While minor cracks are common after jackhammering, some signs indicate deeper problems:
If cracks widen progressively, it could mean ongoing damage. Don’t wait; get a professional opinion.
If cracks affect structural elements like beams or columns, call an engineer immediately. These support your home’s weight and integrity.
If you notice any deflection or sagging, it could indicate serious structural issues. Don’t delay; consult a professional right away.
Initial Assessment and Diagnosis
Follow a simple inspection workflow to document the affected areas. Map crack locations and note any visible surface changes. Do basic non destructive checks to gauge openness and depth.
Record conditions such as load on the slab, surrounding environment, and any recent nearby work. This helps correlate damage with events and guides your next steps or escalation needs.
Visual checkpoints and documentation
Before you start any repair, document the damage. This helps track progress and ensures you don’t miss anything.
- Photograph cracks: Get close-ups of each crack to see details and track changes.
- Measure length: Use a tape measure to record lengths for comparison later.
- Note adjacent joints: Check if nearby joints are affected or need attention.
- Record nearby loads: Note any heavy equipment, vehicles, or structures nearby that could be causing stress.
- Environment notes: Jot down weather conditions and recent events (like heavy rain or freezing) that might’ve contributed to damage.
- Recent works: List any nearby construction or maintenance work done recently.
- Sketch map: Draw a simple map of your property, marking locations of cracks for easy reference.
- Date stamp: Record the date to track progress over time.
Quick rule: The more details you record now, the easier it’ll be to spot trends and make repairs later.
Simple NDT methods for DIY
Before you grab your tools, try these non-destructive tests (NDT) to understand the damage better. They’re easy but have limitations.
Sounding/tapping: Gently tap along the crack with a hammer. A dull sound indicates delamination or honeycombing – where concrete has separated from itself or reinforcement, or air pockets are present.
Water/dye test: Pour water or apply dye to the crack. If it seeps through quickly, you’ve got active cracks that need immediate attention. If it doesn’t, the crack might be inactive but still needs repair to prevent further damage.
Crack width gauge: Use this tool to measure crack widths accurately. It helps track progress and ensures repairs are effective. A ruler can also work, but a gauge is more precise.
These methods give you a basic idea of the problem. For deeper insights, consider professional evaluation.
When to use professional evaluation
Some damage needs more than just a visual check or simple NDT. Here’s when to call in the pros for advanced testing:
Core testing: If you suspect rebar corrosion, delamination, or need concrete strength data, professionals can drill out cores and test them in a lab.
Ultrasonic testing: This uses sound waves to measure the depth and severity of cracks. It’s useful when cracks are too small to see but you suspect deeper damage.
Rebound hammer: This tool measures concrete strength by bouncing a spring-loaded mass off the surface. It’s handy for checking if your concrete is strong enough to support repairs or additional loads.
These tests require specialized equipment and expertise. Always consult a professional engineer or materials specialist when you need them.
Determining Whether Damage Is Cosmetic or Structural
Use a practical decision framework based on location, load path, crack activity, and extent of damage. Cosmetic issues stay near the surface and show little movement. Structural concerns involve critical paths and larger movements over time.
Remember that safety critical elements warrant a professional assessment. If in doubt, flag those areas for a qualified review and follow local rules for reporting structural concerns.
Signs of active or progressive cracking
Active cracks are a red flag. They’re widening, moving with the seasons, or have new offsets.
Recent widening: If cracks are getting bigger over time, that’s a sign they’re active.
Seasonal movement: Cracks that open and close with temperature changes might be due to expansion and contraction. Keep an eye on them.
New offsets mean the concrete is shifting. That could indicate ongoing damage or even instability.
Load-path and location considerations
Cracks in certain spots need extra attention. They might be structural, not just cosmetic.
Beams: Cracks here could affect the building’s stability. Don’t ignore them.
Slabs supporting equipment: These cracks could compromise the load path, leading to further damage or collapse.
Near foundations: Here, cracks might indicate settlement issues. That’s serious stuff.
Overlays and nonstructural elements? Those cracks might be okay for DIY patching. But always double-check.
Risk-based decision making (DIY vs contractor)
Know your limits. Some repairs are safe to do yourself, others need a pro.
DIY: Small cracks in nonstructural areas? Go ahead and patch them up. But be sure it’s just cosmetic damage.
Contractor or engineer: Anything near load-bearing elements, active cracks, or signs of settlement? Call a pro. It’s worth the peace of mind.
Safety-critical elements? Don’t mess around. Get an engineer to assess it first.
Preparing the Damaged Area for Repair (Surface Prep)
Remove delaminated material and expose sound substrate where the repair will anchor. Clear oils and contaminants that could hinder adhesion. Roughen or profile the surface to improve mechanical bonding.
Control moisture to the extent possible and follow product guidance on moisture limits. The success of the patch depends mainly on the prep quality and how well the surface is prepared for bonding.
Tools and materials checklist
Before you start, make sure you have the right tools and safety gear. Here’s a quick checklist.
- Chipping hammer: To remove damaged concrete. Without it, you’ll struggle to expose sound substrate.
- Wire brush: For scrubbing off loose material and revealing the surface.
- Grinder with diamond blade: To create a smooth, even profile for better patch adhesion.
- Pressure washer: To clean the area thoroughly. Skipping this can lead to poor patch adhesion due to contaminants.
- Safety glasses: Protect your eyes from debris.
- Gloves and ear protection: For handling tools and reducing noise exposure.
- Respirator: To protect against dust when chipping and grinding.
- Tape measure and pencil: For marking out the repair area accurately.
Quick rule: Always double-check your tools and PPE before starting any repair work.
Removing loose concrete and preparing edges
First, remove all loose or damaged concrete using a chipping hammer. You want to expose sound substrate for the patch to bond with.
Next, create a chase or keying pattern in the repair area using a grinder or chipping hammer. This increases the surface area and improves mechanical bond between the old and new concrete.
When cutting out the damaged area, make sure your edges are square-cut or chamfered at 45 degrees. This helps distribute stress evenly and prevents edge delamination over time.
Pro tip: Use a straight edge and level to ensure your cuts are accurate and square.
Managing rebar, corrosion, and contaminant removal
Exposed rebar in the repair area? Great! This means you’ve reached sound substrate. Now, assess the condition of the rebar.
If there’s rust or scale, remove it using a wire brush or grinder. Corrosion can weaken the rebar and compromise your patch. Apply a corrosion inhibitor if needed to protect the rebar from further damage.
Before applying any patch material, clean the area thoroughly to remove all oil, grease, and other contaminants. A pressure washer with detergent should do the trick. Contaminants can prevent proper adhesion of the patch.
Remember: Proper cleaning is crucial for a strong bond between the old and new concrete.
Choosing the Right Patch Material and Adhesion Strategies
Compare repair material categories such as cementitious mortars, polymer modified mixes, and epoxy systems. Consider bond strength, shrinkage potential, achievable thickness, cure behavior, and exposure conditions described by the product label.
Review the manufacturer datasheet or instructions to confirm limits and compatibility. When in doubt, check what the label recommends and what your local rules permit before proceeding.
Cementitious vs Epoxy vs Polymer-Modified Mortars
When choosing a patch material, you’ve got three main categories to consider: cementitious mortars, epoxy systems, and polymer-modified mixes. Each has its own strengths and weaknesses.
Cementitious mortars, like concrete itself, are strong in compression but weak in tension. They’re great for filling gaps and rebuilding thickness, but they lack flexibility and can crack under stress or temperature changes.
Epoxy systems offer excellent bond strength and resistance to chemicals. They’re ideal for repairing cracks and restoring structural integrity. However, they’re sensitive to moisture during application and cure, and they lack the breathability of cement-based materials.
Polymer-modified mixes combine the best of both worlds: the strength of epoxy with the flexibility and breathability of cement. They’re versatile, easy to apply, and can be used in a wide range of conditions. However, they may not offer the same level of chemical resistance as pure epoxies.
Using Primers, Bonding Agents, and Admixtures
To ensure your patch material sticks like glue, you’ll need to use the right primers and bonding agents. These create a chemical bond between the old and new concrete.
Apply primers before patching. They prepare the surface by cleaning it and improving adhesion. Always follow manufacturer directions for compatibility with your chosen patch material.
Bonding agents are similar but stronger. They’re used when you need extra bond strength, like when repairing cracks or reattaching delaminated concrete. Again, follow the manufacturer’s instructions.
Admixtures can be added to your patch mix to improve properties like workability, set time, or durability. But use them sparingly and only as directed. Too much can cause problems like excessive shrinkage or delayed setting.
Matching Thermal and Mechanical Properties
For critical repairs, it’s not enough to just match the color of your patch material. You need to consider its thermal and mechanical properties too.
The modulus (stiffness) of your patch should be close to that of the existing concrete. Too much difference can cause stress and cracking at the interface.
Shrinkage potential is another important factor. If your patch shrinks more than the surrounding concrete, it can create tensile stresses and cause cracks. Check the shrinkage values on the datasheet before you buy.
Thermal expansion compatibility is also crucial. Concrete expands and contracts with temperature changes. If your patch doesn’t expand and contract at a similar rate to the existing concrete, it can cause stress and cracking over time.
Step-by-Step Patching Procedure for Microcracks to Larger Spalls
Outline the sequence from crack routing and sealing to injection for hairline cracks. Prepare patch material and ensure mixing follows the prescribed ratio and method. Plan for layered placement if the repair is deep.
Consolidate and finish within the product limits for thickness and required cure conditions. Keep notes on each step to verify adherence to the chosen system’s directions.
Step-by-Step Process
This section guides you through a clear, practical sequence for patching concrete from microcracks to larger spalls.
- Inspect and prepare the area: Ensure safety, remove loose material, and clean the surface. Why: A solid base ensures good adhesion.
- Choose your patch material: Select the right mortar or epoxy based on damage size and type. Why: Matching properties prevents future cracking.
- Apply primer or bonding agent: Use a brush to apply, following manufacturer’s instructions. Why: Enhances adhesion and seals the surface.
- Patch microcracks to larger spalls: Follow specific methods below for different damage sizes. When in doubt: Consult a pro before proceeding.
- Finish and cure: Smooth the patch, protect it from rapid drying, and allow proper curing time. Why: Proper finishing and curing prevent premature failure.
Repairing hairline and microcracks (injection methods)
For tiny cracks, injection methods using resins or epoxies are ideal. They seal cracks from within, preventing water ingress.
When to use: Hairline cracks (less than 0.1mm) and microcracks (up to 2mm).
Injection steps: Drill small holes along the crack, insert ports, inject resin/epoxy, remove ports, and seal holes. Curing: Follow manufacturer’s guidelines for proper curing.
Patching spalls and larger voids (form-and-fill)
For deeper damage, use the form-and-fill method to replace missing concrete.
Preparation: Clean the cavity, remove any loose material, and roughen surfaces for better adhesion. Install forms: Use strong, rigid materials to contain the new patch.
Place patch material in lifts (layers): For deep voids, place material in small layers, consolidating each with a trowel or vibrator. Ensure contact: Press the material firmly against the substrate for strong bonding.
Trowel-applied vs cast-in-place repairs and curing
Hand-applied trowel techniques are great for small, shallow patches. Cast-in-place fills are ideal for larger, deeper voids.
Trowel application: Apply mortar or epoxy with a trowel, working it into the surface to ensure good contact. Curing: Protect from rapid drying and allow proper curing time.
Cast-in-place: Place forms, fill with fresh concrete/mortar, consolidate, and finish. Curing: Keep moist and cool for the required period to prevent premature drying.
Ensuring Long-Term Adhesion and Preventing Re-Cracking
Focus on proper curing and joint detailing to maintain bond durability. Implement shrinkage control measures and use reinforcement where the design calls for it. Consider vibration isolation or procedural controls during future nearby jackhammering.
Document any changes and follow recommended maintenance to reduce future cracking. Plan for inspection after significant nearby work to catch issues early.
Proper Curing Practices and Protection
Curing is crucial to ensure your patch lasts. Here’s how:
Moist Cure: Keep the area damp for 7 days, using plastic sheets or sprinklers.
Curing Compounds: Apply these as directed. They protect from UV and wind.
Follow product-specific cure times. Don’t rush it.
Reinforcement, Dowels, and Crack Stitching Options
Sometimes you need extra strength:
Mechanical Reinforcement: Use steel bars or fibers for heavy-duty repairs.
Dowels: Align and connect concrete sections with these metal rods. Engineer’s advice needed.
Stitch Anchors: Prevent cracking by tying rebar together. Again, consult an engineer first.
Preventive Measures During Future Jackhammer Work
Avoid new damage with these steps:
Temporary Isolation Pads: Place rubber or foam pads under equipment to reduce vibration.
Sequencing Work: Plan jackhammering away from recent repairs. Give concrete time to set.
Communicate with Subcontractors: Make sure they know where you’ve patched. Keep the area clear if possible.
Testing, Monitoring, and Troubleshooting Post-Repair
Verify repair success through visual inspection and simple adhesion checks as allowed by the product guidance. Set up a monitoring schedule to track any movement or new cracking. Note findings clearly in your records.
Learn common failure indicators and take corrective actions when they appear. If problems recur, re-engage professionals and consult the original rehabilitation plan or manufacturer guidance for next steps.
Visual and simple functional tests to confirm adhesion
The first step in confirming your repair’s success is a thorough visual inspection. Look for any signs of delamination, cracks, or discoloration.
Next, perform some quick functional tests:
- Sounding test: Tap the repaired area with a hammer and listen for a solid sound. A hollow sound might indicate delamination.
- Edge pull test: Try to pull at the edges of the repair with pliers or your fingers. Any movement could signal poor adhesion.
Also, check for shrinkage cracks that may appear during curing. If found, they should be minor and not indicative of major issues.
When repairs fail — common causes and fixes
Even with careful preparation, repairs can sometimes fail. Here are some common reasons:
- Poor surface preparation: Inadequate cleaning or removal of laitance can lead to weak adhesion.
- Incompatible materials: Using the wrong type of mortar or not matching thermal and mechanical properties can cause repairs to fail.
- Insufficient curing: Not providing enough moisture during the cure period can weaken the repair.
If you notice any signs of failure, remove the failed repair and re-prepare the surface. Then, re-apply a suitable repair material following our earlier guidelines. In some cases, applying reinforcement like crack stitching or dowels may be necessary.
Long-term monitoring and maintenance checklist
Start using this checklist after the initial cure period (usually 28 days) to ensure your repair’s longevity.
- Visual inspection: Check for cracks, delamination, or signs of distress every 6 months. Skipping this could lead to undetected issues worsening over time.
- Moisture content: Ensure the repair remains protected from excessive moisture exposure. Prolonged wetting can weaken concrete.
- Temperature changes: Monitor how your repair handles temperature fluctuations. Thermal shock can cause cracking.
- Traffic and load: Inspect areas subject to heavy traffic or loads regularly. Excessive loading can lead to failure.
- Document findings: Keep records of your inspections, noting any changes or issues found.
- Re-evaluate: If you notice persistent or worsening issues, re-evaluate the repair’s design and materials used.
- Professional testing: Commission professional testing if recurrent issues arise or after significant events like major temperature drops or heavy loading.
Quick rule: Regular monitoring is key to catching potential issues early, preventing costly re-repairs down the line.
Conclusion
Safety first and durability second—take the time to finish the repair right so the surface remains sound and looks like it belongs there.
First, assess whether the damage is cosmetic or structural, then clean and roughen the area, dry it completely, mix and apply the patch material as directed, build up in thin layers, cure where specified, and test adhesion before putting any load on the repair.
Common mistakes to avoid include choosing the wrong patch material for the site, skipping proper surface prep, or rushing the cure and re-cracking the moment the area is stressed. Always follow basic safety rules: wear eye and ear protection, ventilate if indoors, and never mix or apply products in enclosed, dusty, or damp conditions. If you see wide cracks, exposed rebar, or ongoing movement, stop and reassess before proceeding.
If structural damage is suspected or you’re uncertain about safety, call a professional rather than pushing ahead. Otherwise, proceed methodically, test as you go, and after the patch, monitor the area for changes. Stay practical, stay cautious, and you’ll keep the repair solid and trouble-free.
FAQ
Can microcracks from nearby jackhammering be repaired the same day?
Yes, you can start repairs after you’ve cleaned and prepped the area. But follow the patch product label for cure times and use. If you’re unsure, wait for the manufacturer instructions or local guidance before moving to the next step.
What should I check before choosing a patch material for microcracks?
Read the product label for compatibility with concrete and the crack size. If you’re unsure, consult the manufacturer instructions or ask at the store. Use a product that matches your repair needs and local conditions.
How do I ensure the patch will stick to the surface after jackhammering?
Make sure the area is clean, dry, and roughened to give the adhesive something to bite into. Follow the patch material’s surface prep requirements exactly. If the instructions aren’t clear, ask for guidance from the product or local supplier and check any local rules.
What signs tell me the repair is not sticking or curing correctly?
Look for dull, powdery surfaces or crumbling edges after initial set. If you see gaps, peeling, or staining, stop and re-clean the area and re-prep per the product instructions. Confirm cure times and conditions with the product label or manufacturer guidance before testing the repair.