
Introduction
Repainting old stucco means preparing the surface, then applying primer and coatings that resist peeling. It’s a hands-on process you can do in stages, not a one-shot job. Focus on cleanliness, a good seal, and choosing products labeled for stucco and exterior use.
Start with a thorough cleaning, fix obvious cracks, and verify the wall isn’t damp behind the scenes. Use a compatible primer before any topcoat, and pick coatings that are rated for exterior masonry and stucco. Always check product labels and local rules to confirm suitability and application limits.
Key takeaways
- Inspect substrate for moisture signs before any cleaning or priming work.
- Clean surface with appropriate cleaners to remove dirt, efflorescence, and growth safely.
- Patch cracks and hollows with compatible stucco materials following manufacturer guidance.
- Choose primers that promote adhesion and block stains without peeling risks.
- Select coatings designed for stucco systems and environmental exposure conditions.
- Maintain proper environmental controls during application to prevent rapid drying.
Table of Contents
- Introduction
- Key takeaways
- When to Repaint: Signs, Timing, and Scope
- Diagnosing Substrate and Moisture Problems
- Cleaning: Removing Dirt, Efflorescence, and Biological Growth
- Repairing Stucco: Cracks, Hollows, and Patching Techniques
- Priming: Adhesion, Stain Blocking, and Compatibility
- Coatings That Don’t Peel: Paint Types and System Selection
- Application Best Practices and Environmental Controls
- Tools and Materials Checklist; Visual Checkpoints and Maintenance
- Conclusion
- FAQ
When to Repaint: Signs, Timing, and Scope
Start by assessing visible failure modes on the stucco surface. Look for peeling, cracking, or chalky residue that keeps paint from sticking. Also note overall condition, such as faded color or uneven sheen, which can inform whether repairs should come first.
Decide if you need to repaint now or after fixes by considering moisture, structural movement, and prior coating life. If you see recurrent failures after repairs, plan for a fresh system once the substrate is dry and stable. Always verify any required local rules or manufacturer instructions when timing your project.
Visual failure signs to watch for
Stucco’s a tough cookie, but it ain’t invincible. Keep an eye out for these telltale signs that it’s time to break out the paint:
Flaking: If chunks of your stucco are falling off like dandruff, you’ve got a problem. It’s time to repaint and maybe even do some repairs.
Chalking: When you touch your wall and it leaves white marks on your hands, that’s chalking. Your paint’s breaking down and needs replacing.
Discoloration and patchy areas are also red flags. If your once-uniform stucco looks like a teenager with acne, it’s time for a makeover.
Assessing extent and prioritizing work
Before you grab your paintbrushes, take a step back and survey the damage. You don’t want to tackle this project piecemeal if it’s a full-system issue.
Grab a ladder (be careful now) and walk around your home. Look for areas that need immediate attention – these are your priority zones. They might have extensive flaking, cracks, or other serious damage.
Next, group the rest of the work into categories based on urgency. Spot repairs can wait if you’ve got major issues elsewhere. But remember, even small problems can grow if left untreated.
If more than 20% of your stucco needs repainting or repair, it’s likely a full-system job. Don’t try to tackle that all at once – plan out phases and prioritize based on what you’ve found in your assessment.
Diagnosing Substrate and Moisture Problems
Identify the underlying cause of paint failure by inspecting for moisture intrusion. Look for damp areas, staining, or black or green growth that hints at moisture issues. Check for efflorescence or mineral deposits on the surface as a sign the substrate is drawing moisture.
Use simple diagnostic checks such as a moisture meter or probing for softness near cracks. Emphasize moisture as the primary culprit and verify results against product labels or local code guidance before proceeding. If in doubt, consult manufacturer instructions or local building standards.
Moisture Detection Approaches and Red Flags
Before you start painting, check for moisture. It’s the number one cause of paint failure.
Non-invasive checks: Tap on the stucco. A hollow sound might indicate trapped moisture or rising damp. Check corners too – they’re often prone to moisture issues.
Look for signs like peeling paint, discoloration, or efflorescence (white powdery deposits). These are red flags.
If you suspect serious moisture problems, consider hiring a professional for specialized testing. They can use tools like moisture meters and infrared cameras.
Identifying Substrate Type and Previous Coatings
Knowing what’s under your paint helps you choose the right new coating. Here’s how to identify base materials and old coats.
Stucco is usually made of cement, sand, and water. It might have aggregate (like gravel) for texture. Feel it – rough means aggregate, smooth means no aggregate.
Previous coatings could be latex, oil-based, or elastomeric paint. Check labels if you’ve got any leftover. If not, look at the sheen: high gloss = oil-based, low sheen = latex.
Incompatible paints: Some old coats can’t bond with new ones. Elastomeric paints, for instance, need a specific primer to stick properly.
Structural Issues and Delamination Indicators
Check your stucco for structural problems. These can cause paint to peel or crack.
Hollows: Tap on the surface. A hollow sound might mean there’s a void behind, which could be due to poor construction or water damage.
Racked or delaminated areas: Look for cracks that run vertically or horizontally. These can indicate that the paint is separating from the substrate.
Cosmetic vs. system failure cracks: Small, hairline cracks are usually cosmetic and don’t affect adhesion. Wide, deep cracks might indicate a failing system – consult a professional if you see these.
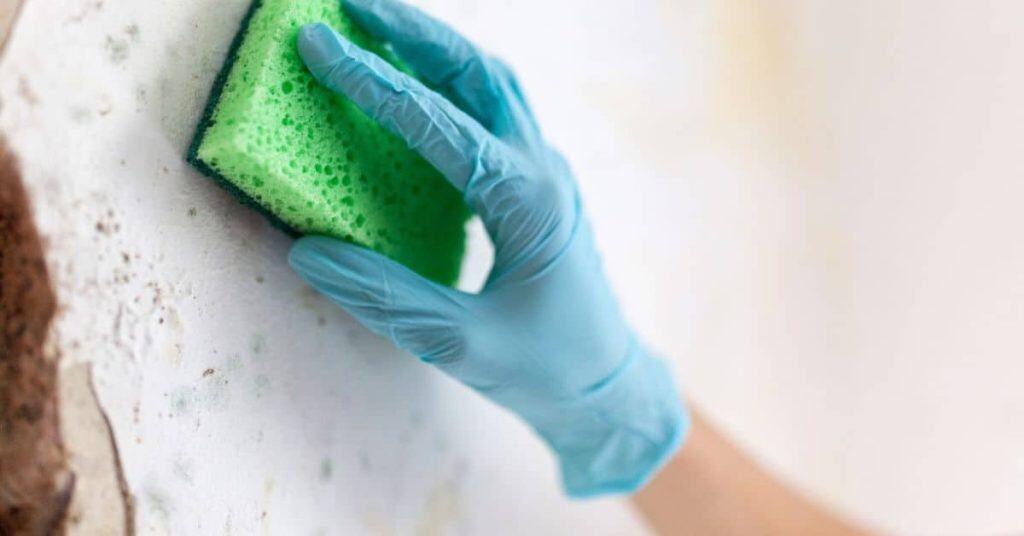
Cleaning: Removing Dirt, Efflorescence, and Biological Growth
Begin with dry brushing or low-pressure techniques to remove loose dirt and surface grime. For stubborn grime, consider mild cleaning solutions and mechanical agitation on a small area first. Rinse thoroughly to prevent residue from interfering with adhesion.
Address efflorescence and biological growth with cleaners recommended for stucco and compatible with your coating system. Always check product labels or datasheets for dilution ratios and contact times, and test a hidden spot before full application. If you’re unsure, follow manufacturer instructions and local rules for safe use.
Low-pressure washing and detergents
Start by wetting the stucco surface to prevent detergent from drying out. Use a pressure washer with a nozzle that delivers water at around 1200-1500 PSI, no more than 30 degrees angle.
Apply a masonry detergent like TSP (trisodium phosphate) or a commercial product designed for stucco. Let it sit for 10-15 minutes to break down dirt and grime. Then, gently scrub with a soft-bristle brush or broom.
Never use a pressure washer at high pressure (above 3000 PSI) as it can damage the stucco surface.
Chemical cleaning for efflorescence and mildew
For tougher contaminants like efflorescence (white powdery deposits) or mildew, use a chemical cleaner. Choose one with active ingredients like muriatic acid, oxalic acid, or sodium hexametaphosphate.
Always wear protective gear – gloves, goggles, and long sleeves. Apply the cleaner according to the manufacturer’s instructions, usually by spraying or brushing it on.
After use, rinse thoroughly with clean water to neutralize any remaining chemicals and prevent damage to the paint.
Visual checkpoints after cleaning
Before you prime and paint, ensure your stucco surface is clean. Use this checklist:
- Dirt-free: No visible dirt or grime.
- Efflorescence gone: White powdery deposits should be absent.
- Mold/mildew removed: No dark spots or patches indicating biological growth.
- Surface dry: The surface should feel dry to the touch.
- No loose material: Tap the surface; it shouldn’t sound hollow or crumble.
- Even texture: No obvious dips, cracks, or raised areas.
- No water stains: These could indicate underlying moisture issues.
- No chalking: Previous paint layers should not be flaking off.
Quick rule: If anything fails these checks, re-clean or address the issue before proceeding.
Repairing Stucco: Cracks, Hollows, and Patching Techniques
Repair cracks and holes with patching material that matches the substrate and your topcoat. Apply repairs in thin, workable passes to avoid sagging on vertical surfaces. Back up larger repairs with a suitable bonding agent and allow adequate curing per product guidance.
Prepare worn or hollow areas by removing loose material and creating sound edges. Feather the patch to blend with the surrounding surface and choose patch material compatible with your paint system. Always verify patching material compatibility with primers and topcoats via labels or manufacturer instructions.
Hairline cracks vs wider cracks: repair choices
Small hairline cracks (less than 1/8 inch) are common and usually don’t require extensive repairs. Use a good quality, flexible acrylic caulk or elastomeric sealant for these.
Preparation: Clean the crack with a wire brush, then dampen it to improve adhesion.
For wider cracks (1/8 inch to 1/2 inch), use a two-part epoxy patching compound. Apply it with a putty knife, forcing it into the crack.
Preparation: Clean and dampen as before. For deep cracks, insert backer rod first to support the patch.
Replacing delaminated patches and bonding back hollows
If stucco is delaminating, remove the loose material with a chisel or grinder. Expose solid substrate.
Keying: Use a wire brush to roughen the surface for better adhesion of new patch. Apply bond breaker (like plastic sheeting) if needed.
For hollows, use a two-part foam patching compound. Apply it thick, then smooth with a trowel or putty knife.
Bonding: Ensure the patch is well-bonded to existing stucco by pressing firmly and using compatible materials.
When to hire a stucco specialist
If you see widespread cracking, large areas of delamination, or signs of structural movement (like diagonal cracks), it’s time to call in the pros.
These issues could indicate underlying problems like foundation settlement, moisture intrusion, or improper installation. A specialist can diagnose and address these root causes.
Safety first: If you suspect asbestos in your stucco (common in homes built before 1980), do not disturb it. Hire a professional immediately for testing and removal.

Priming: Adhesion, Stain Blocking, and Compatibility
Choose a primer designed for exterior stucco that promotes adhesion to the substrate. Look for stamps or labels that mention alkali resistance and stain blocking if you’re covering mineral-based finishes. Use a primer that is compatible with your chosen topcoat to prevent peeling later.
Check compatibility with existing coatings and confirm drying times and recoat windows per the manufacturer’s data. If you’re unsure, compare multiple product datasheets and follow the instructions exactly, or ask for guidance from the store or manufacturer. Verify any required surface tests before full priming.
Choosing a primer for substrate and prior coatings
A good primer starts with the right match to your stucco’s condition and existing finish. Here’s how:
Stucco Type: Match your primer to your stucco type – traditional, acrylic, or synthetic.
Existing Finish: If you’re unsure about the old paint, test it with a strip of sandpaper and methyl ethyl ketone (MEK). If it comes off easily, use an oil-based primer. If not, use latex.
Manufacturer Compatibility: Always check manufacturer notes for compatibility between your chosen primer and topcoat.
Specialty primers and additives
Some jobs need extra help. Here are specialty primers to consider:
Difficult Surfaces: For poor adhesion or porous surfaces, use a primer with high solids content like an acrylic primer.
Tannins or Efflorescence: To block tannin stains from cedar or redwood, use a stain-blocking primer. For efflorescence, use a primer designed to seal and prevent its return.
Mold Inhibition: In areas with high moisture, consider a mold-inhibiting primer to protect against future growth.
Simple adhesion testing before full application
Before priming your entire surface, do a small test. Here’s how:
1. Apply primer to a small, hidden area (about 2′ x 2′).
2. Let it dry according to the manufacturer’s instructions.
3. Lightly scratch the primed area with a nail or utility knife.
If the primer comes off easily, you need better adhesion. If it sticks well, proceed with your full application.
Coatings That Don’t Peel: Paint Types and System Selection
Review coating families suitable for stucco, focusing on breathable systems that handle moisture appropriately. Weigh the pros and cons of elastomeric, acrylic, and hybrid coatings, keeping in mind texture and climate considerations. Choose a system that matches the substrate’s movement and the local environment.
Emphasize system integrity by selecting compatible primers, topcoats, and any reinforcing products if needed. Remember that system selection is key to preventing peeling, and always confirm with product labels or manufacturer instructions before purchase. If available, consult local guidelines for approved exterior coatings.
Acrylic, Elastomeric, and Masonry Coatings Compared
When choosing a coating for your stucco, you’ve got options. Let’s break down three common types:
Acrylic: These are water-based, flexible, and durable. They’re great for exterior use and can handle temperature changes well.
Elastomeric: Thicker than acrylics, elastomerics stretch more, making them good for hiding minor cracks. But they might not be as breathable.
Masonry Coatings: These are designed specifically for masonry surfaces like stucco. They often have better adhesion and can handle efflorescence better than others.
Breathability and Moisture-Vapor Considerations
Stucco walls need to breathe. Trapped moisture can cause peeling and other issues.
Vapor-permeable coatings let moisture escape. Impermeable ones trap it, leading to failure over time.
For damp-prone areas, consider vapor-permeable paints or use a base coat that allows for breathability.
Pro Tip: Check the manufacturer’s ‘perms’ rating – lower numbers mean better breathability.
Following Manufacturer System Specs and Film-Building Guidance
Each paint has its own rules. Follow them for best results:
1. Number of Coats: Too few, you won’t get good coverage or protection. Too many, you’ll waste product and risk peeling.
2. Film Build: This is how thick the paint goes on. Too thin, it won’t protect well. Too thick, it can crack or peel.
3. Compatibility: Some paints don’t play nice with others. Check if your primer and topcoat are compatible.
Application Best Practices and Environmental Controls
Plan application timing to fit dry, mild weather conditions and avoid extreme heat or cold. Use the correct tools for textured stucco and apply coats evenly, watching for lap marks or thinning on high spots. Maintain consistent technique across surfaces to prevent streaking.
Control the environment by limiting wind and direct sun exposure during application and curing. Follow label guidance for recoat intervals and drying times, and document any deviations if conditions change. If you’re unsure about spray setup or layering, refer to manufacturer instructions or product data sheets for safe use.
Techniques for textured surfaces
Stucco’s texture can make painting a challenge. Here are some tips:
First, fill those nooks and crannies with primer or paint. Use a small brush to get into tight spots.
For uniform coverage, use a roller with 1/2″ or 3/4″ nap cover. This helps reach into the texture without leaving runs or holidays.
Pro tip: Lightly mist your surface before rolling. This helps paint flow evenly and reduces streaking.
Overlap, edge work, and curing management
Managing lap seams is key to a smooth finish. Overlap each stroke by about half the roller’s width.
For edges, use a brush to ‘cut in’ before rolling. This ensures a neat line and prevents paint from drying unevenly at the edge.
Follow manufacturer’s curing guidance. Most paints need 2-4 hours of dry time between coats. Don’t rush it; let the paint do its job.
Environmental and seasonal considerations
The ideal temperature for painting stucco is between 50-85°F (10-29°C). Too cold, and paint won’t adhere properly. Too hot, and it dries too fast.
Humidity’s a killer too. Aim for less than 80% relative humidity. If it’s higher, consider using a dehumidifier or wait for better conditions.
Note: Don’t paint in direct sunlight. It can cause uneven drying and blistering.
Tools and Materials Checklist; Visual Checkpoints and Maintenance
Assemble a DIY-friendly toolkit with brushes, rollers, scrapers, a spray tip kit if using sprayers, and PPE such as gloves and eye protection. Include cleaning supplies, masking materials, and compatible cleaners for your chosen system. Keep extra patching material and primer on hand for touch-ups.
Use visual checkpoints at each stage: substrate cleanliness, patch integrity, priming coverage, and uniform topcoat appearance. Establish a simple maintenance plan to inspect the coating after seasonal cycles and address issues early. If you’re unsure about any item, verify requirements on product labels or with the manufacturer’s guidance.
Tools, PPE, and material specs to have on hand
Before you start, make sure you’ve gathered all the necessary tools and materials. This checklist will help you stay organized and safe.
- Safety glasses: Protect your eyes from debris and splashes.
- Gloves: Choose rubber or latex gloves for handling chemicals. Always check material labels first.
- Drop cloths: Cover the ground to protect it from paint spills.
- Scrub brushes: For cleaning stucco surfaces. Medium-stiff bristles work best.
- Pressure washer (optional): For heavy-duty cleaning. Always follow manufacturer guidelines for pressure and nozzle size.
- Tape measure: To ensure even coverage and proper overlap.
- Paint brushes and rollers: Choose the right size and type for your surface. Synthetic bristles work well with latex paints.
- Primer and paint: Always check compatibility with your substrate and prior coatings. Follow manufacturer guidelines for mixing and application.
- Safety data sheets (SDS): Keep these on hand to understand handling, storage, and disposal procedures for all materials used.
Quick rule: Always double-check material labels and SDS before starting any project. Safety first!
Visual checkpoints during prep, priming, and finishing
Throughout the repainting process, use these visual checkpoints to ensure a successful outcome.
- Prep: Inspect surface for dirt, mold, or mildew. Use a scrub brush with cleaning solution if necessary.
- After pressure washing (if applicable): Ensure surface is clean and dry before priming.
- Priming: Check for even coverage and no missed spots. Primer should look uniform and matte.
- After sanding (if needed): Wipe away dust with a damp cloth. Surface should be smooth to the touch.
- Painting: Inspect for drips, runs, or missed spots. Paint should have even coverage and gloss.
- Drying time: Check manufacturer guidelines for proper drying time before recoating or touching up.
- Final inspection: Ensure there are no defects, peeling, or bubbling. Surface should look smooth and uniform.
Quick rule: Regular visual inspections help catch problems early, saving you time and money in the long run.
Post-project maintenance and troubleshooting common failures
Regular maintenance will keep your newly painted stucco looking great for years to come. Here’s how to inspect, repair, and prevent common issues.
- Annual inspection: Check for peeling, cracking, or fading. Address any issues promptly.
- Cleaning: Use a mild detergent and soft brush to remove dirt and grime. Avoid pressure washing, which can damage the surface.
- Touch-ups: Repair small chips or scratches with touch-up paint as needed.
- Peeling paint: If peeling occurs, re-inspect your substrate for moisture issues or poor adhesion. Repaint only after addressing the root cause.
- Mold or mildew: If you notice black spots, use a mold removal solution and scrub gently. Reapply paint if necessary.
Quick rule: Regular maintenance is key to preventing major problems down the line. Don’t let small issues turn into big ones!
Conclusion
Clean, prime, and seal with the right system, and your stucco job will resist peeling for years. Safety, proper diagnosis, and steady workmanship are what stop costly mistakes before they start.
Start by confirming moisture and substrate conditions, test a small patch, fix cracks and hollow areas, scrub away dirt and growth, then pick a primer that offers adhesion and stain blocking, choose a coating system that matches the substrate, apply under the right environmental conditions, and finish with a visual check and planned maintenance plan.
Avoid common missteps: skipping moisture testing or assuming all coatings work the same, using the wrong primer or system for the surface, and painting in rain, high humidity, or extreme heat. Follow the safety rules: wear eye and skin protection, work in good ventilation, and never treat a damp wall as dry. Test patches first, and don’t rush through repairs or coating applications.
If you find major damage, persistent moisture, or hollow stucco, call a professional rather than pushing forward. With careful steps and smart choices, you’ll have a durable finish that looks right and stays intact for years to come.
FAQ
Will old stucco coating likely adhere to new paint, and how can I tell?
Adhesion depends on the existing coating and the surface condition. Inspect for flaking or peeling paint; if large areas lift with a scraper, expect poor adhesion. Check the manufacturer’s label or instructions for compatible primers and coatings.
How should I test moisture before repainting stucco?
Look for staining, efflorescence, and bubbling paint as signs of moisture. If you suspect moisture, pause repainting and investigate the source. Check product labels or local rules for moisture testing methods and preventive steps.
What should I do if the paint starts peeling after coating?
Stop and reassess the substrate and coating system. Remove loose material, clean the area, and fix underlying issues before re-coating. Follow the primer and coating instructions closely and use compatible products.
How do I choose a coating system that won’t peel on stucco?
Match the coating to the substrate and primer you’re using. Read the product instructions for compatibility and surface prep steps. If in doubt, check the label, datasheet, or ask the manufacturer what works best on aged stucco.