
Introduction
Rebar lap splice failures occur when the overlap between reinforcing bars is insufficient to transfer load through the concrete. In DIY projects, that weakness can show up as cracks, settlement, or unexpected movement at joints. Always check the minimum overlap guidance and follow the manufacturer’s or local rules for placement and tying.
To avoid these failures, plan the splices before you pour, keep bars clean and properly aligned, and ensure the splice sits inside the concrete cover. Make sure the bars are fully seated, tied securely, and protected from shifting during the pour and cure. If you are unsure about the requirements, review the bar instructions and local guidelines to determine safe overlap and anchorage options.
Key takeaways
- Rebar lap splices transfer shear and tension, ensure proper alignment and overlap.
- Inspect alignment and clean ends before splicing to prevent weak bonds.
- Common DIY failures stem from improper concrete cover, dirty joints, and poor support.
- Use prescribed lapping length, secure with stakes, and avoid movement during curing.
- Visual checkpoints: witness marks alignment, clean threads, and continuous concrete cover.
- If unsure, consult a structural pro early; do not DIY critical repairs alone.
- Organize tools and materials, label rebar sizes, and protect work area for safety.
Table of Contents
- Introduction
- Key takeaways
- What a Rebar Lap Splice Is and Why It Matters
- Common Causes of Lap Splice Failures in DIY Projects
- Real-World DIY Case Studies and Lessons Learned
- Visual Checkpoints and Inspection Checklist for Diyers
- Step-by-Step Best Practices to Prevent Lap Splice Failures
- Alternatives to Traditional Lap Splices and When to Use Them
- Tools, Materials Checklist and Jobsite Organization for Diyers
- Repair, Remediation, and When to Call a Professional
- Conclusion
- FAQ
What a Rebar Lap Splice Is and Why It Matters
A rebar lap splice is a method of overlapping two reinforcing bars so they can share the load across the joint. In plain terms, it helps transfer stress from one bar to another when the concrete around them carries weight. The connection should behave as a continuous element, supporting the structure as intended, which is why design professionals should be involved when plans are unclear or unusual conditions exist.
Understanding the function of a lap splice helps you recognize its structural role. When done properly, it relies on proper overlap, alignment, and bonding through the surrounding concrete. If you have doubts about the design or how a splice fits into a larger system, consult a professional before proceeding.
Basic definition and function
A rebar lap splice occurs when two reinforcing bars are overlapped and connected to maintain continuity in a concrete structure. This is crucial for transferring tensile forces between the bars, ensuring the integrity of the reinforced concrete.
The overlapping bars work together to share the load, preventing individual bars from being overstressed. Proper alignment and adequate overlap length are essential for effective force transfer.
Consulting a design professional can help ensure your lap splices meet structural requirements and comply with local building codes.
Consequences of failure for common DIY structures
Inadequate or failed lap splices can lead to significant issues in common DIY concrete structures. Patios, steps, footings, and low retaining walls are particularly vulnerable.
Cracking is often the first sign of splice failure. It can start at the splice location and propagate throughout the structure, compromising its integrity. Settlement or deflection may also occur, leading to uneven surfaces and potential structural collapse.
Failed splices can also accelerate corrosion of the reinforcing bars, further weakening the structure. Regular inspections, especially in critical areas like footings and retaining walls, can help catch splice failures early.
If signs of failure are present, consult a structural engineer immediately to prevent further damage and potential hazards.
Common Causes of Lap Splice Failures in DIY Projects
Human error often shows up as misalignment, inadequate overlap, or poor tying that allows movement during concrete placement. Material issues can include using bars with inadequate surface condition or insufficient confinement by surrounding concrete. Environmental factors such as temperature and moisture exposure can also affect how the splice behaves over time.
Field reports typically reveal recurring patterns: rushed work, deviations from approved plans, and insufficient inspection of the joint before and during placement. Identifying these patterns helps you spot potential problems early and adjust your process accordingly.
Incorrect placement or insufficient overlap
Proper rebar lap splice placement is crucial for the strength of your concrete structure. Common mistakes include misaligned bars, gaps between laps, and angled laps.
Required overlap length varies by project and local building codes. Always check your plans or consult with an engineer to ensure you’re using the correct overlap length.
Quick check: Measure overlap length and ensure bars are aligned during installation. Pro check: Verify rebar alignment, gaps, and lap length against plans or engineer’s specifications. If overlap length is less than required, extend lap splice or consult with an engineer.
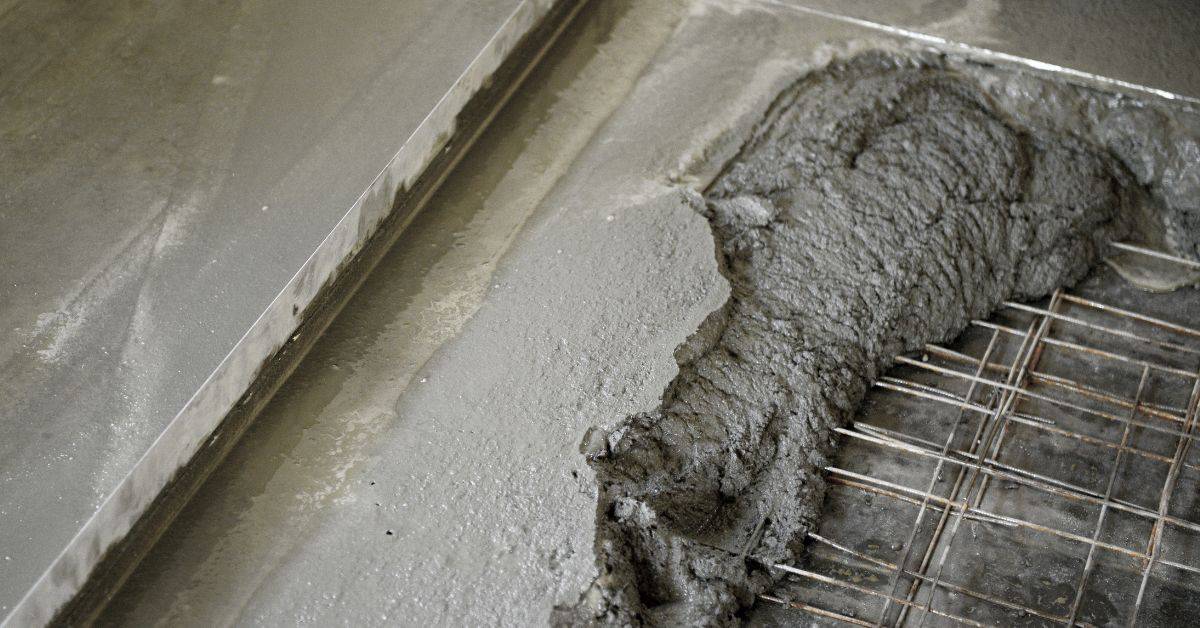
Concrete Cover and Contamination
Adequate concrete cover around rebar lap splices ensures corrosion resistance and longevity of your structure. Insufficient cover, along with debris or mud on bars, can hinder proper bonding and accelerate corrosion.
Check: Verify adequate concrete cover (typically 2-4 inches) around bars after pouring. Inspect bar surface for debris or contaminants before pouring concrete. If cover is less than required, add more concrete to achieve proper cover.
Handling, vibration, and construction sequencing errors
Improper handling, vibration, or incorrect pour sequencing can compromise the integrity of your rebar lap splices. Here are some mistakes to avoid:
- Insufficient compaction: Inadequate compaction can lead to weak concrete and poor bond with rebar.
- Knocking bars out of position: Vibrations during construction can displace rebars, compromising lap splices.
- Incorrect pour sequencing: Pouring concrete in the wrong sequence can cause stress on lap splices and lead to failure.
To prevent these issues, quick check rebar alignment after each phase of construction. Pro check monitor compaction process, ensure bars remain in position, and follow correct pour sequence as per plans or engineer’s specifications. If rebars are out of position or compaction is insufficient, realign bars and/or improve compaction.
Real-World DIY Case Studies and Lessons Learned
Anonymous examples from small-scale projects often center on inadequate overlap and poor placement during pour. The common lesson is to verify that the splice is aligned, continues through the intended length, and remains stable as concrete is placed. Corrective actions usually involve rechecking alignment and ensuring proper consolidation around the joint.
Another frequent scenario involves insufficient tying or movement of bars before concrete sets, which reduces the effective transfer of load. The actionable takeaway is to pause, reassess the splice setup, and adjust tying and positioning before proceeding with placement and curing.
Case study: small slab or patio failure
A common DIY mistake leading to concrete slab failures is improper rebar lap placement. In one case, a homeowner poured a patio with insufficient overlap between rebar laps, causing cracks to form over time.
The homeowner missed the importance of proper lap placement and adequate overlap, which allows concrete to distribute loads evenly across the entire structure. To prevent this:
Always verify that laps are placed correctly during construction, following manufacturer guidelines or consulting a professional if unsure.
Case study: footing or retaining element distress
A retaining wall built by a DIYer experienced movement and bulging after some time. Investigation revealed that lap splice issues in the footing contributed to this problem.
The homeowner failed to regularly inspect the structure during construction and after completion, missing signs of distress. To avoid this:
Perform regular inspections throughout the construction process and after completion. If movement is detected, engage a structural engineer immediately.
Key takeaways from the examples
The root causes of these failures often stemmed from insufficient knowledge about lap splice requirements and not following construction best practices. To avoid repeating these mistakes:
Educate yourself on lap splice requirements, follow construction best practices, and regularly inspect your work for signs of distress or movement.
If unsure about any aspect, always consult a professional to ensure the longevity and safety of your DIY projects.
Visual Checkpoints and Inspection Checklist for Diyers
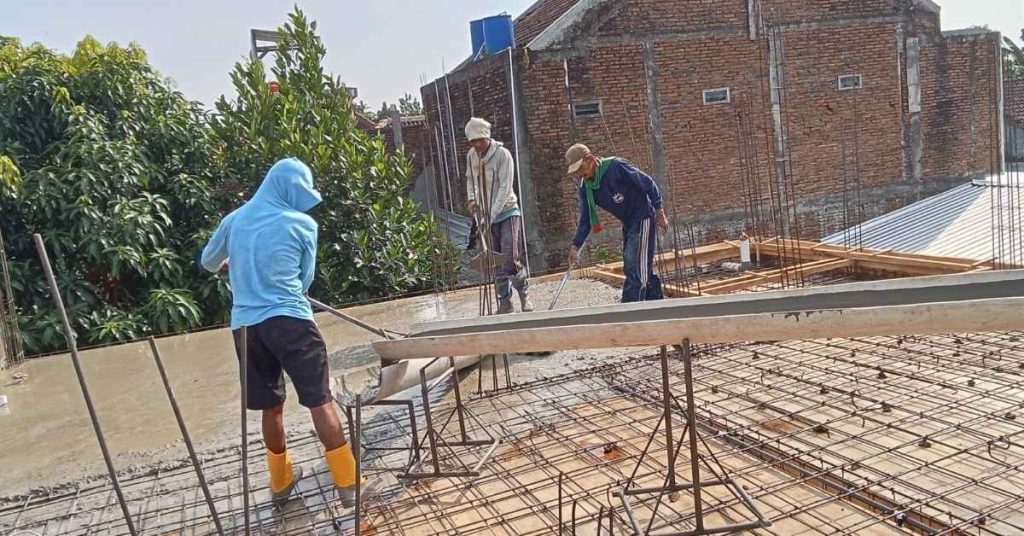
Establish a pre-pour visual sweep to confirm alignment, spacing, and overlap completion. Look for clear seating of bars, no gaps at the joint, and stable positioning before any concrete goes in. Note any visible movement potential and address it before placement begins.
During placement, observe concrete flow around the splice and ensure confinement is maintained. After curing, inspect for cracks or signs of movement at the joint and document any concerns. If uncertainties arise, seek a professional inspection to validate the setup.
Pre-pour visual and physical checks
Before pouring concrete, ensure your rebar lap splices are ready for a strong bond. Use this checklist to confirm critical items.
- Rebar position: Verify bars are correctly placed as per design. Check their alignment with stakes or markings.
- Ties and supports: Ensure all ties are secure and supports are in place, preventing bar movement during pouring.
- Cleanliness: Inspect rebar surfaces for contamination (rust, grease). Clean if necessary to promote bond.
- Lap splice alignment: Check laps align properly with adequate overlap as per design.
- Bar condition: Quick check for any bent, broken, or missing bars. Replace or repair as needed.
Quick rule: If rebars are misaligned or insufficiently overlapped, adjust and realign before proceeding.
Monitoring during pour and consolidation
During the concrete pour, keep an eye on these signs to ensure good bond and proper consolidation around lap splices.
- Bar movement: Check for any shifting bars. Pause pouring if necessary, realign, then resume carefully.
- Tie security: Ensure ties remain secure throughout the pour to prevent bar movement.
- Vibration and voids: Observe consistent vibration and no large voids or honeycombing during consolidation.
- Concrete cover: Verify consistent concrete cover around lap splices for proper protection.
Quick rule: If bars shift during pouring, pause, realign, and resume carefully. Use additional supports if necessary.
Post-cure signs of splice distress
After curing, inspect your concrete structure for any signs of lap splice distress to prevent further damage or failure.
- Misalignment or bulging: Check for any misaligned or bulging areas, indicating potential failure. Consult an engineer if found.
- Cracks: Inspect for cracks, especially at lap locations. Minor cracks can be monitored; severe cracks may require repair.
- Rust stains: Look for rust stains on the concrete surface, which could indicate rebar corrosion and potential failure.
Quick rule: If signs of distress are present, consult a qualified engineer for further evaluation. Monitor minor cracks closely; consider partial demolition and repair for severe cases.
Step-by-Step Best Practices to Prevent Lap Splice Failures
Start with a clear plan and verify that the splice details align with the project’s structural intent. Review plans, site conditions, and any code or engineer notes before beginning work. Keep a running check of alignment and overlap as you prepare materials.
Place and tie bars carefully, ensuring stable positions before concrete is placed. Manage concrete operations to minimize voids around the joint and verify that curing conditions support proper bond development. When in doubt, consult plans, codes, or an engineer for guidance.
Step-by-Step Process
This step-by-step sequence guides you through the best practices for preventing lap splice failures in your DIY concrete work.
- Review plans, codes, and consult with an engineer if needed. Ensure all details are clear and accurate.
- Gather necessary tools and materials before starting work. This includes rebar, ties, chairs, spacers, and any temporary bracing required.
- Prepare the site by clearing debris and ensuring proper drainage. Lay out the rebar according to your plans.
- Tie and support the rebar using reliable patterns and chairs/spacers. Ensure bars are properly aligned and spaced.
- Pour, consolidate, and cure the concrete gently, following product and code guidance. Monitor the pour and check for any signs of splice distress post-cure.
Planning and bar layout tips
Efficient planning minimizes laps and prevents unnecessary splice points. Begin by understanding your plans or simple layouts.
Check for any missing or unclear details. Verify plan accuracy and understand required lap lengths. If necessary, contact the architect or engineer for clarification.
Arrange bars to minimize unnecessary laps. Review and adjust layout as needed to optimize rebar usage and reduce potential splice points.
Proper tying, support, and temporary bracing
Reliable bar placement prevents movement during concrete pouring. Use appropriate tying patterns and chairs/spacers for support.
Check chairs/spacers for proper spacing and support. Verify tying patterns follow best practices or manufacturer’s guidelines. If unsure, consult with a professional or use standard industry practices.
Implement temporary bracing strategies to hold bars in place during construction. Adjust tying, support, or bracing as needed to prevent bar movement.
Pouring, consolidation, and curing best practices
Proper concrete placement preserves bond and cover at lap splices. Follow product and code guidance for gentle pouring techniques.
Ensure adequate water-to-cement ratio and proper aggregate grading. Review product datasheets for recommended pouring and consolidation methods. If guidance is unclear, consult with the manufacturer or a concrete expert.
Adequate curing attention helps preserve lap splice quality. Monitor the pour and check for any signs of splice distress post-cure to ensure a successful outcome.
Alternatives to Traditional Lap Splices and When to Use Them
Non-lap options such as mechanical couplers or welded splices offer different pathways for connecting bars. Each option has trade-offs in setup, cost, and required expertise. Evaluate these choices by matching them to the project requirements and available on-site resources.
Design changes can also influence how a joint behaves. Consider whether an alternative approach aligns with structural goals and local rules. When unsure, seek guidance from a professional to determine the most appropriate solution for your situation.
Mechanical Couplers: Selection Considerations
Mechanical couplers offer an alternative to lap splices in situations where space is limited or reinforcement layouts are complex. They provide a quick, easy connection method but require careful selection.
Ensure couplers match the size and type of rebar you’re using. Inspect them for any visible damage before installation. Always verify product documentation for load capacity and compatibility with your bar size.
Before using mechanical couplers, check structural drawings to ensure they integrate properly into your design. If lap splices are not feasible due to space constraints or complex reinforcement layouts, consider mechanical couplers as an alternative.
Welded or Epoxy Splices: Risks and Limitations
Welding or epoxy-bonding rebar splices has technical and safety limitations. These methods require specialist knowledge for proper execution.
Follow all safety precautions during welding, and check epoxy application instructions before use. For both methods, consult a certified welder or structural engineer to ensure safety and proper execution.
If welding or epoxy bonding is required, consult a specialist. Faulty welds must be removed and re-welded, while improperly cured epoxies should be removed and reapplied.
Design-Level Alternatives to Reduce Splicing
Straightforward design choices can minimize the need for splices, improving overall structure integrity. Consider continuous bars or larger element sizes to reduce splice points.
Review your design drawings to ensure chosen alternatives fit within the overall design and do not compromise structural integrity. For load-bearing elements, consult an engineer to ensure chosen alternatives are suitable.
If reducing splices is desired without compromising structure, consider continuous bars or larger elements for non-load bearing components. If chosen alternatives negatively impact the design, revert to original plans and consult an engineer.
Tools, Materials Checklist and Jobsite Organization for Diyers
Assemble a practical list of tools for positioning, tying, and inspecting the splice, plus basic measuring aids and safety gear. Prioritize tools that help maintain alignment and stability during setup and pour. Avoid relying on improvised solutions for critical joints.
Plan storage and workflow on site to keep bars and accessories organized and protected. Use clearly labeled materials and maintain clean work areas to reduce the chance of contamination or misplacement. Focus on features like corrosion resistance, compatibility with concrete, and proper handling practices.
Rebar Handling, Tying, and Support Supplies
Choosing the right materials for handling, tying, and supporting rebar is crucial to ensure proper lap splice integrity.
- Rebar ties: Used to secure rebar in place. Look for ties with a suitable rating for your project’s load requirements. Avoid using ties that are too small or weak as they can break under pressure, leading to rebar movement and potential cracking.
- Rebar chairs/spacers: Maintain proper concrete cover over rebar by using chairs designed for the required spacing. Incorrect spacing can result in weak bond strength and staining of the finished surface.
- Rebar supports: Provide temporary support to prevent rebar sagging or movement during pouring and consolidation. Use supports that are stable, durable, and suitable for your project’s load requirements.
- Wire brushes: Clean rebar ends before splicing to remove rust, dirt, or other contaminants that could compromise bond strength. A stiff-bristled wire brush is ideal for this task.
- Rebar caps: Protect rebar ends from damage during handling and storage. Caps also help maintain the cleanliness of rebar ends by preventing the accumulation of dirt and debris.
Cutting, Bending, and Inspection Tools
Proper preparation of rebar is essential for achieving strong lap splices. Use the right tools to cut, bend, and inspect rebar ends.
- Hacksaw or power hacksaw: Cut rebar to length using a hacksaw with a suitable blade or a power hacksaw. Ensure blades are in good condition to prevent damage to the rebar.
- Rebar bender: Bend rebar to shape using a manual or hydraulic rebar bender. Use the correct die size to prevent over-bending, which can weaken the rebar.
- Tape measure: Accurately measure and mark rebar for cutting to ensure proper lap lengths. A 25-foot tape measure is suitable for most DIY projects.
- Straight edge or square: Use a straight edge or square to ensure accurate cutting and bending of rebar. This helps maintain the integrity of the rebar and prevents misaligned splices.
- Magnet or flashlight (optional): Inspect rebar ends for defects, such as cracks or inclusions, using a magnet or flashlight. This can help identify potential issues before splicing.
Safety and Site Management
Prioritize safety and organization on the jobsite to protect workers, ensure consistent rebar placement, and maintain high-quality work.
- Hard hat: Protect against head injuries by wearing a hard hat that meets safety standards. Inspect it regularly for cracks or damage.
- Safety glasses: Shield eyes from debris and potential hazards using safety glasses with side shields. Ensure they are clean and undamaged.
- Work gloves: Protect hands from cuts, abrasions, and other injuries by wearing appropriate work gloves. Choose gloves that provide a good grip to handle rebar safely.
- Steel-toed boots: Wear boots with steel toes and soles to protect feet from falling objects and provide traction on uneven surfaces.
- Lifting techniques: Use proper lifting techniques when handling heavy rebar to prevent back injuries. Bend at the knees, keep the load close to your body, and avoid twisting while lifting.
- Rebar storage: Store rebar in a dry, flat area to prevent damage from moisture or uneven surfaces that could cause bending or warping.
- Jobsite cleanliness: Keep the jobsite clean by regularly removing debris and tripping hazards. This helps maintain consistency in rebar placement and prevents accidents.
- Rebar inspection: Inspect rebar before use for damage, such as bends, cracks, or corrosion. Discard any damaged rebar to ensure the integrity of your concrete structure.
Quick rule: Always prioritize safety and organization on the jobsite to protect workers and maintain high-quality work.
Repair, Remediation, and When to Call a Professional
If a splice is suspected of being defective, outline practical repair approaches that stay within safe limits and consider the potential impact on overall strength. Prioritize stabilizing the area and preventing further movement during any remediation work. Do not attempt extensive fixes without professional guidance when in doubt.
Look for clear indicators that a professional is needed, such as signs of significant movement, cracking that worsens after stabilization, or issues beyond typical DIY capability. Adhere to safety and permitting considerations, and arrange an inspection or contract with a licensed professional as required by local rules.
Temporary Measures and Immediate Precautions
If you discover a lap splice failure in your DIY concrete work, immediate action is crucial to ensure safety and prevent further damage. Start by securing the area to prevent injury or additional damage. This may involve temporarily supporting the affected structure or blocking off access.
Next, assess the extent of the damage and the risk of further failure. If the damage appears minor and stable, monitor it closely while planning your repair. However, if the damage is severe or the structure seems unstable, implement temporary support measures immediately and contact a professional engineer or licensed contractor without delay.
It’s important to note that these temporary measures are not substitutes for permanent repairs. They serve only to stabilize the situation until proper assessment and repair can be carried out. Do not attempt permanent repairs without first assessing the damage and gathering the necessary tools. Always prioritize safety and stability.
Permanent Repair Options and Decision Criteria
Once you’ve secured the area and assessed the damage, it’s time to consider permanent repair options. The right method depends on the extent of the damage and the specific circumstances of your project.
For minor damage, a replacement splice may suffice. This involves removing the damaged lap splice and replacing it with a new one, properly tied and supported according to best practices outlined earlier in this guide. However, if the damage is severe or complex, you may need to consider external reinforcement, underpinning, or other specialized methods.
Before proceeding with any permanent repair, consult structural drawings, if available, and evaluate access, material requirements, and equipment needed. For major repairs or complex issues, it’s highly recommended to consult a structural engineer. They can provide expert advice tailored to your specific situation, ensuring the longevity and integrity of your structure.
Matching Repairs to Permits, Costs, and Timelines
In addition to technical considerations, there are non-technical factors to consider when planning your repair. These include permit needs, scope of work, and scheduling.
First, estimate the material and labor costs for your repair. Check the availability of materials and professionals in your area. Next, research local permit requirements. Depending on the extent of the repair, you may need to apply for a permit before proceeding.
If the repair is minor and permit-exempt, you can proceed with your DIY repair. However, if it’s a major structural repair or requires a permit, obtain professional estimates, plan your timeline carefully, and apply for permits if necessary. This ensures compliance with local regulations, sticks to your budget, and keeps your project on schedule.
Conclusion
Solid rebar lap splices protect both safety and long-term durability. By applying careful inspection, proper placement, and deliberate concrete handling, you reduce the risk of hidden failures that can compromise the project’s appearance and performance.
To proceed, check that splice length and overlap follow the guidance you’ve identified, confirm clean and straight bars with proper support, ensure consistent concrete placement and proper consolidation around the splice, and verify that curing and protection steps are in place. Make notes about each step and test a small area if you’re unsure before continuing with the full work. Use the project’s safety plan as your baseline and document any deviations from the plan for future reference.
Common mistakes to avoid include skipping surface cleaning or deburring, allowing misalignment or crowding of bars, and rushing concrete placement or curing. Maintain clean work surfaces, use proper spacers and supports, and follow a steady sequence for tying, placing, and consolidating concrete. Always wear appropriate PPE, keep all personnel clear of formwork during concrete pour, and pause if you notice binding, excessive movement, or unusual noise from the rebar assembly.
If uncertainty remains about splice requirements, access to appropriate tools or the right type of alternative reinforcement, consider calling a professional sooner rather than later. When in doubt, prioritize safety, test a small section first, and proceed only when you have a clear, repeatable plan. With careful steps and disciplined checks, you can finish a reliable splice that stands up to load and time.
FAQ
How can I assess the condition of a rebar lap splice in an existing DIY project?
Look for signs of cracking, slippage, or rust where the bars overlap. Check the concrete around the splice for voids or honeycombing. Compare what you see with the manufacturer instructions and local guidance for your materials.
What indicators may suggest a lap splice is likely to fail during loading?
Inadequate overlap, poor alignment, or insufficient concrete cover are common red flags. Visible corrosion or exposed reinforcement near the splice can also compromise performance. If any of these are present, treat the area as high risk and consult guidance from the material supplier or a professional.
What should I verify before installing a new lap splice in a DIY project?
Check the rebar grade and type, the recommended overlap length from the manufacturer, and the appropriate concrete mix for your project. Confirm whether a splice sleeve or mechanical coupler is required in your case. Always follow product instructions and local rules for installation details.
How do curing, cover, and alignment affect splice reliability?
Proper concrete cover protects the splice from moisture and corrosion. Good alignment ensures the load transfers correctly between bars. Ensure the reinforcement is secured during placement and follow curing guidelines from the material supplier or local guidance.