
Introduction
Rebar cover in concrete for small pours means placing steel reinforcing bars with a protective concrete layer to prevent moisture and corrosion. Work safely by understanding basic rebar handling, clean space, and proper cutting and tying practices. Always check local rules and manufacturer instructions for any required clearances or protection.
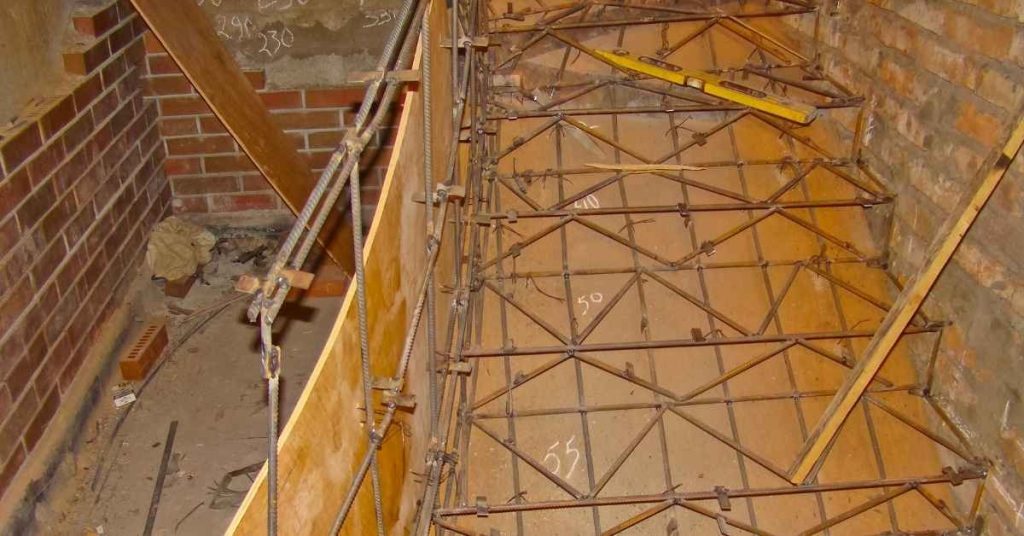
Chairs and spacers are used to keep rebar off the form and centered as you pour. Gather the right tools and a plan for layout, then cut and bend as needed, and tie the bars securely. Check labels and instructions on the materials you use to confirm seating height and spacing, and adjust if needed.
Key takeaways
- Verify rebar cover meets local code and pour size requirements.
- Use chairs and spacers to maintain centered rebar above formwork edges.
- Cut and bend rebar prior to placing; tie cleanly with approved method.
- Wear gloves and eye protection when handling rebar and chairs.
- Check chairs, spacers, and supports for secure seating before pour.
Table of Contents
- Introduction
- Key takeaways
- Why Rebar Cover Matters for Small Pours
- Rebar Types and Choosing the Right Steel
- Planning and Layout for Small Concrete Pours
- Tools and Materials Checklist
- Using Chairs, Spacers, and Supports Effectively
- Techniques to Keep Rebar Centered During the Pour
- Visual Checkpoints and Double-Checks Before Pouring
- Common Mistakes and Troubleshooting During Small Pours
- Conclusion
- FAQ
Why Rebar Cover Matters for Small Pours
In small pours, concrete cover does more than hide the steel. It protects against moisture, chlorides, and carbonation, while helping bond between concrete and rebar. It also supports fire resistance and long-term durability for compact sections.
Small pours increase the risk of voids and misalignment if cover gets compromised. Plan for stable chairs and spacers, and keep the rebar centered during placement and vibration. Verify cover requirements with the project specs and use cover blocks or gauges to confirm alignment before and after form removal.
Functions of concrete cover
Concrete cover serves multiple purposes. First, it protects the rebar from corrosion. Steel rusts when exposed to oxygen and moisture. Concrete provides a barrier, reducing this risk.
Proper cover also enhances bond strength between the steel and concrete. This improves structural performance by allowing forces to be transferred effectively.
Additionally, cover contributes to fire resistance. In case of a fire, it gives the concrete time to cool before the steel reaches its critical temperature.
Lastly, it supports long-term durability by reducing the likelihood of cracks reaching the steel, which could lead to further deterioration.
Code, specifications, and practical minimums
Always check your local building code for required concrete cover. This varies based on factors like exposure conditions, soil type, and water presence.
For instance, in areas with high chloride exposure, like coastal regions, codes may mandate more cover to protect against corrosion.
Engineer requirements should also be considered. They might specify additional cover for specific projects or loading conditions.
Practically, aim for a minimum of 20-25 mm (or as per code) at edges and 30-40 mm in the middle for small pours. This ensures reliable protection and bond strength in compact sections.
Rebar Types and Choosing the Right Steel
Know the common rebar grades and coatings and what they mean for longevity. Consider options like standard bars, welded wire fabric, epoxy coatings, or galvanized finishes based on exposure and environment. Match material choices to the specific small pour context you’re working in.
Practical selection hinges on bar size, yield strength, and whether continuous spacing is better served by individual bars or welded fabric. Plan for proper concrete cover and centerline alignment with chairs and spacers. Include notes on laps, tying, and how coatings affect handling during placement.
Comparing plain, epoxy-coated, galvanized, and stainless options
Rebar comes with different finishes to protect against corrosion. Here’s a quick rundown:
Plain: Cheapest option but offers no protection. Use indoors where moisture isn’t an issue.
Epoxy-coated: Good for moderate exposure. Offers decent protection, but not suitable for harsh environments or long-term outdoor use.
Galvanized: Best for weather-exposed areas. Zinc coating provides excellent protection, but can be damaged during handling and placement.
Stainless: Top-notch corrosion resistance, ideal for chemical exposure or long-term outdoor use. Most expensive option.
Size, grade, and when to consult an engineer
Rebar size (#3, #4, #5) affects how much weight it can hold. Larger sizes are stronger but harder to work with.
Grade: A615 Grade 40/60 is common for residential use. Higher grades (like A706) offer more strength but aren’t always necessary.
For load-critical elements, like footings or beams, consult an engineer. They’ll specify the right size and grade based on your project’s needs.
Welded wire fabric can be easier to place than individual bars, but it might not provide continuous spacing. Use it where even distribution isn’t crucial.
Planning and Layout for Small Concrete Pours
Start with the scope and constraints of the patch or small pour, then translate that into a precise rebar plan. Define maximum depths, lift heights, and irregular shapes so the layout remains repeatable. Keep the plan simple and clearly documented for each pour.
Map the rebar layout on the form and choose spacing patterns that maintain cover and minimize cold joints. Label positions, intersections, and anchorage details to avoid last‑minute guesswork. Include chair and spacer placement and how they support centering during early pours.
Rebar spacing principles and layout checks
Spacing rebar correctly is crucial for strength and crack control. Here’s how:
Grid pattern: For simple, flat surfaces, use a grid pattern. Common spacings are 6″ or 12″ on center (OC).
Staggered pattern: For thicker slabs or complex shapes, stagger rebar like bricks in a wall. This improves strength and reduces cracking.
Always check spacing against your plans and local codes. Incremental steps ensure consistency.
Strategies for tight areas and small slabs
Working in confined spaces? Here are some tips:
Pre-bending: Bend rebar off-site to fit tight areas. Use a rebar bender or hire a service.
Modular cages: Assemble rebar into small, manageable cages before placing. This works well for patch pours and narrow slabs.
Off-site assembly: For complex layouts, assemble rebar off-slab, then lift it into place using a crane or hoist. Safety first!
Tools and Materials Checklist
Clarify essential tools and materials for a small pour, plus PPE and safety practices. Use a compact set that covers cutting, bending, tying, and supporting rebar. Keep a quick reference on site for what to check before any pour.
Cutting tools should include reliable options and safety notes. For bending, have a basic rebar bender or lever and pliers handy. Tying, supporting, and centering require the right chairs, spacers, and alignment aids to speed setup and reduce mistakes.
Cutting, Bending, and Tying Tools
Before you start cutting, bending, and tying rebar, ensure you have the right tools for the job. This checklist helps you stay safe and efficient in small spaces.
- Safety glasses: Protect your eyes from debris and sparks.
- Work gloves: Prevent cuts and burns when handling hot rebar.
- Hacksaw or angle grinder with cut-off wheel: Cut rebar to length. Use jaw protection for hacksaws and avoid kickback with grinders.
- Portable battery cutter (optional): For quick, clean cuts in tight spaces.
- Manual rebar bender: Bend bars to shape. Maintain correct diameter and angle using the tool’s guides.
- Bending lever or locking pliers: For tight radii. Ensure bar maintains its diameter during bending.
- Wire ties (14-16 gauge): Secure bars at precise spacings. Use appropriate tying patterns to prevent slippage.
- Tie wire pliers: Easily cut and twist wire ties for a secure hold.
- Tape measure: Verify bar lengths and spacings match your layout drawings. Incorrect measurements lead to weak, misaligned concrete.
Quick rule: Always prioritize safety when using cutting, bending, and tying tools in small spaces.
Support Materials: Chairs, Spacers, and Accessories
Properly supporting rebar ensures even concrete distribution and strength. Use this checklist to select the right support materials.
- Plastic or metal chairs: Elevate bars above formwork. Choose durable, non-corrosive materials for long-term use.
- Concrete spacers (blocks): Maintain consistent bar spacing. Use appropriate sizes to match your rebar layout.
- Wire supports: Secure bars in place. Use wire ties or additional supports as needed to prevent movement during pouring.
- Centering aids (spacer combos): Keep bars centered within forms. Use adjustable combos for varied bar sizes and spacings.
- Rebar chairs spacing chart: Follow recommended spacings to maintain even concrete coverage and strength.
- Magnetic or marked spacers (optional): Speed up setup by quickly identifying correct spacings without measuring each time.
- Portable rebar cutter (optional): For on-site cutting of support materials to match formwork dimensions.
- Labeling/organizational gear (optional): Keep tools and materials organized, reducing setup time and mistakes.
Quick rule: Always check support materials for damage or wear before use to prevent rebar slippage or movement during pouring.

Using Chairs, Spacers, and Supports Effectively
Define the target cover height and ensure it aligns with project specs for corrosion and finishing. Verify that edge clearances and form interactions are accounted for in the plan. Use stable chairs and compatible spacers to keep bars at the correct level.
Plan layout and counting so you can pre‑place supports and maintain continuous vertical alignment. Position chairs on the forms before lowering rebar and keep bars from contacting the ground during transport to the pour site. Document any deviations for future pours.
Types of chairs and spacers and selection tips
Choosing the right supports for your rebar is crucial. Here’s what you need to know:
Chairs: These come in various materials like plastic, metal, or composite. Plastic is cheap but can degrade over time. Metal offers durability but may rust. Composite chairs last longer and are more expensive.
Spacers: These maintain rebar cover height. They’re usually made of plastic or foam. Choose ones that fit your rebar size snugly to prevent movement during pours.
Consider the load capacity, especially for larger rebar sizes (#4, #5). Ensure they can handle the weight of wet concrete without sagging or breaking. Also, check if they’re compatible with your expected pour temperature and mix consistency.
Placement patterns and load considerations
Proper placement of chairs and spacers keeps rebar centered and prevents movement:
For small pours, place chairs every 12-18 inches along the length of the bar. For larger sizes (#4, #5), go with 6-12 inch spacing to distribute load better.
At lap splices, use extra supports. Place chairs every 3-6 inches along the splice length. This helps prevent sagging and maintains alignment during pours.
Remember, chairs should be firmly seated on the form or slab to avoid tipping over when concrete is poured. Always keep rebar off the ground during transport to prevent contamination and damage.
Techniques to Keep Rebar Centered During the Pour
Small pours are prone to rebar displacement due to low head pressure, so preparation and stable supports matter. Emphasize pre‑placement alignment and post‑pour checks to catch shifting early. Use the right chair/spacer setup to maintain centerline.
Outlining centering methods helps prevent drift during the pour, including temporary bracing or overlays. Secure during multi‑stage pours and adjust vibration to avoid moving bars. After set, perform a quick check to confirm the cover height and centering remain intact.
Pre-pour securing: ties, supports, and temporary bracing
Before pouring, secure your rebar grid to prevent movement. Use ties at intersections to hold bars together.
Anchor chairs firmly to the formwork using nails or screws. This keeps them from shifting when you pour.
For extra stability, use temporary bracing. Run 2x4s or other sturdy boards diagonally between rebar and forms. Remove these after concrete sets but before stripping forms.
Pouring sequence and placement methods to minimize displacement
Start pouring at the lowest point of your formwork. This lets gravity help keep rebar in place.
Introduce concrete gently. Avoid rapid, high-pressure pouring that could dislodge bars. Use a hose or chute, not a dump truck.
Monitor placement visually. Watch for any signs of rebar movement. If you see drifting, pause the pour and adjust as needed.
Visual Checkpoints and Double-Checks Before Pouring
Perform quick visual and measurement checks to catch obvious issues before concrete goes in. Ensure chairs and spacers seat firmly with no vertical movement. Use a tape measure or caliper to verify close cover at several points.
Confirm centering and alignment across the section and check formwork thickness and embedded depth. Inspect chair stability and ensure no tools or spacers get trapped under the finished surface. Create a simple pre‑pour sign‑off for QA.
Measuring cover and verifying spacing
Before you pour, double-check that your rebar setup matches the plans. Here’s a quick checklist to ensure everything is in order.
- Check rebar cleanliness: Ensure no loose rust or debris; if so, clean it off.
- Verify chair/spacer seating: Make sure they’re properly seated with no vertical movement; if not, adjust them.
- Confirm clear cover: Use a tape measure or caliper at multiple points around each bar to ensure it matches plans; if not, adjust supports.
- Check spacing between bars: Ensure consistency; if not, realign them.
- Verify rebar centering: Check that it’s consistently centered in the cross-section to prevent toe-in or misalignment during pouring; if not, adjust supports.
- Confirm formwork thickness: Measure at multiple points to ensure it meets project specs; if not, adjust forms.
- Check embedded depth: Ensure it matches plans; if not, adjust supports.
- Measure cover near spacers: Check for any uneven pours; if found, adjust supports.
Quick rule: Always measure at multiple points to catch any inconsistencies before pouring.
Site mock-up and small test pours
When trying new mixes or support setups, it’s wise to do a site mock-up or small test pour first. Here’s how:
- Set up a test area: Choose a small, representative section of your site for the test.
- Use the same materials: Employ the exact mix and supports you’ll use in the main pour.
- Pour a small batch: Mix and pour a small amount of concrete into your test area.
- Observe support performance: Watch how chairs and spacers behave under pressure; if they shift or tilt, adjust design.
- Check concrete behavior: Observe how the mix sets and hardens; if it doesn’t meet expectations, adjust mix.
- Inspect results: Once set, check for any cracks or issues; if found, make necessary adjustments.
- Document findings: Record observations and changes made for future reference.
Quick rule: A small test pour can save you from big problems later on.
Common Mistakes and Troubleshooting During Small Pours
Pre‑pour checks should catch most early errors, like loose chairs, misalignment, or improper cover. Confirm formwork integrity and plan the pouring sequence with controlled vibration. Identify potential movement risks before concrete arrives.
Watch for shared problems such as misplaced rebar, insufficient edge cover, or overcrowding. If movement occurs, use careful repositioning and adjust vibration to avoid voids. After set, address any voids or defects with approved repair methods and document fixes for next time.
Typical placement errors and preventive measures
During small pours, certain mistakes can lead to weak concrete. Here are common issues and how to avoid them.
- Inadequate supports: Insufficient chairs or spacers cause rebar to sag or shift. Use enough supports, spaced evenly.
- Improper lap splices: Overlapping bars without proper ties lead to weak points. Use proper lap splice techniques and tie securely.
- Over-vibration: Excessive vibration causes rebar to float or shift. Vibrate just enough to remove air, then stop.
- Insufficient edge cover: Edges without proper cover can lead to cracking. Ensure edges have at least minimum required cover.
Regular checks and proper planning prevent these errors.
Remediation options when rebar shifts or cover is insufficient
If rebar shifts during a pour, stop vibrating immediately. Check for and address any loose forms.
Minor shifts: If rebar has shifted slightly, you can often reposition it by gently pushing or pulling while the concrete is still wet. Be careful not to destabilize the setup.
Major shifts or insufficient cover: If rebar has moved significantly or cover is insufficient, stop the pour immediately. Consult with a structural engineer before proceeding. They may recommend additional supports, adjusting the mix design, or even re-pouring the section.
After concrete has set, voids or honeycombing can be addressed using targeted grout or epoxy/urethane injections. Surface patching can fix small defects. However, if cover is insufficient after setting, re-establishing proper cover may require breaking out and re-pouring the section.
Conclusion
Keep it secure and clean: the purpose of proper rebar cover is safety, durability, and a smooth finish, so confirm your plan, verify the right steel and spacing, set chairs or spacers as planned, and double-check alignment before any pour.
Make this a real check: verify the rebar type and size you chose, confirm chairs or spacers are used and positioned to hold the bar at the correct height, ensure spacing and cover match your plan, line up the bars with your layout marks, and run a final visual and a quick test with a modest amount of concrete or a mock pour in a small area before the full pour.
Common mistakes to avoid are underestimating cover, loosening spacers during vibration, and letting rebar shift while you work; always secure supports first, keep hands off the bars during the pour, and never skip a final check after any adjustment or movement.
If the job is bigger than a simple patch, or if you encounter difficult access, poor access to the site, or questionable existing conditions, it makes sense to call a professional rather than push ahead alone; otherwise stay focused, work methodically, and finish with a solid, clean job that will hold up over time.
FAQ
What are the basic safety practices when working with rebar?
Wear gloves and eye protection. Keep the rebar ends capped or bent to avoid snagging or cuts. Move slowly and keep clear of the concrete pour path to avoid injury.
What tools and materials do I need to install rebar for a small pour?
You’ll need rebar cut combination shears, pliers or rebar ties, tie wire, rebar chairs or spacers, and a measuring tool. Have a chalk line or string for alignment, and basic PPE. Check labels and manufacturer instructions for any specific product requirements.
How do I install rebar step by step for a small pour?
Plan layout and mark the grid on the ground. Cut the rebar to required lengths and bend as needed. Place chairs to hold the bars at the correct height, then tie the bars together at intersections. Make sure the rebar is centered in the form and free of debris before you pour.
What final checks should I perform and what are common challenges during pouring?
Double-check spacing and alignment from multiple angles. Ensure chairs stay in place and rebar isn’t resting on the formwork. Watch for shifting bars during the pour and confirm there’s clear cover where required by the project and local rules.