

Introduction
Radon sealing at slab edges means using materials to block radon from entering through the concrete edges around a slab. Common DIY options include polyurethane sealants, tapes designed for concrete, and liquid membranes, each with its own installation quirks. Always check the product label and local rules to confirm suitability and proper use.
Polyurethane sealants work best where movement is expected and joints are accessible, but follow manufacturer instructions for curing and surface prep. Radon tapes can provide fast, broom-clean edges, but require clean, dry surfaces and compatible primers or backing as recommended. Liquid membranes spread as a continuous coating, yet may require multiple coats or primers, so understand the method and drying times before you start.
Key takeaways
- Choose polyurethane sealants labeled for slab edges and radon resistance.
- Tapes with radon-barrier claims should follow manufacturer installation guidelines precisely.
- Liquid membranes require clean edges, proper adhesion, and safe curing conditions.
- Prepare concrete surface with moisture-free, dust-free condition before sealing work, and wear safety gear.
- Durability depends on substrate integrity, temperature exposure, and seam detailing.
- Budget plans should compare material costs, labor time, and potential rework.
Table of Contents
- Introduction
- Key takeaways
- Quick Comparison: Performance, Use Cases, and Trade-Offs
- How Radon Enters at Slab Edges and Why Perimeter Sealing Matters
- Polyurethane Sealants: Properties, Pros, and Cons for Slab Edges
- Sealant Tapes: Types, Performance, and Application Scenarios
- Liquid-Applied Membranes: Formulations, Behavior, and Performance
- Application Methods and Step-by-Step Procedures for Each Material
- Durability, Environmental Factors, and Long-Term Performance
- Cost Comparison and Budget Planning for Radon Sealing Projects
- Conclusion
- FAQ
Quick Comparison: Performance, Use Cases, and Trade-Offs
This section pulls together how polyurethane sealants, tapes, and liquid membranes behave in real slab-edge jobs. You’ll see how adhesion, flexibility, and moisture control factor into your choice. Look for how cure time, durability, and temperature cycling influence long‑term performance.
We map typical install contexts from new slabs to retrofits, and from below grade to above grade. You’ll find the core use cases and limitations tied to porosity, voids, and substrate movement. The goal is a practical, side‑by‑side framework you can trust on site when you’re deciding what to apply.
Head-to-head summary table (what to compare)
The key metrics for comparing polyurethane sealants, tapes, and liquid membranes are:
Seal integrity: How well they prevent radon gas from passing through. This is crucial in radon sealing.
Flexibility, elongation, and adhesion: These properties ensure the seal remains intact despite concrete movement, temperature changes, or other stresses.
Ease of installation, compatibility with concrete, and expected service life are also important factors to consider when comparing these products.
Decision guide by project type
Choose your material based on the specific needs of your project:
New slab pours: Liquid membranes or polyurethane sealants are often best. They can be applied directly to the concrete surface before it cures, providing a seamless, robust seal.
Retrofit sealing: Tapes may be more suitable due to their ease of installation and ability to adhere to existing surfaces without prep work. However, they might not provide the same level of flexibility as other options.
Patching or detail work around penetrations: Here, tapes or liquid membranes can excel. They allow for precise application and can conform to irregular shapes.
Consider substrate condition, budget, access, and required permeability when making your decision.
How Radon Enters at Slab Edges and Why Perimeter Sealing Matters
Radon entry predominantly follows paths at slab-to-foundation interfaces such as cracks, joints, and penetrations. Soil gas pressure drives movement into enclosed spaces if those paths aren’t sealed. Perimeter sealing helps interrupt continuous pathways and supports vapor barrier strategies.
Different sealing approaches address edge joints in distinct ways. Pay attention to adhesion, flexibility, curing behavior, and long‑term durability as you compare polyurethane, tapes, and liquid membranes. This section highlights installation checkpoints and practical DIY versus pro decisions for integration with mitigation systems.
Common entry paths at slab edges and control points
Radon gas seeps into your home through tiny gaps and cracks around the perimeter of your concrete slab. Here are the common entry points:
Slab edge gaps: These occur where the slab meets the foundation wall. They’re often narrow but can extend deep into the soil.
Cold joints: These form when freshly poured concrete stops curing due to temperature drops. They create weak points that radon can exploit.
Construction joints: These are intentional gaps left between pours of concrete. They too can allow radon ingress if not properly sealed.
Utility penetrations: Plumbing, electrical, and HVAC lines passing through the slab provide direct pathways for soil gas to enter your home.
Role of continuous seals and integration with passive systems
Perimeter sealing is just one piece of the puzzle in a comprehensive radon control strategy. Here’s how it fits:
Vapor barriers: Sealing slab edges complements your vapor barrier, creating a continuous layer that prevents soil gas migration into living spaces.
Sub-slab depressurization: Perimeter sealing works hand-in-hand with sub-slab suction systems. By reducing entry points, it enhances the effectiveness of these active systems.
Foundation repairs: If cracks in your foundation are allowing radon ingress, sealing slab edges won’t solve the problem. You’ll need to address these issues separately and integrate them into your overall strategy.
Polyurethane Sealants: Properties, Pros, and Cons for Slab Edges
Polyurethane sealants used on slab edges vary from one‑component moisture‑curing to two‑component systems. Formulations influence how well they block radon vapor and tolerate movement. Expect that chemistry to inform performance in damp or variable conditions.
Adhesion to concrete and edge substrates depends on surface prep, primers, and porosity. The material’s elasticity and cure behavior shape crack‑bridging and seal durability through temperature and humidity changes. This section also covers practical application factors and common failure modes to watch for on site.
Material properties and compatibility with concrete and backfill
The right polyurethane sealant ensures a strong bond to your slab edge, accommodating movement without cracking or delaminating.
- Adhesion: Polyurethanes adhere well to clean, dry concrete. Moisture-curing types are best for green concrete (within 28 days of pouring).
- Elasticity: Look for elongation ratings above 300%. This allows the sealant to stretch and compress with slab movement.
- Shore hardness: A Shore A hardness of 40-60 is ideal. Too soft (low Shore) can result in excessive compression under backfill pressure, while too hard (high Shore) may crack under stress.
- Surface cleanliness: Remove all dust, dirt, and contaminants to ensure strong adhesion. A quick wipe with a damp cloth isn’t enough; use a degreaser if necessary.
- Substrate temperature: Apply sealants when the slab edge is between 40°F (4°C) and 90°F (32°C). Too cold or hot can affect cure time and bond strength.
Advantages and limitations for radon control
Polyurethane sealants excel at sealing slab edges against radon due to their gap-filling abilities and flexibility.
Elasticity: Polyurethanes can accommodate temperature and humidity cycling, preventing cracks that could allow radon entry. They also bridge minor cracks in the concrete.
However, they require careful surface preparation and have some installation considerations:
Surface prep sensitivity: Polyurethanes need a clean, dry surface to adhere properly. Any dirt, grease, or moisture can weaken the bond and allow radon entry.
Cure time: Most polyurethane sealants take 24-72 hours to cure fully. During this time, they are sensitive to moisture and contaminants that could compromise the seal.
Possible odor or VOCs: Some polyurethanes emit strong odors during application and curing. Ensure proper ventilation to protect yourself and others from these volatile organic compounds (VOCs).
Sealant Tapes: Types, Performance, and Application Scenarios
Tape types range from butyl varieties to acrylic and soil‑gas formulations, each suited to certain slab-edge contexts. Consider perimeter joints, penetrations, and transitions when selecting a tape system. The right tape often depends on environmental exposure and substrate readiness.
Key performance questions include bond strength, vapor permeance, and elongation, plus temperature and moisture resistance. This part also reviews surface prep, compatibility with other materials, and common scenario-based recommendations for new or retrofit slabs.
Tape Adhesion, Surface Requirements, and Longevity
Tapes stick best to clean, dry surfaces. Here’s how to prep your slab edges:
- Clean: Remove dust, dirt, and grease with a wire brush or vacuum.
- Dry: Tapes won’t stick well if the surface is wet. Let it dry out completely before application.
- Prime: For better adhesion, apply a thin layer of primer designed for your tape type.
Common failure modes: Edge lift happens when tapes aren’t stuck properly due to moisture or contamination. To avoid this, ensure surfaces are clean and dry before applying.
When Tapes Are Appropriate and When to Avoid Them
Tapes work great in certain situations but can cause issues if used improperly. Here’s what to watch out for:
- Smooth, Dry Surfaces: Tapes need a clean, dry surface to stick. Use on smooth substrates where moisture isn’t present.
- Quick Installations: Tapes are great when you need a quick, easy-to-apply sealant.
- Avoid Irregular Gaps: Tapes can’t bridge large gaps or irregular surfaces effectively. Use other methods like liquid membranes for these areas.
- Wet Conditions: Tapes won’t stick well in wet conditions. Avoid using them where water is present or where the surface will remain wet.
- Long-Term UV Exposure: Some tapes degrade over time when exposed to sunlight. Use UV-resistant tapes for exterior applications or cover with backfill or membranes.
Stick to these guidelines, and you’ll get the most out of your tape seals.
Liquid-Applied Membranes: Formulations, Behavior, and Performance
Liquid membranes cover options like polymer‑modified, cementitious, and polyurethane/bituminous emulsions. Each type has a distinct balance of vapor resistance, elasticity, and movement tolerance. The goal is a continuous edge barrier that works with the rest of the system.
Prep steps, substrate compatibility, and recommended thickness drive performance. Learn how adhesion to concrete, crack bridging, and durability under moisture impact long‑term edge sealing and compatibility with other sealants or tapes.
Formulation differences and curing behavior
Liquid membranes come in two main formulations: water-based and solvent-based. Each has its own cure time, flexibility, and moisture tolerance.
Water-based systems, like polymer-modified or cementitious membranes, are typically faster-curing but less flexible initially. They can handle higher substrate moisture levels during application.
Solvent-based systems, such as polyurethane/bituminous emulsions, cure slower and offer more initial flexibility. They require lower substrate moisture levels for proper curing.
Always check the product data sheet for specific curing windows to ensure your membrane has adequate time to set before backfilling or exposure to elements.
Achieving continuity, thickness, and detail transitions
The key to a continuous barrier is maintaining proper wet film thickness. Follow manufacturer recommendations for application rates to ensure full coverage.
At terminations, overlap the membrane onto adjacent surfaces by at least 2-4 inches to create a seamless gas barrier. This is crucial where membranes meet tapes or sealants, and around penetrations or joints.
Detail transitions carefully around slab edges, ensuring the membrane extends up the wall or ties into other sealing systems without gaps or weak points. Verify manufacturer installation criteria for specific details on overlaps, seams, and edge detailing.
Proper curing is also vital. Follow the recommended curing window to allow the membrane to develop its full gas barrier properties before backfilling or exposing it to moisture.
Application Methods and Step-by-Step Procedures for Each Material
This section outlines a high‑level workflow for polyurethane sealants, tapes, and liquid membranes at slab edges. It emphasizes edge profiles, cleanliness, and environmental readiness. You’ll get a practical sense of sequencing and coordination with pours or backfilling.
Prepare for each material with task‑oriented steps, from tool prep to curing windows. It also covers inspection checkpoints, safety, and common pitfalls to avoid on the jobsite or during DIY execution.
Step-by-Step Process
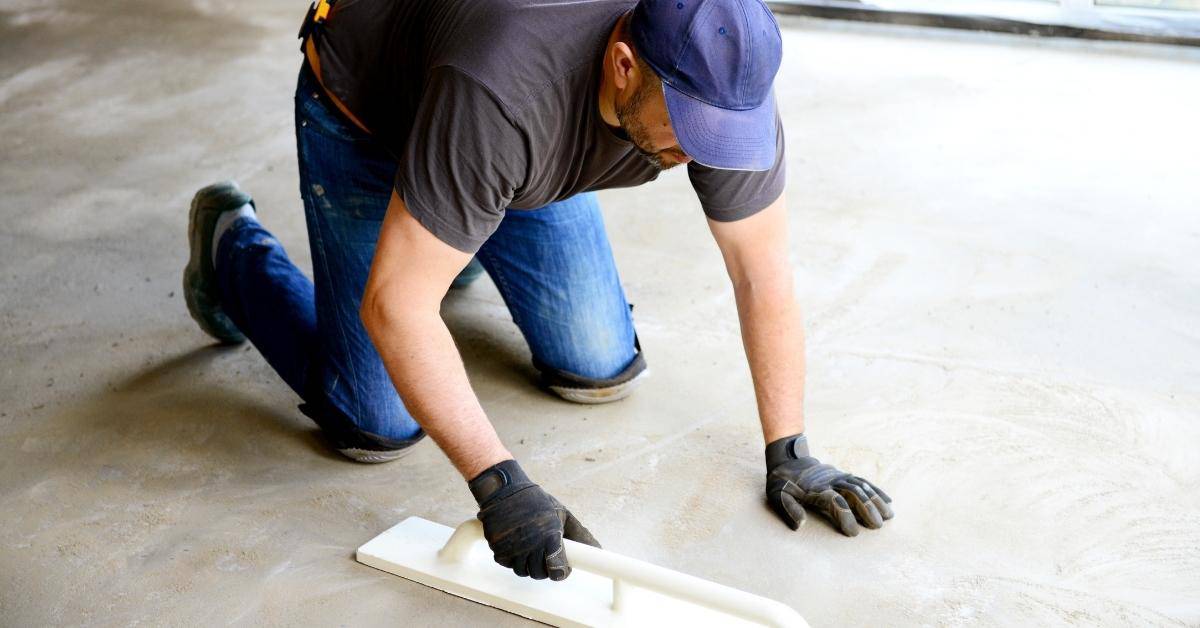
The following is a clear, numbered sequence of practical steps for applying polyurethane sealants, tapes, and liquid membranes at slab edges. This guide focuses on realistic DIY/home-improvement actions and jobsite habits.
- Preparation: Gather tools (gloves, safety glasses, tape measure, etc.) and check material compatibility with your slab’s concrete and rebar.
- Safety Checks: Ensure the area is well-ventilated. Wear appropriate PPE for handling materials.
- Polyurethane Sealant Application: Prime the surface if required, apply sealant using a caulking gun, smooth with a trowel or putty knife, and check bead continuity.
- Tape Application: Clean the surface, apply tape following manufacturer’s instructions, press firmly to ensure adhesion, and check seam continuity.
- Liquid Membrane Application: Prime if needed, mix liquid membrane according to instructions, apply using a roller or sprayer, and check for coverage and continuity.
- Cure Time: Allow materials to cure as per manufacturer’s guidelines before backfilling or pouring concrete.
- Final Checks: Inspect surface roughness, adhesion/seal integrity, and perform moisture/airtight performance tests. Clean up tools and materials.
Surface preparation and diagnostic checks before sealing
Before applying any sealant or membrane, it’s crucial to prepare the surface properly. This ensures better adhesion and helps locate leaks.
Cleanliness: Remove all dirt, dust, and debris using a wire brush or broom. Use a vacuum if necessary.
Moisture Check: Inspect for signs of moisture or capillary action. If present, allow the surface to dry completely before proceeding. You can use a moisture meter for accurate readings.
Diagnostic Checks: Perform visual inspections and smoke tests to locate potential leak paths. Temporarily seal any found leaks with tape or caulk until permanent sealing.
Material-specific installation steps and quality-control tips
The choice of material significantly impacts the outcome. Here are concise, sequenced steps for each type with practical QC checks:
- Polyurethane Sealant: Prime if required (consult manufacturer’s guidelines). Apply sealant using a caulking gun, smooth with a trowel or putty knife. Check bead continuity and ensure no gaps.
- Tape Application: Clean the surface to remove any dust or debris. Apply tape following manufacturer’s instructions, pressing firmly to ensure adhesion. Inspect seam continuity for any gaps or overlaps.
- Liquid Membrane: Prime if needed (consult manufacturer’s guidelines). Mix liquid membrane according to instructions. Apply using a roller or sprayer, ensuring full coverage and checking for continuity. Allow it to cure as per manufacturer’s guidelines before backfilling or pouring concrete.
- Common QC Checks: Inspect surface roughness, adhesion/seal integrity, and perform moisture/airtight performance tests after installation. Address any issues promptly to maintain the seal’s effectiveness.
Durability, Environmental Factors, and Long-Term Performance
Temperature swings and movement at slab edges drive how each option behaves over time. You’ll learn what to expect in terms of expansion, contraction, and potential weaknesses. This helps set maintenance and replacement expectations upfront.
Moisture exposure, hydrostatic conditions, and soil chemistry influence aging differently by product. Consider UV exposure, freeze‑thaw cycles, and substrate conditions when planning long‑term performance and inspections on exterior or exposed edges.
Failure modes and environmental stressors
Each sealing option has its own Achilles’ heel. Understanding these can help you pick the right one for your job and know what to expect over time.
Polyurethane sealants: They’re flexible, but excessive UV exposure can cause chalking and degradation. Freeze-thaw cycles can lead to cracking if not properly formulated. Moisture migration might cause debonding if capillary action isn’t managed.
Tapes: Adhesive creep is a common issue, leading to peeling or lifting over time. Temperature fluctuations and expansion/contraction can cause cracking at the edges. UV exposure can degrade the adhesive, reducing stickiness.
Liquid membranes: Improper curing can lead to weak spots that allow moisture migration. Hydrostatic pressure can cause blistering or delamination if not applied correctly. Chemical incompatibility with soil or concrete can result in staining or corrosion.
Inspection, maintenance, and repair strategies
Regular check-ups keep your sealant in top shape. Here’s a simple checklist to follow:
- Visual inspection: Look for cracks, peeling, or discoloration.
- UV exposure: Check for chalking or degradation on exposed edges.
- Moisture migration: Inspect for signs of water intrusion or dampness at the slab edge.
- Temperature fluctuations: Check for any signs of stress from expansion/contraction.
- Rebar/mesh compatibility: Ensure no corrosion or staining is occurring due to chemical incompatibility.
- Soil contact: Inspect for any signs of damage from soil chemistry.
- Warranty review: Check if your sealant is still covered under warranty.
- Repair continuity: Ensure any repairs maintain the barrier’s integrity and continuity.
Quick rule: If you find issues, address them promptly to prevent small problems from becoming big ones. Regular maintenance extends your sealant’s lifespan.
Cost Comparison and Budget Planning for Radon Sealing Projects
This section lays out the cost elements beyond upfront price. Identify material options, primers, and necessary accessories, plus any variants that affect fast cure or VOC levels. You’ll see how choice impacts the overall budget.
Labor, surface prep, and potential professional involvement are important parts of the equation. It also suggests a budgeting toolkit to compare options against local conditions, climate, and code considerations while allowing for contingencies.
Material, labor, and lifecycle cost factors
The materials you choose significantly impact the result and total cost of your radon sealing project.
- Polyurethane Sealant: Cost-effective upfront. Look for high-solids content (60%+) for better coverage and durability. Avoid low-cost options with poor adhesion.
- Tapes: Generally cheaper per square foot. Seek tapes with strong adhesion and UV resistance. Steer clear of thin, weak tapes that tear easily.
- Liquid Membranes: More expensive initially but often better long-term performance. Opt for 100% solids membranes to minimize shrinking and cracking. Avoid low-cost, high-VOC options due to environmental concerns and potential health issues.
- Primer/Adhesive: Required for some materials. Consider the cost per square foot and compatibility with your chosen sealant.
- Labor: DIY can save money, but consider skill level and time required. Professional installers may offer warranties and better results.
DIY vs professional installation: risk and reward
A competent DIYer can save money, but it’s crucial to understand the risks and limitations.
DIY is ideal for simple, straightforward jobs with minimal edge detailing. It allows you to learn about your home’s construction and gain a sense of accomplishment.
However, professional contractors are advisable when dealing with complex installations, tight spaces, or critical system integrations. They have the experience, tools, and access to hard-to-reach areas. Plus, they often provide warranties that cover both labor and materials.
Consider: Your skill level, available time, project complexity, and potential risks before deciding between DIY and professional installation.
Conclusion
Radon sealing at slab edges protects health, prevents moisture and dirt intrusion, and keeps the finish looking right. Pick a method that fits your budget, climate, and how much wear the edge will see, but always keep safety and long-term durability in focus.
When you plan the work, check the edge condition, moisture presence, and substrate compatibility; choose a material type, clean and prep the surface, apply in the recommended order and thickness, allow proper cure or cure-time, and then verify the seal with a simple pass or test before finishing any adjacent work. Start with a small area to confirm adhesion and waterproofing, then extend in logical sections until the perimeter is done, and finally recheck for gaps or voids after the sealant sets. Safety first and read the product data sheets for open time, cure, and ventilation needs, then document your steps so a future homeowner can follow your setup.
Common pitfalls to avoid include applying over damp or dusty surfaces, using the wrong product for the edge profile, and rushing the cure time. Keep a steady hand, wear eye protection and gloves, ventilate well, and never pressure-wipe wet sealants or peal off a partially cured seam. If in doubt about substrate compatibility or local code requirements, or if the edge is structurally stressed, step back and get a second opinion or a professional assessment, because a poor seal can create leaks or costly repairs later. Test in a small area and proceed cautiously.
If the project involves complex edge shapes, uncertain soil conditions, or you’re sealing a large or high-traffic area, consider professional help to ensure a code-compliant, durable seal. With careful prep, sensible material choice, and disciplined application, you’ll get a solid seal that lasts and keeps your interior dry and comfortable. You can do this—step by step, one edge at a time.
FAQ
What types of polyurethane sealants are suitable for slab edges?
Look for polyurethane sealants labeled for concrete slab edges and interior/exterior use. Check the product label for cure time, moisture tolerance, and adhesion to concrete. If in doubt, read the manufacturer’s instructions or ask the retailer for guidance.
How do radon sealing tapes work as a barrier, and what should I know about their properties?
Radon barriers using tapes rely on a continuous seam and good edge bonding to prevent gas infiltration. Check that the tape is rated for concrete and has a compatible backing and adhesive for the environment you’re in. Always follow the tape maker’s instructions and consider local conditions that affect performance.
What are the advantages and disadvantages of liquid membranes for slab sealing?
Liquid membranes can form a continuous film over irregular edges when applied correctly. They can be easy to apply in one coat but may require a second coat or primer in tough conditions. If you’re unsure, verify coverage and cure guidance on the product label and test a small area first.
How should I approach installation methods and durability across these options?
For each product, follow the installed method in the manufacturer instructions, including surface prep and timing between steps. Compare expected lifespan and maintenance needs by checking the product data sheet and local guidance; there’s no one-size-fits-all answer. If unsure, plan for inspection points and potential reseal intervals based on material type and environment.