
Introduction
Pouring concrete in two lifts means placing concrete in one lift, pausing, and then adding a second lift later, which creates a joint between pours. That joint, or cold joint, can be weaker if the surfaces don’t bond well or if the second pour doesn’t integrate with the first. Understanding how this joint forms helps you plan for a solid interface.
The mechanism involves surface moisture, roughness, and how the new mix chemically and physically bonds to the old. Prevention comes down to good formwork, timing, and ensuring the surface is prepared for a new pour, plus using compatible materials. If you’re unsure, check the manufacturer guidance, local rules, and what to clean or roughen the surface before proceeding.
Key takeaways
- Understand cold joint mechanics: non-cohesive interface allows microcracks and weakness.
- Coordinate lifts to minimize vertical misalignment and ensure consistent consolidation at interface.
- Thorough surface prep and bonding methods before second lift boost adhesion.
- Use dry-pack holding or mechanical scrapes to refresh the first lift surface.
- Formwork and access planning prevents late pours in columns during logistics.
- Safety: verify fall hazards, proper PPE, and shutter removal sequencing on site.
Table of Contents
- Introduction
- Key takeaways
- What Is a Cold Joint and How It Fails
- Chemical and Microstructural Dynamics at the Interface
- Root Causes Specific to Two-Lift Pours
- Pour Planning and Sequencing to Avoid Cold Joints
- Mix Design, Scms and Admixture Strategies
- Formwork Selection, Tools and Materials Checklist
- Surface Preparation and Bonding Methods for the Second Lift
- Placement and Consolidation Best Practices
- Conclusion
- FAQ
What Is a Cold Joint and How It Fails
A cold joint in a two-lift pour is the interface where the second lift meets the first while the first is still or only partially hard. This situation creates a distinct plane between lifts that can act like a weak shear path under load. Timing and curing conditions drive the formation of this condition.
The mechanical weakness shows up as poor load transfer and potential microcracking along the joint. In column pours, this can translate to shear-transfer failure and flexural cracking under lateral or dynamic loads, with degradation accumulating over time. Understanding these failure modes helps you plan better during placement and inspection.
Physical discontinuity formation
The key to understanding cold joints is knowing how they form. When you pour concrete in two lifts, there’s a time gap between the first and second pour. During this gap:
Surface drying occurs. The exposed top layer of the first lift starts to lose moisture as it dries out.
Bleed water rises to the surface. This water separation weakens the surface layer, creating a physical discontinuity.
Structural consequences for columns and walls
A cold joint can compromise your structure’s strength and stability. Here’s how:
Reduced moment transfer. A weak interface means less load can be transferred between lifts, reducing the overall structural capacity.
Shear and ductility loss. Under service loads or seismic activity, a cold joint can cause shear failure. It also reduces the structure’s ability to deform without breaking (ductility).
Chemical and Microstructural Dynamics at the Interface
The interface chemistry evolves as cement hydrates, with C-S-H, ettringite, and portlandite forming across the first lift. A second lift encountering a partially solidified matrix can experience zones with inadequate chemical bonding. This is the root of the compromised interface.
The ITZ shows differences in porosity and microcracking, creating a weak plane that hinders monolithic stiffness. Factors like timing, moisture loss, and temperature influence diffusion and hydration, so expect variations in bond quality at the interface.
Hydration, Laitance and Bleed-Water Effects
The first lift’s concrete starts to set due to hydration chemistry. This is where cement particles react with water to form Calcium Silicate Hydrate (C-S-H), ettringite, and portlandite.
However, as the concrete sets, a layer called laitance forms on the surface. Laitance is rich in cement but poor in aggregates, making it weak and non-reactive. This inhibits chemical bonding with fresh paste from the second lift.
Bleed-water also plays a role. As the first lift sets, water rises to the surface, leaving behind a dry layer that’s hard to bond with. So, when you pour the second lift, it doesn’t stick as well due to these surface issues.
Permeability, Porosity and Durability Implications
A cold joint increases permeability. This means water, oxygen, and other harmful substances can more easily penetrate the concrete, accelerating corrosion of reinforcement.
The increased microvoids at a joint also reduce fire resistance. In a fire, these voids allow heat to transfer faster into the concrete, leading to quicker spalling and reduced residual strength.
Long-term durability is also affected. The increased permeability allows more water and chemicals in, leading to faster deterioration over time. This can result in cracking, scaling, and even structural failure if not addressed.
Root Causes Specific to Two-Lift Pours
Operational triggers such as lift sequencing and gaps between pours raise the risk of a cold joint, especially when surface prep or consolidation steps are shortened. Work pressures can push crews toward skipping critical steps at the interface. Documented checks help catch this early.
Environmental factors like ambient temperature, wind, and humidity affect curing and formwork handling between pours. Material drivers include mix design per lift, slump, bleed water, and the continuity of cement paste at the joint, all of which influence bonding potential.
Logistical causes: delivery, pumping and scheduling
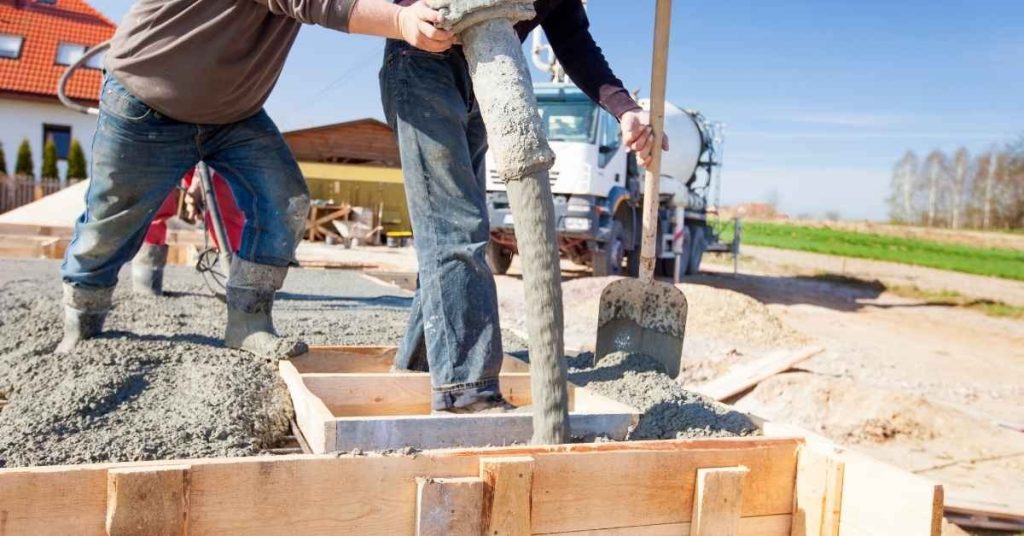
Pouring concrete in two lifts can be tricky due to logistical challenges. These can break the continuity of the pour, leading to cold joints.
Truck breakdowns or late deliveries can cause delays between lifts. This gives time for the surface to set and form a weak bond with the next lift.
Pump blockages or maintenance issues can also interrupt the pour. When this happens, the exposed concrete starts to set, creating a cold joint.
Shift changes can lead to rushed work. Workers might skip crucial steps like surface preparation or consolidation to meet deadlines. This results in weak interlift bonding.
Environmental and mix-related contributors
Weather conditions and mix design can impact the strength of the interface between lifts.
High temperatures speed up setting time. This leaves less time for proper bonding. Wind can also dry out the surface too quickly, preventing a strong bond with the next lift.
Rapid slump loss due to high temperatures or evaporation can cause issues. The concrete may set before it has a chance to bond properly with the underlying layer.
Inadequate air entrainment or improper aggregate loading can also lead to weak interlift bonding. These factors affect the continuity of cement paste at the interface, reducing its strength.
Pour Planning and Sequencing to Avoid Cold Joints
Coordinate delivery, placement pace, and consolidation methods to fit a two-lift sequence. The goal is a compatible surface profile and consistent strength development with minimal risk of a weak interface. Plan for continuity across lifts from start to finish.
Plan joint locations and tie-ins to minimize weak interfaces, while selecting joint treatments and formwork details that support smooth transitions. Establish QC protocols for fresh concrete properties and real-time monitoring of vibration to ensure proper compaction at each lift.
Calculating pour cadence and contingency buffers
Estimating your pour rate is crucial for a smooth two-lift sequence. Here’s what to consider:
Cubic Yardage per Hour: Check your mixer’s capacity, pump rate (if using), and placement efficiency. A typical ready-mix truck delivers about 10 cubic yards in an hour.
Allowable Pause Time: Plan for breaks, equipment maintenance, or formwork adjustments. Aim for no more than a 30-minute pause between lifts to minimize cold joint risk.
Contingency Buffers: Account for unexpected delays like weather changes, equipment breakdowns, or material shortages. A 10-15% buffer in your schedule can help absorb these surprises.
Crew roles, communication and contingency procedures
A well-coordinated crew is key to avoiding cold joints. Assign clear roles and responsibilities:
Concrete Finisher: Oversees placement, consolidation, and finishing of each lift.
Pump Operator (if applicable): Maintains consistent pressure and flow rate during delivery.
Quality Control Technician: Monitors concrete properties, records data, and ensures quality standards are met.
Regularly communicate progress, issues, and any necessary adjustments. Establish contingency procedures for unexpected events, such as:
– Equipment breakdown: Have backup equipment ready or know where to rent quickly.
– Material shortage: Contact your supplier immediately to expedite delivery if needed.
Mix Design, Scms and Admixture Strategies
For a two-lift pour, choose a mix design and admixtures that give you workable time without sacrificing early strength, and plan when to use each cement type, water, and aggregate size. Keep the mix within a practical slump range to balance ease of placement with bond potential between lifts, and refer to the product labels for recommended dosages and open-time guidance.
This matters for a DIY project because the right admixtures and surface prep prevent weak interfaces, reduce stuck or cold joints, and make curing easier. You’ll want practical testing steps (like a simple slump check) and a clear signal for when to join lifts or postpone, plus a plan for bonding procedures and curing that fits the project size and weather. When in doubt, check the label or manufacturer instructions and follow local rules or guidance from the product you’re using.
Retarders, water reducers and workability admixtures
When pouring concrete in two lifts, you’ll need to control the setting time of each lift. This is where admixtures come in handy.
Retarders slow down the hydration process, giving you more time to place and finish the concrete. They’re especially useful when temperatures are high or you’ve got a large pour area.
Water reducers, like plasticizers and superplasticizers, reduce the water-cement ratio without affecting slump. This improves strength and durability while maintaining workability. They’re great for achieving a consistent slump between lifts.
Use of SCMs and durability-focused design
Incorporating supplementary cementitious materials (SCMs) like fly ash, slag, or silica fume can enhance the long-term strength and durability of your concrete.
Fly ash and slag replace a portion of the cement, reducing the heat of hydration and improving the concrete’s resistance to sulfate attack. They also extend the setting time, giving you more flexibility in scheduling lifts.
Silica fume, on the other hand, improves the concrete’s permeability and reduces bleeding, making it ideal for water-retaining structures or when freezing is a concern. It also enhances the bond between lifts, minimizing cold joint issues.
Formwork Selection, Tools and Materials Checklist
Choose formwork that provides a good surface finish, alignment tolerance, and ease of removal for a two-lift pour. Ensure compatibility with larger spans and potential cold-joint risk reduction. Confirm that the design supports continuous lift transitions.
Prepare a tools and equipment checklist that covers vibration, consolidation, screeds, and bracing. Plan materials like bonding agents and curing compounds, and verify moisture control around the formwork to support a solid interface.
Choosing high-performance formwork and cycling considerations
Before you start your two-lift pour, make sure your formwork is up to the task. Here’s a checklist to help you select the right one.
- Rigidity: Formwork must be stiff enough to resist concrete pressure without deflecting. Check manufacturer specs and ensure it matches your pour size.
- Pressure rating: Ensure formwork can handle the expected concrete pressure. Too low, and you risk blowouts; too high, and you’re wasting money.
- Strip speed: Formwork should strip quickly to minimize delays between lifts. Check manufacturer claims and ask for user testimonials.
- Surface finish: Smooth surfaces reduce cold joint risk. Inspect formwork panels for smoothness and cleanliness.
- Alignment tolerance: Formwork should align accurately to prevent misaligned lifts. Check leveling systems and adjustment capabilities.
- Ease of disassembly: Quick stripping reduces downtime between lifts. Practice formwork assembly/disassembly before the pour.
- Compatibility with long spans or complex geometries: Ensure formwork can handle your project’s unique demands without compromising structural integrity.
- Relevance to cold-joint risk reduction: Choose formwork that minimizes lift transitions, like adjustable height systems for seamless pours.
Quick rule: Invest in quality formwork. It’s the backbone of a successful two-lift pour.
Tools and materials checklist for two-lift pours
Before you start mixing concrete, ensure you have all the necessary tools and materials to avoid stoppages during your two-lift pour.
- Placement hoses: Check for leaks, kinks, or clogs. Replace if damaged.
- Vibrators: Inspect for proper functioning and cleanliness to prevent clogging with concrete.
- Scarifiers: Ensure they’re in good working order to remove laitance from the first lift before placing the second.
- Bonding agents or primers: Check expiration dates and ensure compatibility with your concrete mix.
- Cleaning equipment: Have brushes, scrapers, and hoses ready to clean formwork between lifts.
- Accurate screeds: Inspect for straightness and proper adjustment. Bent or misaligned screeds cause cold joints.
- Deck supports and bracing: Ensure they’re secure, level, and can support the weight of concrete and formwork.
- Curing compounds: Check for proper storage and ensure they match your pour conditions (e.g., hot/cold weather).
- Moisture control around formwork: Have materials ready to prevent water loss or gain around formwork, which can cause cold joints.
Quick rule: Verify tool and material condition before the pour. A broken vibrator can halt your entire operation.
Surface Preparation and Bonding Methods for the Second Lift
Set standards for the second-lift surface: remove laitance, reach an appropriate roughness, and ensure moisture and temperature are within acceptable ranges for bonding. A clean, sound substrate is essential for a durable joint.
Specify bonding agents and interim treatments, such as epoxy or a polymer-modified slurry, and detail application thickness and cure times. Outline contingencies for weather or cure delays and plan test methods to verify bond quality.
Mechanical and cleaning methods (scarifying, water-blast)
Before the second lift, you need to clean and prepare the surface of the first lift. This is crucial for a strong bond.
Use mechanical methods like scarifying or water blasting to remove laitance – that weak, fuzzy layer on top of concrete. You want to expose sound aggregate to create a solid base for your new pour.
When to use these methods? Wait until the first lift has gained enough strength, usually around 500 psi. And do it just before you’re ready to place the second lift – timing is key here.
Chemical bonding agents and when to use them
Chemical bonding agents like epoxy or polymer-modified cementitious slurry can boost the bond between lifts. They help when you’ve got a delay between pours, or if the first lift’s surface is smooth.
These products work by creating a chemical bond with the existing concrete and providing a better surface for the new concrete to grip onto. But remember, they’re not a cure-all – proper surface preparation is still crucial.
When do you use them? If there’s going to be a delay of more than a day between lifts, or if the first lift’s surface is too smooth (like a polished floor), consider using a bonding agent. Always follow the manufacturer’s guidance and test panels before full application.
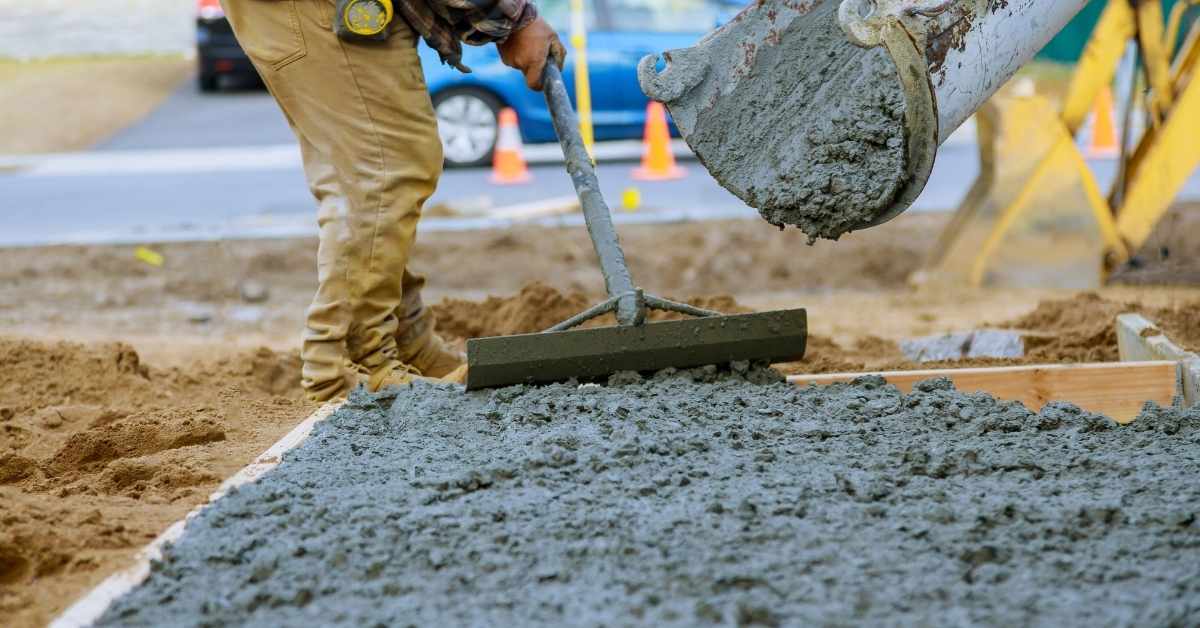
Placement and Consolidation Best Practices
Define the second-lift timing window to maximize intermixing and minimize workability loss. Ensure the surface profile supports cohesion between pours and reduces the chance of a weak interface. Coordinate with the first lift for a smooth transition.
Choose a placement method that promotes paste intermixing without segregation and plan consolidation patterns to avoid voids at the interface. Include checks for slump compatibility, moisture and temperature control, and a clear curing plan to support a strong joint.
Vibration technique and intent
The goal of internal vibration during the second lift is to consolidate the concrete, eliminate voids, and promote intermixing with the first lift. Vibration helps break up any air pockets and encourages the new concrete to blend with the old.
Don’t rely on fixed depths for vibration. Instead, use experienced supervision to judge when it’s needed. Too much vibration can cause segregation, so be careful.
Remember: Vibration is about helping the concrete find its own level and mix well. It’s not about pushing it down as hard as possible.
Placement methods to minimize segregation
There are different ways to place the second lift: tremie/elephant trunk, chute, or pump hose. The key is controlling drop height and discharge location to prevent separation.
For tall structures, use a tremie pipe to control the concrete’s descent. For shorter pours, a chute or pump hose can work. But keep an eye on that drop – too high, and you’ll segregate the mix.
Tip: Always align your placement method with the formwork surface. You don’t want concrete bouncing off the forms and creating voids.
Conclusion
Pouring in two lifts can deliver a strong, durable bond if you treat the interface like a new job site, not a quick patch. The key is control, timing, and safe practice so the surface stays clean, the formwork stays solid, and the second lift mates well with the first.
Follow this practical check as you wrap up: confirm your plan and timing, verify the formwork is secure and the first surface is prepared, check your mix design and any admixtures against the plan, have tools and protective gear ready, test a small area to verify bonding, monitor curing conditions, and execute placement with thorough placement and consolidation while avoiding gaps or segregation and watching for cold joints as you proceed.
Common mistakes to avoid include rushing the second lift before the first has set enough, skipping surface preparation, mistreating the second lift surface, or failing to consolidate fully. Stay safe by wearing the right PPE, keeping forms clean and tight, and never forcing a bond where the first lift is still capable of moving or damming heat or moisture. If the project is large, temperatures are extreme, or you’re unsure about bond strength, call a professional rather than guess; otherwise, keep the process steady, methodical, and focused on a solid, uniform interface you can stand on for years to come. You’ve got this—steady hands, careful planning, and a strong finish ahead.
FAQ
How does a cold joint form chemically and physically?
A cold joint happens when fresh concrete meets concrete that has started to set. The bond is weaker because the capillary and chemical bonding are limited and the surface isn’t receptive to a strong mechanical interlock. You’ll often see a visible seam and roughness where the pours meet.
What column construction logistics tend to create cold joints?
Delays between lifts, stopping a pour for any reason, or moving the second lift to a later day all raise cold-joint risk. In columns, the vertical alignment and load transfer require a solid, continuous interface, so interruptions are especially risky. Check the project plan and follow manufacturer instructions for any time gaps or joint details.
How can I prevent a cold joint with materials and formwork?
Use formwork and shoring that keep the second lift accessible for a clean, tight interface. Roughen or prepare the first-lift surface as directed by the concrete supplier, and use an approved bonding agent only if recommended for your mix. If in doubt, check the product label, datasheet, or local guidance for compatibility and timing rules.
What are signs of a weak interface and how can I test it safely?
Look for mismatched texture, a pronounced seam, or lack of vibration at the joint. Probing with a tool should not gouge the surface; if it does, there may be poor bonding. Always defer to professional testing methods or guidance from the concrete supplier if you’re unsure.