
Introduction
Adhesion of plaster to painted surfaces depends on paint type and surface condition, and you should test adhesion before proceeding.
A simple adhesion check lets you decide whether you can plaster over the paint as is, need to scuff the surface, or must strip the paint first. If the surface shows good grip after a test, you can proceed with proper surface preparation and plaster application. If the test indicates poor adhesion, plan to scuff away the top layer or strip to expose a sound substrate, then recheck before continuing.
When deciding between scuffing and stripping, consider the paint’s hardness, finish, and any flaking or peeling. Techniques include scuffing with the right abrasive, cleaning the surface, and using appropriate bonding agents or primers as directed by manufacturer instructions. Gather tools and materials for surface prep such as an approved scraper, sanding block or orbital sander, clean rags, and a compatible plaster or bonding product, and verify any local rules or guidance as needed.
Key takeaways
- Perform adhesion tests on painted surfaces to confirm bond potential before plastering.
- Scuff existing paint thoroughly at key edges and flat areas before plastering.
- If adhesion test passes, choose scuffing; if fails, strip paint completely from surface.
- Use compatible plaster and apply in thin, even coats over prepared surface.
- Wear eye/respiratory protection when testing or scuffing; remove loose paint safely.
- Keep a clean, dust-free working area and follow manufacturer instructions for primers.
Table of Contents
- Introduction
- Key takeaways
- Understanding Painted Surfaces and Plaster Compatibility
- Initial Inspection and Planning Before Plastering
- Tools and Materials Checklist
- Adhesion Tests: Methods and When to Use Them
- How to Scuff Surfaces Correctly
- When to Strip Paint Completely
- Ensuring Proper Bonding Between Plaster and Paint
- Common Mistakes, Troubleshooting, and Maintenance
- Conclusion
- FAQ
Understanding Painted Surfaces and Plaster Compatibility
Paint types influence how plaster sticks. Common finishes include latex, acrylic, oil-based, and enamel, each with distinct film formation, flexibility, gloss, and porosity. Moisture resistance also varies and can affect adhesion.
Surface chemistry and film properties determine bond strength on porous versus non-porous surfaces, and whether chalky or sealed coatings accept plaster. Look for characteristics that help bonding, such as porosity and matte finishes, and those that hinder it, like high gloss or elastomeric films. Before plastering, run practical pre-adhesion checks and tests to gauge surface profile, moisture content, and patch adhesion. Plan prep steps and consider whether scuffing or stripping is appropriate, and select primers or bonding options accordingly.
Types of Paint and How They Affect Adhesion
Paint types differ in their surface properties, which can impact plaster adhesion. Understanding these differences helps you make informed decisions when preparing painted surfaces for plastering.
Latex/Water-based: These paints form a porous film that allows moisture to evaporate. This can help plaster bond well, provided the paint is sound and not too flexible.
Acrylic: Similar to latex, acrylic paints also have good porosity but offer better flexibility. While this helps with surface movement, it may hinder plaster adhesion if the paint is too flexible.
Oil-based: These paints form a non-porous film with high surface energy. This can make them difficult to adhere to, especially for plasters that rely on mechanical bonding. However, some plasters designed for oil-based surfaces may work well.
When Paint is Suitable as a Substrate for Plaster
Before deciding to leave existing paint in place under new plaster, assess its suitability. A sound, well-adhered surface with low gloss and no flaking will provide the best base.
Listen to the surface by tapping it gently. A solid, dull thud indicates a well-adhered paint film. A hollow or ringing sound suggests instability and may indicate peeling or loose paint.
Check for gloss level. High-gloss paints have a smooth, non-porous surface that plasters may not adhere to well. If the existing paint is high-gloss, consider deglossing or stripping it before plastering.
Inspect for flaking or peeling. Any signs of delamination mean the paint is not sound enough to support new plaster and should be stripped off before proceeding.
Initial Inspection and Planning Before Plastering
Set clear goals for the project, including whether the aim is adhesion testing, scuff vs strip decisions, and the expected finish quality on painted substrates. Outline scope, timing, and required outcomes before starting work.
Perform a safety, environmental, and compliance check, including ventilation, dust control, PPE, lead paint risk if applicable, and local code considerations. Conduct an adhesion risk assessment by reviewing coating age and type, substrate history, repairs, and visible issues; decide if preliminary tests are needed. Inspect substrate condition in detail for moisture, cleanliness, and contaminants, and note any structural concerns. Plan workflow logistics with area segmentation, containment, drying windows, and documentation of test results to guide next steps.
Visual checkpoints and common red flags
Before starting any plastering work, perform a thorough visual inspection to identify potential adhesion issues.
- Blistering: Check for paint blisters; these indicate poor adhesion and should be addressed before plastering.
- Flaking: Look for flaking paint. If found, consider stripping the existing paint.
- Previous repairs: Inspect any previous repairs. Poorly done repairs can affect plaster adhesion.
- Efflorescence: Check for white, powdery deposits. These indicate moisture issues that could hinder adhesion.
- Moisture staining: Look for stains or discoloration. Moisture problems should be resolved before plastering.
- Peeling: If paint is peeling, strip the existing paint before plastering.
- Soft spots: Press on the surface; soft spots indicate underlying issues that need addressing.
- Structural issues: Check for cracks or other structural problems. These should be repaired before plastering.
Quick rule: Address any identified issues to ensure optimal plaster adhesion.
Planning Your Plastering Project
When planning your plastering project, consider the following factors to help manage your budget and timeline effectively.
- Area extent: Larger areas require more material and labor, which can increase costs. Estimate your area accurately for precise cost calculations.
- Accessibility: Limited access may increase time and equipment needs, affecting overall project cost. Plan accordingly to minimize these impacts.
- Surface preparation: Choose between scuffing (cheaper but may require touch-ups) or stripping (ensures better adhesion but is more expensive). Consider your project’s specific requirements.
- Equipment needs: Assess if you need to hire any specialist equipment, such as strippers or scaffolding, and factor these costs into your budget.
- Waste disposal: Larger areas generate more waste. Research local waste disposal options and associated costs to plan accordingly.
- Labor requirements: More complex projects may necessitate skilled labor. Obtain quotes from professionals or consider hiring help for specific tasks.
Key tip: Regularly review and adjust your plans as needed to stay within your desired budget and timeline.
Tools and Materials Checklist
Identify core tool categories for inspection, adhesion tests, scuffing, stripping, and plastering, plus PPE and cleanup gear. Include items such as scrapers, putty knives, moisture meters, adhesion test kits, grinders, sanding discs, and trowels.
List consumables and products by stage, including primers, bonding agents, polymer-modified plaster mix, masking supplies, plastic sheeting, and waste bags. Check substrate compatibility on datasheets and manufacturer guidance. Emphasize safety, ventilation, respirator use, and skin protection for strippers. Use a quick-reference flow: inspect, test, decide, prepare, plaster, and clean, noting any repairs or moisture mitigation needs.
Tools for Surface Preparation and Scuffing
Effective scuffing is crucial for better plaster adhesion. Inspect your tools before use to ensure they’re in good condition.
- Abrasives (sandpaper, sanding sponges): Various grit sizes available; start with 120-grit for painted surfaces. Use coarser grits for heavily soiled areas and finer ones for touch-ups.
- Sanding blocks: Maintain even pressure while scuffing; choose a block that fits the sandpaper size.
- Power sanders (orbital, random orbital): Faster scuffing; consider renting or borrowing. Ensure proper dust collection to minimize mess and potential health risks.
- Scrapers: Remove loose paint and debris; use a sharp edge for better results. Choose between straight and curved blades based on the surface’s contour.
- Wire brushes: Remove rust, loose paint, or other stubborn residues; use gently to avoid damaging the substrate.
- Vacuum: Clean up dust and debris after scuffing; consider using a vacuum with a HEPA filter for better efficiency.
- Dust-control options (dust masks, goggles): Protect yourself from airborne particles; ensure your mask fits well and provides adequate protection.
Tools for Stripping and Safety Equipment
Proper stripping ensures paint compatibility and prevents plaster delamination. Always test a small area first to check stripper effectiveness and identify any hazardous paint layers.
- Chemical strippers: Solvent-based or caustic; choose based on the paint type. Follow manufacturer instructions for safe handling and application.
- Heat tools (heat guns, infrared heaters): Softens paint for easier removal; use carefully to avoid damaging the substrate or causing fires.
- Mechanical removers (scrapers, wire brushes): Remove softened paint; use gently to prevent damage. Wear appropriate PPE when using these tools.
- Containment sheeting: Protect adjacent areas from stripper splatter and removed paint; use drop cloths or plastic sheets.
- Respirators: Protect against stripper fumes and paint dust; choose a respirator with the correct filter for your needs. Ensure it fits well and provides adequate protection.
- Gloves: Protect hands from chemicals and sharp edges; use gloves that provide both chemical resistance and dexterity.
- Eye protection (goggles, safety glasses): Shield eyes from splashes, debris, and dust; ensure they fit well and provide adequate coverage.
Adhesion Tests: Methods and When to Use Them
Begin with quick visual and tactile checks to judge surface grip, peeling, powdering, and edge stability. Use these cues to decide if formal testing is warranted before any further work.
Move to simple tests like a light finger test and light scraping or tape lift to gauge initial adhesion. For more detail, perform tape pull tests and contrast lift with residue, keeping in mind potential substrate damage. If results are inconclusive or the surface will bear significant loads, escalate to formal pull-off testing with calibrated equipment and document findings for traceability.
Simple on-site tests (tape, scratch)
Before applying plaster over a painted surface, perform quick, lightweight adhesion tests to assess substrate soundness. These simple tests help identify loose paint and potential issues with the underlying surface.
Adhesive Tape Pull Test: Apply adhesive tape firmly onto the surface, then lift it quickly. Inspect the residue on both the tape and substrate. If the tape lifts cleanly with no residue, the substrate may be unsound, requiring scuffing or stripping before plastering.
Cross-Scratch Test: Use a sharp tool to lightly score an ‘X’ in the paint. Check for flaking or powdering. If the paint flakes or powders during this test, the substrate may have adhesion issues, warranting further testing.
Professional tests (pull-off, lab testing)
For high-stakes surfaces or uncertain substrates, consider professional pull-off adhesion tests and lab analysis to quantify bond strength and ensure suitability for plastering.
Pull-Off Adhesion Test: Apply a dolly onto the surface, press firmly, then pull using calibrated equipment. Record the force required to break the bond. If results are uncertain or critical substrate, consider lab analysis.
If professional tests indicate weak adhesion, address substrate issues before proceeding with plastering to prevent costly failures. For uncertain substrates, sample material and send it to an accredited lab for analysis, following safety guidelines during sampling.
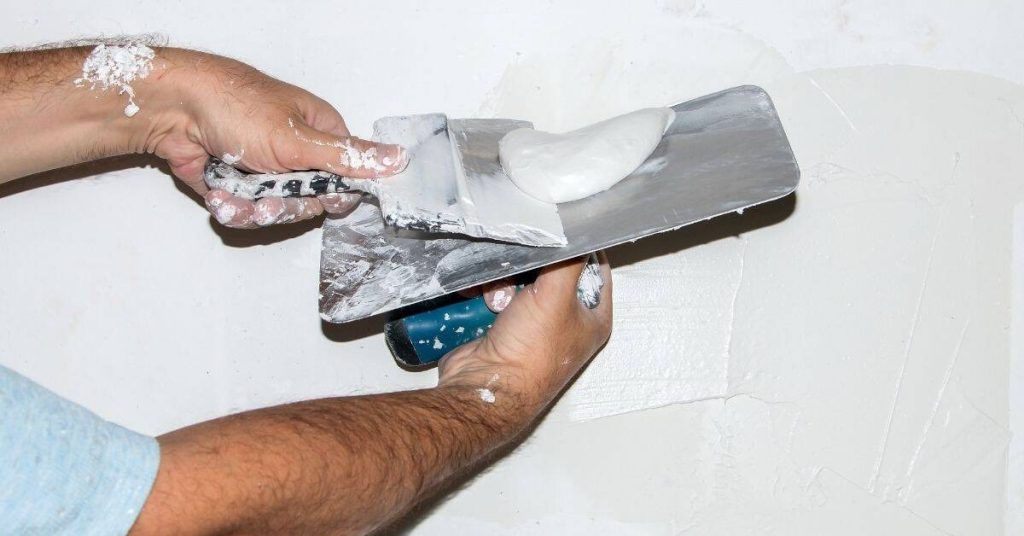
How to Scuff Surfaces Correctly
Scuffing aims to dull gloss and improve mechanical key without removing substantial material. Identify when scuffing is preferred over stripping, noting which paints respond well to this prep and which may require additional steps.
Choose abrasives carefully, starting with milder pads and progressing as needed while avoiding deep scratches. Use proper pressure and even coverage, and decide between dry or damp sanding based on dust control and surface condition. After scuffing, test adhesion with a crosshatch or tape pull and clean the surface thoroughly before priming.
Step-by-Step Process
The following steps guide you through the correct procedure for scuffing surfaces in preparation for plastering. This process ensures optimal adhesion and helps achieve a successful finish.
- Inspect the surface for any damage or contaminants before starting. If necessary, clean and prep the surface accordingly.
- Ensure all necessary tools and safety equipment are available. This includes abrasive pads, sandpaper (if needed), safety glasses, gloves, and dust mask.
- If the surface is glossy or high-gloss paint, start with a milder abrasive pad to avoid over-sanding. Progress to coarser pads as needed.
- Using firm, even pressure, work the pad in small circular motions across the entire surface. Maintain a consistent motion and overlap each pass slightly to ensure full coverage.
- After scuffing, inspect the surface for any damage or over-sanded areas. If necessary, repair or re-prep the affected zones before proceeding with plastering.
Scuffing techniques for different paint types
To create an optimal keyed surface for adhesion, select the appropriate abrasive and method based on the paint type.
Low-gloss or flat paint: Use medium-grit non-woven abrasive pads to dull the gloss without exposing the substrate. Work in small circular motions with firm, even pressure.
High-gloss paint: Begin with fine-grit sanding sponges, progressing to coarser pads if needed. This helps prevent over-sanding and maintains a suitable surface for plaster adhesion. Test your technique on a small, hidden area first.
If the surface becomes over-sanded or damaged during scuffing, stop immediately and assess for repair or additional prep before proceeding.
Preparation steps after scuffing (cleaning, dust removal)
Thoroughly cleaning the surface after scuffing is crucial for optimal plaster adhesion. Follow these steps to ensure a contaminant-free surface.
First, use a tack cloth, breathable dust-free wipe, or vacuum to remove any visible dust from the surface. Ensure no residual particles remain that could hinder adhesion.
If grease or oil contaminants are present, use an appropriate degreasing agent to clean the surface. Allow sufficient drying time before applying bonding primer or plaster to prevent introducing new contaminants into the system.
Before priming, perform a wipe test or crosshatch adhesion test to ensure the surface is ready for plastering. If the surface becomes contaminated during cleaning, re-scuff and clean the area again.
When to Strip Paint Completely
Identify clear failure modes that necessitate stripping, such as loose or chalking coatings, lead-containing finishes, or multiple incompatible layers. Perform quick adhesion checks to determine if stripping is warranted and consider how substrate type affects the decision.
Assess health and safety thresholds, including lead-paint concerns, and follow appropriate containment and disposal practices. Outline adhesion and long-term performance criteria to justify stripping or opting for alternatives, and provide a simple cost-benefit view to guide the decision. Document the plan, test results, and expected timeline to keep the project on track.
Indicators that Stripping is Necessary
Before proceeding with any plastering work, it’s crucial to assess the condition of the existing surface. Several signs indicate that complete paint removal is required:
Extensive flaking or peeling suggests poor adhesion and potential substrate damage.
Presence of multiple successive coatings, especially if they are incompatible, can lead to delamination and weak plaster bond.
Contamination with silicone or wax can prevent proper adhesion. Similarly, unresolved moisture damage may compromise the substrate’s integrity and plaster’s long-term performance.
Stripping Methods and Safety Precautions
To ensure a safe and effective stripping process, consider the following methods and safety measures:
Mechanical stripping, using tools like scrapers or sandblasters, is suitable for hard-to-remove paints. Chemical strippers are useful for softer paints but require proper ventilation and handling precautions.
Thermal stripping uses heat to soften paint for removal. Always test a small area first to ensure the method works effectively and safely.
Before starting, test for hazardous layers like lead using appropriate testing kits. If present, use containment, proper PPE (personal protective equipment), ventilation, and follow regulatory guidelines for waste disposal.
Ensuring Proper Bonding Between Plaster and Paint
Explore primer and bonding-agent options compatible with common paints and explain when bonding agents are essential. Clarify how primers improve keying and initial adhesion on painted substrates.
Detail the recommended application sequence: clean and repair the surface, roughen glossy paint, apply bonding primer, and then plaster or skim coat with appropriate drying windows. Include moisture and temperature considerations, testing for sublayer moisture and avoiding work on damp or freezing surfaces. Remain aware of datasheet guidance for compatibility, cure times, and recoat windows, and perform adhesion tests to verify bonding before proceeding.
Primers, Bonding Agents, and Compatible Systems
To ensure proper adhesion of plaster over painted surfaces, using the right primer or bonding agent is crucial. These products help create a strong bond between the paint and plaster, preventing delamination.
Selecting the right product depends on the type of existing paint:
- For latex/acrylic paints, use a latex/acrylic primer or bonding agent to maintain compatibility.
- For oil-based paints, consider an oil-based primer or bonding agent. However, ensure it’s compatible with the plaster formulation you’ll be using.
- For epoxy paints, consult product datasheets for recommended primers or bonding agents.
Pro tip: Always check product datasheets to verify compatibility with your existing paint and plaster formulation.
Application Tips to Maximize Adhesion
Applying plaster over painted surfaces requires careful technique to ensure optimal adhesion. Here are some practical tips:
Apply thin, even coats. This helps prevent excessive material buildup and reduces the risk of bond failures.
Avoid overworking or applying excessive material. Overworking can compromise the integrity of the paint film and lead to adhesion issues.
Follow mixing instructions on product labels and allow proper dry times between coats. This ensures that each layer has adequate time to cure before the next is applied, promoting better adhesion.
Use a bonding primer or agent when applying plaster directly to a painted surface. For previously plastered surfaces, lightly sand, clean, and apply a new coat of primer before plastering.
Common Mistakes, Troubleshooting, and Maintenance
Stake is skipping surface cleaning, which allows oils and contaminants to compromise adhesion, along with common mistakes like inadequate prep, inadequate primer, wrong plaster mix, insufficient cleaning of paints and oils, and neglected moisture tests.
Remedies include thorough cleaning and etching, selecting the right primer or bonding agent, correcting mix and thickness, performing moisture checks before applying plaster, and ensuring surfaces are clean and free of loose material. If contamination is detected, re-clean and dry the surface before proceeding. Quick cue: a damp cloth swipe will reveal residual dirt or grease; if the surface still feels tacky after wiping, clean again and let dry before proceeding.
Why this matters: proper prep and early monitoring prevent delamination and long repair work, saving time and materials on future projects.
For DIY readers, set a maintenance plan with pre-application checks, regular inspections, and simple repair tactics for small delamination or hairline cracks, plus a clear path for patching vs resurfacing based on findings.
Common errors to avoid and how to fix them
To ensure successful plaster adhesion, avoid these common mistakes:
- Inadequate surface prep: Leads to poor bonding. Solution: Thoroughly clean, degloss, and prime surfaces.
- Skipping or wrong primer: Affects adhesion. Solution: Use a compatible primer for your paint type.
- Improper plaster mix/aggregate: Can cause cracking or delamination. Solution: Follow manufacturer’s guidelines for mixing ratios.
- Insufficient cleaning of paint and oils: Reduces adhesion. Solution: Use appropriate cleaners to remove contaminants.
- Neglecting moisture testing: May lead to efflorescence or delamination. Solution: Test for moisture before application.
- Under- or over-thick application: Can cause cracking or delamination. Solution: Apply plaster in even, recommended layers.
Addressing these issues promptly will help maintain a strong bond between your plaster and the surface.
Long-term maintenance and inspection tips
Regularly inspect your plasterwork to ensure longevity:
- Cracks: Check for hairline cracks. If missed: Can grow larger, leading to more extensive repairs.
- Delamination: Inspect for peeling or lifting. If missed: Can spread and cause major damage.
- Moisture ingress: Look for dampness or efflorescence. If missed: Can lead to structural issues and mold growth.
- Seasonal changes: Inspect during spring and fall. Why: Temperature and humidity fluctuations can affect plaster.
- Quick repairs: Address minor cracks or delamination promptly. How: Use compatible materials to patch small issues.
- Significant damage: Decide between patching and resurfacing. When: Damage is extensive, consider resurfacing for best results.
- Safety checks: Ensure no hazards are present. Why: To prevent accidents during inspection or repair.
Quick rule: Inspect annually and address issues promptly to prolong plaster performance and prevent major repairs.
Conclusion
The core idea is clear: verify adhesion, prep properly, and choose the right approach for safety, durability, and a clean finish. A well-planned path reduces the risk of damage and costly rework while keeping the project on track.
Start with a simple, practical check: perform adhesion tests in a small area, note the results, and then follow a logical sequence—clean and prep the surface, decide whether to scuff or strip based on the test, dampen and prime as needed, mix and apply plaster in thin, workable coats, and monitor curing. If the test shows good bonding, proceed cautiously; if not, adjust your plan or seek guidance before moving ahead.
Avoid common pitfalls such as skipping the tests, over-scrubbing or under-scrubbing the surface, and using incompatible plaster or finishing materials. Always wear appropriate PPE, work in a well-ventilated area, and keep the workspace protected from dust and water damage. Make small, reversible adjustments when unsure, and document results from each test area to inform the next steps.
If uncertainty persists or the substrate shows ongoing issues, consider consulting a professional. When you do proceed, follow the tested sequence, respect safety rules, and stay patient—good adhesion and a solid bond take careful, deliberate steps. You can complete the project with confidence by sticking to the plan and checking results at key points.
FAQ
What adhesion tests should I use to assess plaster over painted surfaces?
Choose simple pull-off or scrape tests to gauge paint bond strength. If the paint peels or the test area shows poor adhesion, plan for more surface preparation or stripping as needed. Always compare test results to manufacturer instructions or local guidelines for best practices.
When is it better to scuff the paint versus stripping it before plastering?
Scuffing is suitable for paints that show good adhesion and little flaking, helping the plaster key without removing the coating. If the paint is soft, peeling, or bonded poorly, stripping or removing problematic layers is safer for a durable plaster bond. Check the paint condition and test results to decide.
What are the proper techniques for applying plaster over different types of paints?
Use a keying or bonding approach appropriate for the paint type—roughen glossy coatings and use an appropriate bonding agent if recommended by the manufacturer. For porous or chalky paints, dampen the surface lightly and apply primer or bonding plaster as directed. Follow the plaster manufacturer instructions for application thickness and curing guidance.
What tools and materials are essential for preparing and plastering over painted walls?
Have a scraper or utility knife, coarse sanding tools, a wire brush, a damp sponge, and protective gear. Use the recommended bonding agent or primer if required, and select plaster mix and trowels suitable for the project. Always ensure the surface is clean, dry, and free of loose material before applying plaster.