
Introduction
Plaster over brick is applying a plaster coat directly onto a brick wall to create a smooth, ready-to-finish surface. The key is good bonding and managing drying so the plaster doesn’t blister. Follow surface prep steps, use the right bonding coat, and monitor moisture as you go.
Clean and dampen the brick surface as needed, then apply a bonding layer per the product you choose. Keep the plaster consistent, don’t let it dry too fast or too slow, and work in workable batches. Always check the manufacturer’s instructions and local rules to confirm prep, materials, and drying times.
Key takeaways
- Inspect brick surfaces for loose mortar, efflorescence, or damp patches before plastering.
- Clean area with brush and water; wear PPE and ventilate to control dust.
- Create a mechanical key by scoring roughening brick face and prepared plaster base.
- Use compatible bonding agents and primers per label; avoid incompatible products.
- Control water during mixing and application; avoid sudden moisture changes that trigger blisters.
- Monitor drying environment; protect from drafts, rapid drying, and temperature swings.
Table of Contents
- Introduction
- Key takeaways
- How Blisters Form on Plastered Brick Surfaces
- Inspecting and Assessing the Brick Substrate
- Preparing Brick: Cleaning, Repair, and Creating a Mechanical Key
- Bonding Agents, Primers, and Compatibility
- Plaster Mix Design, Additives and Water Control
- Application Techniques to Prevent Blisters
- Drying and Curing Control: Environmental and Moisture Management
- Testing, Inspection, Troubleshooting and Repairs
- Conclusion
- FAQ
How Blisters Form on Plastered Brick Surfaces
Brick walls present unique challenges when plastered, so you need to understand why blisters appear. Delamination, trapped moisture, and vapor pressure can separate plaster from brick over time. Salts migrating with moisture also contribute to surface defects on masonry substrates.
The brick itself is a high-risk surface due to porosity and inconsistent moisture behavior. Different brick mixes and mortar joints can create uneven drying and stress. Recognizing these mechanisms helps you head off blister formation before it starts.
Vapor drive and trapped moisture
The main culprit behind blisters on plastered brick surfaces is the movement of moisture. Brick, being porous, absorbs water from the ground or the atmosphere.
As the wall dries, this moisture wants to escape. If the plaster layer isn’t permeable enough, it traps the vapor beneath it, creating internal pressure.
Imagine a balloon filled with steam. As the steam tries to expand, it pushes against the walls of the balloon – much like how trapped moisture pushes against the plaster layer.
This pressure builds up over time and eventually causes the plaster to delaminate or blister.
Poor bond versus cohesive failure
Blisters can form due to two main reasons: a weak bond between the brick and plaster, or a failure within the plaster itself.
Poor bond happens when the plaster doesn’t stick well to the brick. This could be due to contaminants on the brick surface, insufficient suction, or using the wrong plaster mix.
In cohesive failure, the problem lies within the plaster layer itself. It might not have been mixed properly, or it could be too thick, causing it to dry too quickly and crack under stress.
Understanding which type of failure you’re dealing with is crucial. A poor bond needs better surface preparation and possibly a different plaster mix. Cohesive failures require adjusting the application process or the plaster itself.
Role of salts and efflorescence
Soluble salts naturally present in brick can also contribute to blistering. When moisture moves through the brick, it carries these salts along.
As the water evaporates, the salts are left behind and crystallize. These salt crystals are what we see as efflorescence on the surface of walls.
However, if some salts remain trapped beneath the plaster layer, they can disrupt the bond between the brick and plaster as they crystalize, causing blisters.
To prevent this, it’s important to control moisture movement in the wall and ensure proper ventilation to allow any efflorescence to escape harmlessly.
Inspecting and Assessing the Brick Substrate
Start with a careful visual survey of the wall: look for obvious cracks, loose bricks, or deteriorated mortar. Listen for hollow sounds when you tap suspect areas. These signs point to possible structural issues that must be addressed before plastering.
Check for moisture indicators, staining, and any previous coatings. Confirm there is no active leak and assess surface cleanliness. Document any contamination that could hinder adhesion, and plan treatment accordingly.
Visual and Tactile Inspection
Before you start plastering, give your brick substrate a thorough once-over. This checklist helps you spot issues that could cause problems later.
- Loose mortar: Tap bricks with a handle. If it sounds hollow or crumbles, replace the mortar.
- Flaking bricks: Look for pieces breaking off. If found, remove and replace the brick.
- Previous coatings: Check for old paint, render, or other coatings. Remove any before plastering.
- Soft or powdery surfaces: These indicate damaged bricks. Replace them to prevent failure under plaster.
- Cracking: Note hairline and wider cracks. Some may need repair before plastering.
- Bulging bricks: These could be signs of moisture damage or movement. Investigate further if found.
- Inconsistent brick size: This can affect bonding. Consider shimming smaller bricks to ensure a flat surface.
- Uneven surfaces: High spots and hollows can show up under plaster. Level them out before starting.
Quick rule: If in doubt, get professional advice. Better safe than sorry.
Moisture and Salt Testing
Excess moisture and salts can cause blisters and other issues. Test your bricks to avoid surprises.
Moisture: Use a non-invasive moisture meter. Follow manufacturer’s guidelines for interpretation. If readings are high, consider improving ventilation or waterproofing before plastering.
Salt: Apply a small piece of plastic sheet or adhesive patch to the wall. Leave it for 24 hours, then check for salt crystals. If present, treat with a suitable salt inhibitor before plastering.
Note: Always follow manufacturer’s instructions or relevant standards when interpreting test results.
Structural and Thermal Considerations
Check for signs of movement and historic thermal bridging to ensure your plaster stays put.
Movement cracks: These can reopen under plaster, causing blisters. If found, consider using a flexible plaster or reinforcing the wall before plastering.
Thermal bridging: Historic bridges can cause localized heating and cooling, leading to moisture issues. Identify them and consider improving insulation before plastering.
Plaster choice: Based on your findings, choose a suitable plaster. For example, use flexible plasters for areas with movement or high salt content.
Preparing Brick: Cleaning, Repair, and Creating a Mechanical Key
Clean the brick surface to remove dust, efflorescence, oils, and loose particles. Use tools and cleaners appropriate for masonry and follow label directions. A clean base helps plaster bond properly.
Repoint as needed to restore sound mortar joints and fill cracks that could telegraph through the plaster. Create a mechanical key by roughening the face of the brick and mortar without damaging the substrate. Follow manufacturer or product instructions for any surface roughening limits.
Cleaning and contaminant removal
Start by removing any loose material, dirt, or debris from the brick surface using a stiff-bristle brush. For tougher contaminants, use a low-pressure washer with a wide-angle nozzle to avoid damaging the bricks.
Never power wash at high pressure as it can erode the sand and lime in the mortar joints.
For stubborn stains or efflorescence, use a chemical cleaner specifically designed for masonry. Always follow the manufacturer’s instructions and wear appropriate safety gear.
After cleaning, rinse thoroughly with clean water and allow the surface to dry completely before applying plaster.
Repairing mortar joints and damaged bricks
Inspect all mortar joints for cracks or missing material. Use a tuckpointing tool to rake out loose or damaged mortar, creating a V-shaped groove.
Mix fresh mortar according to the manufacturer’s instructions and fill the grooves, pressing it firmly into place with a trowel. Allow it to cure as directed.
For spalled bricks, remove any loose material using a chisel and hammer. If the damage is extensive, replace the brick entirely, ensuring a firm fit in the opening.
Always ensure that the substrate is solid and free from delamination to prevent plaster failure.
Creating and verifying mechanical keys
The key purpose of a mechanical key is to increase the surface area for better adhesion. For brick, this can be achieved by scratching or scoring the surface with a stiff-bristle brush or a masonry scratch tool.
Another method is to apply a thin layer of plaster as a scratch coat, allowing it to set but not harden completely before applying the final coat. This creates microscopic keys for better adhesion.
If you’re using wire lath, ensure it’s securely attached to the brick surface with masonry screws or nails. Raking mortar joints also creates mechanical keys; use a joint rake tool to create grooves in the mortar.
To verify adequate keying, perform a simple visual and physical check. The surface should have a slightly rough texture, and when you press gently on it, there should be no give or movement.
Bonding Agents, Primers, and Compatibility
Compare common bonding aids and primers that suit brick and plaster types. Some products are designed to enhance adhesion on masonry and can reduce blister risk if used correctly. Read label directions for substrate compatibility and cure conditions.
Consider how brick face conditions, existing coatings, and plaster choice interact with bonding products. Use the guidance from the product label, manufacturer instructions, and local code or rule requirements to make a safe selection.
Types of bonding agents and when to use them
Bonding agents help plaster stick to brick. Here’s what you need to know:
Cementitious primers are cheap, easy to apply, but can crack if not used right. Use on smooth surfaces with good suction.
Polymer-modified bonding agents are more flexible, resist cracking, and work well on rough or damaged brick. They’re pricier though.
Proprietary adhesion promoters are high-tech, expensive, but give the best bond for tricky jobs like plastering over old, smooth bricks with no key.
Compatibility and surface preparation for primers
Follow these rules to get the best out of your primer:
Check compatibility charts. Some primers don’t play nice with certain brick types or plasters. Always check first.
Pre-dampen or prime before applying plaster. This helps the primer stick and prevents it from drying too fast, which can cause blisters.
Avoid incompatible residues. No paint, oil, or grease on your bricks – they’ll stop the primer sticking.
Application rates and verification
Apply bonding agents right to get a strong bond:
Follow manufacturer’s guidance. They know best how much to use and how to apply it.
Check tackiness. The surface should feel slightly sticky – this means the primer’s working. Too dry? Apply more.
Ensure even coverage. No bare spots or puddles. A uniform layer gives a strong, even bond.

Plaster Mix Design, Additives and Water Control
Explain how plaster composition influences adhesion, shrinkage, and blister risk on brick. The choice of cement, lime content, and aggregate grading affects performance and workability. Balance these factors with site conditions and repair goals.
Admixtures and water control strategies can help manage setting and moisture movement. Check product data sheets or manufacturer instructions for recommended ranges and compatibility with masonry substrates.
Choosing the right plaster for brick
When it comes to plastering over brick, you’ve got options. But each has its own strengths and weaknesses.
Lime plasters are great for old bricks. They’re breathable, meaning they let moisture pass through. But they take longer to set and aren’t as strong as cement-based plasters.
Cement-lime plasters combine the best of both worlds. They’re stronger than lime plasters and quicker to set. But they’re not as breathable, so use them on internal walls where moisture isn’t an issue.
For new bricks or areas prone to damp, consider gypsum plaster. It’s strong, sets quickly, and resists mold. But it doesn’t like moisture, so keep it away from external walls and areas with high humidity.
Admixtures and modifiers
Admixtures are additives that change how your plaster behaves. Use them wisely.
Retarding agents slow down setting time, giving you more working time. Great for hot days or large areas.
Plasticizers make your mix more flexible and easier to apply. But too much can weaken the bond, so follow manufacturer guidelines.
Polymers like PVA can improve bond strength and water resistance. But again, don’t overdo it. Too much can cause blistering.
Water content and mixing best practices
The key to a good plaster mix is getting the water right. Too little, your mix won’t stick. Too much, it’ll be weak and prone to blistering.
Follow your plaster’s mixing chart. It’ll tell you how much water to add per bag. Don’t guess, don’t estimate – measure.
Mix thoroughly. Any dry lumps left will weaken the bond and could cause blisters later on. Use a drill with a paddle attachment for best results.
And remember, once mixed, use your plaster quickly. It starts to set as soon as you add water.
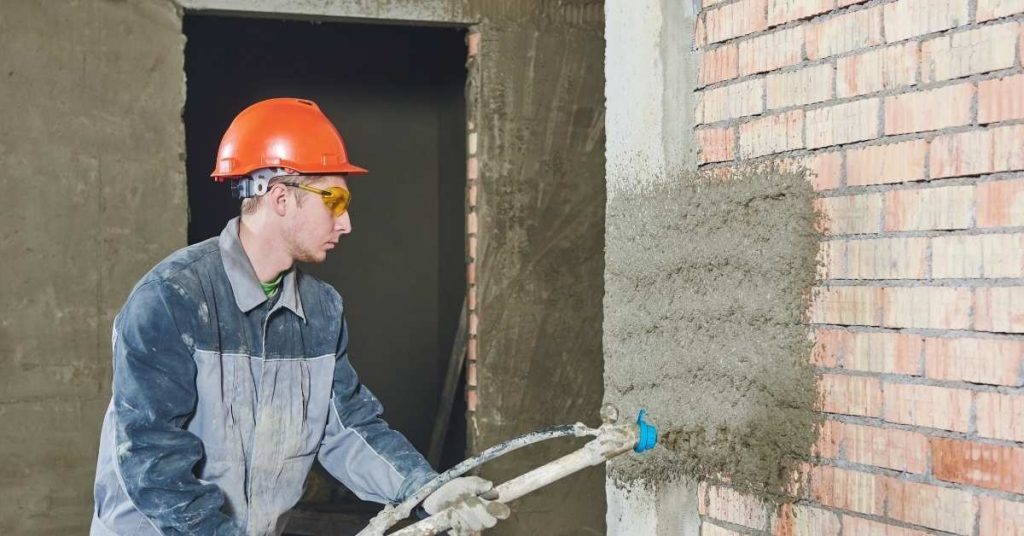
Application Techniques to Prevent Blisters
Outline best-practice sequences: scratching the coat, applying combined first layers, and achieving uniform thickness. Edge detailing and careful tooling reduce stress concentrations that invite blistering. Work in workable segments to maintain consistent moisture loss.
Limit wet-on-wet transitions and avoid over-tetting a single area. Follow site-specific guidance and verify with the product label or manufacturer instructions to ensure your technique aligns with material requirements.
Scratch and Key Coats: Sequencing and Thickness Control
The first two coats of plaster applied over brick are called scratch and key coats. Their purpose is to create a mechanical bond between the brick and the final plaster layer.
Start by applying a thin scratch coat, about 1/8 inch thick, using a hawk and trowel. The goal is to fill the voids in the brick surface without leaving an overly thick layer that could trap moisture.
After the scratch coat has set but not dried completely (usually after 20-30 minutes), apply the key coat. This should be slightly thicker, around 1/4 inch. Use a comb or lizard trowel to create grooves in the wet plaster, increasing its surface area and enhancing bonding.
Remember, controlling thickness is crucial. Too thick, and moisture can get trapped, leading to blisters. Too thin, and you won’t achieve a strong bond.
Troweling, Compaction and Surface Finish
After the key coat has set, it’s time to apply the final plaster layer. Start by troweling on a thin layer of plaster, around 1/8 inch thick.
Use a steel trowel to compact the plaster, pushing it firmly into the grooves created in the key coat. This helps remove air pockets and ensures good bonding.
Once the plaster starts to set, use a wooden or magnesium float to smooth out the surface. Work quickly but gently to avoid leaving weak skin layers that can blister later on.
Finally, use a steel trowel to give the surface its final finish. Work in small sections, using long, smooth strokes to achieve a uniform, smooth appearance.
Joint Detailing and Interfaces
Controlling joints is crucial to prevent stress concentrations that can initiate blisters. Before applying the final plaster layer, install control and movement joints using jointing tools or strips.
Control joints should be spaced around 10-15 feet apart and cut into the surface about 1/4 inch deep. They help control cracking by providing a weak plane where the plaster can crack first under stress.
Movement joints are wider, usually 3/8 to 1/2 inch wide, and should be installed at intervals of 20-30 feet or more, depending on the building’s movement. They allow for expansion and contraction due to temperature changes.
At openings like windows and doors, use transition strips to create a smooth interface between the plaster and the adjacent surface. This helps prevent stress concentrations that can lead to blisters at these critical points.
Drying and Curing Control: Environmental and Moisture Management
Describe how temperature, humidity, wind, and sun exposure influence plaster drying on brick. Rapid drying can create tensile stresses that lead to blisters and cracks. Plan your work around favorable environmental conditions when possible.
Assess internal moisture sources that can drive slow or uneven drying. Implement controls such as shading, ventilation, and dewpoint considerations. Refer to product instructions and local rules for recommended curing practices.
Managing Ambient Conditions
Plaster needs a gentle, steady drying process. Too fast, it blisters. Too slow, it stays wet and weakens.
Shade your work from direct sun to keep temperatures down. A simple tarp or even a large sheet can do the trick.
Use windbreaks – temporary walls of plywood or cardboard – to protect your plaster from wind, which dries it too fast.
Follow product curing guidance for heating and ventilation. Some plasters need warmth to cure right; others dry best in cool air.
Internal Moisture Sources and Building Drying Strategy
Before you plaster, fix any leaks. Water in the walls means trouble for your plaster.
If you’ve had rain, let the bricks dry out first. Plastering wet brick is a recipe for blisters.
Rising damp? Get that under control before you start. Your plasterer can advise on damp-proof courses and other solutions.
Plan your work so you’re not rushing. Let each coat dry properly before moving on to the next.
Monitoring and Stopping Work When Conditions Are Unsuitable
Keep an eye on your plaster. If it’s drying too fast, you’ll see a powdery surface or cracks.
The sheen of the surface can tell you a lot. A dull, matte finish means it’s drying right. A glossy sheen says it’s drying too fast and might blister.
Feel the surface. If it’s warm to touch, that could mean it’s drying too fast. Stop work until conditions improve.
If you see any signs of trouble, stop work. Protect your plaster with damp cloths or plastic sheeting and wait for better conditions.
Testing, Inspection, Troubleshooting and Repairs
Explain in-process checks you should perform while the plaster is setting. Early signs of debonding, dampness, or blisters require prompt evaluation. Document findings to guide repairs.
When blisters or delamination appear, outline repair options that minimize recurrence. Use recommended repair procedures from the product label, manufacturer instructions, or local code guidance, and re-inspect after repairs to confirm stability.
In-process checks and early detection
Inspect your work regularly to catch any issues early. Here’s a checklist to help you.
- Pinholes: Small holes indicate poor bonding. Check for them using a bright light.
- Soft spots: Gently press the surface with your finger or use a small trowel to feel for soft areas.
- Hollow sounds: Tap the surface with a wooden stick. A dull sound indicates poor adhesion.
- Tap test: Gently tap the surface with a hammer. A hollow sound means there’s an issue underneath.
- Small core test: Drill a small hole to check for proper bonding and compaction.
- Check corners: Blisters often start at corners or edges due to uneven application.
- Monitor drying: Ensure the plaster is drying evenly. Check for any wet spots that might cause blistering.
- Inspect joints: Make sure joints are properly filled and compacted to prevent blisters from forming there.
Quick rule: Inspect daily during the first week, then weekly until fully cured.
Repairing blisters and failed areas
If you find blisters or failed areas, follow this repair method to fix them.
- Remove loose plaster: Carefully scrape off any loose plaster using a trowel. Be sure not to damage the substrate.
- Assess damage: Determine if the issue is localized or if full removal is needed.
- Treat substrate: If necessary, treat the brick with a primer or other appropriate treatment to improve adhesion.
- Reapply plaster: Apply a new layer of plaster using the correct application techniques mentioned earlier.
- Monitor drying: Keep an eye on the repaired area to ensure it dries properly and doesn’t blister again.
Quick rule: If blisters are large or widespread, consider full removal and reapplication of plaster.
Documenting and preventing recurrence
Keep records to identify root causes and prevent future issues. Here’s what to document:
- Conditions: Note the temperature, humidity, and other environmental conditions during application and curing.
- Materials: Record the plaster mix design, additives, and any admixtures used.
- Corrective steps: Document what was done to fix any issues that arose.
- Lessons learned: Note any changes made to prep, material selection, or drying control based on troubleshooting.
Quick rule: Regularly review your records to identify trends and adjust your processes accordingly.
Conclusion
Bonding and drying control are the core factors that prevent blisters and keep brickwork looking right and lasting. When you follow solid prep, compatible materials, quiet drying, and careful testing, you build a plaster system that won’t fail after a few seasons or a cold snap.
Check the plan step by step: inspect the brick substrate for soundness, clean and repair as needed to create a good mechanical key, confirm the bonding agents and primers are compatible with your plaster, design the right mix, manage water and additives, apply in controlled coats, and monitor drying with surface and ambient conditions. Do each task in order, test small areas first, and document results so you can adjust before tackling the full surface.
Common mistakes to avoid include skipping substrate prep or mechanical key creation, using incompatible bonding materials, over-wetting the plaster or the wall, and rushing drying or curing under unsuitable conditions. Always follow safe habits: wear eye protection and a dust mask, keep humidity and temperature in the target range, and ventilate the area well. If something feels off, pause, re-check your test area, and don’t force the cure.
When in doubt about substrate condition, bond compatibility, or unusual moisture patterns, call a professional before proceeding. A trained pro can confirm the base, select the right materials, and verify cure strategies so you don’t end up with costly repairs. With careful steps and practical checks, you’ll finish with a durable, blister-free surface you can trust. Stay deliberate, stay safe, and you’ll get a solid result.
FAQ
What signs tell me plaster might blister after application on brick?
Look for pimples, pinholes, or raised bumps under the plaster. If the surface dries too quickly or feels tacky in spots, that can also indicate trouble. Track any cracking that appears soon after finishing, not just after weeks.
How can I improve suction and ensure the plaster bonds well to brick?
Clean the brick thoroughly and remove loose dust. Create a mechanical key with light scoring or brushing, and use a bonding agent approved for plaster over brick as directed by the label. If you’re unsure about compatibility, check the manufacturer’s instructions or product datasheet.
What environmental conditions should I control during plastering and curing?
Avoid very hot, cold, or windy conditions that can dry plaster too fast. Keep surfaces shaded and mist or misting is sometimes recommended only if the product allows it. Refer to the product label for allowable drying conditions and any required curing practices.
How do I inspect and fix blisters without compromising the wall?
Wait for the plaster to be within its safe working window before touching. If blisters form, carefully score and cut them out, then reapply plaster in the affected area using the same bonding approach. Always verify local guidelines and follow manufacturer instructions for touch-ups.